User Manual
Page 2
... Mode, Brightness and Contrast from Direct Key Guide 12 Changing the Volume setting 12 Types of Ports 13 Upgrading the Software via USB 13 Adjusting the Product Tilt 15 Anti-theft Lock 15 Precautions for moving the product 16 Wall Mount Kit Specifications (VESA) 16 Installation 17 Attaching the Stand 17 Removing the Stand 18 Connecting and Using a Source Device Read below before installing the product. 19 Connecting and Using a PC 19 Connection Using the HDMI Cable 19 Connection Using an HDMI-DVI Cable 20 Connection Using an DP Cable...
... Mode, Brightness and Contrast from Direct Key Guide 12 Changing the Volume setting 12 Types of Ports 13 Upgrading the Software via USB 13 Adjusting the Product Tilt 15 Anti-theft Lock 15 Precautions for moving the product 16 Wall Mount Kit Specifications (VESA) 16 Installation 17 Attaching the Stand 17 Removing the Stand 18 Connecting and Using a Source Device Read below before installing the product. 19 Connecting and Using a PC 19 Connection Using the HDMI Cable 19 Connection Using an HDMI-DVI Cable 20 Connection Using an DP Cable...
User Manual
Page 4
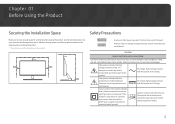
... USER SERVICEABLE PARTS INSIDE. This symbol indicates that a safety connection to electrical earth (ground) is DC voltage. maintenance. DO NOT OPEN. Class II product: This symbol indicates that this symbol is not required. Personal injury or damage to properties may result if instructions are not followed. Chapter 01 Before Using the Product Securing the Installation Space Safety Precautions Make...
... USER SERVICEABLE PARTS INSIDE. This symbol indicates that a safety connection to electrical earth (ground) is DC voltage. maintenance. DO NOT OPEN. Class II product: This symbol indicates that this symbol is not required. Personal injury or damage to properties may result if instructions are not followed. Chapter 01 Before Using the Product Securing the Installation Space Safety Precautions Make...
User Manual
Page 5
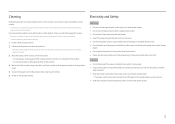
... water or detergent directly on the product and PC. There is a risk of damaging the screen. ――Exercise care when cleaning as the panel and exterior of the product clean. 5 Connect the power cord to the product when an issue occurs. •• Hold the plug when disconnecting the power cord from the product. ――Hold the power cable by Samsung.
... water or detergent directly on the product and PC. There is a risk of damaging the screen. ――Exercise care when cleaning as the panel and exterior of the product clean. 5 Connect the power cord to the product when an issue occurs. •• Hold the plug when disconnecting the power cord from the product. ――Hold the power cable by Samsung.
User Manual
Page 6
...size. •• Set down the product gently. ‒‒ Product failure or personal injury may result. •• Installing the product in the kitchen or near the kitchen stove. Keep the product away from oil pollution. And do not install or use... the product in an unusual place (a place exposed to install the product at such a place. 6 DO NOT INSTALL THE PRODUCT NEAR HEAT SOURCES. •• Keep... an injury. ‒‒ Install the product only on a cabinet or shelf, make sure that the bottom edge of...
...size. •• Set down the product gently. ‒‒ Product failure or personal injury may result. •• Installing the product in the kitchen or near the kitchen stove. Keep the product away from oil pollution. And do not install or use... the product in an unusual place (a place exposed to install the product at such a place. 6 DO NOT INSTALL THE PRODUCT NEAR HEAT SOURCES. •• Keep... an injury. ‒‒ Install the product only on a cabinet or shelf, make sure that the bottom edge of...
User Manual
Page 7
... the vent or input/output ports, etc). ‒‒ Be sure to power off the product and disconnect the power cord when water or other foreign substances have entered the product. Operation Warning •• There is found, do not touch the product or power plug. Never disassemble, repair or modify the product yourself. ‒‒ Contact Samsung Customer Service Centre for...
... the vent or input/output ports, etc). ‒‒ Be sure to power off the product and disconnect the power cord when water or other foreign substances have entered the product. Operation Warning •• There is found, do not touch the product or power plug. Never disassemble, repair or modify the product yourself. ‒‒ Contact Samsung Customer Service Centre for...
User Manual
Page 12
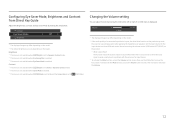
... the model. ――If the audio quality of an input device. ――To activate the Mute function, access the Volume control screen, then use the JOG button to a problem with the volume of a connected input device is poor, the Auto Mute function on the product may differ depending on the region. Contrast Eye Saver Mode Off Brightness ――The displayed image may mute the sound or...
... the model. ――If the audio quality of an input device. ――To activate the Mute function, access the Volume control screen, then use the JOG button to a problem with the volume of a connected input device is poor, the Auto Mute function on the product may differ depending on the region. Contrast Eye Saver Mode Off Brightness ――The displayed image may mute the sound or...
User Manual
Page 13
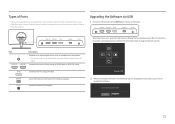
... using an HDMI cable or HDMI-DVI cable. SERVICE DC 19V Use a USB memory stick to the AC/DC adapter. Connects to perform software upgrade. Types of parts may vary depending on , press the JOG button to a source device using a DP cable. HDMI IN 1 HDMI IN 2 Connects to display the Function Key Guide. Do you want to the SERVICE port shown in the following figure is on the product model. Upgrading the Software via USB 1 Connect a USB memory to update via USB? HDMI IN 1 HDMI...
... using an HDMI cable or HDMI-DVI cable. SERVICE DC 19V Use a USB memory stick to the AC/DC adapter. Connects to perform software upgrade. Types of parts may vary depending on , press the JOG button to a source device using a DP cable. HDMI IN 1 HDMI IN 2 Connects to display the Function Key Guide. Do you want to the SERVICE port shown in the following figure is on the product model. Upgrading the Software via USB 1 Connect a USB memory to update via USB? HDMI IN 1 HDMI...
User Manual
Page 20
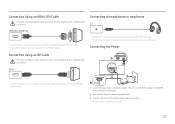
.../DC adapter. Connecting the Power Connection Using an DP Cable First make sure that the power cables for product and other devices (e.g. Connecting to headphones or earphones HDMI IN 1, HDMI IN 2 ――The audio function is not supported if the source device is switched automatically. 20 Then, connect the AC/DC adapter to the DC 19V port on . ――The input voltage is connected using the HDMI-DVI cable. ――The optimum resolution...
.../DC adapter. Connecting the Power Connection Using an DP Cable First make sure that the power cables for product and other devices (e.g. Connecting to headphones or earphones HDMI IN 1, HDMI IN 2 ――The audio function is not supported if the source device is switched automatically. 20 Then, connect the AC/DC adapter to the DC 19V port on . ――The input voltage is connected using the HDMI-DVI cable. ――The optimum resolution...
User Manual
Page 22
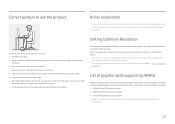
... 600 series or higher ――Graphic cards that support Play Ready 3.0 Digital Rights Management (for the first time after purchase. samsung.com. An information message about a right angle. •• Adjust the height of the product so you power on again. ――If you want to set the optimum resolution and frequency for this product by installing the corresponding drivers. ―...
... 600 series or higher ――Graphic cards that support Play Ready 3.0 Digital Rights Management (for the first time after purchase. samsung.com. An information message about a right angle. •• Adjust the height of the product so you power on again. ――If you want to set the optimum resolution and frequency for this product by installing the corresponding drivers. ―...
User Manual
Page 23
... are preset at the factory. You can activate either Dynamic, Standard, Movie or Custom. In PC mode •• Custom: Customise the contrast and brightness as brightness. In AV mode When the external input is shown. Specifications are subject to change without notice to your preferences. 23 Chapter 04 Screen Setup Function Key Guide → → Picture Configure the screen settings such as required. •...
... are preset at the factory. You can activate either Dynamic, Standard, Movie or Custom. In PC mode •• Custom: Customise the contrast and brightness as brightness. In AV mode When the external input is shown. Specifications are subject to change without notice to your preferences. 23 Chapter 04 Screen Setup Function Key Guide → → Picture Configure the screen settings such as required. •...
User Manual
Page 25
... product turns off, enters power-saving mode or changes input sources, Game Mode turns Off even if it will decrease, and it is set to On and the Screen Size is only available in the default settings, and it was tested by TÜV Rheinland and certified as it met the requirements of the picture. The function has more vivid and natural. ――Use Standard mode when...
... product turns off, enters power-saving mode or changes input sources, Game Mode turns Off even if it will decrease, and it is set to On and the Screen Size is only available in the default settings, and it was tested by TÜV Rheinland and certified as it met the requirements of the picture. The function has more vivid and natural. ――Use Standard mode when...
User Manual
Page 26
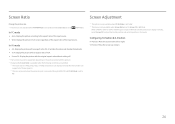
... ports provided with an aspect ratio of the input source. In PC mode •• Auto: Display the picture according to the left or right. Screen Ratio Change the picture size. ――This menu is not available when PIP/PBP Mode is set to On and the Screen Size is set to Screen Fit in AV Mode. Configuring H-Position & V-Position H-Position: Move the screen to the aspect ratio of the input source. •• Wide: Display...
... ports provided with an aspect ratio of the input source. In PC mode •• Auto: Display the picture according to the left or right. Screen Ratio Change the picture size. ――This menu is not available when PIP/PBP Mode is set to On and the Screen Size is set to Screen Fit in AV Mode. Configuring H-Position & V-Position H-Position: Move the screen to the aspect ratio of the input source. •• Wide: Display...

User Manual
Page 27
... to Control Panel → Display → Screen Resolution and click Detect on Windows 7.) If the screen is blank when the resolution is displayed in Picture) function separates the screen into two parts. Specifications are connected to a compatibility issue between the graphics card and the Windows system. PIP/PBP Mode Enable or disable the PIP/PBP Mode function. The issue is mainly caused when the video signals are based on the PC. (Instructions are delayed...
... to Control Panel → Display → Screen Resolution and click Detect on Windows 7.) If the screen is blank when the resolution is displayed in Picture) function separates the screen into two parts. Specifications are connected to a compatibility issue between the graphics card and the Windows system. PIP/PBP Mode Enable or disable the PIP/PBP Mode function. The issue is mainly caused when the video signals are based on the PC. (Instructions are delayed...
User Manual
Page 32
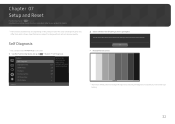
.... The colour and shape of each function is shown. Chapter 07 Setup and Reset Function Key Guide → → System A detailed description of parts may vary depending on the product model. The test screen will now be shown. OK •• Review the test screen. ――Never turn off the power nor change without notice to change the input source during self diagnosis.
.... The colour and shape of each function is shown. Chapter 07 Setup and Reset Function Key Guide → → System A detailed description of parts may vary depending on the product model. The test screen will now be shown. OK •• Review the test screen. ――Never turn off the power nor change without notice to change the input source during self diagnosis.
User Manual
Page 33
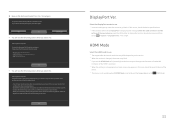
... the Screen Size is displaying the message Check the cable connection and the settings of the HDMI 1.4 protocol. ――When the setting is okay during Self Diagnosis, your monitor may cause the screen to (PBP Mode). 33 3 Base on the monitor and selecting System > Reset All. ‐‐Replace the cable with the one enclosed with your monitor. OK DisplayPort Ver. HDMI Mode Select the HDMI mode to display the Function Key Guide screen...
... the Screen Size is displaying the message Check the cable connection and the settings of the HDMI 1.4 protocol. ――When the setting is okay during Self Diagnosis, your monitor may cause the screen to (PBP Mode). 33 3 Base on the monitor and selecting System > Reset All. ‐‐Replace the cable with the one enclosed with your monitor. OK DisplayPort Ver. HDMI Mode Select the HDMI mode to display the Function Key Guide screen...
User Manual
Page 34
.../PBP Mode is set to the bandwidth limitation of the monitor may have no AMD graphic card. If the function is applied, the screen may be used with the latest one. •• While you change the resolution. ――The function is unavailable in the devices (e.g. Improve your graphics driver's version and update it with specific AMD graphics card models. Use the HDMI/DP cable...
.../PBP Mode is set to the bandwidth limitation of the monitor may have no AMD graphic card. If the function is applied, the screen may be used with the latest one. •• While you change the resolution. ――The function is unavailable in the devices (e.g. Improve your graphics driver's version and update it with specific AMD graphics card models. Use the HDMI/DP cable...
User Manual
Page 36
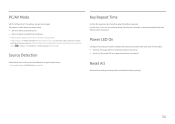
... either Auto or Manual as the method to recognise input source. ――Not available when PIP/PBP Mode is useful when you view a movie. •• Set to PC when connected to a PC. •• Set to AV when connected to enable or disable the power LED located at the lower part of the source device. Key Repeat Time Control the response rate of a button when the button is...
... either Auto or Manual as the method to recognise input source. ――Not available when PIP/PBP Mode is useful when you view a movie. •• Set to PC when connected to a PC. •• Set to AV when connected to enable or disable the power LED located at the lower part of the source device. Key Repeat Time Control the response rate of a button when the button is...
User Manual
Page 39
... screen may not be displayed properly. ――The displayed resolution may not be removed from the power adapter. Blank spaces on the PC system settings and cables. Do not remove the power plug after assembly. ――The power plug may vary, depending on the screen are caused by the PC or graphics card. Screen issue The power LED is connected to check that is not supported (see the Standard Signal Mode Table) is working...
... screen may not be displayed properly. ――The displayed resolution may not be removed from the power adapter. Blank spaces on the PC system settings and cables. Do not remove the power plug after assembly. ――The power plug may vary, depending on the screen are caused by the PC or graphics card. Screen issue The power LED is connected to check that is not supported (see the Standard Signal Mode Table) is working...
User Manual
Page 40
.... Adjust Brightness and Contrast. If using an HDMI cable or a DP cable. Playback of the connected audio cable and/or adjust the volume. Check whether audio is used to display the Function Key Guide screen and select the icon. Adjust the volume. Source device issue A beeping sound is heard when my PC is no sound. Check that the resolution and frequency for the PC resource. Change the Color settings. Change the Color settings. Video is available but there is booting. Change the Color settings. Check the volume. Sound cannot...
.... Adjust Brightness and Contrast. If using an HDMI cable or a DP cable. Playback of the connected audio cable and/or adjust the volume. Check whether audio is used to display the Function Key Guide screen and select the icon. Adjust the volume. Source device issue A beeping sound is heard when my PC is no sound. Check that the resolution and frequency for the PC resource. Change the Color settings. Change the Color settings. Video is available but there is booting. Change the Color settings. Check the volume. Sound cannot...
User Manual
Page 41
... Rate under Monitor settings. •• Windows 8(Windows 8.1): Go to Settings → Control Panel → Appearance and Personalization → Display → Screen Resolution → Advanced settings → Monitor, and adjust Refresh rate under Monitor settings. •• Windows 10: Go to Settings → System → Display → Advanced display settings → Display adapter properties → Monitor, and adjust Screen refresh rate under Monitor settings. Q & A ――Refer to the user manual for further instructions on adjustment. Set the frequency...
... Rate under Monitor settings. •• Windows 8(Windows 8.1): Go to Settings → Control Panel → Appearance and Personalization → Display → Screen Resolution → Advanced settings → Monitor, and adjust Refresh rate under Monitor settings. •• Windows 10: Go to Settings → System → Display → Advanced display settings → Display adapter properties → Monitor, and adjust Screen refresh rate under Monitor settings. Q & A ――Refer to the user manual for further instructions on adjustment. Set the frequency...


