User Manual (ENGLISH)
Page 3
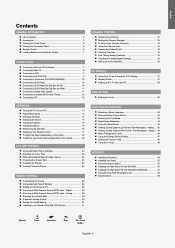
... Antenna 32 Setting the Channel Manager 32 To set-up Your Favorite Channels 33 Using the Channel Lists 34 Viewing the Channel Lists 34 Labeling Channels 35 Fine Tuning Analog Channels 35 Checking the Digital-Signal Strength 36 LNA (Low Noise Amplifier 36 PC DISPLAY Using Your TV as a Computer (PC) Display 37 Display Modes 37 Setting up the TV with...
... Antenna 32 Setting the Channel Manager 32 To set-up Your Favorite Channels 33 Using the Channel Lists 34 Viewing the Channel Lists 34 Labeling Channels 35 Fine Tuning Analog Channels 35 Checking the Digital-Signal Strength 36 LNA (Low Noise Amplifier 36 PC DISPLAY Using Your TV as a Computer (PC) Display 37 Display Modes 37 Setting up the TV with...
User Manual (ENGLISH)
Page 8
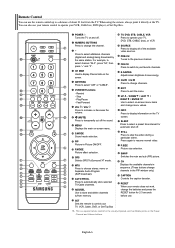
... about 23 feet from memory. English-6 When using the remote, always point it directly at the TV. For example, to save energy. E.SAVING Adjusts screen brightness to select channel "54-3", press "54", then press "-" and "3". STILL Press to select additional channels (digital and analog) being broadcast by the same station. CH Displays the available...
... about 23 feet from memory. English-6 When using the remote, always point it directly at the TV. For example, to save energy. E.SAVING Adjusts screen brightness to select channel "54-3", press "54", then press "-" and "3". STILL Press to select additional channels (digital and analog) being broadcast by the same station. CH Displays the available...

User Manual (ENGLISH)
Page 13
...Connect an Optical Cable between the DIGITAL AUDIO OUT (OPTICAL) jacks on the TV and the Digital Audio Input jacks on the external device. When a Digital Audio System is connected to your TV make it allows multiple channels of digital audio (5.1 channels). English-11 For 40 inch ...device is smaller in size, has the HDCP (High Bandwidth Digital Copy Protection) coding feature installed, and supports multi-channel digital audio. Each external input source device has a different back panel configuration. Digital Audio System TV Rear Panel Optical Cable (Not supplied) 5.1CH audio is...
...Connect an Optical Cable between the DIGITAL AUDIO OUT (OPTICAL) jacks on the TV and the Digital Audio Input jacks on the external device. When a Digital Audio System is connected to your TV make it allows multiple channels of digital audio (5.1 channels). English-11 For 40 inch ...device is smaller in size, has the HDCP (High Bandwidth Digital Copy Protection) coding feature installed, and supports multi-channel digital audio. Each external input source device has a different back panel configuration. Digital Audio System TV Rear Panel Optical Cable (Not supplied) 5.1CH audio is...

User Manual (ENGLISH)
Page 16
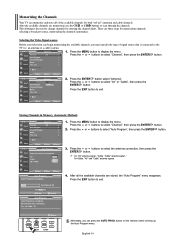
.... 7. Press the or buttons to the last channel viewed. button. You will see all the channels that the TV has memorized. (The TV must have received a digital signal, the time will be accessed in the TV mode. You will switch to select "Setup", then press the ENTER 2. The TV will not see page 40 to highlight the...
.... 7. Press the or buttons to the last channel viewed. button. You will see all the channels that the TV has memorized. (The TV must have received a digital signal, the time will be accessed in the TV mode. You will switch to select "Setup", then press the ENTER 2. The TV will not see page 40 to highlight the...
User Manual (ENGLISH)
Page 18
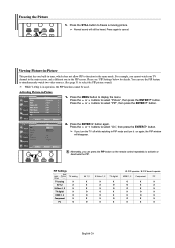
...ENTER button. 3. Press the or buttons to exit. After all of signal source that is connected to the TV (i.e. Press the EXIT button to change channels by entering the channel digits. This eliminates the need to exit. Press the MENU button to display the menu. Press the MENU button to... to bring up the Auto Program menu. Press the or buttons to select "Channel", then press the ENTER button. 2. English-16 Memorizing the Channels Your TV can press the AUTO PROG. Press the or buttons to select "Channel", then press the ENTER button. 2. There are three steps for both "off...
...ENTER button. 3. Press the or buttons to exit. After all of signal source that is connected to the TV (i.e. Press the EXIT button to change channels by entering the channel digits. This eliminates the need to exit. Press the MENU button to display the menu. Press the MENU button to... to bring up the Auto Program menu. Press the or buttons to select "Channel", then press the ENTER button. 2. English-16 Memorizing the Channels Your TV can press the AUTO PROG. Press the or buttons to select "Channel", then press the ENTER button. 2. There are three steps for both "off...
User Manual (ENGLISH)
Page 28
...to display the menu. If you can use the PIP feature to simultaneously watch one TV channel in the main screen, and a different one built-in tuner, which does not ... 1. Press again to freeze a moving picture. Press the ENTER button again. Normal sound will disappear. PIP Settings Sub Main Picture Picture TV analog TV analog X AV 1,2 X S-Video 1, 2 X TV digital X HDMI 1, 2 O Component X PC O AV 1,2 X X X O O X O S-Video 1, 2 X X X O O X X TV digital X O O X X O X O: PIP operates / X: PIP doesn't operate HDMI 1, 2 Component PC O X X O X X O X X ...
...to display the menu. If you can use the PIP feature to simultaneously watch one TV channel in the main screen, and a different one built-in tuner, which does not ... 1. Press again to freeze a moving picture. Press the ENTER button again. Normal sound will disappear. PIP Settings Sub Main Picture Picture TV analog TV analog X AV 1,2 X S-Video 1, 2 X TV digital X HDMI 1, 2 O Component X PC O AV 1,2 X X X O O X O S-Video 1, 2 X X X O O X X TV digital X O O X X O X O: PIP operates / X: PIP doesn't operate HDMI 1, 2 Component PC O X X O X X O X X ...
User Manual (ENGLISH)
Page 29
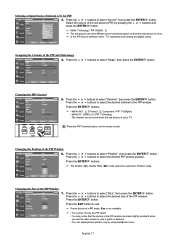
Selecting a Signal Source (External A/V) for PIP. 3. Press the or buttons to select "Channel", then press the ENTER button. In the PIP Source selection menu, 'TV' represents both analog and digital tuning. Press the or buttons to select "Source", then press the ENTER button. Press the ENTER ...the Contents of the PIP window. Press the ENTER buttons. • MAIN: AV(1, 2), S-Video(1, 2), Component / PIP: TV(Digital) • MAIN: PC, HDMI(1,2) / PIP: TV(Analog) • The channel can be selected in the PIP window. Press the or buttons to exit. The Double ( ), Double Wide ( ) mode ...
Selecting a Signal Source (External A/V) for PIP. 3. Press the or buttons to select "Channel", then press the ENTER button. In the PIP Source selection menu, 'TV' represents both analog and digital tuning. Press the or buttons to select "Source", then press the ENTER button. Press the ENTER ...the Contents of the PIP window. Press the ENTER buttons. • MAIN: AV(1, 2), S-Video(1, 2), Component / PIP: TV(Digital) • MAIN: PC, HDMI(1,2) / PIP: TV(Analog) • The channel can be selected in the PIP window. Press the or buttons to exit. The Double ( ), Double Wide ( ) mode ...
User Manual (ENGLISH)
Page 31
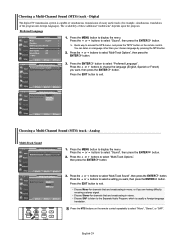
Digital The digital-TV transmission system is usually a foreign-language translation. Press the or buttons to display the menu. Press the or buttons to select "Mono", "Stereo", or "SAP". Analog Multi-Track Sound 1. Press the MENU button to select "Sound", then press the ENTER button. Press the or buttons to exit. Choosing a Multi-Channel...the or buttons to select "Preferred Language". Press the or buttons to exit. • Choose Mono for channels that are having difficulty receiving a stereo signal. • Choose Stereo for example, simultaneous translations of these ...
Digital The digital-TV transmission system is usually a foreign-language translation. Press the or buttons to display the menu. Press the or buttons to select "Mono", "Stereo", or "SAP". Analog Multi-Track Sound 1. Press the MENU button to select "Sound", then press the ENTER button. Press the or buttons to exit. Choosing a Multi-Channel...the or buttons to select "Preferred Language". Press the or buttons to exit. • Choose Mono for channels that are having difficulty receiving a stereo signal. • Choose Stereo for example, simultaneous translations of these ...

User Manual (ENGLISH)
Page 37
... to select "Name", then press the ENTER button. 2. If you have finished, press the ENTER button to the name of digital broadcasting channels are not saved. 4. button. Press the or buttons to select "Fine Tune", then press the ENTER button. 3. Press the...TV channels can be assigned a new name, then press the ENTER button. Fine Tuning Analog Channels Use fine tuning to adjust the fine tuning. Press the or buttons to display the menu. The names of fine-tuned channels. Press the MENU button to select "Channel", then press the ENTER button. Select a second letter or digit...
... to select "Name", then press the ENTER button. 2. If you have finished, press the ENTER button to the name of digital broadcasting channels are not saved. 4. button. Press the or buttons to select "Fine Tune", then press the ENTER button. 3. Press the...TV channels can be assigned a new name, then press the ENTER button. Fine Tuning Analog Channels Use fine tuning to adjust the fine tuning. Press the or buttons to display the menu. The names of fine-tuned channels. Press the MENU button to select "Channel", then press the ENTER button. Select a second letter or digit...
User Manual (ENGLISH)
Page 38
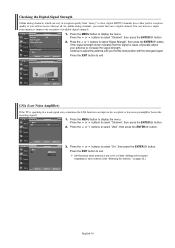
...TV is set to Air or Cable. Press the or buttons to display the menu. on page 32.) English-36 Press the or buttons to display the menu. Settings will not receive them at all. So, unlike analog channels, you find the best position with the strongest signal. Checking the Digital...-Signal Strength Unlike analog channels, which can , however, ...
...TV is set to Air or Cable. Press the or buttons to display the menu. on page 32.) English-36 Press the or buttons to display the menu. Settings will not receive them at all. So, unlike analog channels, you find the best position with the strongest signal. Checking the Digital...-Signal Strength Unlike analog channels, which can , however, ...
User Manual (ENGLISH)
Page 48
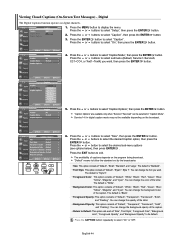
Press the MENU button to exit. Service1~6 in digital caption mode may not be selected in "Caption Mode". Press the EXIT button to display the menu. You can change the background color of "Default",...: This option consists of "Default", "White", "Black", "Red", "Green", "Blue", "Yellow", "Magenta", and "Cyan". Press the or buttons to its default. Digital The Digital Captions function operates on digital channels. 1. "Caption Options" are available only when "Service1~Service6" can change the font you want . The default is "White". • Background Color: This option...
Press the MENU button to exit. Service1~6 in digital caption mode may not be selected in "Caption Mode". Press the EXIT button to display the menu. You can change the background color of "Default",...: This option consists of "Default", "White", "Black", "Red", "Green", "Blue", "Yellow", "Magenta", and "Cyan". Press the or buttons to its default. Digital The Digital Captions function operates on digital channels. 1. "Caption Options" are available only when "Service1~Service6" can change the font you want . The default is "White". • Background Color: This option...
User Manual (ENGLISH)
Page 56
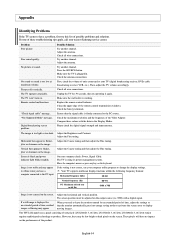
... tuning. Screen is not correct, use your TV (digital broadcasting receiver, DVD, cable broadcasting receiver, VCR, etc.). Image is not stable and may appear. On your nearest Samsung service center. When you have a computer connected...TV seems to have a problem, first try operating it again. No sound or sound is too low at 60 Hz) 60~75 1360 x 768 Image is firmly connected to the PC source. Digital broadcasting screen problem. Try another channel... on the performance of these values with a digital signal. The TFT LCD panel uses a panel consisting of the Video Adapter.
... tuning. Screen is not correct, use your TV (digital broadcasting receiver, DVD, cable broadcasting receiver, VCR, etc.). Image is not stable and may appear. On your nearest Samsung service center. When you have a computer connected...TV seems to have a problem, first try operating it again. No sound or sound is too low at 60 Hz) 60~75 1360 x 768 Image is firmly connected to the PC source. Digital broadcasting screen problem. Try another channel... on the performance of these values with a digital signal. The TFT LCD panel uses a panel consisting of the Video Adapter.


