
User Manual (user Manual) (ver.1.0) (English)
Page 2
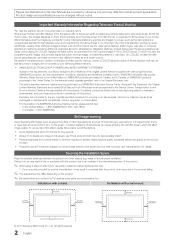
... programming and images, and primarily display full screen moving . On LCD/LED models that leave subtle, but not limited to an increase in the internal temperature of the product. ✎✎ When using a stand or wall-mount, use TV set picture format menu for viewing. In the United States : 1-800-SAMSUNG (1-800-726-7864) -- Installation with a wall-mount. 4inches 4inches 4inches 4inches 4inches 4inches © 2011 Samsung Electronics Co., Ltd. Installation with a stand...
... programming and images, and primarily display full screen moving . On LCD/LED models that leave subtle, but not limited to an increase in the internal temperature of the product. ✎✎ When using a stand or wall-mount, use TV set picture format menu for viewing. In the United States : 1-800-SAMSUNG (1-800-726-7864) -- Installation with a wall-mount. 4inches 4inches 4inches 4inches 4inches 4inches © 2011 Samsung Electronics Co., Ltd. Installation with a stand...
User Manual (user Manual) (ver.1.0) (English)
Page 3
... Channels 12 Memorizing channels 12 Editing channels 12 Other Features 12 yy Picture Menu 14 Changing the Preset Picture Mode 14 Adjusting picture settings 14 Changing the Picture Options 14 yy Sound Menu 16 Changing the Preset Sound Mode 16 Adjusting sound settings 16 Sound Settings 16 yy Setup Menu 17 Setting the Time 17 Using the Sleep Timer 17 Setting the On/Off Timer 17 Locking Programs 18 Other Features 19 yy Support Menu 20 Advanced Features yy Media Play 21 Connecting a USB Device 21 Other Information yy Installing the Wall Mount...
... Channels 12 Memorizing channels 12 Editing channels 12 Other Features 12 yy Picture Menu 14 Changing the Preset Picture Mode 14 Adjusting picture settings 14 Changing the Picture Options 14 yy Sound Menu 16 Changing the Preset Sound Mode 16 Adjusting sound settings 16 Sound Settings 16 yy Setup Menu 17 Setting the Time 17 Using the Sleep Timer 17 Setting the On/Off Timer 17 Locking Programs 18 Other Features 19 yy Support Menu 20 Advanced Features yy Media Play 21 Connecting a USB Device 21 Other Information yy Installing the Wall Mount...

User Manual (user Manual) (ver.1.0) (English)
Page 4
... digital tuner, nonsubscription HD broadcasts can be viewed without a cable box / STB (Set-Top-Box) satellite receiver. ■■ Media Play: Allows you to play music files, and pictures saved on the models. ■■ Remote Control (BN59-01006A) & Batteries (AAA x 2) ■■ Warranty Card / Safety Guide / Quick Setup Guide ■■ Owner's Instructions ■■ Cleaning Cloth (BN63-01798B) ■■ Power Cord Holder wire stand (UN40D5003BF Model only) Assembling Holder-wire stand (UN40D5003BF Model only) Input Cables (Sold Separately) HDMI HDMI...
... digital tuner, nonsubscription HD broadcasts can be viewed without a cable box / STB (Set-Top-Box) satellite receiver. ■■ Media Play: Allows you to play music files, and pictures saved on the models. ■■ Remote Control (BN59-01006A) & Batteries (AAA x 2) ■■ Warranty Card / Safety Guide / Quick Setup Guide ■■ Owner's Instructions ■■ Cleaning Cloth (BN63-01798B) ■■ Power Cord Holder wire stand (UN40D5003BF Model only) Assembling Holder-wire stand (UN40D5003BF Model only) Input Cables (Sold Separately) HDMI HDMI...

User Manual (user Manual) (ver.1.0) (English)
Page 5
... on-screen menu, use this spot on the remote control. Changes the channels. Blinks and turns off . Adjusts the volume. Toggles between all the available input sources. Control Panel Speakers P (Power) Remote control sensor SOURCEE MEnU y z Power Indicator Press to unplug the power cord. 5 English A small amount of time (when you would use the y buttons as you would use the EnTERE button on the model. It is turned off. In the on-screen menu, use the z buttons as you are away on and lights up in standby mode...
... on-screen menu, use this spot on the remote control. Changes the channels. Blinks and turns off . Adjusts the volume. Toggles between all the available input sources. Control Panel Speakers P (Power) Remote control sensor SOURCEE MEnU y z Power Indicator Press to unplug the power cord. 5 English A small amount of time (when you would use the y buttons as you would use the EnTERE button on the model. It is turned off. In the on-screen menu, use the z buttons as you are away on and lights up in standby mode...

User Manual (user Manual) (ver.1.0) (English)
Page 6
... Audio Program (SAP broadcast). (P. 16) P.SIZE: Choose the picture size. (P. 15) CC: Controls the caption decoder. (P. 19) Installing batteries (Battery size: AAA) 6 English ✎ nOTE x Use the remote control within 23 feet from TV. MTS: Press to the previous menu. x The Color and shape may affect the performance of the remote control. Displays the channel list on -screen menu. Buttons used functions. Displays the main on the screen. (P. 11) View the Media Play. (P. 21) Quickly select frequently used in the Channel list, Media Play menu...
... Audio Program (SAP broadcast). (P. 16) P.SIZE: Choose the picture size. (P. 15) CC: Controls the caption decoder. (P. 19) Installing batteries (Battery size: AAA) 6 English ✎ nOTE x Use the remote control within 23 feet from TV. MTS: Press to the previous menu. x The Color and shape may affect the performance of the remote control. Displays the channel list on -screen menu. Buttons used functions. Displays the main on the screen. (P. 11) View the Media Play. (P. 21) Quickly select frequently used in the Channel list, Media Play menu...
User Manual (user Manual) (ver.1.0) (English)
Page 7
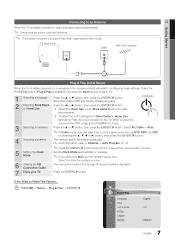
... Channel → Auto Program. (P. 12) MEDIA.P ✎✎Press the ENTERE button at any time to Reset This Feature... Select the time zone where you select the Auto, set to TV. 1 Selecting a language Press the ▲ or ▼ button, then press the ENTERE button. OO MENUm → Setup → Plug & Play → ENTERE Plug & Play Language Time Game Mode V-Chip Caption Melody : English S: OLfEf EP : Medium 7 English TV Rear Panel Cable VHF/UHF Antenna or Plug & Play...
... Channel → Auto Program. (P. 12) MEDIA.P ✎✎Press the ENTERE button at any time to Reset This Feature... Select the time zone where you select the Auto, set to TV. 1 Selecting a language Press the ▲ or ▼ button, then press the ENTERE button. OO MENUm → Setup → Plug & Play → ENTERE Plug & Play Language Time Game Mode V-Chip Caption Melody : English S: OLfEf EP : Medium 7 English TV Rear Panel Cable VHF/UHF Antenna or Plug & Play...

User Manual (user Manual) (ver.1.0) (English)
Page 8
... display normally (if at all) or the audio may not work . Using a Component Cable: (up to 1080p) We recommend using an HDMI/DVI cable connection, you must use the hDMI/DVI In jack for the best quality HD picture. Connections Connecting to an AV Device Using an hDMI cable or hDMI to DVI Cable: hD connection (up to 1080p), Using an Audio/Video Cable: (480i only) Available devices: DVD, Blu-ray player, cable box, STB satellite receiver, VCR TV Rear Y W R ✎ When connecting...
... display normally (if at all) or the audio may not work . Using a Component Cable: (up to 1080p) We recommend using an HDMI/DVI cable connection, you must use the hDMI/DVI In jack for the best quality HD picture. Connections Connecting to an AV Device Using an hDMI cable or hDMI to DVI Cable: hD connection (up to 1080p), Using an Audio/Video Cable: (480i only) Available devices: DVD, Blu-ray player, cable box, STB satellite receiver, VCR TV Rear Y W R ✎ When connecting...

User Manual (user Manual) (ver.1.0) (English)
Page 10
... cable is connected to the TV, use hDMI1/DVI input. ✎ You can use the hDMI In 1(DVI) jack. SERVICE Connector for service only. MEDIA.P Changing the Input source P.SIZE Source list O MEnUm → Input → Source list → EnTERE Use to select TV or an external input sources such as a DVD / Blu-ray player / cable box / STB satellite receiver. ■ TV / AV / Component / hDMI1/DVI / hDMI2 ✎ You can see detailed information about the selected exSteLrnEaEl dPevice. S.MODE P.MODE...
... cable is connected to the TV, use hDMI1/DVI input. ✎ You can use the hDMI In 1(DVI) jack. SERVICE Connector for service only. MEDIA.P Changing the Input source P.SIZE Source list O MEnUm → Input → Source list → EnTERE Use to select TV or an external input sources such as a DVD / Blu-ray player / cable box / STB satellite receiver. ■ TV / AV / Component / hDMI1/DVI / hDMI2 ✎ You can see detailed information about the selected exSteLrnEaEl dPevice. S.MODE P.MODE...
User Manual (user Manual) (ver.1.0) (English)
Page 11
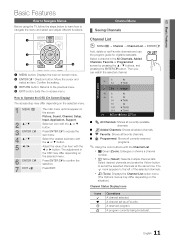
... Screen Display) MEDIA.P The access step may differ depending on the selected menu. 1 MEnU m 2 ▲/▼ 3 EnTER E 4 ▲/▼ 5 ◄/► 6 EnTER E 7 EXIT e The main menu options appear on the screen: Picture, Sound, Channel, Setup, Input, Application, Support. how to the previous menu. 4 EXIT button: Exits the on the situation.) Channel Status Display Icons Icons c * ) ( Operations A channel selected. Add, delete or set as a Favorite. The adjustment in the All Channels, Added Channels, Favorite or Programmed screen...
... Screen Display) MEDIA.P The access step may differ depending on the selected menu. 1 MEnU m 2 ▲/▼ 3 EnTER E 4 ▲/▼ 5 ◄/► 6 EnTER E 7 EXIT e The main menu options appear on the screen: Picture, Sound, Channel, Setup, Input, Application, Support. how to the previous menu. 4 EXIT button: Exits the on the situation.) Channel Status Display Icons Icons c * ) ( Operations A channel selected. Add, delete or set as a Favorite. The adjustment in the All Channels, Added Channels, Favorite or Programmed screen...
User Manual (user Manual) (ver.1.0) (English)
Page 13
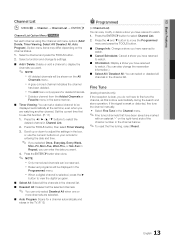
... A gray-colored channel indicates the channel has been deleted. even when you want . ✎✎ NOTE xx All deleted channels will be displayed automatically at the set time; Press the ENTERE button to use the numeric buttons on the All Channels menu. 03 Basic Features Channel List OO MENUm → Channel → Channel List → ENTERE Channel List Option Menu t Set each channel using the Channel List menu options (Add/ Delete, Timer Viewing, Select All/ Deselect All, Auto Program). Select...
... A gray-colored channel indicates the channel has been deleted. even when you want . ✎✎ NOTE xx All deleted channels will be displayed automatically at the set time; Press the ENTERE button to use the numeric buttons on the All Channels menu. 03 Basic Features Channel List OO MENUm → Channel → Channel List → ENTERE Channel List Option Menu t Set each channel using the Channel List menu options (Add/ Delete, Timer Viewing, Select All/ Deselect All, Auto Program). Select...
User Manual (user Manual) (ver.1.0) (English)
Page 14
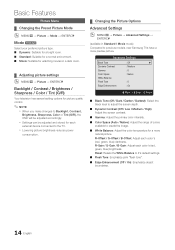
... each external device connected to the TV. R-Offset / G-Offset / B-Offset: Adjust each color's (red, green, blue) brightness. Reset: Resets the White Balance to it's default settings. ■■ Flesh Tone: Emphasize pink "flesh tone". ■■ Edge Enhancement (Off / On): Emphasize object boundaries. 14 English Basic Features Picture Menu ¦¦ Changing the Preset Picture Mode OO MENUm → Picture → Mode → ENTERE Mode t Select your preferred picture type. ■...
... each external device connected to the TV. R-Offset / G-Offset / B-Offset: Adjust each color's (red, green, blue) brightness. Reset: Resets the White Balance to it's default settings. ■■ Flesh Tone: Emphasize pink "flesh tone". ■■ Edge Enhancement (Off / On): Emphasize object boundaries. 14 English Basic Features Picture Menu ¦¦ Changing the Preset Picture Mode OO MENUm → Picture → Mode → ENTERE Mode t Select your preferred picture type. ■...

User Manual (user Manual) (ver.1.0) (English)
Page 15
... the picture mode is displayed. ■■ HDMI Black Level (Low / Normal): Selects the black level on the TV. ■■ Size: Your cable box/satellite receiver MEDIA.P may have connected to an input on the left, right and center of the screen may appear on the screen. ✎✎ When the signal is weak, try other options until the best picture is Movie. ✎✎ Settings can be adjusted...
... the picture mode is displayed. ■■ HDMI Black Level (Low / Normal): Selects the black level on the TV. ■■ Size: Your cable box/satellite receiver MEDIA.P may have connected to an input on the left, right and center of the screen may appear on the screen. ✎✎ When the signal is weak, try other options until the best picture is Movie. ✎✎ Settings can be adjusted...

User Manual (user Manual) (ver.1.0) (English)
Page 17
... number buttons on by the Timer): The TV will appear every time you press the INFO button. ■■ Clock: Setting the clock is for using the time from the digital channel. ✎✎ The antenna must set to Auto. TV/USB: Select TV or USB. (Make sure that an USB device is connected to your time zone. ✎✎ This function is only available when the Clock Mode...
... number buttons on by the Timer): The TV will appear every time you press the INFO button. ■■ Clock: Setting the clock is for using the time from the digital channel. ✎✎ The antenna must set to Auto. TV/USB: Select TV or USB. (Make sure that an USB device is connected to your time zone. ✎✎ This function is only available when the Clock Mode...
User Manual (user Manual) (ver.1.0) (English)
Page 18
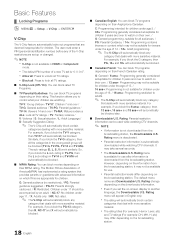
... rating. G: General / 8 ans+: Programming generally considered acceptable for use after information is downloaded from the broadcasting station. Rating menu is automatically downloaded while watching DTV channels. The default menu name and Downloadable U.S. This function allows you block the TV-Y category, then TV-Y7 will appear in HDMI or Component mode. Rating: Parental restriction information can be used while watching DTV channels. ✎✎ NOTE xx...
... rating. G: General / 8 ans+: Programming generally considered acceptable for use after information is downloaded from the broadcasting station. Rating menu is automatically downloaded while watching DTV channels. The default menu name and Downloadable U.S. This function allows you block the TV-Y category, then TV-Y7 will appear in HDMI or Component mode. Rating: Parental restriction information can be used while watching DTV channels. ✎✎ NOTE xx...
User Manual (user Manual) (ver.1.0) (English)
Page 19
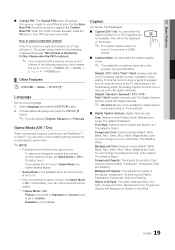
... Game Mode is White. Picture mode is set to Standard and Sound mode is set Game Mode to TV. Default / CC1~CC4 / Text1~Text4: (analog channels only) The Analog Caption function operates in either analog TV channel mode or when a signal is supplied from an external device to "0-0-0-0" : POWER (off . The default is On: -- Background Opacity: This adjusts the opacity of text. If you forget the PIN, press the remote-control buttons in Component or HDMI modes. ■■ Caption Mode: You can change the color...
... Game Mode is White. Picture mode is set to Standard and Sound mode is set Game Mode to TV. Default / CC1~CC4 / Text1~Text4: (analog channels only) The Analog Caption function operates in either analog TV channel mode or when a signal is supplied from an external device to "0-0-0-0" : POWER (off . The default is On: -- Background Opacity: This adjusts the opacity of text. If you forget the PIN, press the remote-control buttons in Component or HDMI modes. ■■ Caption Mode: You can change the color...

User Manual (user Manual) (ver.1.0) (English)
Page 20
... upgrade the software. TV Rear Panel USB Drive HD Connection Guide Refer to the TV. Contact Samsung View this information when connecting external devices to this information when your connections. Energy Saving (Off / Low / Medium / High / Auto) Adjust the brightness of captions depends on or off. ✎✎NOTE xx Only available when the Input source is output from the TV because the volume has been reduced to reduce power...
... upgrade the software. TV Rear Panel USB Drive HD Connection Guide Refer to the TV. Contact Samsung View this information when connecting external devices to this information when your connections. Energy Saving (Off / Low / Medium / High / Auto) Adjust the brightness of captions depends on or off. ✎✎NOTE xx Only available when the Input source is output from the TV because the volume has been reduced to reduce power...
User Manual (user Manual) (ver.1.0) (English)
Page 25
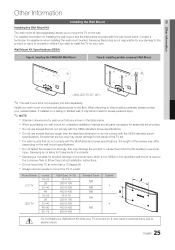
... the VESA standard screw specifications. If installed on a ceiling or slanted wall, it may fall , leading to personal injury. xx When purchasing our wall mount kit, a detailed installation manual and all parts necessary for assembly are longer than a 15 degree tilt. Screws that do not comply with the VESA standard screw specifications, the length of the TV set. xx Do not fasten the screws too strongly; xx Samsung...
... the VESA standard screw specifications. If installed on a ceiling or slanted wall, it may fall , leading to personal injury. xx When purchasing our wall mount kit, a detailed installation manual and all parts necessary for assembly are longer than a 15 degree tilt. Screws that do not comply with the VESA standard screw specifications, the length of the TV set. xx Do not fasten the screws too strongly; xx Samsung...
User Manual (user Manual) (ver.1.0) (English)
Page 30
.... Setup - It may cause picture distortion, especially in the TV menu. (go to MENU - Sound Problem First of video contents may take up . • Air/Cable Antenna connection: Try HD stations after performing Auto Program. ✎✎ Many HD channels are upscaled from SD(Standard Definition) contents. • Adjust the Cable/Sat box video output resolution to 1080i or 720p. The speakers are connected to the correct jacks. Support - Self Diagnosis - Use HDMI or Component cables...
.... Setup - It may cause picture distortion, especially in the TV menu. (go to MENU - Sound Problem First of video contents may take up . • Air/Cable Antenna connection: Try HD stations after performing Auto Program. ✎✎ Many HD channels are upscaled from SD(Standard Definition) contents. • Adjust the Cable/Sat box video output resolution to 1080i or 720p. The speakers are connected to the correct jacks. Support - Self Diagnosis - Use HDMI or Component cables...
User Manual (user Manual) (ver.1.0) (English)
Page 31
... correct Cable TV signal type is set in the menu. Especially on digital channels. • Check Caption Setup menu. go to the channel list. This is distorted: macroblock, error, small block, dots, pixelization. • Compression of the screen when displaying upscaled SD (4:3) contents. • Black bars on the Top & Bottom will be connected to an HDMI input on the TV. • Make sure your external device's (Cable/Sat Box, DVD, Blu-ray etc) video outputs...
... correct Cable TV signal type is set in the menu. Especially on digital channels. • Check Caption Setup menu. go to the channel list. This is distorted: macroblock, error, small block, dots, pixelization. • Compression of the screen when displaying upscaled SD (4:3) contents. • Black bars on the Top & Bottom will be connected to an HDMI input on the TV. • Make sure your external device's (Cable/Sat Box, DVD, Blu-ray etc) video outputs...
User Manual (user Manual) (ver.1.0) (English)
Page 32
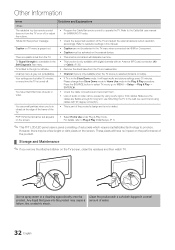
... menu when connected via HDMI or Component. • Caption must be a few bright or dark pixels on the screen. • Select Home Use under Plug & Play mode. For details, refer to Plug & Play (Initial Setup). (P. 7) ✎✎This TFT LCD/LED panel uses a panel consisting of water. 32 English Make sure the cables are lost after 30 minutes or every time the TV is turned off , or adjust the volume. • Program the Cable/Sat remote control...
... menu when connected via HDMI or Component. • Caption must be a few bright or dark pixels on the screen. • Select Home Use under Plug & Play mode. For details, refer to Plug & Play (Initial Setup). (P. 7) ✎✎This TFT LCD/LED panel uses a panel consisting of water. 32 English Make sure the cables are lost after 30 minutes or every time the TV is turned off , or adjust the volume. • Program the Cable/Sat remote control...


