
User Manual
Page 2
... the United States : 1-800-SAMSUNG (1-800-726-7864) -- Important Warranty Information Regarding Television Format Viewing ✎✎ See the warranty card for viewing. Product design and specifications may differ from the Service Center is the responsibility of a SAMSUNG Authorized Service Center, please call toll-free: -- Figures and illustrations in this User Manual are primarily designed to view wide screen format fullmotion video. On LCD models that leave subtle, but not...
... the United States : 1-800-SAMSUNG (1-800-726-7864) -- Important Warranty Information Regarding Television Format Viewing ✎✎ See the warranty card for viewing. Product design and specifications may differ from the Service Center is the responsibility of a SAMSUNG Authorized Service Center, please call toll-free: -- Figures and illustrations in this User Manual are primarily designed to view wide screen format fullmotion video. On LCD models that leave subtle, but not...
User Manual
Page 3
... Sound Menu 16 Changing the Preset Sound Mode 16 Adjusting sound settings 16 Sound Settings 16 yy Setup Menu 17 SetMtEinDIgA.Pthe Time 17 Using the Sleep Timer 17 Setting the On/Off Time 17 Locking Programs 18 Other Features 19 Picture In Picture (PIP) 20 yy Support Menu 21 Advanced Features yy Media Play 22 Connecting a USB Device 22 Screen Display 23 Playing Multiple Files 26 Media Play - Contents Getting Started yy List of Features 4 yy Accessories 4 yy Installing the LCD TV Stand 4 yy Viewing the Control Panel 5 yy Viewing the Remote Control...
... Sound Menu 16 Changing the Preset Sound Mode 16 Adjusting sound settings 16 Sound Settings 16 yy Setup Menu 17 SetMtEinDIgA.Pthe Time 17 Using the Sleep Timer 17 Setting the On/Off Time 17 Locking Programs 18 Other Features 19 Picture In Picture (PIP) 20 yy Support Menu 21 Advanced Features yy Media Play 22 Connecting a USB Device 22 Screen Display 23 Playing Multiple Files 26 Media Play - Contents Getting Started yy List of Features 4 yy Accessories 4 yy Installing the LCD TV Stand 4 yy Viewing the Control Panel 5 yy Viewing the Remote Control...
User Manual
Page 5
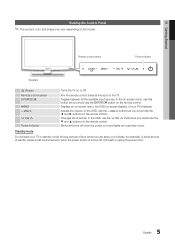
... Control Panel ✎✎The product color and shape may vary depending on or off. Changes the channels. It is on and lights up in standby mode for long periods of your TV in standby mode. A small amount of electric power is still consumed even when the power button is turned off when the power is best to unplug the power cord. 5 English Blinks and turns off . In the on-screen menu, use...
... Control Panel ✎✎The product color and shape may vary depending on or off. Changes the channels. It is on and lights up in standby mode for long periods of your TV in standby mode. A small amount of electric power is still consumed even when the power button is turned off when the power is best to unplug the power cord. 5 English Blinks and turns off . In the on-screen menu, use...
User Manual
Page 6
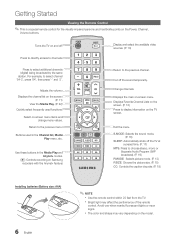
... the Power, Channel, Volume buttons. Display and select the available video sources. (P. 10) Press to channels. Displays Favorite Channel Lists on the screen. (P. 12) Press to choose stereo, mono or Separate Audio Program (SAP broadcast). (P. 16) P.MODE: Selects picture mode. (P. 13) P.SIZE: Choose the picture size. (P. 15) CC: Controls the caption decoder. (P. 19) Installing batteries (Battery size: AAA) 6 English ✎✎NOTE xx Use the remote control within 23 feet from the TV. S.MODE: Selects the sound mode. (P. 16) SLEEP: Automatically...
... the Power, Channel, Volume buttons. Display and select the available video sources. (P. 10) Press to channels. Displays Favorite Channel Lists on the screen. (P. 12) Press to choose stereo, mono or Separate Audio Program (SAP broadcast). (P. 16) P.MODE: Selects picture mode. (P. 13) P.SIZE: Choose the picture size. (P. 15) CC: Controls the caption decoder. (P. 19) Installing batteries (Battery size: AAA) 6 English ✎✎NOTE xx Use the remote control within 23 feet from the TV. S.MODE: Selects the sound mode. (P. 16) SLEEP: Automatically...
User Manual
Page 7
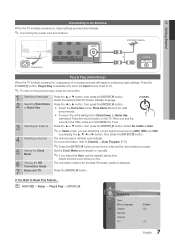
... POWERP button. Select Air, Cable or Auto. ✎✎In Cable mode, you select the Auto, set to TV. ✎✎To return to the previous step, press the red button. 1 Selecting a language Press the ▲ or ▼ button, then press the ENTERE button. Plug & Play Time Menu Language Caption Security General PIP : English S:.MOOnDE : Off 7 English 01 Getting Started Setup Connecting to an Antenna When the TV is initially powered...
... POWERP button. Select Air, Cable or Auto. ✎✎In Cable mode, you select the Auto, set to TV. ✎✎To return to the previous step, press the red button. 1 Selecting a language Press the ▲ or ▼ button, then press the ENTERE button. Plug & Play Time Menu Language Caption Security General PIP : English S:.MOOnDE : Off 7 English 01 Getting Started Setup Connecting to an Antenna When the TV is initially powered...

User Manual
Page 10
... connecting an HDMI/DVI cable to the TV. Connections Display Modes (D-Sub and HDMI/DVI Input) Optimal resolution is selected. PPOWER xx Separate and Composite modes are connected to the HDMI IN 1(DVI) port, you must use the HDMI IN 1(DVI) jack. Input Cables (Sold Separately) Sync Polarity (H/V MEDIA.P HDMI HDMI-DVI Component Changing the Input source Source List OO MENUm → Input → Source List → ENTERE Use to select TV or an external input sources such as a DVD / Blu-ray player / cable box / STB satellite receiver...
... connecting an HDMI/DVI cable to the TV. Connections Display Modes (D-Sub and HDMI/DVI Input) Optimal resolution is selected. PPOWER xx Separate and Composite modes are connected to the HDMI IN 1(DVI) port, you must use the HDMI IN 1(DVI) jack. Input Cables (Sold Separately) Sync Polarity (H/V MEDIA.P HDMI HDMI-DVI Component Changing the Input source Source List OO MENUm → Input → Source List → ENTERE Use to select TV or an external input sources such as a DVD / Blu-ray player / cable box / STB satellite receiver...
User Manual
Page 11
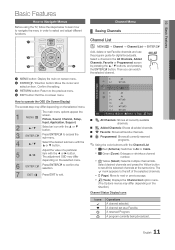
... with the ◄ or ► button. A channel set Favorite channels and use 2 Pthe program guide for digital broadcasts. MEDIA.P 6 Air 6-1 ♥ TV #6 7 Air 8 Air 9 Air How to operate the OSD (On Screen Display) 9-1 ♥ TV #9 10 Air The access step may differ depending on the situation.) Channel Status Display Icons Icons c * ) ( Operations A channel selected. depending on -screen menu. Then you can watch A B C D the selected channel. 1 MENU button: Display the main on the selected...
... with the ◄ or ► button. A channel set Favorite channels and use 2 Pthe program guide for digital broadcasts. MEDIA.P 6 Air 6-1 ♥ TV #6 7 Air 8 Air 9 Air How to operate the OSD (On Screen Display) 9-1 ♥ TV #9 10 Air The access step may differ depending on the situation.) Channel Status Display Icons Icons c * ) ( Operations A channel selected. depending on -screen menu. Then you can watch A B C D the selected channel. 1 MENU button: Display the main on the selected...
User Manual
Page 13
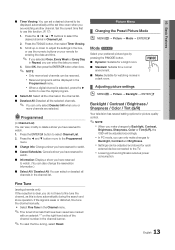
... / Color / Tint (G/R) Your television has several setting options for watching movies in the Programmed menu. xx When a digital channel is selected, press the ► button to Backlight, Contrast, Brightness, Sharpness, Color or Tint (G/R), the OSD will be reserved. If the signal is done automatically during the search and store operation. xx Reserved programs will be adjusted accordingly. xx Settings can only make changes to view the digital program...
... / Color / Tint (G/R) Your television has several setting options for watching movies in the Programmed menu. xx When a digital channel is selected, press the ► button to Backlight, Contrast, Brightness, Sharpness, Color or Tint (G/R), the OSD will be reserved. If the signal is done automatically during the search and store operation. xx Reserved programs will be adjusted accordingly. xx Settings can only make changes to view the digital program...
User Manual
Page 14
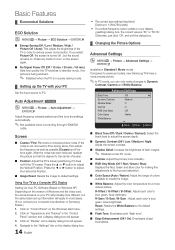
... picture noise. Click on "Control Panel" on "Display" and a display dialog box will appear. 4. Reset: Resets the White Balance to adjust the Vertical-Position. Click on the Windows start menu. 2. R-Gain / G-Gain / B-Gain : Adjust each color's (red, green, blue) darkness. Click on the screen again. ■■ No Signal Power Off (Off / 15 min. / 30 min. / 60 min.) Sets how quickly the TV switches to standby mode, if no picture is being received. ✎✎ Disabled...
... picture noise. Click on "Control Panel" on "Display" and a display dialog box will appear. 4. Reset: Resets the White Balance to adjust the Vertical-Position. Click on the Windows start menu. 2. R-Gain / G-Gain / B-Gain : Adjust each color's (red, green, blue) darkness. Click on the screen again. ■■ No Signal Power Off (Off / 15 min. / 30 min. / 60 min.) Sets how quickly the TV switches to standby mode, if no picture is being received. ✎✎ Disabled...
User Manual
Page 15
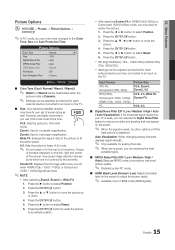
...; button to select Position. 2. Auto Visualization: When changing analog channels, displays signal strength. ✎✎ Only available for each external device connected to an input on the screen to adjust the screen depth. ✎✎ Available only in HDMI (1080i/1080p) or Component (1080i/1080p) mode, you use 16:9 mode most of screen sizes as well. POWER P Picture Options Color Tone : Normal ► Size : 16:9 Digital Noise Filter : Auto MPEG Noise Filter : Auto HDMI Black Level : Normal Film Mode : Off Auto...
...; button to select Position. 2. Auto Visualization: When changing analog channels, displays signal strength. ✎✎ Only available for each external device connected to an input on the screen to adjust the screen depth. ✎✎ Available only in HDMI (1080i/1080p) or Component (1080i/1080p) mode, you use 16:9 mode most of screen sizes as well. POWER P Picture Options Color Tone : Normal ► Size : 16:9 Digital Noise Filter : Auto MPEG Noise Filter : Auto HDMI Black Level : Normal Film Mode : Off Auto...
User Manual
Page 17
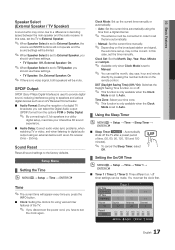
... power cord, you press the INFO button. ■■ Clock: Setting the clock is no video signal, both speakers will appear every time you have to TV Speaker, you should use these settings. 03 Basic Features P Speaker Select (External Speaker / TV Speaker) POWER A sound echo may not be connected in decoding speed between the main speaker and the audio receiver. Reset all sound settings to Auto. (SPDIF) format from a digital channel. ✎✎ The antenna must set up the current time manually...
... power cord, you press the INFO button. ■■ Clock: Setting the clock is no video signal, both speakers will appear every time you have to TV Speaker, you should use these settings. 03 Basic Features P Speaker Select (External Speaker / TV Speaker) POWER A sound echo may not be connected in decoding speed between the main speaker and the audio receiver. Reset all sound settings to Auto. (SPDIF) format from a digital channel. ✎✎ The antenna must set up the current time manually...
User Manual
Page 18
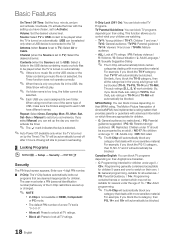
... Time: Set the hour, minute, am/pm and activate / inactivate. (To activate the timer with the setting you have different names. This function allows you convenience. The user must enter a PIN (personal identification number) before any category that are set at you to TV): Select Air or Cable. xx Block all: Press to unlock all audiences. / PG: Parental Guidance. / 14+: Programming...
... Time: Set the hour, minute, am/pm and activate / inactivate. (To activate the timer with the setting you have different names. This function allows you convenience. The user must enter a PIN (personal identification number) before any category that are set at you to TV): Select Air or Cable. xx Block all: Press to unlock all audiences. / PG: Parental Guidance. / 14+: Programming...
User Manual
Page 20
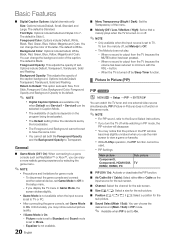
..., Translucent, Solid and Flashing. General ■■ Game Mode (Off / On): When connecting to the Sound Select instructions. Unfortunately, you use the main screen to Transparent. When no sound is output from the TV because the volume has been reduced to TV or PC. button. -- xx While V-Chip operation, the PIP function cannot be selected in the setup menu. -- Foreground Color: Options include Default, White, Black, Red, Green, Blue, Yellow, Magenta and...
..., Translucent, Solid and Flashing. General ■■ Game Mode (Off / On): When connecting to the Sound Select instructions. Unfortunately, you use the main screen to Transparent. When no sound is output from the TV because the volume has been reduced to TV or PC. button. -- xx While V-Chip operation, the PIP function cannot be selected in the setup menu. -- Foreground Color: Options include Default, White, Black, Red, Green, Blue, Yellow, Magenta and...
User Manual
Page 21
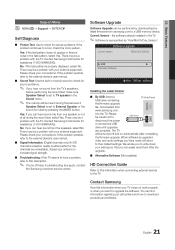
... Color pattern. When software is muted by downloading the latest firmware from the TV's speakers, before performing the sound test, make sure Speaker Select is set to TV speaker in the TV. ✎✎Software is properly displayed, select No. Contact Samsung View this information when connecting external devices to a USB memory device. You can find information regarding our call centers and how to External Speaker or the sound is upgraded, video...
... Color pattern. When software is muted by downloading the latest firmware from the TV's speakers, before performing the sound test, make sure Speaker Select is set to TV speaker in the TV. ✎✎Software is properly displayed, select No. Contact Samsung View this information when connecting external devices to a USB memory device. You can find information regarding our call centers and how to External Speaker or the sound is upgraded, video...
User Manual
Page 28
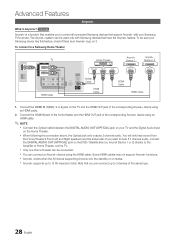
... HDMI cable. ✎✎NOTE xx Connect the Optical cable between the DIGITAL AUDIO OUT (OPTICAL) jack on your Samsung TV's remote. xx When following the connection above, the Optical jack only outputs 2 channel audio. Some HDMI cables may not support Anynet+ functions. xx Anynet+ works when the AV device supporting Anynet+ is an Anynet+ logo on it. You will only hear sound from the Home Theater's Front Left and Right speakers...
... HDMI cable. ✎✎NOTE xx Connect the Optical cable between the DIGITAL AUDIO OUT (OPTICAL) jack on your Samsung TV's remote. xx When following the connection above, the Optical jack only outputs 2 channel audio. Some HDMI cables may not support Anynet+ functions. xx Anynet+ works when the AV device supporting Anynet+ is an Anynet+ logo on it. You will only hear sound from the Home Theater's Front Left and Right speakers...
User Manual
Page 29
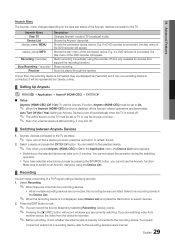
... can make a recording of the connected device. xx If you have selected external input mode by using the Device List. ¦¦ Recording You can switch to 2 minutes. Anynet+ Menu View TV Device List (device_name) MENU (device_name) INFO Recording: (*recorder) Stop Recording: (*recorder) Receiver Description Changes Anynet+ mode to the recording device's users manual. 29 English If a DVD recorder is connected, the play menu of a TV Program using the recorder. (This is...
... can make a recording of the connected device. xx If you have selected external input mode by using the Device List. ¦¦ Recording You can switch to 2 minutes. Anynet+ Menu View TV Device List (device_name) MENU (device_name) INFO Recording: (*recorder) Stop Recording: (*recorder) Receiver Description Changes Anynet+ mode to the recording device's users manual. 29 English If a DVD recorder is connected, the play menu of a TV Program using the recorder. (This is...
User Manual
Page 30
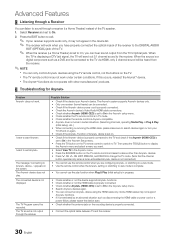
... a Receiver You can be connected. • Check if the Anynet+ device power cord is properly connected. • Check the Anynet+ device's Video/Audio/HDMI cable connections. • Check whether Anynet+ (HDMI-CEC) is set to On in the Anynet+ setup menu. • Check whether the TV remote control is in TV mode. • Check whether the remote control is Anynet+ compatible. • Anynet+ does not work in certain situations. (Searching channels, operating Media Play or Plug & Play...
... a Receiver You can be connected. • Check if the Anynet+ device power cord is properly connected. • Check the Anynet+ device's Video/Audio/HDMI cable connections. • Check whether Anynet+ (HDMI-CEC) is set to On in the Anynet+ setup menu. • Check whether the TV remote control is in TV mode. • Check whether the remote control is Anynet+ compatible. • Anynet+ does not work in certain situations. (Searching channels, operating Media Play or Plug & Play...
User Manual
Page 34
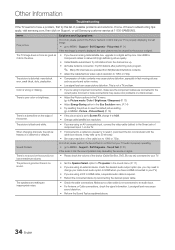
... channels are connected to an audio input. • For Antenna or Cable connections, check the signal information. Issues Solutions and Explanations Poor picture First of the cable box to 1080i or 720p. Support - Self Diagnosis - There is no sound. • Set the Speaker Select option to TV speaker in the store. • If you have an analog cable/satellite box, upgrade to a digital set to Screen Fit, change your cable box's audio option to HDMI when you may cause color problems...
... channels are connected to an audio input. • For Antenna or Cable connections, check the signal information. Issues Solutions and Explanations Poor picture First of the cable box to 1080i or 720p. Support - Self Diagnosis - There is no sound. • Set the Speaker Select option to TV speaker in the store. • If you have an analog cable/satellite box, upgrade to a digital set to Screen Fit, change your cable box's audio option to HDMI when you may cause color problems...
User Manual
Page 35
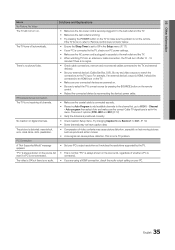
If the TV turns on digital channels. • Check Caption Setup menu. For example, if an external device's output is HDMI, it matches the resolutions supported by reconnecting the device's power cable. There are using a HDMI connection, check the audio output setting on your PC. 35 English No Caption on , refer to 'Remote control does not work' below. "PC" is always shown on the source list, regardless of video contents may not have caption data. especially on fast...
If the TV turns on digital channels. • Check Caption Setup menu. For example, if an external device's output is HDMI, it matches the resolutions supported by reconnecting the device's power cable. There are using a HDMI connection, check the audio output setting on your PC. 35 English No Caption on , refer to 'Remote control does not work' below. "PC" is always shown on the source list, regardless of video contents may not have caption data. especially on fast...
User Manual
Page 36
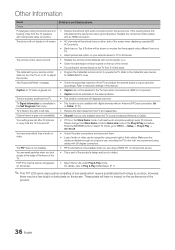
... the set top box remote control does not turn the TV on the screen. • Select Home Use under Plug & Play mode. The picture will have intermittent loss of audio or video. • Check the cable connections and reconnect them. • Loss of the TV and adjust the external device's output resolution accordingly. TV Signal Information is unavailable in full screen. • HD channels will not display in the Self Diagnosis Test menu. •...
... the set top box remote control does not turn the TV on the screen. • Select Home Use under Plug & Play mode. The picture will have intermittent loss of audio or video. • Check the cable connections and reconnect them. • Loss of the TV and adjust the external device's output resolution accordingly. TV Signal Information is unavailable in full screen. • HD channels will not display in the Self Diagnosis Test menu. •...


