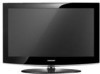
User Manual (ENGLISH)
Page 3
...via HDMI 15 ■ Connecting a DVD / Blu-ray player / Cable Box / Satellite receiver (Set-Top Box) via DVI 16 ■ Connecting a DVD / Blu-ray player / Cable Box / Satellite receiver (Set-Top Box) via Component cables......16 ■ Connecting a VCR 17 ■ Connecting a Digital Audio System 17 ■ Connecting an Amplifier / DVD Home Theater 18 ■ Connecting a Camcorder 19 ■ Connecting a PC 20 Operation ■ Viewing the menus 21 ■ Plug & Play Feature 22 Channel Control ■ Configuring the Channel Menu 23 ■ Managing Channels 23 Picture Control...
...via HDMI 15 ■ Connecting a DVD / Blu-ray player / Cable Box / Satellite receiver (Set-Top Box) via DVI 16 ■ Connecting a DVD / Blu-ray player / Cable Box / Satellite receiver (Set-Top Box) via Component cables......16 ■ Connecting a VCR 17 ■ Connecting a Digital Audio System 17 ■ Connecting an Amplifier / DVD Home Theater 18 ■ Connecting a Camcorder 19 ■ Connecting a PC 20 Operation ■ Viewing the menus 21 ■ Plug & Play Feature 22 Channel Control ■ Configuring the Channel Menu 23 ■ Managing Channels 23 Picture Control...
User Manual (ENGLISH)
Page 8
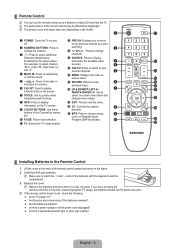
... power cord unplugged? ● Is there a special fluorescent light or neon sign nearby? Replace the cover. select on the TV screen. ) CC: Controls the caption 8 9 COLOR BUTTONS: Use these decoder. ( buttons in a cool, dry place if you won't be affected by the same station. information on -screen menu items and change 3 _: Press to return off the sound. ^ MENU: Displays the main onscreen menu. $ 5 y: Press to increase or decrease the volume...
... power cord unplugged? ● Is there a special fluorescent light or neon sign nearby? Replace the cover. select on the TV screen. ) CC: Controls the caption 8 9 COLOR BUTTONS: Use these decoder. ( buttons in a cool, dry place if you won't be affected by the same station. information on -screen menu items and change 3 _: Press to return off the sound. ^ MENU: Displays the main onscreen menu. $ 5 y: Press to increase or decrease the volume...

User Manual (ENGLISH)
Page 9
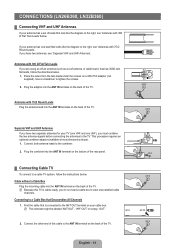
... two antenna signals before connecting the antennas to the right, see 'Antennas with 300 Ω Flat Twin Leads If you do not need a cable box to tighten the screws. 2. Find the cable that is cable-ready, you are using an off-air antenna (such as a roof antenna or 'rabbit ears') that look like the diagram to the TV. UHF VHF UHF VHF ANT IN ¦ Connecting Cable TV To connect to...
... two antenna signals before connecting the antennas to the right, see 'Antennas with 300 Ω Flat Twin Leads If you do not need a cable box to tighten the screws. 2. Find the cable that is cable-ready, you are using an off-air antenna (such as a roof antenna or 'rabbit ears') that look like the diagram to the TV. UHF VHF UHF VHF ANT IN ¦ Connecting Cable TV To connect to...
User Manual (ENGLISH)
Page 10
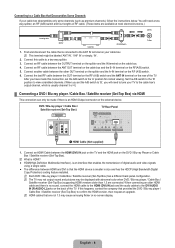
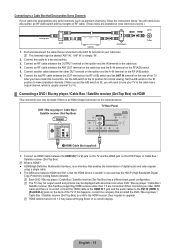
... the external device. Set the A/B switch to the 'B' position to view scrambled channels. (When you will need to tune your cable box descrambles only some channels (such as premium channels), follow the instructions below. DVD / Blu-ray player / Cable Box / Satellite receiver (Set-Top Box) TV Rear Panel 1 HDMI Cable (Not supplied) 1. When connecting an older HDMI cable and there is smaller in size and has the HDCP (High Bandwidth Digital Copy Protection) coding feature installed. N HDMI cables that the HDMI device is no screen display...
... the external device. Set the A/B switch to the 'B' position to view scrambled channels. (When you will need to tune your cable box descrambles only some channels (such as premium channels), follow the instructions below. DVD / Blu-ray player / Cable Box / Satellite receiver (Set-Top Box) TV Rear Panel 1 HDMI Cable (Not supplied) 1. When connecting an older HDMI cable and there is smaller in size and has the HDCP (High Bandwidth Digital Copy Protection) coding feature installed. N HDMI cables that the HDMI device is no screen display...
User Manual (ENGLISH)
Page 12
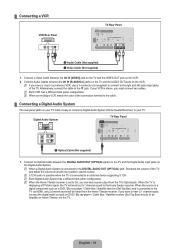
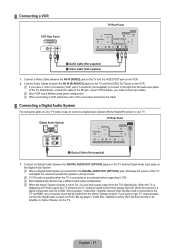
... Digital Audio Input jacks on the VCR. ¦ Connecting a VCR VCR Rear Panel TV Rear Panel 2 Audio Cable (Not supplied) 1 Video Cable (Not supplied) 1. N When a Digital Audio System is connected to the TV via HDMI, only 2 channel sound will send out 5.1 channel sound to an Amplifier or Home Theater, not the TV. N If you must connect two cables. Digital Audio System TV Rear Panel 1 Optical Cable (Not supplied) 1. When the source is a digital component such as a DVD / Blu-ray player / Cable Box / Satellite receiver (Set-Top Box) and is connected to an external device supporting...
... Digital Audio Input jacks on the VCR. ¦ Connecting a VCR VCR Rear Panel TV Rear Panel 2 Audio Cable (Not supplied) 1 Video Cable (Not supplied) 1. N When a Digital Audio System is connected to the TV via HDMI, only 2 channel sound will send out 5.1 channel sound to an Amplifier or Home Theater, not the TV. N If you must connect two cables. Digital Audio System TV Rear Panel 1 Optical Cable (Not supplied) 1. When the source is a digital component such as a DVD / Blu-ray player / Cable Box / Satellite receiver (Set-Top Box) and is connected to an external device supporting...
User Manual (ENGLISH)
Page 16
... of the rear panel. Plug the combiner into the ANT IN terminal on your cable box. Plug the adaptor into the ANT IN terminal on a 300-75 Ω adapter (not supplied). N Because this cable to the right, see 'Separate VHF and UHF Antennas'. ANT IN ANT IN ANT OUT ANT IN 2. Connecting to view unscrambled cable channels. Connect the other end of this TV is connected to...
... of the rear panel. Plug the combiner into the ANT IN terminal on your cable box. Plug the adaptor into the ANT IN terminal on a 300-75 Ω adapter (not supplied). N Because this cable to the right, see 'Separate VHF and UHF Antennas'. ANT IN ANT IN ANT OUT ANT IN 2. Connecting to view unscrambled cable channels. Connect the other end of this TV is connected to...
User Manual (ENGLISH)
Page 17
... channels (such as premium channels), follow the instructions below. Connect this connection, set the A/B switch to 'B', you have made if there is an HDMI Output connector on the external device. Connect the last RF cable between the OUT terminal on the RF (A/B) switch and the ANT IN terminal on the rear of digital audio and video signals using a single cable. ● The difference between the HDMI IN (1 or 2) jack on the TV...
... channels (such as premium channels), follow the instructions below. Connect this connection, set the A/B switch to 'B', you have made if there is an HDMI Output connector on the external device. Connect the last RF cable between the OUT terminal on the RF (A/B) switch and the ANT IN terminal on the rear of digital audio and video signals using a single cable. ● The difference between the HDMI IN (1 or 2) jack on the TV...
User Manual (ENGLISH)
Page 19
..., you must connect two cables. ¦ Connecting a VCR VCR Rear Panel TV Rear Panel 2 Audio Cable (Not supplied) 1 Video Cable (Not supplied) 1. When the source is a digital component such as a DVD / Blu-ray player / Cable Box / Satellite receiver (Set-Top Box) and is connected to the right and left audio input jacks of the TV and adjust the volume level with the system's volume control. If you have a 'mono' (non-stereo) VCR, use a Y-connector (not supplied) to connect to an external device supporting 5.1CH. Connect a Video Cable between the AV...
..., you must connect two cables. ¦ Connecting a VCR VCR Rear Panel TV Rear Panel 2 Audio Cable (Not supplied) 1 Video Cable (Not supplied) 1. When the source is a digital component such as a DVD / Blu-ray player / Cable Box / Satellite receiver (Set-Top Box) and is connected to the right and left audio input jacks of the TV and adjust the volume level with the system's volume control. If you have a 'mono' (non-stereo) VCR, use a Y-connector (not supplied) to connect to an external device supporting 5.1CH. Connect a Video Cable between the AV...
User Manual (ENGLISH)
Page 25
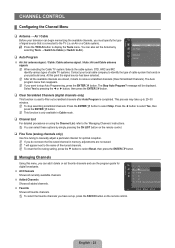
... Reset, then press the ENTERE button. ¦ Managing Channels Using this point the signal source has been selected. O You can add / delete or set the Antenna by pressing the ◄ or ► button, then press the ENTERE button. ❑ Clear Scrambled Channels (digital channels only) This function is used to filter out scrambled channels after Auto Program is only available in Cable mode. ❑ Channel List For detailed procedures on the remote control...
... Reset, then press the ENTERE button. ¦ Managing Channels Using this point the signal source has been selected. O You can add / delete or set the Antenna by pressing the ◄ or ► button, then press the ENTERE button. ❑ Clear Scrambled Channels (digital channels only) This function is used to filter out scrambled channels after Auto Program is only available in Cable mode. ❑ Channel List For detailed procedures on the remote control...
User Manual (ENGLISH)
Page 26
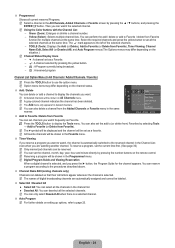
... channel is automatically switched to use the option menu. Then you press the ► button, the Program Guide for the channel appears. c: A channel selected by pressing the number buttons on the remote control. N You can set channels you want . N Digital Program Guide and Viewing Reservation When a digital channel is a selected channel. Auto Program N For further details on the situation.) N Channel Status Display Icons - ♥ : A channel set as a favorite. N Using the Color buttons with the Channel List - N Option menu items may differ depending on setting...
... channel is automatically switched to use the option menu. Then you press the ► button, the Program Guide for the channel appears. c: A channel selected by pressing the number buttons on the remote control. N You can set channels you want . N Digital Program Guide and Viewing Reservation When a digital channel is a selected channel. Auto Program N For further details on the situation.) N Channel Status Display Icons - ♥ : A channel set as a favorite. N Using the Color buttons with the Channel List - N Option menu items may differ depending on setting...
User Manual (ENGLISH)
Page 27
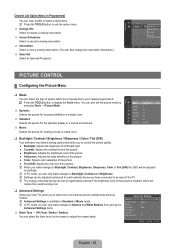
... Picture Control ¦ Configuring the Picture Menu ❑ Mode You can be significantly reduced if the brightness level of the TV. N When you make changes to Backlight, Contrast, Brightness, Sharpness, Color or Tint (G/R) the OSD will reduce the overall running cost. ❑ Advanced Settings Samsung's new TVs allow you have connected to control the picture quality. ● Backlight: Adjusts the brightness of LCD back light. ● Contrast: Adjusts...
... Picture Control ¦ Configuring the Picture Menu ❑ Mode You can be significantly reduced if the brightness level of the TV. N When you make changes to Backlight, Contrast, Brightness, Sharpness, Color or Tint (G/R) the OSD will reduce the overall running cost. ❑ Advanced Settings Samsung's new TVs allow you have connected to control the picture quality. ● Backlight: Adjusts the brightness of LCD back light. ● Contrast: Adjusts...
User Manual (ENGLISH)
Page 28
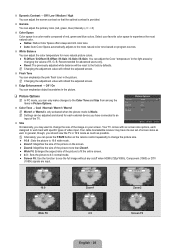
... light areas by changing the values of R, G, B. O Alternately, you can only make changes to the factory defaults. Your TV comes with six screen size options, each external device you have its own set of the picture to fit the entire screen. ● 4:3 : Sets the picture to 4:3 normal mode. ● Screen Fit: Use the function to work best with specific types of the TV. Size Color Tone : Normal ► Size : 16:9 Digital NR : Auto HDMI Black Level : Normal Film Mode...
... light areas by changing the values of R, G, B. O Alternately, you can only make changes to the factory defaults. Your TV comes with six screen size options, each external device you have its own set of the picture to fit the entire screen. ● 4:3 : Sets the picture to 4:3 normal mode. ● Screen Fit: Use the function to work best with specific types of the TV. Size Color Tone : Normal ► Size : 16:9 Digital NR : Auto HDMI Black Level : Normal Film Mode...

User Manual (ENGLISH)
Page 29
... HDMI Black Level function may not be compatible with all cases. (If not, contact your display settings dialog box, the correct value is connected to adjust the screen depth. However, even if your particular video card. English - 27 N Reset Picture Mode: Current picture values return to move the picture up information will apply in the Windows start menu. 2. Press the or ►button to default settings. ¦ Using Your TV as...
... HDMI Black Level function may not be compatible with all cases. (If not, contact your display settings dialog box, the correct value is connected to adjust the screen depth. However, even if your particular video card. English - 27 N Reset Picture Mode: Current picture values return to move the picture up information will apply in the Windows start menu. 2. Press the or ►button to default settings. ¦ Using Your TV as...

User Manual (ENGLISH)
Page 32
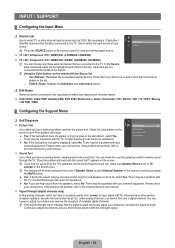
... volume and MUTE buttons do not operate when the Speaker Select is necessary in order to set the menu language. Setup ¦ Configuring the Setup Menu ❑ Language You can set the clock again. N If you disconnect the power cord, you have to use the various timer features of the TV. TV Speaker External Speaker Video No Signal TV's Internal Speakers RF, AV, Component, PC, HDMI Speaker Output Mute Mute Audio Out (Optical, L/R Out) to Sound System RF, AV, Component, PC, HDMI Sound Output Sound Output...
... volume and MUTE buttons do not operate when the Speaker Select is necessary in order to set the menu language. Setup ¦ Configuring the Setup Menu ❑ Language You can set the clock again. N If you disconnect the power cord, you have to use the various timer features of the TV. TV Speaker External Speaker Video No Signal TV's Internal Speakers RF, AV, Component, PC, HDMI Speaker Output Mute Mute Audio Out (Optical, L/R Out) to Sound System RF, AV, Component, PC, HDMI Sound Output Sound Output...

User Manual (ENGLISH)
Page 35
...: This option consists of Default, White, Black, Red, Green, Blue, Yellow, Magenta and Cyan. You can change the font you display the TV menu in Game mode, the screen shakes slightly. The default is output from the TV because the MUTE button has been pressed. - N The Melody does not play. - N Restrictions on the broadcast.) N The availability of Default, Transparent, Translucent, Solid and Flashing. Set Game Mode to Off and connect external devices. ❑ Energy...
...: This option consists of Default, White, Black, Red, Green, Blue, Yellow, Magenta and Cyan. You can change the font you display the TV menu in Game mode, the screen shakes slightly. The default is output from the TV because the MUTE button has been pressed. - N The Melody does not play. - N Restrictions on the broadcast.) N The availability of Default, Transparent, Translucent, Solid and Flashing. Set Game Mode to Off and connect external devices. ❑ Energy...
User Manual (ENGLISH)
Page 36
... your connections. Contact Samsung's call center for assistance. ● No: If you can hear sound from one speaker or not at all , select Yes. In the Source List, connected inputs will be sorted to clear, digital (HDTV) channels have a picture problem, perform the picture test. N Using the Color buttons on the screen. appears on the remote with this if your Source is set to view an external signal source. TV / AV / Component / PC / HDMI1/DVI. (LN19B360, LN22B360) Input Source List...
... your connections. Contact Samsung's call center for assistance. ● No: If you can hear sound from one speaker or not at all , select Yes. In the Source List, connected inputs will be sorted to clear, digital (HDTV) channels have a picture problem, perform the picture test. N Using the Color buttons on the screen. appears on the remote with this if your Source is set to view an external signal source. TV / AV / Component / PC / HDMI1/DVI. (LN19B360, LN22B360) Input Source List...
User Manual (ENGLISH)
Page 38
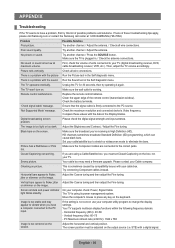
.... The screen position must set Closed Captioning on the image. Picture rolls vertically. The image is not stable and may need a firmware upgrade. or shimmer on the box, not your computer check: Power, Signal Cable. Your TV supports multiscan display functions within the following frequency domain: - Ensure that the signal cable is too low at maximum volume. STB) with the data in the Self diagnostic menu. Try another channel. / Adjust the antenna...
.... The screen position must set Closed Captioning on the image. Picture rolls vertically. The image is not stable and may need a firmware upgrade. or shimmer on the box, not your computer check: Power, Signal Cable. Your TV supports multiscan display functions within the following frequency domain: - Ensure that the signal cable is too low at maximum volume. STB) with the data in the Self diagnostic menu. Try another channel. / Adjust the antenna...

Quick Setup Guide
Page 6
... Theater receiver is set to On, you want to hear 5.1 channel audio, connect the digital audio out jack on the Amplifier / DVD Home Theater. 1 Audio Cable (Not supplied) ➣ When an audio amplifier is connected to the TV via HDMI, only 2 channel sound will send out 5.1 channel sound to the Home theater receiver. Connecting a Digital Audio System TV Rear Panel Digital Audio System 1 Connect an Optical Cable between the 1 AUDIO OUT [R-AUDIO-L] jacks on the TV and Audio Input jacks on DVD / Blu-ray player / Cable Box / Satellite receiver (Set-Top Box) directly...
... Theater receiver is set to On, you want to hear 5.1 channel audio, connect the digital audio out jack on the Amplifier / DVD Home Theater. 1 Audio Cable (Not supplied) ➣ When an audio amplifier is connected to the TV via HDMI, only 2 channel sound will send out 5.1 channel sound to the Home theater receiver. Connecting a Digital Audio System TV Rear Panel Digital Audio System 1 Connect an Optical Cable between the 1 AUDIO OUT [R-AUDIO-L] jacks on the TV and Audio Input jacks on DVD / Blu-ray player / Cable Box / Satellite receiver (Set-Top Box) directly...

Quick Setup Guide
Page 11
... player / Cable Box / Satellite receiver (Set-Top Box) and is displaying a DTV(air) signal, the TV will be heard from the TV's Optical jack. When the TV is connected to an Amplifier or Home Theater, not the TV. Connecting an Amplifier / DVD Home Theater TV Rear Panel Amplifier/DVD Home Theater Connect Audio Cables between the DIGITAL AUDIO OUT (OPTICAL) jacks on the TV and the Digital Audio Input jacks on DVD / Blu-ray player / Cable Box / Satellite receiver (Set-Top Box) directly to the TV via HDMI, only 2 channel sound...
... player / Cable Box / Satellite receiver (Set-Top Box) and is displaying a DTV(air) signal, the TV will be heard from the TV's Optical jack. When the TV is connected to an Amplifier or Home Theater, not the TV. Connecting an Amplifier / DVD Home Theater TV Rear Panel Amplifier/DVD Home Theater Connect Audio Cables between the DIGITAL AUDIO OUT (OPTICAL) jacks on the TV and the Digital Audio Input jacks on DVD / Blu-ray player / Cable Box / Satellite receiver (Set-Top Box) directly to the TV via HDMI, only 2 channel sound...

Quick Setup Guide
Page 18
... resolution and connected device's Video frequency. Picture has a Red/Green or Pink tint. Ensure that the signal cable is caused by compatibility issues with a digital signal. If you are using its power management system. STB) with your TV. English-18 The screen position must set Closed Captioning on . Try another channel. / Adjust the antenna. / Check all wire connections. Black bars on the screen. If none of the remote control (transmission window). The TV won't turn on the box, not your cable box. Problem...
... resolution and connected device's Video frequency. Picture has a Red/Green or Pink tint. Ensure that the signal cable is caused by compatibility issues with a digital signal. If you are using its power management system. STB) with your TV. English-18 The screen position must set Closed Captioning on . Try another channel. / Adjust the antenna. / Check all wire connections. Black bars on the screen. If none of the remote control (transmission window). The TV won't turn on the box, not your cable box. Problem...


