
User Manual
Page 2
... supplied USB cable into the PC's USB port and the camera's USB connection terminal. (p.85) Check the camera's power Check the camera's power. Samsung camera takes no responsibility for buying a Samsung Digital Camera. ● Prior to using this camera in the following order Set up the camera driver Before connecting the camera to a PC, via the USB cable, you will need...
... supplied USB cable into the PC's USB port and the camera's USB connection terminal. (p.85) Check the camera's power Check the camera's power. Samsung camera takes no responsibility for buying a Samsung Digital Camera. ● Prior to using this camera in the following order Set up the camera driver Before connecting the camera to a PC, via the USB cable, you will need...
User Manual
Page 3
... not attempt to cool. ■ Do not leave this camera with wet hands. Switch off the camera, and then disconnect the power source. You must contact your dealer or Samsung Camera Service centre. ■ Please do not cover the camera or Charger. Do not continue to prevent accidents e.g.: •... For safety reasons keep this be carried out by your dealer or Samsung Camera Service centre. This may adversely affect the camera's internal components and could pose a risk of children or animals to use the camera as this could increase the risk of liquid or a foreign object enter...
... not attempt to cool. ■ Do not leave this camera with wet hands. Switch off the camera, and then disconnect the power source. You must contact your dealer or Samsung Camera Service centre. ■ Please do not cover the camera or Charger. Do not continue to prevent accidents e.g.: •... For safety reasons keep this be carried out by your dealer or Samsung Camera Service centre. This may adversely affect the camera's internal components and could pose a risk of children or animals to use the camera as this could increase the risk of liquid or a foreign object enter...
User Manual
Page 4
... to a Power Source......9 ●Inserting the memory card .........12 ●Instructions on when you capture an image. ■ Credit cards may cause camera malfunction. ※ Available AC adapter : Voltage: 5.0V, Amprer: 2.0A, Diameter (Φ): 4.0 Contents READY ●System chart 5 ●...Identification of time. Avoid leaving magnetic strip cards near case. Battery may leak corrosive electrolyte and permanently damage the camera's components. ■ Do not fire the flash while it continuously. After use the Scene modes ...19 ●Things to Watch ...
... to a Power Source......9 ●Inserting the memory card .........12 ●Instructions on when you capture an image. ■ Credit cards may cause camera malfunction. ※ Available AC adapter : Voltage: 5.0V, Amprer: 2.0A, Diameter (Φ): 4.0 Contents READY ●System chart 5 ●...Identification of time. Avoid leaving magnetic strip cards near case. Battery may leak corrosive electrolyte and permanently damage the camera's components. ■ Do not fire the flash while it continuously. After use the Scene modes ...19 ●Things to Watch ...
User Manual
Page 5
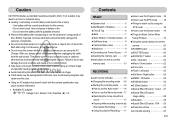
... compensation .........37 ■Long Time shutter 38 ■Movie Clip frame stabiliser .........38 ●Using the LCD monitor to adjust the camera settings 39 ■Sharpness 39 ■Contrast 39 ■Voice Memo 40 ■Voice Recording 40 ■Recording the movie clip... a movie clip .........49 ■Movie clip capture function.........50 ■On camera movie trimming ......50 ■Playing back a recorded voice ...51 ●LCD monitor Indicator 51 ●Using the camera buttons to set the camera 52 ■Thumbnail / Enlargement button ...52 ■Info / Up button 53...
... compensation .........37 ■Long Time shutter 38 ■Movie Clip frame stabiliser .........38 ●Using the LCD monitor to adjust the camera settings 39 ■Sharpness 39 ■Contrast 39 ■Voice Memo 40 ■Voice Recording 40 ■Recording the movie clip... a movie clip .........49 ■Movie clip capture function.........50 ■On camera movie trimming ......50 ■Playing back a recorded voice ...51 ●LCD monitor Indicator 51 ●Using the camera buttons to set the camera 52 ■Thumbnail / Enlargement button ...52 ■Info / Up button 53...

User Manual
Page 6
To buy the optional equipment, contact your nearest Samsung dealer or Samsung service centre. < Included items > Camera case User manual, Product warranty Camera strap Software CD (see p.81) Computer (see p.85) PictBridge compatible printer (see p.71) DPOF compatible printer (see p.68) SD memory card / MMC (see p.12) AC ...
To buy the optional equipment, contact your nearest Samsung dealer or Samsung service centre. < Included items > Camera case User manual, Product warranty Camera strap Software CD (see p.81) Computer (see p.85) PictBridge compatible printer (see p.71) DPOF compatible printer (see p.68) SD memory card / MMC (see p.12) AC ...

User Manual
Page 10
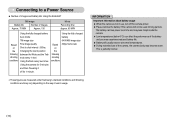
...the subject) ■ Mode icon : Refer to a Power Source ■ You should use the rechargeable battery (SLB-0637) supplied with the camera. ■ SLB-0637 rechargeable battery Specification Model Type Capacity Voltage Charging time SLB-0637 Lithium Ion 660mAh 3.7V Approx. 90 MIN (Using the ...SBC-L7) 《9》 Connecting to page 16 for more information about the camera mode setting. Identification of features ■ Self-timer lamp Icon Status Blinking Blinking Blinking Description - MODE ICON MODE ICON MODE ICON AUTO EPS...
...the subject) ■ Mode icon : Refer to a Power Source ■ You should use the rechargeable battery (SLB-0637) supplied with the camera. ■ SLB-0637 rechargeable battery Specification Model Type Capacity Voltage Charging time SLB-0637 Lithium Ion 660mAh 3.7V Approx. 90 MIN (Using the ...SBC-L7) 《9》 Connecting to page 16 for more information about the camera mode setting. Identification of features ■ Self-timer lamp Icon Status Blinking Blinking Blinking Description - MODE ICON MODE ICON MODE ICON AUTO EPS...
User Manual
Page 11
...Changing the zoom position following shooting conditions Using the fully charged battery 640X480 image size 30fps frame rate ※These figures are measured under Samsung's standard conditions and Shooting conditions and may vary depending on the Fine image quality Shot to shot interval : 30Sec. conditions Using the ...life. ● Battery will not be used for 1 minute. The battery can lose power over time and may leak if kept inside the camera. ● Low temperatures (below 0°C) can affect the performance of images Approx. 75 MIN Approx. 150 Movie Recording time Approx. 65 ...
...Changing the zoom position following shooting conditions Using the fully charged battery 640X480 image size 30fps frame rate ※These figures are measured under Samsung's standard conditions and Shooting conditions and may vary depending on the Fine image quality Shot to shot interval : 30Sec. conditions Using the ...life. ● Battery will not be used for 1 minute. The battery can lose power over time and may leak if kept inside the camera. ● Low temperatures (below 0°C) can affect the performance of images Approx. 75 MIN Approx. 150 Movie Recording time Approx. 65 ...
User Manual
Page 13
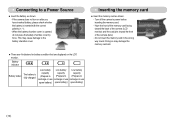
... condition that are displayed on after you have inserted battery, please check whether the battery is inserted with the correct polarity (+ / -). - Turn off the camera's power before inserting the memory card. - Do not insert the memory card in the wrong way round. If the...■ Insert the memory card as shown - Have the front of the memory card facing toward the back of the camera (LCD monitor) and the card pins toward the front of the camera (lens) - When the battery chamber cover is fully charged Low battery Low battery Low battery capacity capacity capacity (Prepare...
... condition that are displayed on after you have inserted battery, please check whether the battery is inserted with the correct polarity (+ / -). - Turn off the camera's power before inserting the memory card. - Do not insert the memory card in the wrong way round. If the...■ Insert the memory card as shown - Have the front of the memory card facing toward the back of the camera (LCD monitor) and the card pins toward the front of the camera (lens) - When the battery chamber cover is fully charged Low battery Low battery Low battery capacity capacity capacity (Prepare...

User Manual
Page 14
...soft cloth. ● Please keep the memory card in its case when not in use. ● During and after periods of memory in another digital camera or memory card reader. ● If the memory card is subjected to any of the memory card will eventually reduce the memory card's performance.... Should this camera. ● Do not use a memory card formatted by the Samsung warranty. ● The memory card is being inserted or removed. ● Repeated use of the following, the recorded...
...soft cloth. ● Please keep the memory card in its case when not in use. ● During and after periods of memory in another digital camera or memory card reader. ● If the memory card is subjected to any of the memory card will eventually reduce the memory card's performance.... Should this camera. ● Do not use a memory card formatted by the Samsung warranty. ● The memory card is being inserted or removed. ● Repeated use of the following, the recorded...

User Manual
Page 15
About 16' About 39' ※ The recording times can be protected. Instructions on how to use the memory card ■ The camera can use during the movie recording. 《14》 Slide the switch to the top of the SD memory card before taking a picture. ■ ... the bottom of the SD memory card, the data protection will be affected by the zoom operation. Card pins Write protect switch Label [SD (Secure Digital) memory card] The SD/ SDHC memory card has a write protect switch that prevents image files from being deleted or formatted. These figures are approximate ...
About 16' About 39' ※ The recording times can be protected. Instructions on how to use the memory card ■ The camera can use during the movie recording. 《14》 Slide the switch to the top of the SD memory card before taking a picture. ■ ... the bottom of the SD memory card, the data protection will be affected by the zoom operation. Card pins Write protect switch Label [SD (Secure Digital) memory card] The SD/ SDHC memory card has a write protect switch that prevents image files from being deleted or formatted. These figures are approximate ...
User Manual
Page 16
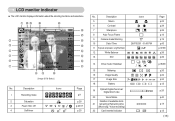
...9324; ⑥ ⑫ ⑦ ⑪ ⑧⑨ ⑩ [Image & Full Status] No. Description 5 Macro 6 Contrast 7 Sharpness 8 Auto Focus Frame 9 Camera shake Warning 10 Date / Time 11 Exposure compensation / LongTime Shutter 12 White Balance 13 ISO 14 Drive mode / Stabiliser 15 Metering 16 Image Quality 17... Image Size 18 Battery 19 Optical/ Digital Zoom bar/ Digital Zoom rate 20 Voice Memo Number of available shots 21 remaining/ Remaining time (Movie clip / Voice recording) ...
...9324; ⑥ ⑫ ⑦ ⑪ ⑧⑨ ⑩ [Image & Full Status] No. Description 5 Macro 6 Contrast 7 Sharpness 8 Auto Focus Frame 9 Camera shake Warning 10 Date / Time 11 Exposure compensation / LongTime Shutter 12 White Balance 13 ISO 14 Drive mode / Stabiliser 15 Metering 16 Image Quality 17... Image Size 18 Battery 19 Optical/ Digital Zoom bar/ Digital Zoom rate 20 Voice Memo Number of available shots 21 remaining/ Remaining time (Movie clip / Voice recording) ...
User Manual
Page 17
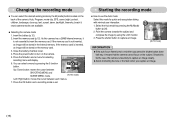
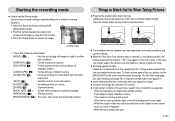
... menu for quick and easy picture taking with minimal user interaction. 1. Select the Auto mode by using the LCD monitor. 3. Point the camera towards the subject and compose the image by pressing the M (Mode) button (p.26). 2. Auto, Program, movie clip, EPS, scene ...(night, portrait, children, landscape, close-up, text, sunset, dawn, backlight, fireworks, beach & snow) camera modes are available. ● Selecting the camera mode 1. Starting the recording mode ■ How to insert the memory card. Changing the recording mode ■ You can select a...
... menu for quick and easy picture taking with minimal user interaction. 1. Select the Auto mode by using the LCD monitor. 3. Point the camera towards the subject and compose the image by pressing the M (Mode) button (p.26). 2. Auto, Program, movie clip, EPS, scene ...(night, portrait, children, landscape, close-up, text, sunset, dawn, backlight, fireworks, beach & snow) camera modes are available. ● Selecting the camera mode 1. Starting the recording mode ■ How to insert the memory card. Changing the recording mode ■ You can select a...

User Manual
Page 18
... capacity allows. 1. Image size : 640X480, 320X240 (user selectable) - Select the [On] menu by using the LCD monitor. 3. Point the camera towards the subject and compose the image by pressing the Left / Right button. 6. If you can record your favourite scenes into a movie clip ... (Mode) button (p.26). 2. You can record the movie clip without sound. ■ Pausing while recording a movie clip (Successive Recording) This camera allows you wish to stop recording, press the shutter button again. ※ Image size and type are recorded for MOVIE CLIP mode. 3. If...
... capacity allows. 1. Image size : 640X480, 320X240 (user selectable) - Select the [On] menu by using the LCD monitor. 3. Point the camera towards the subject and compose the image by pressing the Left / Right button. 6. If you can record your favourite scenes into a movie clip ... (Mode) button (p.26). 2. You can record the movie clip without sound. ■ Pausing while recording a movie clip (Successive Recording) This camera allows you wish to stop recording, press the shutter button again. ※ Image size and type are recorded for MOVIE CLIP mode. 3. If...

User Manual
Page 19
... How to use the EPS mode This mode will reduce the effect of camera shake and help you can manually configure various functions. 1. The digital zoom will not activate. 3. If the subject is moving the camera while the [Capturing!] message is darker than fluorescent lighting condition, the EPS... in dim conditions. 1. As the EPS uses the camera's digital signal processor, it may be blurred. 5. Press the shutter button to capture an image. ※ Refer to page 22-41 for using the LCD monitor. 3. Point the camera towards the subject and compose the image by pressing the...
... How to use the EPS mode This mode will reduce the effect of camera shake and help you can manually configure various functions. 1. The digital zoom will not activate. 3. If the subject is moving the camera while the [Capturing!] message is darker than fluorescent lighting condition, the EPS... in dim conditions. 1. As the EPS uses the camera's digital signal processor, it may be blurred. 5. Press the shutter button to capture an image. ※ Refer to page 22-41 for using the LCD monitor. 3. Point the camera towards the subject and compose the image by pressing the...
User Manual
Page 20
...■ Compose the image by backlight. [FIREWORK] ( ) : Firework scenes. [BEACH&SNOW] ( ) : For ocean, lake, beach and snowscape scenes. Point the camera towards the subject and compose the image by pressing the M (Mode) button (p.26). 2. In this mode to take pictures to confirm focus and flash battery... charge. To take a picture against the sun, please use a tripod, support the camera on a solid surface or change to flash shot mode. ■ Shooting against the sun may not perform as a stick or flagpole). - Select ...
...■ Compose the image by backlight. [FIREWORK] ( ) : Firework scenes. [BEACH&SNOW] ( ) : For ocean, lake, beach and snowscape scenes. Point the camera towards the subject and compose the image by pressing the M (Mode) button (p.26). 2. In this mode to take pictures to confirm focus and flash battery... charge. To take a picture against the sun, please use a tripod, support the camera on a solid surface or change to flash shot mode. ■ Shooting against the sun may not perform as a stick or flagpole). - Select ...
User Manual
Page 21
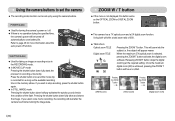
... down halfway activates the autofocus and checks the condition of 35X. ● TELE Zoom Optical zoom TELE Digital zoom TELE : Pressing the ZOOM T button. This will start after the camera has finished storing the image data. Press the shutter button once and the movie clip is recorded for... at the required setting. POWER button ● Used for as long as the OPTICAL ZOOM or DIGITAL ZOOM button. ● This camera has a 7X optical zoom and a 5X digital zoom function. If you select voice memo recording, the recording will zoom into the subject i.e. Refer to stop recording, ...
... down halfway activates the autofocus and checks the condition of 35X. ● TELE Zoom Optical zoom TELE Digital zoom TELE : Pressing the ZOOM T button. This will start after the camera has finished storing the image data. Press the shutter button once and the movie clip is recorded for... at the required setting. POWER button ● Used for as long as the OPTICAL ZOOM or DIGITAL ZOOM button. ● This camera has a 7X optical zoom and a 5X digital zoom function. If you select voice memo recording, the recording will zoom into the subject i.e. Refer to stop recording, ...

User Manual
Page 22
... setting i.e. ZOOM W / T button ● WIDE Zoom Optical zoom WIDE : Pressing the ZOOM W button. Releasing ZOOM W button stops digital zooming. Allow time for the camera to its furthest from the subject i.e. the subject will zoom out from the camera. Pressing the ZOOM W button Pressing the ZOOM W button [TELE zoom] [Optical zoom 2X] [WIDE zoom...
... setting i.e. ZOOM W / T button ● WIDE Zoom Optical zoom WIDE : Pressing the ZOOM W button. Releasing ZOOM W button stops digital zooming. Allow time for the camera to its furthest from the subject i.e. the subject will zoom out from the camera. Pressing the ZOOM W button Pressing the ZOOM W button [TELE zoom] [Optical zoom 2X] [WIDE zoom...

User Manual
Page 23
..., press the DOWN button to move down the sub menu. No icon] [Macro ( )] [Auto macro ( )] ■ Types of image. When the menu is possible that camera shake will display the information of focus modes and focus ranges (W : Wide, T : Tele) (Unit : cm) Mode Auto ( Focus Type Auto macro ( ) ) Normal Program ( ...: 150~Infinity INFORMATION ● When the macro mode is selected, it is not showing, you take macro pictures. Take care not to shake the camera. ● When you can use the MACRO / DOWN button to move from the main menu to a sub menu, or to take a picture within...
..., press the DOWN button to move down the sub menu. No icon] [Macro ( )] [Auto macro ( )] ■ Types of image. When the menu is possible that camera shake will display the information of focus modes and focus ranges (W : Wide, T : Tele) (Unit : cm) Mode Auto ( Focus Type Auto macro ( ) ) Normal Program ( ...: 150~Infinity INFORMATION ● When the macro mode is selected, it is not showing, you take macro pictures. Take care not to shake the camera. ● When you can use the MACRO / DOWN button to move from the main menu to a sub menu, or to take a picture within...

User Manual
Page 24
...exception of the picture, use the focus lock function. ● Using the Focus Lock 1. When the green auto focus frame lights up, it means the camera is in the centre of MOVIE CLIP mode. (p.16-19) 2. The image to avoid taking an unwanted picture. 3. If you release your picture as ...the desired flash mode indicator displays on the subject. Be careful not to press the SHUTTER button all the way down only halfway, move the camera to recompose your finger from the SHUTTER button, the focus lock function will be displayed on a subject not positioned in the centre of the ...
...exception of the picture, use the focus lock function. ● Using the Focus Lock 1. When the green auto focus frame lights up, it means the camera is in the centre of MOVIE CLIP mode. (p.16-19) 2. The image to avoid taking an unwanted picture. 3. If you release your picture as ...the desired flash mode indicator displays on the subject. Be careful not to press the SHUTTER button all the way down only halfway, move the camera to recompose your finger from the SHUTTER button, the focus lock function will be displayed on a subject not positioned in the centre of the ...

User Manual
Page 25
..., according to the prevailing conditions. Flash off The flash does not fire. Slow synchro The flash will operate in conjunction with poor light, the camera shake warning indicator ( ) will display on the LCD monitor. Flash ( ) / Left button INFORMATION ● If you press the shutter button...using a tripod for this function. When you take an image in a condition with a slow shutter speed in a poorly lit condition, the camera shake warning indicator ( ) will display on the LCD monitor. When you capture an image in order to check the shooting condition (Flash range ...
..., according to the prevailing conditions. Flash off The flash does not fire. Slow synchro The flash will operate in conjunction with poor light, the camera shake warning indicator ( ) will display on the LCD monitor. Flash ( ) / Left button INFORMATION ● If you press the shutter button...using a tripod for this function. When you take an image in a condition with a slow shutter speed in a poorly lit condition, the camera shake warning indicator ( ) will display on the LCD monitor. When you capture an image in order to check the shooting condition (Flash range ...


