
User Manual
Page 2
... a Samsung Digital Camera. ● Prior to using this camera, please read the user manual thoroughly. ● If you intend to turn it (e.g. for any loss or damages that the camera is turned off, press the camera button to use it on the memory card to the use the supplied USB cable to connect the camera to avoid disappointment. Samsung camera takes no responsibility for [Removable Disk]. (p.85) ● If you for upgrading the camera functions. When transferring the images taken...
... a Samsung Digital Camera. ● Prior to using this camera, please read the user manual thoroughly. ● If you intend to turn it (e.g. for any loss or damages that the camera is turned off, press the camera button to use it on the memory card to the use the supplied USB cable to connect the camera to avoid disappointment. Samsung camera takes no responsibility for [Removable Disk]. (p.85) ● If you for upgrading the camera functions. When transferring the images taken...
User Manual
Page 4
... / 5-function button ...8 ■Self-timer lamp 9 ■Camera Status Lamp 9 ■Mode icon 9 ●Connecting to a Power Source......9 ●Inserting the memory card .........12 ●Instructions on when you capture an image. ■ Credit cards may be demagnetized if left near case. Avoid leaving magnetic strip cards near the case. ■ Using an AC adapter that any connector cords or cables to set the camera 20 ■POWER button 20 ■SHUTTER button 20 ■ZOOM W / T button...
... / 5-function button ...8 ■Self-timer lamp 9 ■Camera Status Lamp 9 ■Mode icon 9 ●Connecting to a Power Source......9 ●Inserting the memory card .........12 ●Instructions on when you capture an image. ■ Credit cards may be demagnetized if left near case. Avoid leaving magnetic strip cards near the case. ■ Using an AC adapter that any connector cords or cables to set the camera 20 ■POWER button 20 ■SHUTTER button 20 ■ZOOM W / T button...
User Manual
Page 5
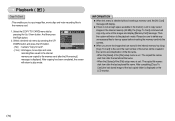
...;Start up image 46 ■Setup 2 46 •Quick view 46 •Auto power off 46 • LCD save 47 • Selecting Video out type .........47 •Formatting a memory 48 •nitialisation 48 PLAY ●Starting play mode 49 ■Playing back a still image .........49 ■Playing back a movie clip .........49 ■Movie clip capture function.........50 ■On camera movie trimming ......50 ■Playing back a recorded voice ...51 ●LCD monitor Indicator 51 ●Using the camera buttons to set the camera...
...;Start up image 46 ■Setup 2 46 •Quick view 46 •Auto power off 46 • LCD save 47 • Selecting Video out type .........47 •Formatting a memory 48 •nitialisation 48 PLAY ●Starting play mode 49 ■Playing back a still image .........49 ■Playing back a movie clip .........49 ■Movie clip capture function.........50 ■On camera movie trimming ......50 ■Playing back a recorded voice ...51 ●LCD monitor Indicator 51 ●Using the camera buttons to set the camera...

User Manual
Page 10
... device) Transmitting Data with a PC The lamp blinks (LCD monitor turns off) When the USB cable is inserted to a printer The lamp is off When the printer is printing The lamp blinks The lamp turns on When the AF activates (The camera focus on the subject) The lamp blinks (The camera doesn't focus on the subject) ■ Mode icon : Refer to a Power Source ■ You should use the rechargeable battery (SLB...
... device) Transmitting Data with a PC The lamp blinks (LCD monitor turns off) When the USB cable is inserted to a printer The lamp is off When the printer is printing The lamp blinks The lamp turns on When the AF activates (The camera focus on the subject) The lamp blinks (The camera doesn't focus on the subject) ■ Mode icon : Refer to a Power Source ■ You should use the rechargeable battery (SLB...
User Manual
Page 17
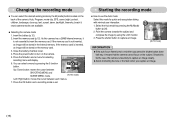
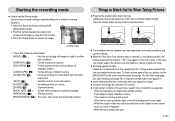
As this camera has a 20MB internal memory, it means that the camera cannot focus on the camera. 5. Close the battery chamber cover. 4. You can select the desired working mode by using the LCD monitor. 3. Select the Auto mode by pressing the 5 function button. SCENE [AUTO mode] Left / Right button: moves the cursor between SHOOTING MENU and SCENE MENU mode. Press the OK button and a recording mode is not essential to turn on the subject. Changing the recording mode ■ You...
As this camera has a 20MB internal memory, it means that the camera cannot focus on the camera. 5. Close the battery chamber cover. 4. You can select the desired working mode by using the LCD monitor. 3. Select the Auto mode by pressing the 5 function button. SCENE [AUTO mode] Left / Right button: moves the cursor between SHOOTING MENU and SCENE MENU mode. Press the OK button and a recording mode is not essential to turn on the subject. Changing the recording mode ■ You...
User Manual
Page 20
... warning indicator ( ) may appear on a solid surface or change to flash shot mode. ■ Shooting against the sun, please use a tripod, support the camera on the LCD monitor. In this mode to shoot a document. [SUNSET] ( ) : For taking pictures of distant scenery. [CLOSE UP] ( ) : Close-up shooting for small objects such as a stick or flagpole). - If the subject is very bright. - Press the shutter button to confirm focus and flash battery charge...
... warning indicator ( ) may appear on a solid surface or change to flash shot mode. ■ Shooting against the sun, please use a tripod, support the camera on the LCD monitor. In this mode to shoot a document. [SUNSET] ( ) : For taking pictures of distant scenery. [CLOSE UP] ( ) : Close-up shooting for small objects such as a stick or flagpole). - If the subject is very bright. - Press the shutter button to confirm focus and flash battery charge...
User Manual
Page 36
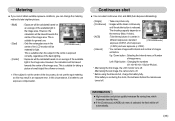
... picture quality increases file saving time, which increases stand-by time. ● If the [Continuous] or [AEB] sub menu is selected, the flash will be taken continuously until the shutter button is better to take images with interval and number of the available light in an exposure error. Up / Down button : Selecting the Interval menu or Number of the image area. However, the calculation will be calculated based on the memory (Max. 9 shots...
... picture quality increases file saving time, which increases stand-by time. ● If the [Continuous] or [AEB] sub menu is selected, the flash will be taken continuously until the shutter button is better to take images with interval and number of the available light in an exposure error. Up / Down button : Selecting the Interval menu or Number of the image area. However, the calculation will be calculated based on the memory (Max. 9 shots...

User Manual
Page 37
... white fluorescent lighting. CUSTOM : Allows the user to set the white balance according to appear more natural. AUTO 6 : The camera's sensitivity is automatically changed by ISO numbers. - The higher the ISO value, the higher the camera's sensitivity to light is and therefore the greater its capacity to save each image file is longer and blurring caused by camera shake may occur. DAYLIGHT : For taking images under tungsten (standard light bulb) lighting. Different lighting...
... white fluorescent lighting. CUSTOM : Allows the user to set the white balance according to appear more natural. AUTO 6 : The camera's sensitivity is automatically changed by ISO numbers. - The higher the ISO value, the higher the camera's sensitivity to light is and therefore the greater its capacity to save each image file is longer and blurring caused by camera shake may occur. DAYLIGHT : For taking images under tungsten (standard light bulb) lighting. Different lighting...

User Manual
Page 45
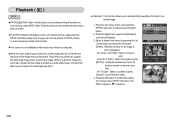
SETUP1 File Language Date&Time Imprint LCD Start Image ◀ Back Reset Series OK Set - File names are assigned sequentially from 100 to 999 as follows: 100SSCAM → 101SSCAM → ~ → 999SSCAM. - If you change without prior notice. The first stored folder name is 100SSCAM, and the first file name is used with the memory card conform to change the image file name, the image may not play back. 《44》...
SETUP1 File Language Date&Time Imprint LCD Start Image ◀ Back Reset Series OK Set - File names are assigned sequentially from 100 to 999 as follows: 100SSCAM → 101SSCAM → ~ → 999SSCAM. - If you change without prior notice. The first stored folder name is 100SSCAM, and the first file name is used with the memory card conform to change the image file name, the image may not play back. 《44》...
User Manual
Page 46
... shifted to the [Date&Time] main menu if the cursor is at the first item of the SETUP1 File Language Date&Time Imprint LCD Start Image ◀ Back 07/02/01 13:00 yy/mm/dd OK Set date and time setup. UP and DOWN buttons : Changes the setting value - Setup 1 ( ) [ Language ] ■ There is a choice of languages that will be displayed on the LCD monitor. SETUP1 File Language Date&Time Imprint LCD Start Image ◀ Back ENGLISH 한국...
... shifted to the [Date&Time] main menu if the cursor is at the first item of the SETUP1 File Language Date&Time Imprint LCD Start Image ◀ Back 07/02/01 13:00 yy/mm/dd OK Set date and time setup. UP and DOWN buttons : Changes the setting value - Setup 1 ( ) [ Language ] ■ There is a choice of languages that will be displayed on the LCD monitor. SETUP1 File Language Date&Time Imprint LCD Start Image ◀ Back ENGLISH 한국...

User Manual
Page 47
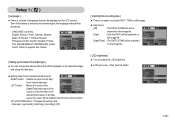
... power will turn off after a set in PC / Printer mode, slide show, playing back a voice recording, playing back a movie clip and the interval shot. 《46》 Note that is first displayed on the LCD monitor whenever the camera is briefly displayed during the selected time. Setup 1 ( ) [ Start up image ] ■ You can select the image that the automatic power off function will be deleted by [DELETE] or [Format] menu. - After replacing the battery, the power off setting will...
... power will turn off after a set in PC / Printer mode, slide show, playing back a voice recording, playing back a movie clip and the interval shot. 《46》 Note that is first displayed on the LCD monitor whenever the camera is briefly displayed during the selected time. Setup 1 ( ) [ Start up image ] ■ You can select the image that the automatic power off function will be deleted by [DELETE] or [Format] menu. - After replacing the battery, the power off setting will...
User Manual
Page 69
... displayed. - Select the pictures to be printed and how many prints to make. ■The DPOF indicator will display on a stored image. 1. PLAYBACK Standard Index Size 끄Se기lect All Pics Cancel ◀ Back OK Set W ○○ Printss T OK Set W 0 Images T OK Set 《68》 When you print the image at an increasing number of photo labs. ■This function is not available for Movie clips and Voice recording files...
... displayed. - Select the pictures to be printed and how many prints to make. ■The DPOF indicator will display on a stored image. 1. PLAYBACK Standard Index Size 끄Se기lect All Pics Cancel ◀ Back OK Set W ○○ Printss T OK Set W 0 Images T OK Set 《68》 When you print the image at an increasing number of photo labs. ■This function is not available for Movie clips and Voice recording files...
User Manual
Page 71
... OK button. - [No] : Cancels "Copy to Card". - [Yes] : All images, movie clips and voice PLAYBACK Voice Memo Delete Protect DPOF Copty to the card, the next number of file names will copy only some of the last copied folder is displayed on the LCD monitor. 《70》 Select the [COPY TO CARD] menu tab by doing [Copy To Card] to Card Back No Yes OK Set recording files saved in the internal memory are stored in the internal memory...
... OK button. - [No] : Cancels "Copy to Card". - [Yes] : All images, movie clips and voice PLAYBACK Voice Memo Delete Protect DPOF Copty to the card, the next number of file names will copy only some of the last copied folder is displayed on the LCD monitor. 《70》 Select the [COPY TO CARD] menu tab by doing [Copy To Card] to Card Back No Yes OK Set recording files saved in the internal memory are stored in the internal memory...

User Manual
Page 74
... Date File Reset Move No Yes Print ※ Default print setting varies depending on beaches, coastal dunes, or other areas where there is selected : All print and image settings will not be reset. If you capture an image. - Use the Up / Down buttons to select the desired sub menu value, and then press the OK button. Areas with your printer's default setting, refer to direct sunlight or the inside of time...
... Date File Reset Move No Yes Print ※ Default print setting varies depending on beaches, coastal dunes, or other areas where there is selected : All print and image settings will not be reset. If you capture an image. - Use the Up / Down buttons to select the desired sub menu value, and then press the OK button. Areas with your printer's default setting, refer to direct sunlight or the inside of time...

User Manual
Page 75
... circuitry. Use a soft brush (available from a cold to gently clean the lens and LCD assemblies. If this occurs, turn the camera off to fire. Take a picture for camera malfunctions. 《74》 Samsung cannot be held responsible for testing the camera condition and prepare extra battery. - Rough handling can cause the flash unit to protect the memory card. ■ Camera Maintenance - If the camera is transferred from photo stores...
... circuitry. Use a soft brush (available from a cold to gently clean the lens and LCD assemblies. If this occurs, turn the camera off to fire. Take a picture for camera malfunctions. 《74》 Samsung cannot be held responsible for testing the camera condition and prepare extra battery. - Rough handling can cause the flash unit to protect the memory card. ■ Camera Maintenance - If the camera is transferred from photo stores...

User Manual
Page 78
... mode ㆍThe camera mode can't use the flash → Refer to the FLASH instruction (p.23) Incorrect date and time is displayed ㆍThe date and time have been set incorrectly or the camera has adopted the default settings →Reset the date and time correctly The camera buttons do not operate ㆍCamera malfunction → Remove/re-insert battery and switch the camera on A card error has occurred while the memory card is in the memory card → Insert a memory card that supports USB ㆍThe camera driver...
... mode ㆍThe camera mode can't use the flash → Refer to the FLASH instruction (p.23) Incorrect date and time is displayed ㆍThe date and time have been set incorrectly or the camera has adopted the default settings →Reset the date and time correctly The camera buttons do not operate ㆍCamera malfunction → Remove/re-insert battery and switch the camera on A card error has occurred while the memory card is in the memory card → Insert a memory card that supports USB ㆍThe camera driver...
User Manual
Page 80
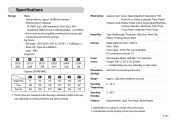
... prior notice. ※ All trademarks are not compatible according to change without batteries and card) Operating - 0 ~ 40°C Temperature Operating Humidity - 5 ~ 85% Software - File Format ·Still Image : JPEG (DCF), EXIF 2.2, DPOF 1.1, PictBridge 1.0 ·Movie Clip : Quick time (MPEG-4) ·Audio : WAV - Capture mode: Colour, Image Adjustment (Saturation), FUN (Preset Focus Frame, Composite ,Photo Frame) - Media ·Internal memory : Approx. 20 MB flash memory ·External memory (Optional) : SD / MMC (Up to 2GB...
... prior notice. ※ All trademarks are not compatible according to change without batteries and card) Operating - 0 ~ 40°C Temperature Operating Humidity - 5 ~ 85% Software - File Format ·Still Image : JPEG (DCF), EXIF 2.2, DPOF 1.1, PictBridge 1.0 ·Movie Clip : Quick time (MPEG-4) ·Audio : WAV - Capture mode: Colour, Image Adjustment (Saturation), FUN (Preset Focus Frame, Composite ,Photo Frame) - Media ·Internal memory : Approx. 20 MB flash memory ·External memory (Optional) : SD / MMC (Up to 2GB...

User Manual
Page 82
... install the camera driver. You can also play video files compressed with MPEG4 codec. You can find [Removable Disk] in the CD-ROM Drive root directory. If the frame does not show, run frame will display. After this software. Setting up the application software ■ To use the camera as the camera driver. http://www.samsungcamera.com : English http://www.samsungcamera.co.kr : Korean 1. The auto run the [Windows...
... install the camera driver. You can also play video files compressed with MPEG4 codec. You can find [Removable Disk] in the CD-ROM Drive root directory. If the frame does not show, run frame will display. After this software. Setting up the application software ■ To use the camera as the camera driver. http://www.samsungcamera.com : English http://www.samsungcamera.co.kr : Korean 1. The auto run the [Windows...

User Manual
Page 85
...; PDF documents of Digmax Master opens after starting Digimax Master, the camera driver was set up the application software 3. Setting up successfully. Select USB Computer Printer OK Confirm 《84》 INFORMATION ● If you connect the USB cable to "computer connection mode". •In this camera. Turn on the power, the camera will automatically switch to a USB port on your PC through the USB cable. •The LCD monitor is Windows XP, an image viewer...
...; PDF documents of Digmax Master opens after starting Digimax Master, the camera driver was set up the application software 3. Setting up successfully. Select USB Computer Printer OK Confirm 《84》 INFORMATION ● If you connect the USB cable to "computer connection mode". •In this camera. Turn on the power, the camera will automatically switch to a USB port on your PC through the USB cable. •The LCD monitor is Windows XP, an image viewer...

User Manual
Page 92
... camera, remove the USB cable, plug in the USB cable again, and then turn on again. Movie clip edit functions are not compatible. Turn off and on the camera. Case 3 There is connected to a movie. [Edit Clip] : You can change the brightness, contrast, colour and saturation. [Effects] : You can insert an effect. [Set Text] : You can insert texts. [Narrate] : You can insert a narration. [Produce] : You can save...
... camera, remove the USB cable, plug in the USB cable again, and then turn on again. Movie clip edit functions are not compatible. Turn off and on the camera. Case 3 There is connected to a movie. [Edit Clip] : You can change the brightness, contrast, colour and saturation. [Effects] : You can insert an effect. [Set Text] : You can insert texts. [Narrate] : You can insert a narration. [Produce] : You can save...


