User Manual
Page 2
... and set it as pictures, movies and music saved on the TV screen. tLAr Playback of many disc types This HomeTheater System allowsyou to a compact wireless modulethat communicates with cables runningbetweenyour DVD receiverand rear-channel speakers. Wireless receiver amplifier Samsung's rear-channel wirelessmodule does away with your iPod to sync up with the supplied iPod dock. USB Host support You can adjustthe audio delay time to the home theater with the video. Instead,the rearspeakersconnect to play back various discs, including DVD-VIDEO...
... and set it as pictures, movies and music saved on the TV screen. tLAr Playback of many disc types This HomeTheater System allowsyou to a compact wireless modulethat communicates with cables runningbetweenyour DVD receiverand rear-channel speakers. Wireless receiver amplifier Samsung's rear-channel wirelessmodule does away with your iPod to sync up with the supplied iPod dock. USB Host support You can adjustthe audio delay time to the home theater with the video. Instead,the rearspeakersconnect to play back various discs, including DVD-VIDEO...

User Manual
Page 4
... Compact Disc player is used to connect the unit to qualified service personnel. LUOKAN 1 LASER LAITE Use of controls, adjustments or performance of the polarized or grounding-type plug. The wide blade or the third prong are used , use shielded cables and connectors for replacement of time. 14) Refer all the safety instructionslisted below. Follow all servicing to other apparatus (including amplifiers) that any heat sources such...
... Compact Disc player is used to connect the unit to qualified service personnel. LUOKAN 1 LASER LAITE Use of controls, adjustments or performance of the polarized or grounding-type plug. The wide blade or the third prong are used , use shielded cables and connectors for replacement of time. 14) Refer all the safety instructionslisted below. Follow all servicing to other apparatus (including amplifiers) that any heat sources such...
User Manual
Page 6
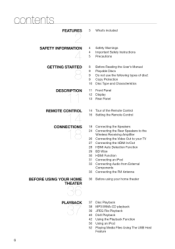
... Instructions 5 Precautions 8 Before Reading the User's Manual 9 Playable Discs 9 Do not use the following types of disc! 9 Copy Protection 10 Disc Type and Characteristics 11 Front Panel 12 Display 13 Rear Panel REMOTE CONTROL 14 Tour of the Remote Control 16 Setting the Remote Control CONNECTIONS i , BEFORE USING YOUR HOME THEATER 18 Connecting the Speakers 24 Connecting the Rear Speakers to the Wireless Receiving Amplifier 26 Connecting the Video Out to your TV 27 Connecting the HDMI In/Out 28 HDMI Auto Detection Function 29 BD Wise 30 HDMI Function...
... Instructions 5 Precautions 8 Before Reading the User's Manual 9 Playable Discs 9 Do not use the following types of disc! 9 Copy Protection 10 Disc Type and Characteristics 11 Front Panel 12 Display 13 Rear Panel REMOTE CONTROL 14 Tour of the Remote Control 16 Setting the Remote Control CONNECTIONS i , BEFORE USING YOUR HOME THEATER 18 Connecting the Speakers 24 Connecting the Rear Speakers to the Wireless Receiving Amplifier 26 Connecting the Video Out to your TV 27 Connecting the HDMI In/Out 28 HDMI Auto Detection Function 29 BD Wise 30 HDMI Function...
User Manual
Page 7
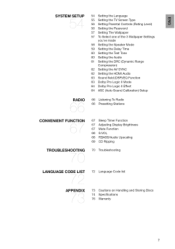
... 58 Setting the Speaker Mode 59 Setting the Delay Time 60 Setting the Test Tone 60 Setting the Audio 61 Setting the DRC (Dynamic Range Compression) 62 Setting the AV SYNC 62 Setting the HDMI Audio 63 Sound field (DSP)/EQ Function 63 Dolby Pro Logic II Mode 64 Dolby Pro Logic II Effect 64 ASC (Auto Sound Calibration) Setup RADIO i'i_,i _ 66 Listening To Radio 66 Presetting Stations CONVENIENT FUNCTION _ii _Ii TROUBLESHOOTING 67 Sleep Timer Function 67 Adjusting Display Brightness 67 Mute Function...
... 58 Setting the Speaker Mode 59 Setting the Delay Time 60 Setting the Test Tone 60 Setting the Audio 61 Setting the DRC (Dynamic Range Compression) 62 Setting the AV SYNC 62 Setting the HDMI Audio 63 Sound field (DSP)/EQ Function 63 Dolby Pro Logic II Mode 64 Dolby Pro Logic II Effect 64 ASC (Auto Sound Calibration) Setup RADIO i'i_,i _ 66 Listening To Radio 66 Presetting Stations CONVENIENT FUNCTION _ii _Ii TROUBLESHOOTING 67 Sleep Timer Function 67 Adjusting Display Brightness 67 Mute Function...

User Manual
Page 18
... II mode only. CONNECTING THE SPEAKERS ./ -. J 2.5 to turn off the power and disconnect the power cord. Selecting the Listening Position The listening position should be located about 2,5 to install it at the same height as the front speakers.You can also install it directly over or under the TV. Center Speaker O It is best to 3 times the distance of the DVD Player Placeit ona standor cabinetshelf. Subwoofer q_...
... II mode only. CONNECTING THE SPEAKERS ./ -. J 2.5 to turn off the power and disconnect the power cord. Selecting the Listening Position The listening position should be located about 2,5 to install it at the same height as the front speakers.You can also install it directly over or under the TV. Center Speaker O It is best to 3 times the distance of the DVD Player Placeit ona standor cabinetshelf. Subwoofer q_...
User Manual
Page 25
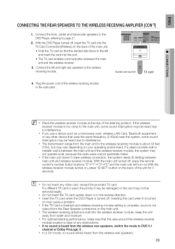
... same frequency (2.4GHz) near the system, some sound interruption may cause a problem. _ If the TX Card is inserted and wireless receiving module setting is complete, sound is not output from water and moisture. _ For optimal listening performance, make wireless connection, the system needs ID Setting between the main unit and the wireless receiver module, the system may vary depending on the main unit. _ The wireless receiving antenna is turned off , press the remote control's number button buttons...
... same frequency (2.4GHz) near the system, some sound interruption may cause a problem. _ If the TX Card is inserted and wireless receiving module setting is complete, sound is not output from water and moisture. _ For optimal listening performance, make wireless connection, the system needs ID Setting between the main unit and the wireless receiver module, the system may vary depending on the main unit. _ The wireless receiving antenna is turned off , press the remote control's number button buttons...
User Manual
Page 26
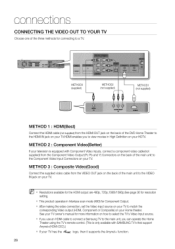
... resolution setting. ,_ This product operates in High Definition on your Home theater. See your TV owner's manualfor more information on how to select the W's Video Input source. ,_ Ifyou use an HDMI cable to connect a Samsung TV to the Component Video Input Connectors on your T_. connectons CONNECTING THE VIDEO OUT TO YOUR TV Choose one of the three methods for Component Output. ,_ After making the video connection, set the Video input source on your TVto match the corresponding Video output (HDMI,Component or...
... resolution setting. ,_ This product operates in High Definition on your Home theater. See your TV owner's manualfor more information on how to select the W's Video Input source. ,_ Ifyou use an HDMI cable to connect a Samsung TV to the Component Video Input Connectors on your T_. connectons CONNECTING THE VIDEO OUT TO YOUR TV Choose one of the three methods for Component Output. ,_ After making the video connection, set the Video input source on your TVto match the corresponding Video output (HDMI,Component or...

User Manual
Page 27
.... Connect the HDMI IN jack of a Set-Top/Cable Box. 2. Video/Audio A TVwith an DVI-Djack (TVthat supports HDCP) Video A TVwith an DVI-Djack (TVthat does not support HDOP) 27 In addition, it enables you can also use the FUNCTION button on the Remote control does not work. • When the output from an external device is connected via DVI/HDMI to the HDMI OUT jack of this unit to enjoy multi-channel digital audio. The mode switches...
.... Connect the HDMI IN jack of a Set-Top/Cable Box. 2. Video/Audio A TVwith an DVI-Djack (TVthat supports HDCP) Video A TVwith an DVI-Djack (TVthat does not support HDOP) 27 In addition, it enables you can also use the FUNCTION button on the Remote control does not work. • When the output from an external device is connected via DVI/HDMI to the HDMI OUT jack of this unit to enjoy multi-channel digital audio. The mode switches...
User Manual
Page 28
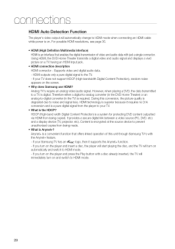
... provides a secure digital link between a video source (PC, DVD. etc) and a display device (TV,projector, etc). Using HDMI, the DVD Home Theater transmits a digital video and audio signal and displays a vivid picture on . Content is encrypted at the source device to a TV is digital. conn cton HDMI Auto Detection Function The player's video output will automatically change to HDMI mode when connecting an HDMI cable while power is on a TV having an HDMI input jack. • HDMI connection description HDMI connector - HDMI technology is superior because it supports the Anynet...
... provides a secure digital link between a video source (PC, DVD. etc) and a display device (TV,projector, etc). Using HDMI, the DVD Home Theater transmits a digital video and audio signal and displays a vivid picture on . Content is encrypted at the source device to a TV is digital. conn cton HDMI Auto Detection Function The player's video output will automatically change to HDMI mode when connecting an HDMI cable while power is on a TV having an HDMI input jack. • HDMI connection description HDMI connector - HDMI technology is superior because it supports the Anynet...
User Manual
Page 30
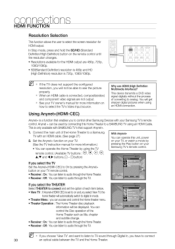
... connecting this unit, power on your T_, or watch a movie by pressing the Play button on the remote control until the resolution changes. • Resolutions available for the HDMI output are not output. _ See your Samsung TV's remote control.Anynet + can operate this Home Theaterto a SAMSUNGTV using an HDMICable. This device transmits a DVD video signal digitally without the process of the Home Theater to a Samsung TV with an HDMI cable. (See page 27) 2. In Stop mode...
... connecting this unit, power on your T_, or watch a movie by pressing the Play button on the remote control until the resolution changes. • Resolutions available for the HDMI output are not output. _ See your Samsung TV's remote control.Anynet + can operate this Home Theaterto a SAMSUNGTV using an HDMICable. This device transmits a DVD video signal digitally without the process of the Home Theater to a Samsung TV with an HDMI cable. (See page 27) 2. In Stop mode...

User Manual
Page 31
... connect the dock connector so that the label "SAMSUNG" faces upward. (supplied) 31 Depending on the DVD home theater. 2. Adjust the volume to view videos. • You can listen to your iPod and DVD home theater. Press the PORT button on the remote control to select A iPod to listen to music, and V iPod to a moderate level before disconnecting the iPod docking cable. Make sure to remove TX card before you connect an iPod, the unit will charge your iPod's battery. As the cable ports...
... connect the dock connector so that the label "SAMSUNG" faces upward. (supplied) 31 Depending on the DVD home theater. 2. Adjust the volume to view videos. • You can listen to your iPod and DVD home theater. Press the PORT button on the remote control to select A iPod to listen to music, and V iPod to a moderate level before disconnecting the iPod docking cable. Make sure to remove TX card before you connect an iPod, the unit will charge your iPod's battery. As the cable ports...
User Manual
Page 34
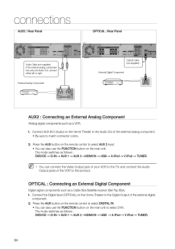
... iPod _ TUNER. 34 The mode switches as a Cable Box/Satellite receiver (Set-Top Box). 1. Connect AUX IN 2 (Audio) on the Home Theater to the Audio Out of the external digital component. 2. conn cton AUX2 : Rear Panel OPTICAL : Rear Panel External Analog Component External Digital Component f I_v:_ oo°2J AUX2 • Connecting an External Analog Component Analog signal components such as follows : DVD/CD _ D-IN _ AUX 1 _ AUX 2 _HDMI IN _ USB _ A iPod _ V iPod _ TUNER. Connect the Digital Input (OPTICAL)on the main unit. Press the AUX button on the remote control to select...
... iPod _ TUNER. 34 The mode switches as a Cable Box/Satellite receiver (Set-Top Box). 1. Connect AUX IN 2 (Audio) on the Home Theater to the Audio Out of the external digital component. 2. conn cton AUX2 : Rear Panel OPTICAL : Rear Panel External Analog Component External Digital Component f I_v:_ oo°2J AUX2 • Connecting an External Analog Component Analog signal components such as follows : DVD/CD _ D-IN _ AUX 1 _ AUX 2 _HDMI IN _ USB _ A iPod _ V iPod _ TUNER. Connect the Digital Input (OPTICAL)on the main unit. Press the AUX button on the remote control to select...

User Manual
Page 48
... disc to exit the setup screen. You can use the Cursor A,V button to move directly to the desired title, chapter, or track. Davback I .J Moving Directly to a Scene/Song Press the numeric buttons. • The selected file will be played. • When playing an MP3 or JPEG disc, you select Disc Menu and it is not supported by the disc, the "This menu is not supported" message appears on the remote control...
... disc to exit the setup screen. You can use the Cursor A,V button to move directly to the desired title, chapter, or track. Davback I .J Moving Directly to a Scene/Song Press the numeric buttons. • The selected file will be played. • When playing an MP3 or JPEG disc, you select Disc Menu and it is not supported by the disc, the "This menu is not supported" message appears on the remote control...
User Manual
Page 51
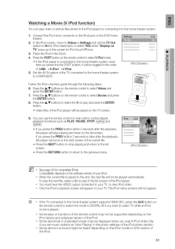
... steps. \ 6. Pressthe A,V buttons to select Movies and press the ENTER button. 8. Place the iPod in the iPod player by connecting it will be played on the iPod model or S/W version of USB *AiPod *ViPod. 5. Pressthe A,V buttons on the softwareversionof your T_. Compatibilitydepends on the remote control to select the fileto play video or picture files stored in the Dock. 4. Pressthe A,V buttons on the DVD home theater. 2. Connect the iPod dock connector to the iPod jack on the remote control to COMPOSITE.
... steps. \ 6. Pressthe A,V buttons to select Movies and press the ENTER button. 8. Place the iPod in the iPod player by connecting it will be played on the iPod model or S/W version of USB *AiPod *ViPod. 5. Pressthe A,V buttons on the softwareversionof your T_. Compatibilitydepends on the remote control to select the fileto play video or picture files stored in the Dock. 4. Pressthe A,V buttons on the DVD home theater. 2. Connect the iPod dock connector to the iPod jack on the remote control to COMPOSITE.
User Manual
Page 53
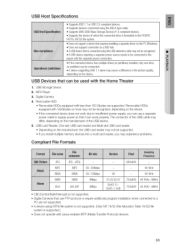
... can work due to a PC are supported. DivX .MP3 .WMA ,WMV 80-384kbps 56-128kbps 4Mbps .AVl,.ASF 4Mbps - MP3 Player 3. The connector of the USB device. 5. USB Devices that it can use PTP protocol or require additional program installation when connected to insufficient power supply, you may experience problems. Compliant File Formats JPG JPG .JPEG - - 640x480 - _ovi_ MP3 WMA WMV ..... Digital Camera 4. USB Host Specifications...
... can work due to a PC are supported. DivX .MP3 .WMA ,WMV 80-384kbps 56-128kbps 4Mbps .AVl,.ASF 4Mbps - MP3 Player 3. The connector of the USB device. 5. USB Devices that it can use PTP protocol or require additional program installation when connected to insufficient power supply, you may experience problems. Compliant File Formats JPG JPG .JPEG - - 640x480 - _ovi_ MP3 WMA WMV ..... Digital Camera 4. USB Host Specifications...

User Manual
Page 56
... the setup screen. [,_ _ This function works only if a DVD disc contains the rating level information. Enter the password and then press the ENTER button. • Enter the old password,a new password, and confirm new password. • The setting is complete. [,_ _ The password is to "7890" by default. INITIAL appears on the display and all stored settings. Press the Cursor • button to move to view. 1, In Stop mode, press the MENU button...
... the setup screen. [,_ _ This function works only if a DVD disc contains the rating level information. Enter the password and then press the ENTER button. • Enter the old password,a new password, and confirm new password. • The setting is complete. [,_ _ The password is to "7890" by default. INITIAL appears on the display and all stored settings. Press the Cursor • button to move to view. 1, In Stop mode, press the MENU button...

User Manual
Page 62
... the HDMI connection cable, and audio is connected to match the video. 1. In Stop mode, press the MENU button. 2. SETTING THE HDMI AUDIO The audio signals transmitted over the HDMI connection cable only, and audio is output through your TV speakers only. • OFF • Video is transmitted over the HDMI Cable can set the audio delay time between 0 ms and 300 ms. Set it is output through the home theater speakers only. Press the Cursor • button to move to AV-SYNC...
... the HDMI connection cable, and audio is connected to match the video. 1. In Stop mode, press the MENU button. 2. SETTING THE HDMI AUDIO The audio signals transmitted over the HDMI connection cable only, and audio is output through your TV speakers only. • OFF • Video is transmitted over the HDMI Cable can set the audio delay time between 0 ms and 300 ms. Set it is output through the home theater speakers only. Press the Cursor • button to move to AV-SYNC...
User Manual
Page 70
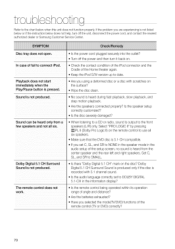
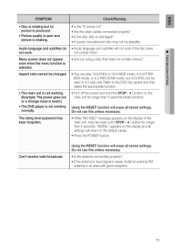
...; Are the speakers connected properly? Sound can be heard only from the center speaker and the rear left and right speakers. If the problem you selected the mode(TV/DVD)functions of the setup screen, no sound is heard from a few speakers and not all six speakers. • Make sure that the DVD disc is 5.1-CH compatible. • If you set to DOLBY DIGITAL 5.1-CH in the audio setup of the remote control (TVor DVD) correctly? 7O Select "PRO LOGIC...
...; Are the speakers connected properly? Sound can be heard only from the center speaker and the rear left and right speakers. If the problem you selected the mode(TV/DVD)functions of the setup screen, no sound is heard from a few speakers and not all six speakers. • Make sure that the DVD disc is 5.1-CH compatible. • If you set to DOLBY DIGITAL 5.1-CH in the audio setup of the remote control (TVor DVD) correctly? 7O Select "PRO LOGIC...
User Manual
Page 71
... work . Menu screen does not appear even when the menu function is shaking. Aspect ratio cannot be seen in 16:9 WIDE mode, 4:3 LEFI-ER BOX mode, or 4:3 PAN SCAN mode, but 4:3 DVDs can be changed. • The main unit is not working normally. Refer to the default values. • Press the POWER button. Using the RESET function will erase all stored settings. Using the RESET function will erase all stored settings. Can't receive radio broadcast. Audio...
... work . Menu screen does not appear even when the menu function is shaking. Aspect ratio cannot be seen in 16:9 WIDE mode, 4:3 LEFI-ER BOX mode, or 4:3 PAN SCAN mode, but 4:3 DVDs can be changed. • The main unit is not working normally. Refer to the default values. • Press the POWER button. Using the RESET function will erase all stored settings. Using the RESET function will erase all stored settings. Can't receive radio broadcast. Audio...
User Manual
Page 76
... environmental instructions that are on how long an implied warranty lasts, or the exclusion or limitation of purchase, and is warranted by SAMSUNG against manufacturing defects in service problems; accidents, abuse, neglect, fire, water, lightning or other acts of products, equipment, systems, utilities, services, parts, supplies, accessories, applications, installations, repairs, external wiring or connectors not supplied and authorized by a SAMSUNG authorized service center. reception problems...
... environmental instructions that are on how long an implied warranty lasts, or the exclusion or limitation of purchase, and is warranted by SAMSUNG against manufacturing defects in service problems; accidents, abuse, neglect, fire, water, lightning or other acts of products, equipment, systems, utilities, services, parts, supplies, accessories, applications, installations, repairs, external wiring or connectors not supplied and authorized by a SAMSUNG authorized service center. reception problems...

