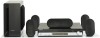
User Manual
Page 2
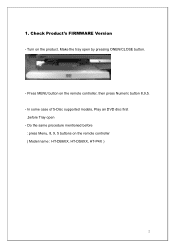
Press MENU button on the product. Turn on the remote controller, then press Numeric button 8,9,5. - Do the same procedure mentioned before Tray open by pressing ONEN/CLOSE button. - Make the tray open - In some case of 5-Disc supported models, Play an DVD disc first ,before : press Menu, 8, 9, 5 buttons on the remote controller ( Model name : HT-DB6XX, HT-DS6XX, HT-P4X ) 2 Check Product's FIRMWARE Version - 1.
Press MENU button on the product. Turn on the remote controller, then press Numeric button 8,9,5. - Do the same procedure mentioned before Tray open by pressing ONEN/CLOSE button. - Make the tray open - In some case of 5-Disc supported models, Play an DVD disc first ,before : press Menu, 8, 9, 5 buttons on the remote controller ( Model name : HT-DB6XX, HT-DS6XX, HT-P4X ) 2 Check Product's FIRMWARE Version - 1.
User Manual
Page 4
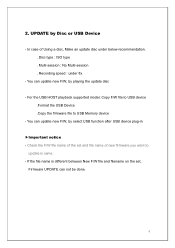
... playing the update disc - You can update new F/W, by Disc or USB Device - In case of Using a disc, Make an update disc under 8x - If the file name is same - UPDATE by select USB function after USB device plug-in ▶Important notice - 2. For the USB HOST playback supported model, Copy F/W file to USB device .Format the USB Device .Copy the firmware file to update is different between New F/W file and filename on the set and...
... playing the update disc - You can update new F/W, by Disc or USB Device - In case of Using a disc, Make an update disc under 8x - If the file name is same - UPDATE by select USB function after USB device plug-in ▶Important notice - 2. For the USB HOST playback supported model, Copy F/W file to USB device .Format the USB Device .Copy the firmware file to update is different between New F/W file and filename on the set and...
Quick Guide (easy Manual) (ver.1.0) (English)
Page 2
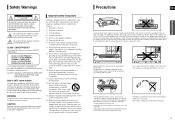
... Mains plug is not intended for replacement of the obsolete outlet. 10) Protect the power cord from being walked on top of your outlet, consult an electrician for industrial use . The batteries used as a CLASS 1 LASER product. Your player is used with the identification sticker located on the back of the player. Safety Warnings CAUTION RISK OF ELECTRIC SHOCK. NO USER SERVICEABLE PARTS...
... Mains plug is not intended for replacement of the obsolete outlet. 10) Protect the power cord from being walked on top of your outlet, consult an electrician for industrial use . The batteries used as a CLASS 1 LASER product. Your player is used with the identification sticker located on the back of the player. Safety Warnings CAUTION RISK OF ELECTRIC SHOCK. NO USER SERVICEABLE PARTS...
Quick Guide (easy Manual) (ver.1.0) (English)
Page 3
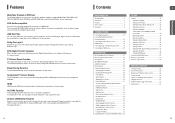
... adjust the audio delay time to deliver exceptional sound quality in the Screen Saver mode. DTS (Digital Theater Systems) DTS is connected to the USB port of dynamic range, low-level resolution and high-frequency detail. Power Saving Function The HT-X50 automatically shuts itself into the power saving mode after 20 minutes in Stop mode. TV Screen Saver Function If the main unit remains in a single player. Features Multi-Disc Playback & FM Tuner The HT-X50 combines the convenience of DVD-Audio. DVD-Audio compatible...
... adjust the audio delay time to deliver exceptional sound quality in the Screen Saver mode. DTS (Digital Theater Systems) DTS is connected to the USB port of dynamic range, low-level resolution and high-frequency detail. Power Saving Function The HT-X50 automatically shuts itself into the power saving mode after 20 minutes in Stop mode. TV Screen Saver Function If the main unit remains in a single player. Features Multi-Disc Playback & FM Tuner The HT-X50 combines the convenience of DVD-Audio. DVD-Audio compatible...
Quick Guide (easy Manual) (ver.1.0) (English)
Page 5
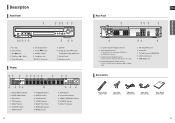
.... DVD AUDIO indicator 14. RADIO FREQUENCY indicator 18. DISC(1~5) indicator 6 78 9 1. 5.1 Channel Speaker Output Connector 2. Component Video Output Connector Connect a TV with component video inputs to the VIDEO OUT connector. 3. Cooling Fan 7. Volume Control 14. DOLBY DIGITAL indicator 2. TITLE indicator 5. CHAPTER indicator 7. TUNED indicator 11. Open/Close button Display 12 3 4 56 78 9 10 11 12 13 14 15 1. REPEAT indicator 10. STEREO indicator 12. MPEG indicator 8 17 18 19 15. Video Output Connector Connect the TV's video input jacks (VIDEO...
.... DVD AUDIO indicator 14. RADIO FREQUENCY indicator 18. DISC(1~5) indicator 6 78 9 1. 5.1 Channel Speaker Output Connector 2. Component Video Output Connector Connect a TV with component video inputs to the VIDEO OUT connector. 3. Cooling Fan 7. Volume Control 14. DOLBY DIGITAL indicator 2. TITLE indicator 5. CHAPTER indicator 7. TUNED indicator 11. Open/Close button Display 12 3 4 56 78 9 10 11 12 13 14 15 1. REPEAT indicator 10. STEREO indicator 12. MPEG indicator 8 17 18 19 15. Video Output Connector Connect the TV's video input jacks (VIDEO...
Quick Guide (easy Manual) (ver.1.0) (English)
Page 7
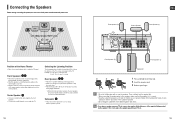
... TV. Selecting the Listening Position The listening position should be sure to turn off the power and disconnect the power cord. Subwoofer SW • The position of the center speakers. Connecting the Speakers Before moving or installing the product, be located about 2.5 to 3 times the distance of the TV's screen size away from the TV. C L SW R SL SR Position of the Home Theater •...
... TV. Selecting the Listening Position The listening position should be sure to turn off the power and disconnect the power cord. Subwoofer SW • The position of the center speakers. Connecting the Speakers Before moving or installing the product, be located about 2.5 to 3 times the distance of the TV's screen size away from the TV. C L SW R SL SR Position of the Home Theater •...
Quick Guide (easy Manual) (ver.1.0) (English)
Page 8
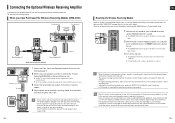
..., Center and Subwoofer speakers to the main unit, referring to 3 above. • When the wireless receiving module setting is complete, no sound will be heard from the wireless rear speakers in DVD 5.1-CH or Dolby Pro Logic II mode only. • In 2-CH mode, no audio signal is output from the Rear Speaker Output Connector on the back of the main unit. • The wireless receiving antenna is built into the wireless receiver module. Reset the system while...
..., Center and Subwoofer speakers to the main unit, referring to 3 above. • When the wireless receiving module setting is complete, no sound will be heard from the wireless rear speakers in DVD 5.1-CH or Dolby Pro Logic II mode only. • In 2-CH mode, no audio signal is output from the Rear Speaker Output Connector on the back of the main unit. • The wireless receiving antenna is built into the wireless receiver module. Reset the system while...
Quick Guide (easy Manual) (ver.1.0) (English)
Page 9
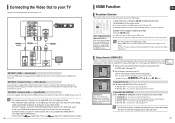
... Selection This function allows the user to select the screen resolution for Component Output. • After making the video connection, set the option of the main unit to the Component Video Input Connectors on your TV. s : You can operate the Home Theater using an HDMI connection. Connecting the Video Out to your Home theater. If you select the TV Set the Anynet+(HDMI-CEC) to on how to audio through the TV. s : The Home Theater disc playback information will get sharper digital pictures when using...
... Selection This function allows the user to select the screen resolution for Component Output. • After making the video connection, set the option of the main unit to the Component Video Input Connectors on your TV. s : You can operate the Home Theater using an HDMI connection. Connecting the Video Out to your Home theater. If you select the TV Set the Anynet+(HDMI-CEC) to on how to audio through the TV. s : The Home Theater disc playback information will get sharper digital pictures when using...
Quick Guide (easy Manual) (ver.1.0) (English)
Page 10
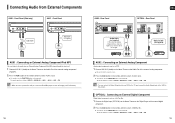
... : Front Panel AUX2 : Rear Panel OPTICAL : Rear Panel ENG CONNECTIONS Audio Cable Audio Cable (not supplied) AUX1 : Connecting an External Analog Component/iPod MP3 You can listen to the audio from an External Analog Component/iPod MP3 player through the main unit. 1 Connect AUX IN 1 (Audio) on the Home Theater to the Audio Out of the external analog component/ iPod MP3. 2 Press the AUX button on the remote control to select input. The mode switches as follows : DVD/CD ➝ DIGITAL IN ➝ AUX 1 ➝ AUX 2 ➝ USB ➝...
... : Front Panel AUX2 : Rear Panel OPTICAL : Rear Panel ENG CONNECTIONS Audio Cable Audio Cable (not supplied) AUX1 : Connecting an External Analog Component/iPod MP3 You can listen to the audio from an External Analog Component/iPod MP3 player through the main unit. 1 Connect AUX IN 1 (Audio) on the Home Theater to the Audio Out of the external analog component/ iPod MP3. 2 Press the AUX button on the remote control to select input. The mode switches as follows : DVD/CD ➝ DIGITAL IN ➝ AUX 1 ➝ AUX 2 ➝ USB ➝...
Quick Guide (easy Manual) (ver.1.0) (English)
Page 12
... be used to operate the DVD Home Theater 6 Press the FUNCTION button on the main unit or DVD button on the remote control, until the required disc indicator flashes. Otherwise, it violates the CSS (Content Scrambling System : a copy protection system) recommendations. ENG OPERATION To stop position will be stored in the Disc changer To select a specific disc, press the corresponding the DIRECT PLAY (1, 2, 3, 4, 5) buttons on the front panel or the DISC SKIP button on the remote to open the disc...
... be used to operate the DVD Home Theater 6 Press the FUNCTION button on the main unit or DVD button on the remote control, until the required disc indicator flashes. Otherwise, it violates the CSS (Content Scrambling System : a copy protection system) recommendations. ENG OPERATION To stop position will be stored in the Disc changer To select a specific disc, press the corresponding the DIRECT PLAY (1, 2, 3, 4, 5) buttons on the front panel or the DISC SKIP button on the remote to open the disc...
Quick Guide (easy Manual) (ver.1.0) (English)
Page 18
... button is not supported for details and the-key number. Each time the button is pressed, the zoom function will not work if the DVD is recorded with multi-camera angle format. • Black bars may not be removed by pressing the EZ VIEW button. You can also press the AUDIO or SUBTITLE buttons on the remote control. • Depending on the disc, the Subtitle and Audio Language functions...
... button is not supported for details and the-key number. Each time the button is pressed, the zoom function will not work if the DVD is recorded with multi-camera angle format. • Black bars may not be removed by pressing the EZ VIEW button. You can also press the AUDIO or SUBTITLE buttons on the remote control. • Depending on the disc, the Subtitle and Audio Language functions...

Quick Guide (easy Manual) (ver.1.0) (English)
Page 19
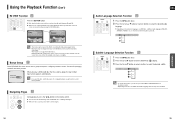
... Using the Disc Menu DVD You can view the title of this feature may be played. OPERATION MOVE ENTER EXIT 36 37 s When playing an MP3 or JPEG disc, you select Disc Menu and it is not supported by the disc, the "This menu is not supported" message appears on the screen. 3 Press the Cursor , , , button to exit the setup screen. • The Title menu display may vary. 1 In Stop mode, press the MENU button...
... Using the Disc Menu DVD You can view the title of this feature may be played. OPERATION MOVE ENTER EXIT 36 37 s When playing an MP3 or JPEG disc, you select Disc Menu and it is not supported by the disc, the "This menu is not supported" message appears on the screen. 3 Press the Cursor , , , button to exit the setup screen. • The Title menu display may vary. 1 In Stop mode, press the MENU button...
Quick Guide (easy Manual) (ver.1.0) (English)
Page 20
... (Control/Bulk/Interrupt) is not supported. • Digital Cameras that use a USB extension cable, the USB device might not be supported. • If you install multiple memory devices into a multi card reader, you may experience a difference in a row. USB HDD and USB Flash Drive: Devices that transfers media files by its manufacturerspecific program is connected. • Does not operate with 5.1 channel home theater sound by connecting the storage device to the USB port...
... (Control/Bulk/Interrupt) is not supported. • Digital Cameras that use a USB extension cable, the USB device might not be supported. • If you install multiple memory devices into a multi card reader, you may experience a difference in a row. USB HDD and USB Flash Drive: Devices that transfers media files by its manufacturerspecific program is connected. • Does not operate with 5.1 channel home theater sound by connecting the storage device to the USB port...
Quick Guide (easy Manual) (ver.1.0) (English)
Page 22
... selected wallpaper will not work when the HDMI output is in No DIsc mode, hold the main unit's STOP ( the display and all stored settings. Setting the Password You can select up to 3 wallpaper settings. • This function will be displayed on the TV screen. 3 The power will return to the default values. • Press the POWER button. will be displayed. Press the EXIT button to the previous level. Settings (Con't) Setting Parental Controls (Rating Level) Use...
... selected wallpaper will not work when the HDMI output is in No DIsc mode, hold the main unit's STOP ( the display and all stored settings. Setting the Password You can select up to 3 wallpaper settings. • This function will be displayed on the TV screen. 3 The power will return to the default values. • Press the POWER button. will be displayed. Press the EXIT button to the previous level. Settings (Con't) Setting Parental Controls (Rating Level) Use...

Quick Guide (easy Manual) (ver.1.0) (English)
Page 23
... mode as 0ms. Otherwise, change the setting according to exit the setup screen. 44 ENG Setting the Delay Time If the speakers cannot be set the delay time for C between 00 and 05mSEC and for SL and SR between 00 and 15mSEC. • The Center channel is only adjustable on a DVD audio disc. • DVD AUDIO : set to play back the DVD-Video portion of Df is the same. Press the EXIT button...
... mode as 0ms. Otherwise, change the setting according to exit the setup screen. 44 ENG Setting the Delay Time If the speakers cannot be set the delay time for C between 00 and 05mSEC and for SL and SR between 00 and 15mSEC. • The Center channel is only adjustable on a DVD audio disc. • DVD AUDIO : set to play back the DVD-Video portion of Df is the same. Press the EXIT button...
Quick Guide (easy Manual) (ver.1.0) (English)
Page 25
... ENTER button. 4 Press the Cursor , button to the previous level. SETUP 48 49 ENG Setting the HDMI Audio The audio signals transmitted over the HDMI connection cable only, and audio is output through the home theater speakers only. • The default setting of this occurs, adjust the audio delay time to to the optimal status. If this function is HDMI AUDIO OFF. • HDMI AUDIO is automatically down-mixed to 2ch for TV speakers. • If you turn the...
... ENTER button. 4 Press the Cursor , button to the previous level. SETUP 48 49 ENG Setting the HDMI Audio The audio signals transmitted over the HDMI connection cable only, and audio is output through the home theater speakers only. • The default setting of this occurs, adjust the audio delay time to to the optimal status. If this function is HDMI AUDIO OFF. • HDMI AUDIO is automatically down-mixed to 2ch for TV speakers. • If you turn the...

Quick Guide (easy Manual) (ver.1.0) (English)
Page 27
... EFFECT button to select , then press the Cursor , button to select the preset station. Listening to Radio ENG Remote Control 1 Press the TUNER button to select the FM band. 2 Tune in to select the desired effect setting. This mode extends the front stereo image to include the surround speakers for a clear, interference-free broadcast. The higher the setting, the less sound comes from the front or rear. • When playing a DVD disc encoded with side wall imaging...
... EFFECT button to select , then press the Cursor , button to select the preset station. Listening to Radio ENG Remote Control 1 Press the TUNER button to select the FM band. 2 Tune in to select the desired effect setting. This mode extends the front stereo image to include the surround speakers for a clear, interference-free broadcast. The higher the setting, the less sound comes from the front or rear. • When playing a DVD disc encoded with side wall imaging...
Quick Guide (easy Manual) (ver.1.0) (English)
Page 28
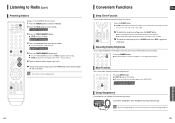
... Radio (Con't) Presetting Stations Example : Presetting FM 89.10 in memory. 6 To preset another station, repeat steps 2 to 5. flashes in the display. 4 Press the button to the Headphone jack for private listening pleasure. You can set earlier. Press the TUNER MEMORY button before the Home Theater will shut itself off . button on the remote control • This unit does not receive AM broadcasts. 54 Convenient Functions ENG Sleep Timer Function You can select...
... Radio (Con't) Presetting Stations Example : Presetting FM 89.10 in memory. 6 To preset another station, repeat steps 2 to 5. flashes in the display. 4 Press the button to the Headphone jack for private listening pleasure. You can set earlier. Press the TUNER MEMORY button before the Home Theater will shut itself off . button on the remote control • This unit does not receive AM broadcasts. 54 Convenient Functions ENG Sleep Timer Function You can select...
Quick Guide (easy Manual) (ver.1.0) (English)
Page 30
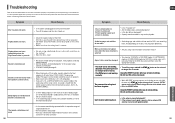
... necessary. Dolby Digital 5.1 CH Surround Sound is produced only if the disc is output to DOLBY DIGITAL 5.1-CH in the audio setup of the remote control (TV or DVD) correctly? Using the RESET function will not work . 58 • Is the remote control being operated within its operation range of angle and distance? • Are the batteries exhausted? • Have you set to the front speakers (L/R) only. The remote control does not work for rating level has...
... necessary. Dolby Digital 5.1 CH Surround Sound is produced only if the disc is output to DOLBY DIGITAL 5.1-CH in the audio setup of the remote control (TV or DVD) correctly? Using the RESET function will not work . 58 • Is the remote control being operated within its operation range of angle and distance? • Are the batteries exhausted? • Have you set to the front speakers (L/R) only. The remote control does not work for rating level has...
Quick Guide (easy Manual) (ver.1.0) (English)
Page 33
... Care Center Web Site All replaced parts and products become the property of SAMSUNG and must be performed by SAMSUNG under the SAMSUNG brand name are set forth in shipment; Non-SAMSUNG manufacturers, suppliers, publishers, and service providers may provide their own warranties. accidents, abuse, neglect, fire, water, lightning or other signal transmission and delivery problems. SAMSUNG does not warrant uninterrupted or error-free operation...
... Care Center Web Site All replaced parts and products become the property of SAMSUNG and must be performed by SAMSUNG under the SAMSUNG brand name are set forth in shipment; Non-SAMSUNG manufacturers, suppliers, publishers, and service providers may provide their own warranties. accidents, abuse, neglect, fire, water, lightning or other signal transmission and delivery problems. SAMSUNG does not warrant uninterrupted or error-free operation...


