Samsung HT X40 - DVD Home Theater System Research
Related Manual Pages


Related Videos

Home Theater Samsung HT-X40 + Play 3
Duration: 3:43
Total Views: 2,822
Duration: 3:43
Total Views: 2,822
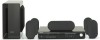
Samsung Home Theater HT-X40
Duration: 1:48
Total Views: 3,938
Duration: 1:48
Total Views: 3,938
Similar Questions

Tv Remotes Keep Switching Off My Samsung Dvd Home Theater System Ht-x70
Every time I use my TV remote to change channels it switches off my Samsung DVD Home Theater System ...
Every time I use my TV remote to change channels it switches off my Samsung DVD Home Theater System ...
(Posted by clarkandy62 7 months ago)

My Samsung Ht X40 Gives An Electrical Burning Odor And Then Shuts Off..
Is there a recall on this item? There is an odor coming from my system as if it's about to catch on ...
Is there a recall on this item? There is an odor coming from my system as if it's about to catch on ...
(Posted by Luvhair 10 years ago)

If I Lost My Remote Control, How Can I Adjust My Bass, Treble, Speaker, Etc.?
(Posted by nmckinnonsr 10 years ago)

Where To Buy Ht X40 Wireless Receiver Modulle
(Posted by marqhome 11 years ago)
Problem With Samsung Ht-ds650 Dvd Home Theater System
when power on display will show HELLO, LOADING,PROTECTION AND GOOD BYE. this procss in only 15 secon...
when power on display will show HELLO, LOADING,PROTECTION AND GOOD BYE. this procss in only 15 secon...
(Posted by yewaled 12 years ago)