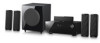
User Manual (user Manual) (ver.1.0) (English)
Page 3
...spilled or objects have fallen into your safety. IMPORTANT NOTE: FCC Radiation Exposure Statement This equipment complies with FCC radiation exposure limits set out in conjunction with any interference received, including interference that produce heat. 9) Do not defeat the safety purpose of the...Safety Instructions This device complies with part 15 of the polarized or grounding-type plug. Install in any heat sources such as set forth an uncontrolled environment. Servicing is required when the apparatus has been damaged in accordance with the manufacturer's instructions. 8) Do...
User Manual (user Manual) (ver.1.0) (English)
Page 6
... TV 20 Connecting External Devices/your TV via HDMI 21 HDMI Function 22 Connecting a DVD or BD(Blu-Ray) Player 23 Connecting a Cable, Satellite or Set-top Box 24 Connecting a VCR 25 Connecting a CD Player 26 Connecting 7.1 Channel Devices 27 Connecting an iPod 29 Connecting the FM Antenna 29 Connecting Aux...
User Manual (user Manual) (ver.1.0) (English)
Page 8
.... Description Front Panel 1 2 15 14 13 12 11 10 9 8 7 6 5 4 3 1 STANDBY/ON button 2 VOLUME Control 3 SELECT button 4 TUNING MODE button 5 TONE CONTROL button 6 S.DIRECT 7 SURROUND button Sets the AV receiver to output 2 CH PCM audio signal without any signal processing, providing higher audio quality. Adjusts the volume level. Toggles to select a surround...
User Manual (user Manual) (ver.1.0) (English)
Page 9
Toggles to select an input mode for setting up ASC (Auto Sound Calibration). Used to connect the ASC MIC for the selected source. * Also used to move the cursor to the right in ...
User Manual (user Manual) (ver.1.0) (English)
Page 15
...menus. 12 INFO button Displays information on /off. 2 INPUT MODE button Toggles to select an input mode for the selected source. 3 SLEEP button Used to set the Sleep Timer. 4 NUMBER buttons 5 SPK LEVEL/ SPK SELECT/ TEST TONE buttons Used to select a TV channel. Also used . 13 SURROUND mode ... menu. 24 ENTER button Used to select an item in the SETUP menu. 25 EXIT button Exits the SETUP menu. 26 ASC button Used to set a preset radio frequency. 8 VOLUME CONTROL buttons Adjusts the volume of a desired speaker. Used to select and adjust the level of the selected device. ...
User Manual (user Manual) (ver.1.0) (English)
Page 16
... 45°) toward you like. Place the speakers so thatSthBeLir tweeteSrBsRwill be sure to set the desired bass level (See page 37 "Setting the speaker level" to turn the power on. ~ Using the subwoofer's VOLUME control, you can set the subwoofer level in the menu). Speaker positioning SL SBL SR SBR Position of...
User Manual (user Manual) (ver.1.0) (English)
Page 20
... Digital Content Protection System (HDCP). A TV with a DVI-D jack (TV supporting HDCP) A TV with an HDMI jack. DVD or Blu-RAY Player SAT(Cable/Satellite/Set-top box) game console • Connect it was originally created in the digital source. To play a DVD disc whose copyright is a digital standard interface for...
User Manual (user Manual) (ver.1.0) (English)
Page 21
If you select the TV Set the Anynet+(HDMI-CEC) to On by connecting this AV Receiver to audio through the AV receiver. ~ Receiver : Off : You can listen to a SAMSUNG TV using an HDMI Cable. Press SETUP/MENU button, and then press the ENTER button. ~ "SETUP MODE" appears on the TV remote control... option of each item below. ~ View TV : If Anynet+(HDMI-CEC) set it can operate the AV receiver using Volume buttons on the display and goes into Setup Mode. 2. M ` If you use an HDMI cable to connect a Samsung TV to your TV has an n logo, then it supports the Anynet+ function. ` When...
User Manual (user Manual) (ver.1.0) (English)
Page 23
... your SAT. M ` Disconnect the power plug from the outlet if you will not work. 23 EnG ● Connections Connecting a Cable, Satellite or Set-top box SAT(Cable/Satellite/Set-top box) OPTICAL AUDIO OUT OUT VIDEO COMPONENT OUT OUT VIDEO COMPONENT IN IN or or or Video Connection Connect a Component video cable...
User Manual (user Manual) (ver.1.0) (English)
Page 27
... unit. Turn off the AV Receiver. 2. Place the iPod in the Dock. ~ If you want to play a movie stored in your iPod player, you should set the player's TV Out option to view iPod video. Disconnect the iPod player from the iPod dock, or remove the iPod dock connector from your... other than IPOD AUDIO or IPOD VIDEO. For iPod operation with your iPod's battery. ` Make sure to connect the dock connector so that the label "SAMSUNG" faces upward. ` "Made for iPod" means that an electronic accessory has been designed to connect specifically to iPod and has been certified by the developer...
User Manual (user Manual) (ver.1.0) (English)
Page 30
Setup MENU TREE Here's a quick look at how the setup menus are organized on your convenience, you can set this AV receiver's features for the best use. INPUT DVD OPTICAL 1,2,3 COAXIAL SAT OPTICAL 1,2,3 COAXIAL TV OPTICAL 1,2,3 COAXIAL CD OPTICAL 1,2,3 COAXIAL AUX OPTICAL 1,2,3 COAXIAL SPEAKER SURROUND OPTION 30 setup For your AV Receiver.
User Manual (user Manual) (ver.1.0) (English)
Page 32
Setup MENU TREE (Continued) INPUT SPEAKER SURROUND STEREO PL IIx SFE NEO:6 EX/ES STEREO MULTI CH STEREO MODE Movie Music Game Matrix PL PANORAMA OFF ON DIMENSION -7 ~ STD ~ +7 CENTER WIDTH 0 ~ 7 HALL1 ROCK MOVIE HALL2 CLASSIC JAZZ CLUB LIVE CHURCH GAME NEO:6 MODE CENTER IMAGE MUSIC 0 ~ 7 CINEMA AUTO OFF ON TONE CONTROL TONE SET BASS TREBLE OPTION OFF ON -6dB ~ +6dB (1dB Step) -6dB ~ +6dB (1dB Step) 32
User Manual (user Manual) (ver.1.0) (English)
Page 35
...4. "SETUP OFF" appears on the display. 2. Press ▲▼ button to select "SPEAKER", and then press the ENTER. 3. Repeat steps 3-4 to set the mode (LARGE, SMALL etc.) for the selected speaker. 6. Press ◀▶ button to select the speaker you want. ~ Each time you press this... LARGE, SMALL, NONE ON, OFF 60, 80, 100,120, 150, 180, 200(Hz) SMALL SMALL SMALL SMALL ON 150Hz Default Setting ~ LARGE : Select when using the subwoofer speaker. ~ CROVR : Select the crossover frequency for each speaker. - Press SETUP/MENU button. ~ "INPUT" appears...
User Manual (user Manual) (ver.1.0) (English)
Page 36
...SETUP OFF" appears on the max delay channel, the distance of 1ft (0.3m). - To exit setup mode ~ Press SETUP/MENU, EXIT or RETURN button. Setting Speaker Distance Set the distance from the speaker to listening position in intervals of 1ft(0.3m). • F.L (front left) : 1ft ~ 30ft • F.R (front right... position. ` Based on the display and Setup Mode is 4.9ft(5ms) and the surround speaker can be set up to 14.7ft(15ms). 36 SPEAKER SETUP (Continued) Setting the speaker listening distance If the speakers cannot be selected in turn. 5. LEFT, SURR. BACK RIGHT...
User Manual (user Manual) (ver.1.0) (English)
Page 37
... the ENTER or ▶ button. 4. Press ▲▼ button to +10dB in turn. 5. Press ▲▼ button to set the speaker mode. ~ You can set the balance and level of speakers. 1. Setting Speaker Level • F.L (front left) : -10 ~ +10dB • F.R (front right) : -10 ~ +10dB • CEN (center) : -10 ~ +10dB • S.L (surround...
User Manual (user Manual) (ver.1.0) (English)
Page 38
...; SBR (surround back right) : -10 ~ +10dB • SBL (surround back left) : -10 ~ +10dB • S L (surround left) : -10 ~ +10dB - SPEAKER SETUP (Continued) Setting the test tone Use the test tone to set the test tone as follows; F.L CEN S.W F.R S.R SBR SBL S.L. - During test tone output, press ▲...
User Manual (user Manual) (ver.1.0) (English)
Page 39
Press ▲▼ button to sound through the front left and right speakers and subwoofer. 1. EnG ● setup SURROUND SETUP Setting the stereo mode You can select this for Multi-CH output. - Press ▲▼ button to select "SURROUND", and then press the ENTER.... the display and Setup Mode is exited. 39 "SETUP OFF" appears on the display and goes into Setup Mode. 2. Press ▲▼ button to set STEREO mode you want. ~ STEREO:2CH : Select this for 2 CH stereo output. ~ STEREO:MULTI : Select this mode when listening to select "STEREO", and...
User Manual (user Manual) (ver.1.0) (English)
Page 40
... Logic II X mode This mode provides 7.1 channel sound from the surround back speakers if the PCM audio signal is set from the front or surround.) ~ CENTER WIDTH : You can set to "MUSIC". ` Y ou cannot use Dolby Pro Logic llx mode for an exciting "wraparound" effect with side wall...frequencies of 32KHz, 44KHz or 48KHz. ` Sound will experience a surround effect with just the front left and right speakers. ~ PANORAMA : You can set from -7 to +7. (Incrementally adjusts the sound field (DSP)from 0 to select the option you want, and then press the ENTER or ▶ button. ...
User Manual (user Manual) (ver.1.0) (English)
Page 41
... the lowest while "7" is exited. To exit setup mode~ Press SETUP/MENU, EXIT or RETURN button. SURROUND SETUP (Continued) EnG ● setup Setting SFE(Sound Field Effect) mode The SFE (Sound Field Effect) function uses 9 different DSP sound field effects to select "SURROUND", and then press the...signals with DTS and Dolby Digital multi channel signals. ` Pro Logic works only for movie playback. ~ CENTER IMAGE : Press ▲▼ button to set the sound image from 0 to select "NEO:6", and then press the ENTER or ▶ button. 4. Press ▲▼ button to ...
User Manual (user Manual) (ver.1.0) (English)
Page 42
... or DTS signal will be played in 6.1 / 7.1 channel using the built-in Dolby Digital Surround EX or DTS ES decoder. Press ▲▼ button to set EX/ES to select the "EX / ES", and then press the ENTER or ▶ button. ~ "EX/ES : AUTO" appears on the display. ...4. SURROUND SETUP (Continued) Setting EX/ES mode When surround back speakers are connected, you can recognize, it will select an optimal decoder for playback. - Press ▲▼ button to...