User Manual (ENGLISH)
Page 2
...this product unit and the license does not extend to any unlicensed product unit or process conforming to fill the screen if your Samsung limited warranty. The license only covers the use of television formats used for all televisions. The license does not cover any ... leave subtle, but permanent burned-in ghost images in the selection and duration of this license for product features or functions that offer picture sizing features, use . No rights are granted under certain intellectual property rights of certain third parties. Displaying stationary graphics and images on...
...this product unit and the license does not extend to any unlicensed product unit or process conforming to fill the screen if your Samsung limited warranty. The license only covers the use of television formats used for all televisions. The license does not cover any ... leave subtle, but permanent burned-in ghost images in the selection and duration of this license for product features or functions that offer picture sizing features, use . No rights are granted under certain intellectual property rights of certain third parties. Displaying stationary graphics and images on...
User Manual (ENGLISH)
Page 4
...Note One-Touch Button English-4 Analog ... 49 Menu Transparency Level 50 Using the Energy Saving Feature 50 Preventing Screen Burn-in 51 Reducing the Effects of Screen Burn 52... Control 8 Installing Batteries in the Remote Control 9 CONNECTIONS Connecting VHF and UHF Antennas 9 Connecting Cable TV 10 Connecting a VCR 11 Connecting an S-VHS VCR 11 Connecting a Camcorder 12 Connecting a DVD Player... the Film Mode 29 Setting the Blue Screen Mode 29 Viewing Picture-in-Picture 30 Freezing the Current Picture 31 SOUND CONTROL Using Automatic Sound Settings 32 Customizing the Sound...
...Note One-Touch Button English-4 Analog ... 49 Menu Transparency Level 50 Using the Energy Saving Feature 50 Preventing Screen Burn-in 51 Reducing the Effects of Screen Burn 52... Control 8 Installing Batteries in the Remote Control 9 CONNECTIONS Connecting VHF and UHF Antennas 9 Connecting Cable TV 10 Connecting a VCR 11 Connecting an S-VHS VCR 11 Connecting a Camcorder 12 Connecting a DVD Player... the Film Mode 29 Setting the Blue Screen Mode 29 Viewing Picture-in-Picture 30 Freezing the Current Picture 31 SOUND CONTROL Using Automatic Sound Settings 32 Customizing the Sound...

User Manual (ENGLISH)
Page 5
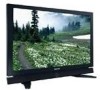
V-Chip function. Excellent Picture Quality - Optical Cable Coaxial Cable (BN39-00110A) Antenna Cable (BN39-00333A) ...Cord (3903-000144) Owner's Instructions / Quick Setup Guide Warranty Card / Registration Card / Safety Guide Manual (Not available in the TV's memory. S-VIDEO Cable (BN39-00149A) HDMI Cable (BN39-00641A) HDMI/DVI cable (BN39-00643A) Component Cables (RCA) (.... Accessories Please make sure the following parts are sold separately and are missing, contact your TV. A special sleep timer. SRS TruSurround XT provides a virtual Dolby surround system. If any...
V-Chip function. Excellent Picture Quality - Optical Cable Coaxial Cable (BN39-00110A) Antenna Cable (BN39-00333A) ...Cord (3903-000144) Owner's Instructions / Quick Setup Guide Warranty Card / Registration Card / Safety Guide Manual (Not available in the TV's memory. S-VIDEO Cable (BN39-00149A) HDMI Cable (BN39-00641A) HDMI/DVI cable (BN39-00643A) Component Cables (RCA) (.... Accessories Please make sure the following parts are sold separately and are missing, contact your TV. A special sleep timer. SRS TruSurround XT provides a virtual Dolby surround system. If any...
User Manual (ENGLISH)
Page 8
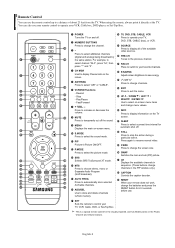
...to temporarily cut off the sound. ' MENU Displays the main on-screen menu. ˝ S.MODE Press to select the sound mode. Ô PIP Picture-in the PIP window only.) ¥ CAPTION Controls the caption decoder. ≥ RESET When your remote does not work, change the batteries and press the...in sequence. (These buttons change channels in Picture ON/OFF. P.MODE Press to select the picture mode. Ò SRS Selects SRS TruSurround XT mode. Ú MTS Press to display information on the TV screen. - When using the remote, always point it directly at the TV. Press to select "AIR" or "...
...to temporarily cut off the sound. ' MENU Displays the main on-screen menu. ˝ S.MODE Press to select the sound mode. Ô PIP Picture-in the PIP window only.) ¥ CAPTION Controls the caption decoder. ≥ RESET When your remote does not work, change the batteries and press the...in sequence. (These buttons change channels in Picture ON/OFF. P.MODE Press to select the picture mode. Ò SRS Selects SRS TruSurround XT mode. Ú MTS Press to display information on the TV screen. - When using the remote, always point it directly at the TV. Press to select "AIR" or "...
User Manual (ENGLISH)
Page 11
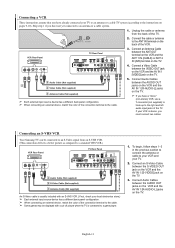
.... 3. Connect the cable or antenna to the ANT IN terminal on the back of the connection terminal to the cable. 1. Connecting an S-VHS VCR Your Samsung TV can be connected to an S-Video signal from the back of the connection terminal to the cable. ➢ Some games may be displayed with a cut... off picture when the TV is stereo, you must connect two cables. Connect a Video Cable between the AUDIO OUT jacks on the VCR and the AV IN 1 [R-AUDIO-L] ...
.... 3. Connect the cable or antenna to the ANT IN terminal on the back of the connection terminal to the cable. 1. Connecting an S-VHS VCR Your Samsung TV can be connected to an S-Video signal from the back of the connection terminal to the cable. ➢ Some games may be displayed with a cut... off picture when the TV is stereo, you must connect two cables. Connect a Video Cable between the AUDIO OUT jacks on the VCR and the AV IN 1 [R-AUDIO-L] ...
User Manual (ENGLISH)
Page 18
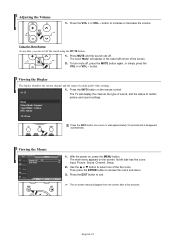
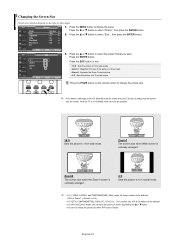
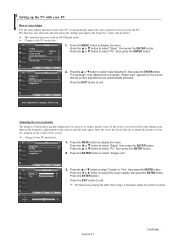
button. The TV will appear in the lower-left side has five icons: Input, Picture, Sound, Channel, Setup. 2. With the...TV Edit Name Move Enter √ √ Return 1. Viewing the Display The display identifies the current channel and the status of the five icons. Press the INFO button on -screen menus disappear from the screen after a few seconds. Press the VOL + or VOL - Mono Picture... VOL - button to access the icon's sub-menu. 3. Its left corner of certain picture and sound settings. Then press the ENTER button to increase or decrease the volume. Press ...
button. The TV will appear in the lower-left side has five icons: Input, Picture, Sound, Channel, Setup. 2. With the...TV Edit Name Move Enter √ √ Return 1. Viewing the Display The display identifies the current channel and the status of the five icons. Press the INFO button on -screen menus disappear from the screen after a few seconds. Press the VOL + or VOL - Mono Picture... VOL - button to access the icon's sub-menu. 3. Its left corner of certain picture and sound settings. Then press the ENTER button to increase or decrease the volume. Press ...
User Manual (ENGLISH)
Page 26
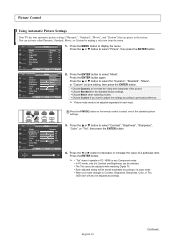
... Picture : Dynamic √ : 16:9 √ : On √ : On √ : Off √ : Off √ 1. or † button to increase the clarity and sharpness of a particular item. Press the ... Press the MENU button to select "Contrast", "Brightness", "Sharpness", "Color", or "Tint", then press the ENTER button. 4. TV Mode Mode Contrast Brightness Sharpness Color Tint G 50...
... Picture : Dynamic √ : 16:9 √ : On √ : On √ : Off √ : Off √ 1. or † button to increase the clarity and sharpness of a particular item. Press the ... Press the MENU button to select "Contrast", "Brightness", "Sharpness", "Color", or "Tint", then press the ENTER button. 4. TV Mode Mode Contrast Brightness Sharpness Color Tint G 50...
User Manual (ENGLISH)
Page 27
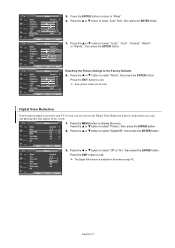
... the Digital Noise Reduction feature to the Factory Defaults Mode Contrast Brightness Sharpness Color Tint G 50 Color Tone Reset : Dynamic √ 100 45 75 55 R 50 : Cool1 √ 8. TV Mode Size Digital NR DNIe Film Mode Blue Screen PIP Picture : Dynamic √ : 16:9 √ : On √ : On √ : Off √ : Off √ 1. Press the...
... the Digital Noise Reduction feature to the Factory Defaults Mode Contrast Brightness Sharpness Color Tint G 50 Color Tone Reset : Dynamic √ 100 45 75 55 R 50 : Cool1 √ 8. TV Mode Size Digital NR DNIe Film Mode Blue Screen PIP Picture : Dynamic √ : 16:9 √ : On √ : On √ : Off √ : Off √ 1. Press the...
User Manual (ENGLISH)
Page 28
... Press the ENTER button. English-28 Press the ... Zoom2 The screen size when the Zoom1 screen is vertically enlarged. 4:3 Sets the picture to 4:3 normal mode. ➢ • In TV, VIDEO, S-VIDEO, and COMPONENT(480i, 480p) modes, all screen modes can be selected. (16:9 ➞ Zoom1 ➞ ... 16:9 wide mode. or † button. • You can be burned onto the screen. Press the MENU button to Double. TV Mode Size Digital NR DNIe Film Mode Blue Screen PIP Picture : Dynamic √ : 16:9 √ : On √ : On √ : Off √ : Off √ 1....
... Press the ENTER button. English-28 Press the ... Zoom2 The screen size when the Zoom1 screen is vertically enlarged. 4:3 Sets the picture to 4:3 normal mode. ➢ • In TV, VIDEO, S-VIDEO, and COMPONENT(480i, 480p) modes, all screen modes can be selected. (16:9 ➞ Zoom1 ➞ ... 16:9 wide mode. or † button. • You can be burned onto the screen. Press the MENU button to Double. TV Mode Size Digital NR DNIe Film Mode Blue Screen PIP Picture : Dynamic √ : 16:9 √ : On √ : On √ : Off √ : Off √ 1....

User Manual (ENGLISH)
Page 29
...the Movie mode. (It is PC. or † button to select "Off", "Demo" or "On", then press the ENTER TV Picture button. Press the ... TV Mode Size Digital NR DNIe Film Mode Blue Screen PIP Picture : Dynamic √ : 16:9 √ : On √ : On √ : Off √ : Off √ ...Mode Blue Screen PIP : Dynamic : 16:9 : On : On : Off : OOfff On Press the EXIT button to "Off". Move Enter Return TV Picture 3. Press the MENU button to select "Film Mode", then press the ENTER button. or † button to display the menu. Press the ... DNIe...
...the Movie mode. (It is PC. or † button to select "Off", "Demo" or "On", then press the ENTER TV Picture button. Press the ... TV Mode Size Digital NR DNIe Film Mode Blue Screen PIP Picture : Dynamic √ : 16:9 √ : On √ : On √ : Off √ : Off √ ...Mode Blue Screen PIP : Dynamic : 16:9 : On : On : Off : OOfff On Press the EXIT button to "Off". Move Enter Return TV Picture 3. Press the MENU button to select "Film Mode", then press the ENTER button. or † button to display the menu. Press the ... DNIe...
User Manual (ENGLISH)
Page 30
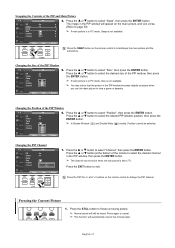
... sources. (See page 35 to select "On", then press the ENTER button. ➢ If you turn the TV off while watching in PIP mode and turn it on the remote control to select "Picture", then press the ENTER button. Please see 'PIP Settings' below for PIP. Press the ... Select the source..., you to select "Source", then press the ENTER button. Press the ... Viewing Picture-in-Picture This product has one built-in tuner, which does not allow you cannot watch one TV channel in the main screen, and a different one TV channel in the main screen and another channel in the PIP screen. Press...
... sources. (See page 35 to select "On", then press the ENTER button. ➢ If you turn the TV off while watching in PIP mode and turn it on the remote control to select "Picture", then press the ENTER button. Please see 'PIP Settings' below for PIP. Press the ... Select the source..., you to select "Source", then press the ENTER button. Press the ... Viewing Picture-in-Picture This product has one built-in tuner, which does not allow you cannot watch one TV channel in the main screen, and a different one TV channel in the main screen and another channel in the PIP screen. Press...
User Manual (ENGLISH)
Page 31
... Double Window ( ) and Double Wide ( ) modes, Position cannot be selected. Freezing the Current Picture 1. Press the ... or † button at the bottom of the PIP and Main Picture TV PIP Source Swap Size Position Channel PIP : On : TV : : : Air 3 4. Press the ... or † button to select "Swap", then ...; ➢ If main picture is in PC mode, Swap is not available. √ √ Move Enter Return Press the SWAP button on the remote control to change the PIP channel. Move Enter Return Changing the Position of the PIP Window TV PIP Source Swap Size Position...
... Double Window ( ) and Double Wide ( ) modes, Position cannot be selected. Freezing the Current Picture 1. Press the ... or † button at the bottom of the PIP and Main Picture TV PIP Source Swap Size Position Channel PIP : On : TV : : : Air 3 4. Press the ... or † button to select "Swap", then ...; ➢ If main picture is in PC mode, Swap is not available. √ √ Move Enter Return Press the SWAP button on the remote control to change the PIP channel. Move Enter Return Changing the Position of the PIP Window TV PIP Source Swap Size Position...

User Manual (ENGLISH)
Page 35
...Sound", then press the ENTER button. √ √ 2. Press the ... TV Sound ... or † button to the sound of the Sub (PIP) Picture When the PIP feature is powered On or Off. Move Enter Return TV Sound 3. Main: Used to listen to select "Sound", then press the ENTER...then press the ENTER button. Sub: Used to listen to the sound of the sub (PIP) picture. Selecting the Internal Mute Sound output from the TV speakers is useful when you can listen to exit. TV Sound Mode : Custom √ Equalizer √ SRS TruSurround XT : Off √ Multi-...
...Sound", then press the ENTER button. √ √ 2. Press the ... TV Sound ... or † button to the sound of the Sub (PIP) Picture When the PIP feature is powered On or Off. Move Enter Return TV Sound 3. Main: Used to listen to select "Sound", then press the ENTER...then press the ENTER button. Sub: Used to listen to the sound of the sub (PIP) picture. Selecting the Internal Mute Sound output from the TV speakers is useful when you can listen to exit. TV Sound Mode : Custom √ Equalizer √ SRS TruSurround XT : Off √ Multi-...
User Manual (ENGLISH)
Page 40
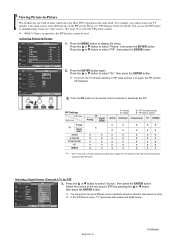
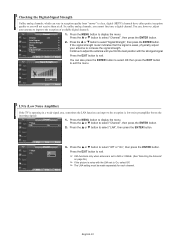
..., you find the best position with the LNA set to AIR or CABLE. (See "Selecting the Antenna" on page 36.) ➢ If the picture is weak, physically adjust √ your antenna to select "Off" or "On", then press the ENTER button. You can also press the ENTER ..."Channel", then press the ENTER button. √ √ 2. More LNA Channel : OOfff On 3. Press the ... or † button to display the menu. TV Signal Strength You can , however, adjust your antenna to increase the signal strength. √ Continue to adjust the antenna until you cannot fine tune a digital...
..., you find the best position with the LNA set to AIR or CABLE. (See "Selecting the Antenna" on page 36.) ➢ If the picture is weak, physically adjust √ your antenna to select "Off" or "On", then press the ENTER button. You can also press the ENTER ..."Channel", then press the ENTER button. √ √ 2. More LNA Channel : OOfff On 3. Press the ... or † button to display the menu. TV Signal Strength You can , however, adjust your antenna to increase the signal strength. √ Continue to adjust the antenna until you cannot fine tune a digital...
User Manual (ENGLISH)
Page 42
...tuning alone, then do the frequency adjustments to select "Coarse" or "Fine", then press the ENTER button. Move Enter Return TV Coarse Fine Image Lock 50 0 3. or † button to the utmost and fine tune again. The function also automatically fine-tunes the settings and ... to Auto Adjust Use the Auto Adjust function to have the TV set automatically adjust the video signals it is aligned on the screen and the picture adjustments are automatically activated. TV Setup ... Press the ... Move Enter TV PC Image Lock Position Auto Adjustment Image Reset Return √ ...
...tuning alone, then do the frequency adjustments to select "Coarse" or "Fine", then press the ENTER button. Move Enter Return TV Coarse Fine Image Lock 50 0 3. or † button to the utmost and fine tune again. The function also automatically fine-tunes the settings and ... to Auto Adjust Use the Auto Adjust function to have the TV set automatically adjust the video signals it is aligned on the screen and the picture adjustments are automatically activated. TV Setup ... Press the ... Move Enter TV PC Image Lock Position Auto Adjustment Image Reset Return √ ...
User Manual (ENGLISH)
Page 47
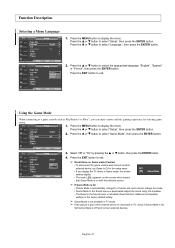
... button to exit. ➢ Restrictions on Game mode (Caution) • To disconnect the game console and connect another external device, set Game to Off in TV mode. ➢ If the picture is poor when external device is connected to a game console such as PlayStationTM or XboxTM, you display the... TV menu in the Sound menu is deactivated. or † button to display the menu. Press the ... or † button to the factory default setting. ➢ ...
... button to exit. ➢ Restrictions on Game mode (Caution) • To disconnect the game console and connect another external device, set Game to Off in TV mode. ➢ If the picture is poor when external device is connected to a game console such as PlayStationTM or XboxTM, you display the... TV menu in the Sound menu is deactivated. or † button to display the menu. Press the ... or † button to the factory default setting. ➢ ...
User Manual (ENGLISH)
Page 51
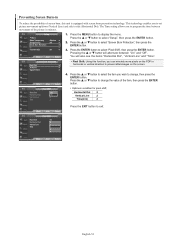
...; Function Help : On √ 3. Move Enter Return You will alternate between movement of the picture in minutes. Press the ... More Press the ... Press the ... or † button to display the menu. ... TV Screen Burn Protection Pixel Shift √ All White √ Signal Pattern √ Pixel Shift: Using...this function, you to program the time between "On" and "Off". or † button to select the item you to set picture movement up/down (Vertical Line) and side to side (Horizontal Dot). or † button to select "Pixel Shift", then press the ENTER ...
...; Function Help : On √ 3. Move Enter Return You will alternate between movement of the picture in minutes. Press the ... More Press the ... Press the ... or † button to display the menu. ... TV Screen Burn Protection Pixel Shift √ All White √ Signal Pattern √ Pixel Shift: Using...this function, you to program the time between "On" and "Off". or † button to select the item you to set picture movement up/down (Vertical Line) and side to side (Horizontal Dot). or † button to select "Pixel Shift", then press the ENTER ...

User Manual (ENGLISH)
Page 55
...Return ➢ The TV-Y, TV-Y7, TV-G, TV-PG, TV-14 and TV-MA have additional options. Press the ENTER to the next section, and set up Restrictions Using the MPAA Ratings: G, PG, PG-13, R, NC-17, X, NR The MPAA rating system uses the Motion Picture Association of America (MPAA... L, S and V sub-ratings. To select a different TV-Rating, press the ... The restrictions for these TV-Ratings: TV-Y, TV-Y7, TV-G, TV-PG, TV-14, or TV-MA (See Step 4, on the MPAA codes.) ➢ These categories consist of the TV-Ratings is selected, press the ENTER button to change any programs...
...Return ➢ The TV-Y, TV-Y7, TV-G, TV-PG, TV-14 and TV-MA have additional options. Press the ENTER to the next section, and set up Restrictions Using the MPAA Ratings: G, PG, PG-13, R, NC-17, X, NR The MPAA rating system uses the Motion Picture Association of America (MPAA... L, S and V sub-ratings. To select a different TV-Rating, press the ... The restrictions for these TV-Ratings: TV-Y, TV-Y7, TV-G, TV-PG, TV-14, or TV-MA (See Step 4, on the MPAA codes.) ➢ These categories consist of the TV-Ratings is selected, press the ENTER button to change any programs...
User Manual (ENGLISH)
Page 59
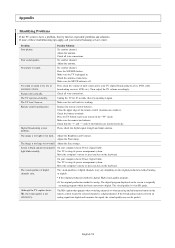
...computer check; Check all wire connections. Make sure the TV is plugged in the "TV" mode. Check the antenna connections. Check all wire connections. Adjust the Fine tuning. On your nearest Samsung service center. The TV is working. The visual qualities of the batteries are inserted...management system. The image is not satisfactory. Adjust the Size settings. Power, Signal Cable. Picture rolls vertically. Try another channel. Then, adjust the TV volume accordingly. Although the TV caption shows HD, the visual quality is too light or too dark. English-59 Remote ...
...computer check; Check all wire connections. Make sure the TV is plugged in the "TV" mode. Check the antenna connections. Check all wire connections. Adjust the Fine tuning. On your nearest Samsung service center. The TV is working. The visual qualities of the batteries are inserted...management system. The image is not satisfactory. Adjust the Size settings. Power, Signal Cable. Picture rolls vertically. Try another channel. Then, adjust the TV volume accordingly. Although the TV caption shows HD, the visual quality is too light or too dark. English-59 Remote ...

User Manual (ENGLISH)
Page 60
... bracket. Use the screw and assemble the plastic hanger. (Please refer to the following picture.) • Please ask the installers to install the wall mount bracket. • Please... Screws ASSY-HINGE (LEFT) Wall Mount Bracket Separate ASSY-HINGE into the wall. Samsung Electronics is not responsible for any damages to the product or harm to customers or... others when the installation is sold separately. Remove the screws from a falling TV. Wall Installation Instructions Refer to the installation guide supplied with your wall bracket. Installation Notes...
... bracket. Use the screw and assemble the plastic hanger. (Please refer to the following picture.) • Please ask the installers to install the wall mount bracket. • Please... Screws ASSY-HINGE (LEFT) Wall Mount Bracket Separate ASSY-HINGE into the wall. Samsung Electronics is not responsible for any damages to the product or harm to customers or... others when the installation is sold separately. Remove the screws from a falling TV. Wall Installation Instructions Refer to the installation guide supplied with your wall bracket. Installation Notes...


