User Manual (ENGLISH)
Page 3
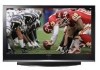
...contrast of the screen when displaying a still image. Playing a DVD or a game console may cause similar effect to produce. Watching the PDP TV in 4:3 format for a long period of time may leave traces of borders displayed on the left, right and center of the screen caused by... burn". Altitude The PDP can cause screen image retention. Avoid operating the TV at heights under 6500ft. User Instructions Screen Image retention Do not display a still image (such as on a video game) on the plasma display panel for more than a certain period of time may produce partial after...
...contrast of the screen when displaying a still image. Playing a DVD or a game console may cause similar effect to produce. Watching the PDP TV in 4:3 format for a long period of time may leave traces of borders displayed on the left, right and center of the screen caused by... burn". Altitude The PDP can cause screen image retention. Avoid operating the TV at heights under 6500ft. User Instructions Screen Image retention Do not display a still image (such as on a video game) on the plasma display panel for more than a certain period of time may produce partial after...
User Manual (ENGLISH)
Page 4
... track - Table of Contents General Information Your New Plasma Display Panel 8 Remote Control Buttons 11 Wall Installation Instructions 13 How to assemble the Stand-Base 17 Connections Connecting VHF and UHF Antennas 20 Connecting Cable TV 21 Connecting a VCR 23 Connecting a Camcorder 24 ...DTV Receiver (480p, 720p, 1080i 26 Connecting to HDMI (High Definition Multimedia Interface) (480p, 720p, 1080i) ..27 Connecting a Digital TV Set-Top Box (480p, 720p, 1080i 28 Connecting a Digital Audio System 29 Connecting to an Analog Amplifier 30 Picture Control Changing the Picture...
... track - Table of Contents General Information Your New Plasma Display Panel 8 Remote Control Buttons 11 Wall Installation Instructions 13 How to assemble the Stand-Base 17 Connections Connecting VHF and UHF Antennas 20 Connecting Cable TV 21 Connecting a VCR 23 Connecting a Camcorder 24 ...DTV Receiver (480p, 720p, 1080i 26 Connecting to HDMI (High Definition Multimedia Interface) (480p, 720p, 1080i) ..27 Connecting a Digital TV Set-Top Box (480p, 720p, 1080i 28 Connecting a Digital Audio System 29 Connecting to an Analog Amplifier 30 Picture Control Changing the Picture...
User Manual (ENGLISH)
Page 5
Connecting a PC and Operation Connecting a PC 88 Changing the Position of the TV's software and the regional conditions. 5 Digital 110 Menu Transparency Level 112 Using the Energy Saving Feature 113 Preventing Screen Burn-in 114 Reducing the...117 Using the V-Chip (for USA 118 Using the V-Chip (for Canada 124 Appendix Troubleshooting 134 Care and Maintenance 135 Specifications 136 Dimensions (HP-S4253 137 Dimensions (HP-S5053 139 Note • The information contained in these Owner's Instructions is subject to change without prior notice for improvement, and may vary depending...
Connecting a PC and Operation Connecting a PC 88 Changing the Position of the TV's software and the regional conditions. 5 Digital 110 Menu Transparency Level 112 Using the Energy Saving Feature 113 Preventing Screen Burn-in 114 Reducing the...117 Using the V-Chip (for USA 118 Using the V-Chip (for Canada 124 Appendix Troubleshooting 134 Care and Maintenance 135 Specifications 136 Dimensions (HP-S4253 137 Dimensions (HP-S5053 139 Note • The information contained in these Owner's Instructions is subject to change without prior notice for improvement, and may vary depending...
User Manual (ENGLISH)
Page 8
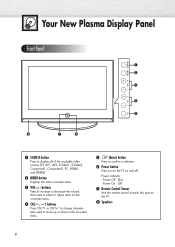
... and off. buttons Press to change channels. " Speakers 8 Your New Plasma Display Panel Front Panel Œ ´ ˇ ¨ ˆ " ∏ Ø Œ SOURCE button Press to display all of the available video sources (TV, AV1, AV2, S-Video1, S-Video2, Component1, Component2, PC, HDMI1..., and HDMI2). ´ MENU button Displays the main on the TV. Power indicator - Power On : Off ∏ Remote Control Sensor Aim the remote ...
... and off. buttons Press to change channels. " Speakers 8 Your New Plasma Display Panel Front Panel Œ ´ ˇ ¨ ˆ " ∏ Ø Œ SOURCE button Press to display all of the available video sources (TV, AV1, AV2, S-Video1, S-Video2, Component1, Component2, PC, HDMI1..., and HDMI2). ´ MENU button Displays the main on the TV. Power indicator - Power On : Off ∏ Remote Control Sensor Aim the remote ...
User Manual (ENGLISH)
Page 9
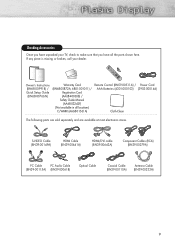
If any piece is missing or broken, call your TV, check to make sure that you have all locations) C/WARR (AA68-01561A) Remote Control (BN59-00511A) / Power Cord AAA Batteries (4301-000103) (3903-000144) Cloth-...
If any piece is missing or broken, call your TV, check to make sure that you have all locations) C/WARR (AA68-01561A) Remote Control (BN59-00511A) / Power Cord AAA Batteries (4301-000103) (3903-000144) Cloth-...
User Manual (ENGLISH)
Page 10
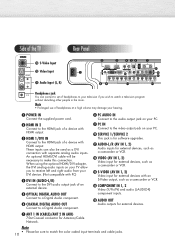
Side of the TV Rear Panel Ò S-Video Input Video Input Ô Audio Input (L, R) Headphones jack You can also be used as a camcorder or VCR. Ú COMPONENT IN 1, 2 ... analog audio inputs. " PC AUDIO IN Connect to the audio output jack on your PC. ' PC IN Connect to the video output jack on your TV allow you wish to a Digital Audio component. An optional HDMI/DVI cable will be sure to make this connection. These inputs can connect a set of...
Side of the TV Rear Panel Ò S-Video Input Video Input Ô Audio Input (L, R) Headphones jack You can also be used as a camcorder or VCR. Ú COMPONENT IN 1, 2 ... analog audio inputs. " PC AUDIO IN Connect to the audio output jack on your PC. ' PC IN Connect to the video output jack on your TV allow you wish to a Digital Audio component. An optional HDMI/DVI cable will be sure to make this connection. These inputs can connect a set of...
User Manual (ENGLISH)
Page 11
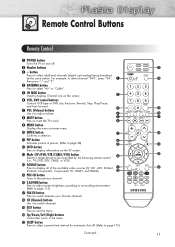
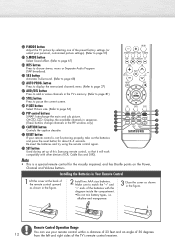
...Ô PIP button Activates picture in picture. (Refer to page 58) INFO button Press to display information on the TV screen. Ò Mode (TV/DVD/STB/CABLE/VCR) button Selects a target device to adjust volume. button Press to select additional channels (digital and analog)... being broadcast by the Samsung remote control (i.e., TV, DVD, STB, CABLE, or VCR). Ú SOURCE button Press to display all of the available video sources (TV, AV1, AV2, S-Video1, S-Video2, Component1, Component2, PC, HDMI1, and HDMI2...
...Ô PIP button Activates picture in picture. (Refer to page 58) INFO button Press to display information on the TV screen. Ò Mode (TV/DVD/STB/CABLE/VCR) button Selects a target device to adjust volume. button Press to select additional channels (digital and analog)... being broadcast by the Samsung remote control (i.e., TV, DVD, STB, CABLE, or VCR). Ú SOURCE button Press to display all of the available video sources (TV, AV1, AV2, S-Video1, S-Video2, Component1, Component2, PC, HDMI1, and HDMI2...
User Manual (ENGLISH)
Page 12
..., mono or Separate Audio Program (SAP broadcast). ≠ SRS button Activates TruSurround. (Refer to match the "+" and "-" ends of the TV's remote control receiver. Installing the Batteries in Your Remote Control 1 Lift the cover at the back of the remote control upward as shown in...factory settings (or select your remote control is a special remote control for about 2~3 seconds. ˛ P.MODE button Adjust the TV picture by selecting one of this Samsung remote control, so that it will work compatibly with the diagram inside the compartment. •Do not mix battery types, i.e. ...
..., mono or Separate Audio Program (SAP broadcast). ≠ SRS button Activates TruSurround. (Refer to match the "+" and "-" ends of the TV's remote control receiver. Installing the Batteries in Your Remote Control 1 Lift the cover at the back of the remote control upward as shown in...factory settings (or select your remote control is a special remote control for about 2~3 seconds. ˛ P.MODE button Adjust the TV picture by selecting one of this Samsung remote control, so that it will work compatibly with the diagram inside the compartment. •Do not mix battery types, i.e. ...
User Manual (ENGLISH)
Page 14
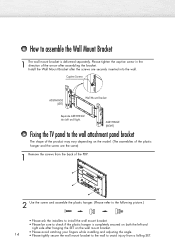
... is delivered separately. Install the Wall Mount Bracket after the screws are the same) 1 Remove the screws from a falling SET. ASSY-HINGE (RIGHT) Fixing the TV panel to the wall attachment panel bracket The shape of the product may vary depending on the model. (The assemblies of the PDP. 2 Use the...
... is delivered separately. Install the Wall Mount Bracket after the screws are the same) 1 Remove the screws from a falling SET. ASSY-HINGE (RIGHT) Fixing the TV panel to the wall attachment panel bracket The shape of the product may vary depending on the model. (The assemblies of the PDP. 2 Use the...

User Manual (ENGLISH)
Page 17
How to assemble the Stand-Base 1 Using the 4 screws for securing the stand pegs and the monitor, firmly attach the monitor to the stand pegs. (The exterior of possible damage to the TV before moving it, as the stand may fall and could cause serious injury. ➤ Two or more people should carry the TV. Never lay the TV on the floor because of the set may be different than the picture.) Warning Firmly secure the stand to the screen. Always store the TV upright. 17
How to assemble the Stand-Base 1 Using the 4 screws for securing the stand pegs and the monitor, firmly attach the monitor to the stand pegs. (The exterior of possible damage to the TV before moving it, as the stand may fall and could cause serious injury. ➤ Two or more people should carry the TV. Never lay the TV on the floor because of the set may be different than the picture.) Warning Firmly secure the stand to the screen. Always store the TV upright. 17

User Manual (ENGLISH)
Page 20
Connecting VHF and UHF Antennas Antennas with 75-ohm Round Leads If your antenna looks like this: it has 75-ohm round leads. 1 Plug the antenna lead into the ANT 2 IN (AIR) on the TV. Use an antenna cable. (Sold Separately) 20
Connecting VHF and UHF Antennas Antennas with 75-ohm Round Leads If your antenna looks like this: it has 75-ohm round leads. 1 Plug the antenna lead into the ANT 2 IN (AIR) on the TV. Use an antenna cable. (Sold Separately) 20

User Manual (ENGLISH)
Page 21
...box. Cable without a Cable box, and cable with a Cable Box that descrambles some or all channels. Connecting Cable TV You can connect different cable systems to the ANTENNA OUT terminal on your TV, including cable without a Cable Box 1 Plug the incoming cable into the ANT 1 IN (CABLE) on the... TV. Use an antenna cable. (Sold Separately) Cable Box 21 This terminal might be labeled "ANT OUT", "VHF OUT" or simply ...
...box. Cable without a Cable box, and cable with a Cable Box that descrambles some or all channels. Connecting Cable TV You can connect different cable systems to the ANTENNA OUT terminal on your TV, including cable without a Cable Box 1 Plug the incoming cable into the ANT 1 IN (CABLE) on the... TV. Use an antenna cable. (Sold Separately) Cable Box 21 This terminal might be labeled "ANT OUT", "VHF OUT" or simply ...
User Manual (ENGLISH)
Page 22
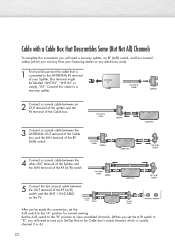
... RF (A/B) switch, and four coaxial cables (which is connected to the ANTENNA IN terminal of the RF (A/B) switch and the ANT 1 IN (CABLE) on the TV. Set the A/B switch to the "B" position to view scrambled channels. (When you set the A/B switch to a two-way splitter. 2 Connect a coaxial cable...other OUT terminal of the Splitter and the A-IN terminal of the RF (A/B) switch. 5 Connect the last coaxial cable between the OUT terminal of your Samsung dealer or any electronics store). 1 Find and disconnect the cable that is usually channel 3 or 4.) 22 This terminal might be labeled "ANT IN", ...
... RF (A/B) switch, and four coaxial cables (which is connected to the ANTENNA IN terminal of the RF (A/B) switch and the ANT 1 IN (CABLE) on the TV. Set the A/B switch to the "B" position to view scrambled channels. (When you set the A/B switch to a two-way splitter. 2 Connect a coaxial cable...other OUT terminal of the Splitter and the A-IN terminal of the RF (A/B) switch. 5 Connect the last coaxial cable between the OUT terminal of your Samsung dealer or any electronics store). 1 Find and disconnect the cable that is usually channel 3 or 4.) 22 This terminal might be labeled "ANT IN", ...
User Manual (ENGLISH)
Page 23
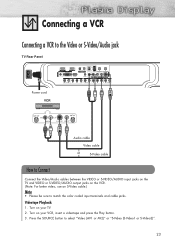
...3. Press the SOURCE button to match the color coded input terminals and cable jacks. Connecting a VCR Connecting a VCR to the Video or S-Video/Audio jack TV Rear Panel Power cord VCR Audio cable Video cable S-Video cable How to Connect Connect the Video/Audio cables between the VIDEO or S-VIDEO/AUDIO... input jacks on the TV and VIDEO or S-VIDEO/AUDIO output jacks on your TV. 2. Videotape Playback: 1. Turn on the VCR. (Note: For better video, use an S-Video cable.) Note • Please be ...
...3. Press the SOURCE button to match the color coded input terminals and cable jacks. Connecting a VCR Connecting a VCR to the Video or S-Video/Audio jack TV Rear Panel Power cord VCR Audio cable Video cable S-Video cable How to Connect Connect the Video/Audio cables between the VIDEO or S-VIDEO/AUDIO... input jacks on the TV and VIDEO or S-VIDEO/AUDIO output jacks on your TV. 2. Videotape Playback: 1. Turn on the VCR. (Note: For better video, use an S-Video cable.) Note • Please be ...
User Manual (ENGLISH)
Page 24
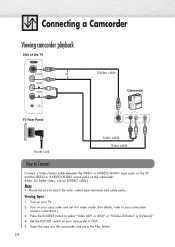
...to video mode. (For details, refer to OUT. 5. Set the IN/OUT switch on your camcorder to your TV. 2. Connecting a Camcorder Viewing camcorder playback Side of the TV S-Video cable Camcorder TV Rear Panel Power cord Audio cable Video cable How to Connect Connect a Video/Audio cable between the VIDEO or S-...VIDEO/AUDIO input jacks on the TV and the VIDEO or S-VIDEO/AUDIO output jacks on the camcorder. (Note: For better video, use an S-VIDEO cable.) Note • Please be ...
...to video mode. (For details, refer to OUT. 5. Set the IN/OUT switch on your camcorder to your TV. 2. Connecting a Camcorder Viewing camcorder playback Side of the TV S-Video cable Camcorder TV Rear Panel Power cord Audio cable Video cable How to Connect Connect a Video/Audio cable between the VIDEO or S-...VIDEO/AUDIO input jacks on the TV and the VIDEO or S-VIDEO/AUDIO output jacks on the camcorder. (Note: For better video, use an S-VIDEO cable.) Note • Please be ...
User Manual (ENGLISH)
Page 25
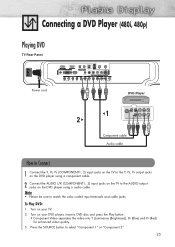
... player using a audio cable. Press the SOURCE button to match the color coded input terminals and cable jacks. Connecting a DVD Player (480i, 480p) Playing DVD TV Rear Panel Power cord DVD Player 1 2 Component cable Audio cable How to Connect 1 Connect the Y, PB, PR (COMPONENT1, 2) input jacks on the... the Y, PB, PR output jacks on the DVD player using a component cable. 2 Connect the AUDIO L/R (COMPONENT1, 2) input jacks on the TV to the AUDIO output jacks on your DVD player, insert a DVD disc and press the Play button. • Component Video separates the video into Y (Luminance (...
... player using a audio cable. Press the SOURCE button to match the color coded input terminals and cable jacks. Connecting a DVD Player (480i, 480p) Playing DVD TV Rear Panel Power cord DVD Player 1 2 Component cable Audio cable How to Connect 1 Connect the Y, PB, PR (COMPONENT1, 2) input jacks on the... the Y, PB, PR output jacks on the DVD player using a component cable. 2 Connect the AUDIO L/R (COMPONENT1, 2) input jacks on the TV to the AUDIO output jacks on your DVD player, insert a DVD disc and press the Play button. • Component Video separates the video into Y (Luminance (...
User Manual (ENGLISH)
Page 26
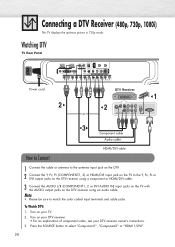
Connecting a DTV Receiver (480p, 720p, 1080i) This TV displays the optimum picture in 720p mode. Watching DTV TV Rear Panel Power cord 2 DTV Receiver 1 2 3 Component cable Audio cable How to Connect HDMI/DVI cable 1 Connect the cable or antenna to the antenna input ... the DTV receiver using a component or HDMI/DVI cable. 3 Connect the AUDIO L/R (COMPONENT1, 2 or DVI AUDIO IN) input jacks on the TV with the AUDIO output jacks on the TV to match the color coded input terminals and cable jacks. Turn on your DTV receiver. • For an explanation of component video...
Connecting a DTV Receiver (480p, 720p, 1080i) This TV displays the optimum picture in 720p mode. Watching DTV TV Rear Panel Power cord 2 DTV Receiver 1 2 3 Component cable Audio cable How to Connect HDMI/DVI cable 1 Connect the cable or antenna to the antenna input ... the DTV receiver using a component or HDMI/DVI cable. 3 Connect the AUDIO L/R (COMPONENT1, 2 or DVI AUDIO IN) input jacks on the TV with the AUDIO output jacks on the TV to match the color coded input terminals and cable jacks. Turn on your DTV receiver. • For an explanation of component video...
User Manual (ENGLISH)
Page 27
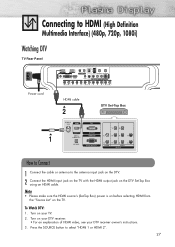
... receiver owner's instructions. 3. Press the SOURCE button to the antenna input jack on the DTV. 2 Connect the HDMI input jack on the TV with the HDMI output jack on the TV. Note • Please make sure the HDMI source's (Set-Top Box) power is on before selecting HDMI from the "Source List..." on the DTV Set-Top Box using an HDMI cable. Connecting to HDMI (High Definition Multimedia Interface) (480p, 720p, 1080i) Watching DTV TV Rear Panel Power cord HDMI cable 2 DTV Set-Top Box 1 How to Connect 1 Connect the cable or antenna to select "HDMI 1 or HDMI 2". 27...
... receiver owner's instructions. 3. Press the SOURCE button to the antenna input jack on the DTV. 2 Connect the HDMI input jack on the TV with the HDMI output jack on the TV. Note • Please make sure the HDMI source's (Set-Top Box) power is on before selecting HDMI from the "Source List..." on the DTV Set-Top Box using an HDMI cable. Connecting to HDMI (High Definition Multimedia Interface) (480p, 720p, 1080i) Watching DTV TV Rear Panel Power cord HDMI cable 2 DTV Set-Top Box 1 How to Connect 1 Connect the cable or antenna to select "HDMI 1 or HDMI 2". 27...

User Manual (ENGLISH)
Page 28
... the Set-Top Box using an audio cable. Note • Use analog stereo audio inputs when using the HDMI input with PC. 28 Connecting a Digital TV Set-Top Box (480p, 720p, 1080i) By inputting a high-bandwidth digital content protection High-Definition picture source to Connect 1 Connect the DVI AUDIO (L,... R) input jacks on the TV with the AUDIO output jacks on the Set-Top Box using an HDMI/DVI cable. Note • The HDMI/DVI IN jack is not compatible...
... the Set-Top Box using an audio cable. Note • Use analog stereo audio inputs when using the HDMI input with PC. 28 Connecting a Digital TV Set-Top Box (480p, 720p, 1080i) By inputting a high-bandwidth digital content protection High-Definition picture source to Connect 1 Connect the DVI AUDIO (L,... R) input jacks on the TV with the AUDIO output jacks on the Set-Top Box using an HDMI/DVI cable. Note • The HDMI/DVI IN jack is not compatible...
User Manual (ENGLISH)
Page 29
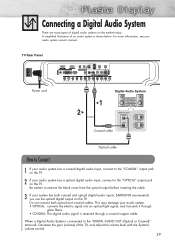
... optical and coaxial cables. Be certain to the "OPTICAL" output jack on the TV. Do not connect both coaxial and optical digital audio inputs, SAMSUNG recommends you use the optical digital output on the TV. For more information, see your audio system has a optical digital audio input,...3 If your audio system. • OPTICAL: converts the electric signal into an optical light signal, and transmits it through a coaxial copper cable. TV Rear Panel Power cord Digital Audio System 1 2 Coaxial cable Optical cable How to Connect 1 If your audio system has a coaxial digital audio input...
... optical and coaxial cables. Be certain to the "OPTICAL" output jack on the TV. Do not connect both coaxial and optical digital audio inputs, SAMSUNG recommends you use the optical digital output on the TV. For more information, see your audio system has a optical digital audio input,...3 If your audio system. • OPTICAL: converts the electric signal into an optical light signal, and transmits it through a coaxial copper cable. TV Rear Panel Power cord Digital Audio System 1 2 Coaxial cable Optical cable How to Connect 1 If your audio system has a coaxial digital audio input...


