User Manual (user Manual) (ver.1.0) (English)
Page 3
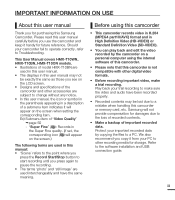
... set, the corresponding icon ( ) will appear on a personal computer using this camcorder • This camcorder records video in H.264 (MPEG4 part10/AVC) format and in this manual: • 'Scene' refers to the point where you press the Record Start/Stop button to start recording until you for storage. We also recommend you copy it from your camcorder fail to operate correctly, refer to the software installation and USB connection guide...
... set, the corresponding icon ( ) will appear on a personal computer using this camcorder • This camcorder records video in H.264 (MPEG4 part10/AVC) format and in this manual: • 'Scene' refers to the point where you press the Record Start/Stop button to start recording until you for storage. We also recommend you copy it from your camcorder fail to operate correctly, refer to the software installation and USB connection guide...

User Manual (user Manual) (ver.1.0) (English)
Page 6
..., or other ) or a 3-wire grounding type plug, a plug having a third (grounding) pin. vi If you are not likely to be taken to keep from overheating. important safety instructions 15. LIGHTNING: For added protection of the polarized plug. 19. When installing an outside antenna system should be operated from battery power, or other electric light or power circuits where it from touching such...
..., or other ) or a 3-wire grounding type plug, a plug having a third (grounding) pin. vi If you are not likely to be taken to keep from overheating. important safety instructions 15. LIGHTNING: For added protection of the polarized plug. 19. When installing an outside antenna system should be operated from battery power, or other electric light or power circuits where it from touching such...
User Manual (user Manual) (ver.1.0) (English)
Page 13
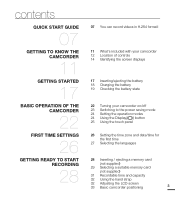
... screen displays 17 Inserting/ejecting the battery 18 Charging the battery 19 Checking the battery state 22 Turning your camcorder on/off 23 Switching to the power saving mode 24 Setting the operation modes 24 Using the Display( ) button 25 Using the touch panel 26 Setting the time zone and date/time for the first time 27 Selecting the languages 28 Inserting / ejecting a memory card (not supplied) 29 Selecting a suitable memory card (not supplied) 31 Recordable time and capacity 32 Using the hand strap 32 Adjusting...
... screen displays 17 Inserting/ejecting the battery 18 Charging the battery 19 Checking the battery state 22 Turning your camcorder on/off 23 Switching to the power saving mode 24 Setting the operation modes 24 Using the Display( ) button 25 Using the touch panel 26 Setting the time zone and date/time for the first time 27 Selecting the languages 28 Inserting / ejecting a memory card (not supplied) 29 Selecting a suitable memory card (not supplied) 31 Recordable time and capacity 32 Using the hand strap 32 Adjusting...
User Manual (user Manual) (ver.1.0) (English)
Page 20
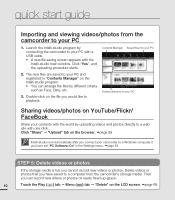
...; You can record new videos or photos on newly freed up space. 10 Touch the Play ( ) tab Menu ( ) tab "Delete" on the LCD screen. page 69 quick start guide Importing and viewing videos/photos from the camcorder's storage media. Launch the Intelli-studio program by connecting the camcorder to your contents with the world by different criteria such as Face, Date, etc. 3. The new files are saved to playback.
...; You can record new videos or photos on newly freed up space. 10 Touch the Play ( ) tab Menu ( ) tab "Delete" on the LCD screen. page 69 quick start guide Importing and viewing videos/photos from the camcorder's storage media. Launch the Intelli-studio program by connecting the camcorder to your contents with the world by different criteria such as Face, Date, etc. 3. The new files are saved to playback.
User Manual (user Manual) (ver.1.0) (English)
Page 21
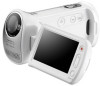
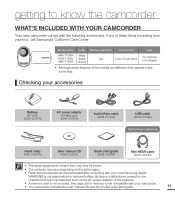
... CAMCORDER Your new camcorder comes with your camcorder. • Your camcorder includes the user manual CD and the printed quick start guide (AD68-05486A) Mini HDMI cable (AD39-00159A) • The exact appearance of each item may vary by any of these items is not included. SAMSUNG is not responsible for memory cards compatible with the following accessories. Model name Color Memory card slot LCD screen Lens HMX-T10WN HMX-T10BN HMX-T10ON White Black Orange Yes Color...
... CAMCORDER Your new camcorder comes with your camcorder. • Your camcorder includes the user manual CD and the printed quick start guide (AD68-05486A) Mini HDMI cable (AD39-00159A) • The exact appearance of each item may vary by any of these items is not included. SAMSUNG is not responsible for memory cards compatible with the following accessories. Model name Color Memory card slot LCD screen Lens HMX-T10WN HMX-T10BN HMX-T10ON White Black Orange Yes Color...

User Manual (user Manual) (ver.1.0) (English)
Page 24
...Optical zoom / Digital zoom bar Time Zone (visit) JAN/01/2010 12:00AM Date/Time Left of the LCD screen Indicator / STBY / / // Meaning Record mode (Video/Photo) Operating status (standby/recording) / Self Timer* SCENE / Smart Auto / Digital Effect , White Balance, Fader* , Manual focus*, Touch Point* / F2 OFF S.1/60 / - 0.3SUPER Manual aperture* / Manual shutter* / Super C.Nite EV (Exposure Value)* Play tab Right of the LCD screen Indicator 9999 , , , , , Meaning Storage media (Memory card) Battery info. (remaining charge level) Image counter (total number of functions...
...Optical zoom / Digital zoom bar Time Zone (visit) JAN/01/2010 12:00AM Date/Time Left of the LCD screen Indicator / STBY / / // Meaning Record mode (Video/Photo) Operating status (standby/recording) / Self Timer* SCENE / Smart Auto / Digital Effect , White Balance, Fader* , Manual focus*, Touch Point* / F2 OFF S.1/60 / - 0.3SUPER Manual aperture* / Manual shutter* / Super C.Nite EV (Exposure Value)* Play tab Right of the LCD screen Indicator 9999 , , , , , Meaning Storage media (Memory card) Battery info. (remaining charge level) Image counter (total number of functions...
User Manual (user Manual) (ver.1.0) (English)
Page 25
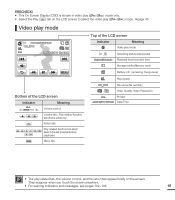
... of the LCD screen Indicator Meaning Video play mode , 00:00:05/00:00:50 Operating status (play/pause) Playback time/recorded time Storage media (Memory card) Battery info. (remaining charge level) Bottom of the LCD screen Indicator 10 Meaning Volume control Volume tab / Play related function / tab (frame advance) Return tab Play related function tab (skip/ search/pause/playback/slow playback) Menu tab Play Option 100_0001 , File name (file number) Video Quality, Video Resolution Protect JAN/01/2010 12:00AM Date/Time • The play related tab, the volume control, and the...
... of the LCD screen Indicator Meaning Video play mode , 00:00:05/00:00:50 Operating status (play/pause) Playback time/recorded time Storage media (Memory card) Battery info. (remaining charge level) Bottom of the LCD screen Indicator 10 Meaning Volume control Volume tab / Play related function / tab (frame advance) Return tab Play related function tab (skip/ search/pause/playback/slow playback) Menu tab Play Option 100_0001 , File name (file number) Video Quality, Video Resolution Protect JAN/01/2010 12:00AM Date/Time • The play related tab, the volume control, and the...
User Manual (user Manual) (ver.1.0) (English)
Page 33
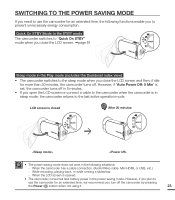
..., if "Auto Power Off: 5 Min" is set, the camcorder turns off the camcorder by pressing the Power ( ) button when not using it. 23 SWITCHING TO THE POWER SAVING MODE If you need to use the camcorder for an extended time, we recommend you turn off in 5 minutes. • If you open the LCD screen or connect a cable to the camcorder when the camcorder is in sleep mode, the camcorder returns to the last active operation mode. Quick On STBY Mode in...
..., if "Auto Power Off: 5 Min" is set, the camcorder turns off the camcorder by pressing the Power ( ) button when not using it. 23 SWITCHING TO THE POWER SAVING MODE If you need to use the camcorder for an extended time, we recommend you turn off in 5 minutes. • If you open the LCD screen or connect a cable to the camcorder when the camcorder is in sleep mode, the camcorder returns to the last active operation mode. Quick On STBY Mode in...
User Manual (user Manual) (ver.1.0) (English)
Page 45
... on-screen information display, see page 14 • For approximate recording time, see pages 49~65 • If the power cable/battery is disconnected or recording is interrupted, the camcorder switches to the data recovery mode. Adjusting the LCD screen does not affect the image being recovered, no other function is enabled. • You can set the Quick View menu option to On. • The menu setting tabs shown on the front of a memory card error...
... on-screen information display, see page 14 • For approximate recording time, see pages 49~65 • If the power cable/battery is disconnected or recording is interrupted, the camcorder switches to the data recovery mode. Adjusting the LCD screen does not affect the image being recovered, no other function is enabled. • You can set the Quick View menu option to On. • The menu setting tabs shown on the front of a memory card error...

User Manual (user Manual) (ver.1.0) (English)
Page 46
... HDMI cable is connected to photograph, and then press the PHOTO button. • When the indicator disappears, the camcorder has recorded the photo image without interrupting video recording. basic recording CAPTURING PHOTOS DURING VIDEO RECORDING Your camcorder can capture photos without a shutter sound. • Video keeps recording, even while you cannot capture a photo while recording a video. 36 PRECHECK! • Insert a memory card. page 28 • Select the record mode by pressing the MODE button. page 24 1. Press the Recording start /stop button. •...
... HDMI cable is connected to photograph, and then press the PHOTO button. • When the indicator disappears, the camcorder has recorded the photo image without interrupting video recording. basic recording CAPTURING PHOTOS DURING VIDEO RECORDING Your camcorder can capture photos without a shutter sound. • Video keeps recording, even while you cannot capture a photo while recording a video. 36 PRECHECK! • Insert a memory card. page 28 • Select the record mode by pressing the MODE button. page 24 1. Press the Recording start /stop button. •...
User Manual (user Manual) (ver.1.0) (English)
Page 47
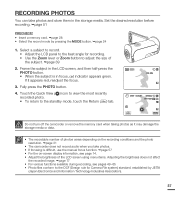
... various functions available during recording, see pages 49~65 • Photo files conform to the DCF (Design rule for recording. • Use the Zoom lever or Zoom button to the standby mode, touch the Return ( ) tab. 9999 STBY 00:00:00 [307Min] 9999 OFF SUPER Do not turn off the camcorder or remove the memory card when taking photos as it appears red, readjust the focus. 3. Set the desired...
... various functions available during recording, see pages 49~65 • Photo files conform to the DCF (Design rule for recording. • Use the Zoom lever or Zoom button to the standby mode, touch the Return ( ) tab. 9999 STBY 00:00:00 [307Min] 9999 OFF SUPER Do not turn off the camcorder or remove the memory card when taking photos as it appears red, readjust the focus. 3. Set the desired...
User Manual (user Manual) (ver.1.0) (English)
Page 53
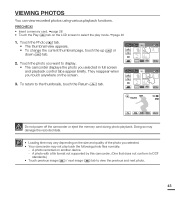
... following photo files normally: - Doing so may damage the recorded data. • Loading time may vary depending on the LCD screen to the thumbnails, touch the Return ( ) tab. 3/3 14/17 100_0014 Do not power off the camcorder or eject the memory card during photo playback. They reappear when you selected. • Your camcorder may not play mode. page 40 1. VIEWING PHOTOS You can view recorded photos using various playback functions. PRECHECK! • Insert a memory card. ...
... following photo files normally: - Doing so may damage the recorded data. • Loading time may vary depending on the LCD screen to the thumbnails, touch the Return ( ) tab. 3/3 14/17 100_0014 Do not power off the camcorder or eject the memory card during photo playback. They reappear when you selected. • Your camcorder may not play mode. page 40 1. VIEWING PHOTOS You can view recorded photos using various playback functions. PRECHECK! • Insert a memory card. ...

User Manual (user Manual) (ver.1.0) (English)
Page 68
... on the LCD screen. You can access auto focus by pressing the MODE button. page 24 1. Touch the desired submenu item. 3. Anti-Shake(OIS) Off On 1/1 Submenu items • Off: Disables the function. • On ( ): The Anti-Shake(OIS) function is useful when you operate the zoom function because you can return to manual focus by touching the manual focusing tabs. • If you have the camcorder focus on...
... on the LCD screen. You can access auto focus by pressing the MODE button. page 24 1. Touch the desired submenu item. 3. Anti-Shake(OIS) Off On 1/1 Submenu items • Off: Disables the function. • On ( ): The Anti-Shake(OIS) function is useful when you operate the zoom function because you can return to manual focus by touching the manual focusing tabs. • If you have the camcorder focus on...
User Manual (user Manual) (ver.1.0) (English)
Page 87
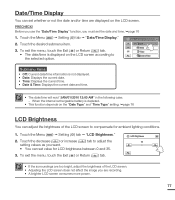
... you use the "Date/Time Display" function, you are recording. • A brighter LCD screen consumes more power. 77 Date/Time Display Off Date 1/1 Time Date & Time Submenu items • Off: Current date/time information is depleted. • This function depends on the "Date Type" and "Time Type" setting. page 76 LCD Brightness You can adjust the brightness of the LCD screen. • Adjusting the LCD screen does not affect the image you must set the date and time. page 76 1. To exit the menu...
... you use the "Date/Time Display" function, you are recording. • A brighter LCD screen consumes more power. 77 Date/Time Display Off Date 1/1 Time Date & Time Submenu items • Off: Current date/time information is depleted. • This function depends on the "Date Type" and "Time Type" setting. page 76 LCD Brightness You can adjust the brightness of the LCD screen. • Adjusting the LCD screen does not affect the image you must set the date and time. page 76 1. To exit the menu...
User Manual (user Manual) (ver.1.0) (English)
Page 92
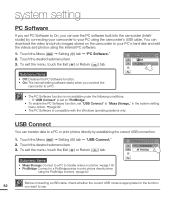
...; The PC Software is compatible with the Windows operating systems only. Touch the Menu ( ) Setting ( ) tab "PC Software." 2. USB Connect You can transfer data to a PC or print photos directly by connecting your camcorder to your PC's hard disk and edit the videos and photos using the camcorder's USB cable. Touch the Menu ( ) Setting ( ) tab "USB Connect." 2. PC Software Off On 1/1 Submenu items • Off: Disables the PC Software function. • On: The internal editing software starts when you...
...; The PC Software is compatible with the Windows operating systems only. Touch the Menu ( ) Setting ( ) tab "PC Software." 2. USB Connect You can transfer data to a PC or print photos directly by connecting your camcorder to your PC's hard disk and edit the videos and photos using the camcorder's USB cable. Touch the Menu ( ) Setting ( ) tab "USB Connect." 2. PC Software Off On 1/1 Submenu items • Off: Disables the PC Software function. • On: The internal editing software starts when you...
User Manual (user Manual) (ver.1.0) (English)
Page 93
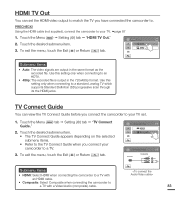
... format as the recorded file. Use this setting only when connecting to a standard, analog TV which supports Standard Definition (SD) progressive scan through its the HDMI jacks. Touch the desired submenu item. • The TV Connect Guide appears depending on the selected submenu items. • Refer to the TV Connect Guide when you have connected the camcorder to your camcorder to a TV with a Video/Audio (composite) cable...
... format as the recorded file. Use this setting only when connecting to a standard, analog TV which supports Standard Definition (SD) progressive scan through its the HDMI jacks. Touch the desired submenu item. • The TV Connect Guide appears depending on the selected submenu items. • Refer to the TV Connect Guide when you have connected the camcorder to your camcorder to a TV with a Video/Audio (composite) cable...
User Manual (user Manual) (ver.1.0) (English)
Page 101
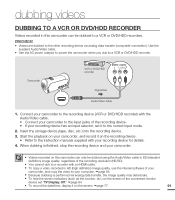
... the storage device (tape, disc, etc.) into the recording device. 3. Start the playback on your camcorder, and record it on the screen. page 77 91 Connect your camcorder to the recording device (VCR or DVD/HDD recorder) with your recording device has an input selector, set "TV Display: Off." page 84 To record the date/time, display it to the correct input mode. 2. When dubbing is performed via analog data transfer (composite connection). dubbing videos DUBBING TO A VCR OR DVD/HDD RECORDER Videos recorded in...
... the storage device (tape, disc, etc.) into the recording device. 3. Start the playback on your camcorder, and record it on the screen. page 77 91 Connect your camcorder to the recording device (VCR or DVD/HDD recorder) with your recording device has an input selector, set "TV Display: Off." page 84 To record the date/time, display it to the correct input mode. 2. When dubbing is performed via analog data transfer (composite connection). dubbing videos DUBBING TO A VCR OR DVD/HDD RECORDER Videos recorded in...
User Manual (user Manual) (ver.1.0) (English)
Page 113
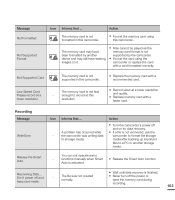
... format the storage media after backing up important files to a PC or another device and may have existing images on it. Files cannot be played as the memory card format is finished. Never turn off the power or eject the memory card during recording. 103 Recording Message Write Error Icon - Action Turn the camcorder's power off and keep card inside. - Auto is not fast - Not Supported Card The memory card is not formatted in this resolution. Record video...
... format the storage media after backing up important files to a PC or another device and may have existing images on it. Files cannot be played as the memory card format is finished. Never turn off the power or eject the memory card during recording. 103 Recording Message Write Error Icon - Action Turn the camcorder's power off and keep card inside. - Auto is not fast - Not Supported Card The memory card is not formatted in this resolution. Record video...
User Manual (user Manual) (ver.1.0) (English)
Page 117
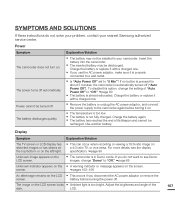
... . For more details, see Demo images, change the setting of the 107 dark. If you do not solve your problem, contact your camcorder. LCD. Power cannot be recharged. Explanation/Solution The battery may be installed in Demo mode. Charge the battery or replace it with a charged one . If you disconnect the AC power adaptor or remove the screen. Use another battery. Adjust the brightness and angle of "Auto Power Off" to "Off...
... . For more details, see Demo images, change the setting of the 107 dark. If you do not solve your problem, contact your camcorder. LCD. Power cannot be recharged. Explanation/Solution The battery may be installed in Demo mode. Charge the battery or replace it with a charged one . If you disconnect the AC power adaptor or remove the screen. Use another battery. Adjust the brightness and angle of "Auto Power Off" to "Off...
User Manual (user Manual) (ver.1.0) (English)
Page 118
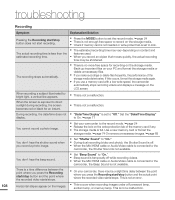
... use a memory card with a low write speed, the camcorder automatically stops recording videos and displays a message on the write-protection tab of the storage media deteriorates. During recording, the date/time does not "Date/Time Display" is not available. When the screen is exposed to the camcorder, the Shutter Sound is set to the record mode. page 24 Release the lock on the LCD screen. Horizontal stripes appear on the storage media. Check if memory card...
... use a memory card with a low write speed, the camcorder automatically stops recording videos and displays a message on the write-protection tab of the storage media deteriorates. During recording, the date/time does not "Date/Time Display" is not available. When the screen is exposed to the camcorder, the Shutter Sound is set to the record mode. page 24 Release the lock on the LCD screen. Horizontal stripes appear on the storage media. Check if memory card...


