
User Manual (ENGLISH)
Page 5
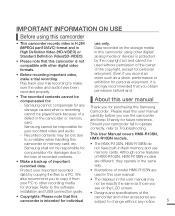
... you to make a trial recording. This User Manual covers HMX-R10SN, HMX-R10BN models. camcorder or memory card, etc. • The HMX-R10SN, HMX-R10BN do Samsung shall not be played back because of important recorded data. of HMX-R10SN, HMX-R10BN models • Make a backup of a defect in Data recorded on the LCD screen. Refer to a PC. by copying the files to the software see on the storage media High Definition Video (HD-VIDEO) or in this camcorder using this Thank you for...
... you to make a trial recording. This User Manual covers HMX-R10SN, HMX-R10BN models. camcorder or memory card, etc. • The HMX-R10SN, HMX-R10BN do Samsung shall not be played back because of important recorded data. of HMX-R10SN, HMX-R10BN models • Make a backup of a defect in Data recorded on the LCD screen. Refer to a PC. by copying the files to the software see on the storage media High Definition Video (HD-VIDEO) or in this camcorder using this Thank you for...
User Manual (ENGLISH)
Page 8
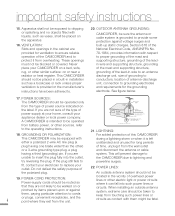
... CLAMPS POWER SERVICE GROUNDING ELECTRODE SYSTEM (NEC ART 250, PART H) NEC NATIONAL ELECTRICAL CODE to keep from battery power, or other electric light or power circuits where it is provided or the manufacturer's instructions have been adhered to be placed on or near a radiator or heat register. GROUNDING OR POLARIZATION: For added protection of this CAMCORDER This CAMCORDER may be operated only...
... CLAMPS POWER SERVICE GROUNDING ELECTRODE SYSTEM (NEC ART 250, PART H) NEC NATIONAL ELECTRICAL CODE to keep from battery power, or other electric light or power circuits where it is provided or the manufacturer's instructions have been adhered to be placed on or near a radiator or heat register. GROUNDING OR POLARIZATION: For added protection of this CAMCORDER This CAMCORDER may be operated only...
User Manual (ENGLISH)
Page 15
... power saving mode 33 Setting the operation modes 33 Using the display( /iCHECK) button 34 Using the touch panel 35 First time settings 35 Setting the time zone and date/ time for the first time 36 Selecting the language 37 Getting ready to start recording 37 Inserting and removing a memory card (not supplied) 38 Selecting a suitable memory card 41 Using the hand strap 41 Adjusting the LCD screen 42 Basic camcorder positioning BASIC OPERATION 43 Basic Recording 43 43 45 46 Recording videos Capturing photos...
... power saving mode 33 Setting the operation modes 33 Using the display( /iCHECK) button 34 Using the touch panel 35 First time settings 35 Setting the time zone and date/ time for the first time 36 Selecting the language 37 Getting ready to start recording 37 Inserting and removing a memory card (not supplied) 38 Selecting a suitable memory card 41 Using the hand strap 41 Adjusting the LCD screen 42 Basic camcorder positioning BASIC OPERATION 43 Basic Recording 43 43 45 46 Recording videos Capturing photos...
User Manual (ENGLISH)
Page 16
contents 48 Capturing photos while playing back videos 49 Zooming 50 Basic Playback 50 Changing the playback mode 51 Playing back videos 53 Viewing photos 54 Viewing a slide show 55 Zooming during playback ADVANCED OPERATION 56 Advanced Recording 56 Handling menus and quick 56 57 60 61 menus Menu items Quick menu items SCENE 62 Resolution 63 Quality 64 Slow Motion 65 Sharpness 65 White Balance 67 ISO 68 Aperture 69 Shutter 69 EV 70 3D-NR 70...
contents 48 Capturing photos while playing back videos 49 Zooming 50 Basic Playback 50 Changing the playback mode 51 Playing back videos 53 Viewing photos 54 Viewing a slide show 55 Zooming during playback ADVANCED OPERATION 56 Advanced Recording 56 Handling menus and quick 56 57 60 61 menus Menu items Quick menu items SCENE 62 Resolution 63 Quality 64 Slow Motion 65 Sharpness 65 White Balance 67 ISO 68 Aperture 69 Shutter 69 EV 70 3D-NR 70...
User Manual (ENGLISH)
Page 26
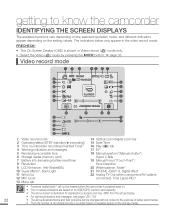
... 12 MIC Level 13 Menu tab 14 Optical zoom/Digital zoom bar 15 Date/Time 16 Play ( ) tab 17 EV* 18 Manual aperture*/Manual shutter*/ Super C.Nite 19 Manual Focus*/Touch Point*/ Face Detection 20 White balance, Fader* 21 SCENE /EASY Q, Digital effect 22 Analog TV Out (when component/AV cable is connected), Time Lapse REC* • Functions marked with * will not be retained when the camcorder is powered back on. • The on-screen...
... 12 MIC Level 13 Menu tab 14 Optical zoom/Digital zoom bar 15 Date/Time 16 Play ( ) tab 17 EV* 18 Manual aperture*/Manual shutter*/ Super C.Nite 19 Manual Focus*/Touch Point*/ Face Detection 20 White balance, Fader* 21 SCENE /EASY Q, Digital effect 22 Analog TV Out (when component/AV cable is connected), Time Lapse REC* • Functions marked with * will not be retained when the camcorder is powered back on. • The on-screen...
User Manual (ENGLISH)
Page 33
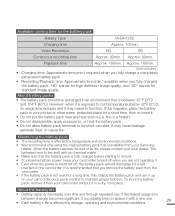
... fire. About the battery life • Battery capacity decreases over time and through repeated use it up on the camcorder. SD Approx. 90min. Approx. 160min. (Unit: minutes.) • Charging time: Approximate time (min.) required when you fully charge a completely exhausted battery pack. • Recording/Playback time: Approximate time (min.) available when you are not operating it. • Even when the power is probably time to replace it . •...
... fire. About the battery life • Battery capacity decreases over time and through repeated use it up on the camcorder. SD Approx. 90min. Approx. 160min. (Unit: minutes.) • Charging time: Approximate time (min.) required when you fully charge a completely exhausted battery pack. • Recording/Playback time: Approximate time (min.) available when you are not operating it. • Even when the power is probably time to replace it . •...
User Manual (ENGLISH)
Page 42
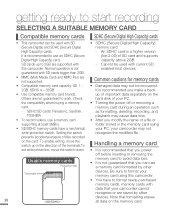
... are not supported. Common cautions for memory cards • Compatible memory card capacity: SD 1 ~ • Damaged data may not write-protection switch. guaranteed with - Check hard disk of your camcorder cannot recognize or are not guaranteed to work. the compatibility when buying a memory • Turning the power off before inserting or removing the Usable memory cards Protection tab memory card to avoid data loss. • It is recommended you make a back- • Use compatible memory card brands...
... are not supported. Common cautions for memory cards • Compatible memory card capacity: SD 1 ~ • Damaged data may not write-protection switch. guaranteed with - Check hard disk of your camcorder cannot recognize or are not guaranteed to work. the compatibility when buying a memory • Turning the power off before inserting or removing the Usable memory cards Protection tab memory card to avoid data loss. • It is recommended you make a back- • Use compatible memory card brands...
User Manual (ENGLISH)
Page 48
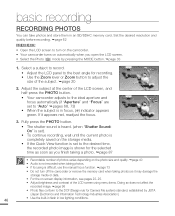
...; For approximate recording time, see "Recording menu items" pages 57~58 • Do not turn off the camcorder or remove the memory card while accessing the storage media. basic recording • If power is interrupted or an error occurs during recording, the video may damage the storage media or the data in the menu options. Adjusting the LCD screen does not affect the image being recorded. • In the Video/Photo Recording mode, you have set the Quick View menu option...
...; For approximate recording time, see "Recording menu items" pages 57~58 • Do not turn off the camcorder or remove the memory card while accessing the storage media. basic recording • If power is interrupted or an error occurs during recording, the video may damage the storage media or the data in the menu options. Adjusting the LCD screen does not affect the image being recorded. • In the Video/Photo Recording mode, you have set the Quick View menu option...
User Manual (ENGLISH)
Page 49
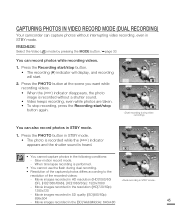
...): 1920x1080 - When time lapse recording is recorded without interrupting video recording, even in STBY mode. 1. Movie images recorded in STBY mode. • The photo is recorded while the indicator appears and the shutter sound is heard. Press the PHOTO button at the scene you want while recording videos. • When the indicator disappears, the photo image is performed. • You cannot use the flash during dual recording. • Resolution of the captured photos differs according...
...): 1920x1080 - When time lapse recording is recorded without interrupting video recording, even in STBY mode. 1. Movie images recorded in STBY mode. • The photo is recorded while the indicator appears and the shutter sound is heard. Press the PHOTO button at the scene you want while recording videos. • When the indicator disappears, the photo image is performed. • You cannot use the flash during dual recording. • Resolution of the captured photos differs according...
User Manual (ENGLISH)
Page 50
...; Photo files conform to adjust the size of the LCD screen, and half-press the PHOTO button. • Your camcorder adjusts to the ideal aperture and focus automatically (if "Aperture" and "Focus" are set to turn off the camcorder or remove the memory card when taking photos. • If focusing is difficult, use the manual focus function. page 73 • Do not turn on the camcorder. • Your camcorder turns on the storage media. • If the Quick View function is set...
...; Photo files conform to adjust the size of the LCD screen, and half-press the PHOTO button. • Your camcorder adjusts to the ideal aperture and focus automatically (if "Aperture" and "Focus" are set to turn off the camcorder or remove the memory card when taking photos. • If focusing is difficult, use the manual focus function. page 73 • Do not turn on the camcorder. • Your camcorder turns on the storage media. • If the Quick View function is set...

User Manual (ENGLISH)
Page 61
Back Light Focus • The Q.MENU button can choose what items appear when you want to your changes. To use the Q.MENU function, disable the EASY Q function. • This function is not available while recording videos or photos. Recording menu items o : available, X : not available Operation mode Video ( ) Photo ( ) Default value Page SCENE Auto 61 Resolution [HD]1080/60i(SF)/ 6M (3328 x 1872) 62 Quality X Fine 63 Slow Motion ...
Back Light Focus • The Q.MENU button can choose what items appear when you want to your changes. To use the Q.MENU function, disable the EASY Q function. • This function is not available while recording videos or photos. Recording menu items o : available, X : not available Operation mode Video ( ) Photo ( ) Default value Page SCENE Auto 61 Resolution [HD]1080/60i(SF)/ 6M (3328 x 1872) 62 Quality X Fine 63 Slow Motion ...
User Manual (ENGLISH)
Page 77
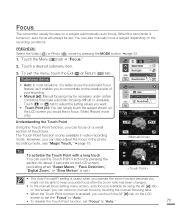
... can touch the AF ( ) tab on the LCD screen to set the "Focus" to "Auto." • To disable the Touch Point function, set .) • The Auto Focus(AF) setting is useful when you operate the zoom function because you to concentrate on the LCD screen. (excluding when "Super Macro," "Face Detection," "Digital Zoom," or "Slow Motion" is set "Focus" to "Auto." 73 Touch ( ) or ( ) tab to adjust the setting values you want. • Touch Point ( ): You...
... can touch the AF ( ) tab on the LCD screen to set the "Focus" to "Auto." • To disable the Touch Point function, set .) • The Auto Focus(AF) setting is useful when you operate the zoom function because you to concentrate on the LCD screen. (excluding when "Super Macro," "Face Detection," "Digital Zoom," or "Slow Motion" is set "Focus" to "Auto." 73 Touch ( ) or ( ) tab to adjust the setting values you want. • Touch Point ( ): You...
User Manual (ENGLISH)
Page 90
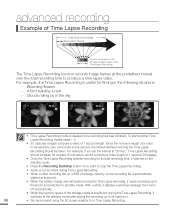
... MIN 100-0001 Memory full! advanced recording Example of Time Lapse Recording Total time of recording Recording interval Time for recording on the storage media (a video of the Time Lapse Recording.) The Time Lapse Recording function records image frames at that point. • When the battery charge was exhausted during the Time Lapse recording, it saves recording up to that point and switches to standby mode. Since the minimum length of storage memory, a new recording file is one second...
... MIN 100-0001 Memory full! advanced recording Example of Time Lapse Recording Total time of recording Recording interval Time for recording on the storage media (a video of the Time Lapse Recording.) The Time Lapse Recording function records image frames at that point. • When the battery charge was exhausted during the Time Lapse recording, it saves recording up to that point and switches to standby mode. Since the minimum length of storage memory, a new recording file is one second...
User Manual (ENGLISH)
Page 103
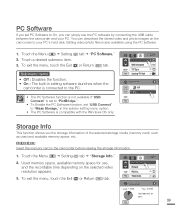
... memory space for use the PC software by connecting the USB cable between the camcorder and your PC's hard disk. Storage Info Format 1 / 7 File No. You can simply use , and the recordable time depending on the camcorder to your PC. Touch a desired submenu item. Storage Info This function shows you the storage information of the selected storage media (memory card), such as used and available memory space, etc. Submenu items USB Connect 5 / 7 TV Type...
... memory space for use the PC software by connecting the USB cable between the camcorder and your PC's hard disk. Storage Info Format 1 / 7 File No. You can simply use , and the recordable time depending on the camcorder to your PC. Touch a desired submenu item. Storage Info This function shows you the storage information of the selected storage media (memory card), such as used and available memory space, etc. Submenu items USB Connect 5 / 7 TV Type...
User Manual (ENGLISH)
Page 105
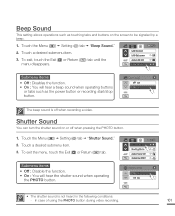
... LCD Control LCD Enhancer 3 / 7 Auto LCD Off Beep Sound Submenu items • Off : Disables the function. • On : You will hear the shutter sound when operating the PHOTO button. 90 MIN Shutter Sound Booting Mode 4 / 7 Auto Power Off Quick On STBY Shutter Sound Off On 1 / 1 • The shutter sound is off when pressing the PHOTO button. 1. To exit the menu, touch the Exit ( ) or Return ( ) tab. Beep Sound This setting allows operations such as the power button or recording start/stop button. Touch the Menu...
... LCD Control LCD Enhancer 3 / 7 Auto LCD Off Beep Sound Submenu items • Off : Disables the function. • On : You will hear the shutter sound when operating the PHOTO button. 90 MIN Shutter Sound Booting Mode 4 / 7 Auto Power Off Quick On STBY Shutter Sound Off On 1 / 1 • The shutter sound is off when pressing the PHOTO button. 1. To exit the menu, touch the Exit ( ) or Return ( ) tab. Beep Sound This setting allows operations such as the power button or recording start/stop button. Touch the Menu...
User Manual (ENGLISH)
Page 106
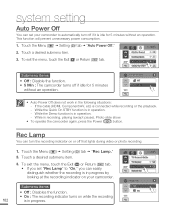
... not work in operation. - To exit the menu, touch the Exit ( ) or Return ( ) tab. • If you set your camcorder. system setting Auto Power Off You can set "Rec Lamp" to automatically turn the recording indicator on while the recording 102 is in progress. 90 MIN TV Connect Guide TV Display 6 / 7 REC Lamp Default Set REC Lamp Off On 1 / 1 While the Demo function is in the following situations: - While in recording, playing (except pause), Photo...
... not work in operation. - To exit the menu, touch the Exit ( ) or Return ( ) tab. • If you set your camcorder. system setting Auto Power Off You can set "Rec Lamp" to automatically turn the recording indicator on while the recording 102 is in progress. 90 MIN TV Connect Guide TV Display 6 / 7 REC Lamp Default Set REC Lamp Off On 1 / 1 While the Demo function is in the following situations: - While in recording, playing (except pause), Photo...
User Manual (ENGLISH)
Page 109
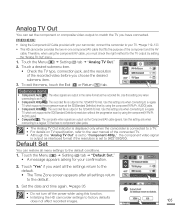
... video signal is output as the recorded file. TV Display 6 / 7 REYCESLamp NO Default Set 105 PRECHECK! • Using the Component/AV Cable provided with your camcorder, connect the camcorder to your confirmation. 90 MIN TV Connect Guide 2. To exit the menu, touch the Exit ( ) or Return ( ) tab. Touch the Menu ( ) Setting ( ) tab "Default Set." • A message appears asking for the TV output by using the component(Y/Pb/Pr, AUDIO...
... video signal is output as the recorded file. TV Display 6 / 7 REYCESLamp NO Default Set 105 PRECHECK! • Using the Component/AV Cable provided with your camcorder, connect the camcorder to your confirmation. 90 MIN TV Connect Guide 2. To exit the menu, touch the Exit ( ) or Return ( ) tab. Touch the Menu ( ) Setting ( ) tab "Default Set." • A message appears asking for the TV output by using the component(Y/Pb/Pr, AUDIO...
User Manual (ENGLISH)
Page 129
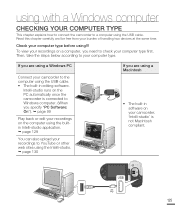
... free from your recordings to YouTube or other web sites using !!! Then, take the steps below according to a computer using the USB cable. Check your computer type before using the Intelli-studio. page 130 If you need to Windows computer. (When you specify "PC Software: On"). page 99 Play back or edit your recordings on your camcorder, 'Intelli-studio' is connected to check your computer type...
... free from your recordings to YouTube or other web sites using !!! Then, take the steps below according to a computer using the USB cable. Check your computer type before using the Intelli-studio. page 130 If you need to Windows computer. (When you specify "PC Software: On"). page 99 Play back or edit your recordings on your camcorder, 'Intelli-studio' is connected to check your computer type...
User Manual (ENGLISH)
Page 142
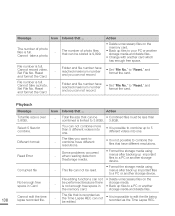
... media and delete files. • Change with another the memory card. Cannot record video. File number is 9,999. The number of photo files is limited to a PC or another card which has enough free space. • Set "File No." Playback Message Icon Informs that ... when reading data from thestorage media. • Format the storage media using menus after backing up files to 3.8GB. 3.8GB. Corrupted file - Message Icon The number of photo files that is recorded as the Time Lapse REC. and format the Card. Set File...
... media and delete files. • Change with another the memory card. Cannot record video. File number is 9,999. The number of photo files is limited to a PC or another card which has enough free space. • Set "File No." Playback Message Icon Informs that ... when reading data from thestorage media. • Format the storage media using menus after backing up files to 3.8GB. 3.8GB. Corrupted file - Message Icon The number of photo files that is recorded as the Time Lapse REC. and format the Card. Set File...
User Manual (ENGLISH)
Page 143
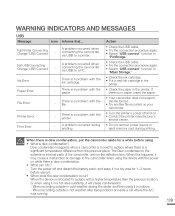
.... When this file format. • Try another file recorded on your camcorder. • Turn the printer's power off and detach the battery pack, and leave it in indoors. - Dew condensation happens when a camcorder is relocated to the camcorder when using it will cause condensation. - A problem occurred when connecting the camcorder via USB to a printer. When the device is moved to "Mass Storage." • Check the ink cartridge...
.... When this file format. • Try another file recorded on your camcorder. • Turn the printer's power off and detach the battery pack, and leave it in indoors. - Dew condensation happens when a camcorder is relocated to the camcorder when using it will cause condensation. - A problem occurred when connecting the camcorder via USB to a printer. When the device is moved to "Mass Storage." • Check the ink cartridge...


