
User Manual (ENGLISH)
Page 13
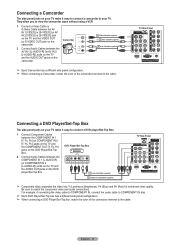
...) 2 Audio Cable(Not supplied) ➢ Each Camcorder has a different side panel configuration. ➢ When connecting a Camcorder, match the color of the connection terminal to the cable. English - 13 DVD Player/Set-Top Box 2 Audio Cable(Not supplied) 1 Component Cable(Not supplied...) TV Side Panel ➢ Component video separates the video into Y (Luminance (brightness), PB (Blue) and PR (Red) for enhanced video quality. They allow you to view the camcorder tapes without using a VCR 1...
...) 2 Audio Cable(Not supplied) ➢ Each Camcorder has a different side panel configuration. ➢ When connecting a Camcorder, match the color of the connection terminal to the cable. English - 13 DVD Player/Set-Top Box 2 Audio Cable(Not supplied) 1 Component Cable(Not supplied...) TV Side Panel ➢ Component video separates the video into Y (Luminance (brightness), PB (Blue) and PR (Red) for enhanced video quality. They allow you to view the camcorder tapes without using a VCR 1...
User Manual (ENGLISH)
Page 20
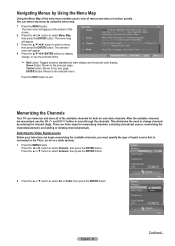
...This eliminates the need to the TV(i.e. an air or a cable system). 1 Press the MENU button. Memorizing the Channels Your TV can memorize and store all menus...Contrast І Brightness І Shapness І Color І Tint Color Tone І Detailed Settings І Size І Digital NR І DNIe Active Color І Color Gamut І Position І Reset Mode І... Timer 1 І Timer 2 Alphabetical Order Next Page Enter Return ➢ Red button: Toggles between alphabetical order display and functional order display. Press the ▲ or ▼ button...
...This eliminates the need to the TV(i.e. an air or a cable system). 1 Press the MENU button. Memorizing the Channels Your TV can memorize and store all menus...Contrast І Brightness І Shapness І Color І Tint Color Tone І Detailed Settings І Size І Digital NR І DNIe Active Color І Color Gamut І Position І Reset Mode І... Timer 1 І Timer 2 Alphabetical Order Next Page Enter Return ➢ Red button: Toggles between alphabetical order display and functional order display. Press the ▲ or ▼ button...
User Manual (ENGLISH)
Page 29
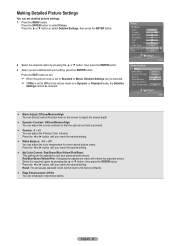
...or ▼ button, then press the ENTER button. Press the ◄ or ► button until you reach the optimal setting. ● My Color Control: Red/Green/Blue/Yellow/Pink/Reset This setting can be selected. ➢ If DNIe is set detailed picture settings. 1 Press the MENU button. Press ... for more natural picture colors. Making Detailed Picture Settings You can set to Off and the picture mode is provided. ● Gamma: -3 ~ +3 You can adjust the Primary Color Intensity. Red/Blue/Green/Yellow/Pink: Changing the adjustment value will be selected. Press the ◄ or ► button ...
...or ▼ button, then press the ENTER button. Press the ◄ or ► button until you reach the optimal setting. ● My Color Control: Red/Green/Blue/Yellow/Pink/Reset This setting can be selected. ➢ If DNIe is set detailed picture settings. 1 Press the MENU button. Press ... for more natural picture colors. Making Detailed Picture Settings You can set to Off and the picture mode is provided. ● Gamma: -3 ~ +3 You can adjust the Primary Color Intensity. Red/Blue/Green/Yellow/Pink: Changing the adjustment value will be selected. Press the ◄ or ► button ...
User Manual (ENGLISH)
Page 32
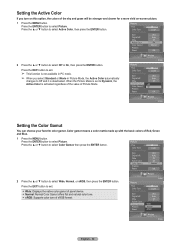
...and it is deactivated. Color gamut means a color matrix made up with the basic colors of the sky and grass will be stronger and clearer for a more vivid on this option, the colors of Red, Green and Blue. 1 Press the MENU button. Picture Tint G50 Color Tone Detailed Settings Size ...Digital NR DNIe Active Color Color Gamut Position Reset R50 Cool1 16:9 Auto On On Normal 0 OK 2 Press the...
...and it is deactivated. Color gamut means a color matrix made up with the basic colors of the sky and grass will be stronger and clearer for a more vivid on this option, the colors of Red, Green and Blue. 1 Press the MENU button. Picture Tint G50 Color Tone Detailed Settings Size ...Digital NR DNIe Active Color Color Gamut Position Reset R50 Cool1 16:9 Auto On On Normal 0 OK 2 Press the...
User Manual (ENGLISH)
Page 52
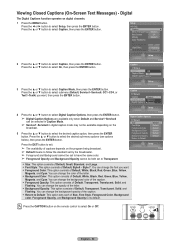
...; or ▼ button to select Setup, then press the ENTER button. You can change the background color of the caption. Foreground Opacity: This option consists of Default, White, Black, Red, Green, Blue, Yellow, Magenta, and Cyan. Viewing Closed Captions (On-Screen Text Messages) - Press...captions depends on digital channels. 1 Press the MENU button. You can change the font you want . Foreground Color: This option consists of Default, White, Black, Red, Green, Blue, Yellow, Magenta, and Cyan. You can change the opacity of the letter. Background Opacity:...
...; or ▼ button to select Setup, then press the ENTER button. You can change the background color of the caption. Foreground Opacity: This option consists of Default, White, Black, Red, Green, Blue, Yellow, Magenta, and Cyan. Viewing Closed Captions (On-Screen Text Messages) - Press...captions depends on digital channels. 1 Press the MENU button. You can change the font you want . Foreground Color: This option consists of Default, White, Black, Red, Green, Blue, Yellow, Magenta, and Cyan. You can change the opacity of the letter. Background Opacity:...
User Manual (ENGLISH)
Page 55
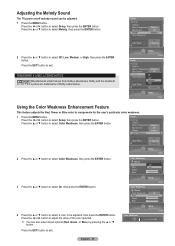
... to be adjusted. 1 Press the MENU button. Setup Enter Color Weakness Return Color Weakness Red Green Blue Off On 0 0 0 4 Press the ▲ or ▼ button to select a color to select On, then press the ENTER button. Adjusting the Melody Sound The TV power on/off melody sound can also select these options... (Red, Green, or Blue) by pressing the ▲ or ▼ button. Dolby and the ...
... to be adjusted. 1 Press the MENU button. Setup Enter Color Weakness Return Color Weakness Red Green Blue Off On 0 0 0 4 Press the ▲ or ▼ button to select a color to select On, then press the ENTER button. Adjusting the Melody Sound The TV power on/off melody sound can also select these options... (Red, Green, or Blue) by pressing the ▲ or ▼ button. Dolby and the ...


