User Manual (ENGLISH)
Page 4
... Panel LED Indicators 10 Front side buttons 11 Side Panel Jacks ...11 Rear Panel Jacks ...12 Remote Control...13 Connections 16 Connecting VHF and UHF Antennas 16 Antennas with 75-ohm Round Leads 16 Connecting Cable TV 17 Cable without a Cable Box 17 Cable with a Cable Box that...Definition Multimedia Interface 24 Connecting a Digital Audio System 25 Connecting to an Analog Amplifier 26 Operation 28 Turning the TV On and Off 28 Dynamic Menus and On-Screen Displays 28 Navigating Menus by Using the Menu Map 29 Selecting a Menu Language 30 Memorizing Channels 31 Changing Channels...
... Panel LED Indicators 10 Front side buttons 11 Side Panel Jacks ...11 Rear Panel Jacks ...12 Remote Control...13 Connections 16 Connecting VHF and UHF Antennas 16 Antennas with 75-ohm Round Leads 16 Connecting Cable TV 17 Cable without a Cable Box 17 Cable with a Cable Box that...Definition Multimedia Interface 24 Connecting a Digital Audio System 25 Connecting to an Analog Amplifier 26 Operation 28 Turning the TV On and Off 28 Dynamic Menus and On-Screen Displays 28 Navigating Menus by Using the Menu Map 29 Selecting a Menu Language 30 Memorizing Channels 31 Changing Channels...
User Manual (ENGLISH)
Page 5
...59 Digital Noise Reduction 60 DNIe (Digital Natural Image engine 61 Setting the My Color Control Mode 62 Using the Color Weakness Enhancement Feature 64 Setting the Film Mode 65 Freezing the Picture 66 Setting the Blue Screen Mode 67 Sound Control 70 Sound Control ...70 Setting ...Using the V-Chip...83 Using the V-Chip for Digital channels 93 Viewing Closed Captions (On-Screen Text Messages) Analog 95 Viewing Closed Captions (On-Screen Text Messages) Digital 97 PC Display 100 Using Your TV as a Computer (PC) Display 100 Adjusting the Picture Quality 103 Changing the Picture Position...
...59 Digital Noise Reduction 60 DNIe (Digital Natural Image engine 61 Setting the My Color Control Mode 62 Using the Color Weakness Enhancement Feature 64 Setting the Film Mode 65 Freezing the Picture 66 Setting the Blue Screen Mode 67 Sound Control 70 Sound Control ...70 Setting ...Using the V-Chip...83 Using the V-Chip for Digital channels 93 Viewing Closed Captions (On-Screen Text Messages) Analog 95 Viewing Closed Captions (On-Screen Text Messages) Digital 97 PC Display 100 Using Your TV as a Computer (PC) Display 100 Adjusting the Picture Quality 103 Changing the Picture Position...

User Manual (ENGLISH)
Page 8
When installing the product, make sure to keep it away from the screen as far back from the wall (more than 10cm/4 inches) for an extended period of the product, resulting in a shortened component life and degraded performance. English - 8 If viewing for ventilation purposes. • Poor ventilation may cause an increase in the internal temperature of time, sit as possible. Your New Wide TV Viewing Position To optimize your viewing comfort, please follow the guidelines below for viewing distance.
When installing the product, make sure to keep it away from the screen as far back from the wall (more than 10cm/4 inches) for an extended period of the product, resulting in a shortened component life and degraded performance. English - 8 If viewing for ventilation purposes. • Poor ventilation may cause an increase in the internal temperature of time, sit as possible. Your New Wide TV Viewing Position To optimize your viewing comfort, please follow the guidelines below for viewing distance.
User Manual (ENGLISH)
Page 9
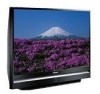
... Card/ Owner's Instructions Registration Card/ Safety Guide Manual/ Quick Guide Manual/ Power Cord (3903-000144) Cloth-Clean English - 9 List of Features Your TV is a full-featured, high-performance unit that you have unpacked your color preference • Color Weakness mode • Digital Input jack • Digital Audio... Output (OPTICAL) jack • Game mode • Easy-to-use on-screen menu system you can access from the front panel or remote control • Automatic timer to turn the TV on and off at any piece is missing or broken, call your dealer. It is ...
... Card/ Owner's Instructions Registration Card/ Safety Guide Manual/ Quick Guide Manual/ Power Cord (3903-000144) Cloth-Clean English - 9 List of Features Your TV is a full-featured, high-performance unit that you have unpacked your color preference • Color Weakness mode • Digital Input jack • Digital Audio... Output (OPTICAL) jack • Game mode • Easy-to-use on-screen menu system you can access from the front panel or remote control • Automatic timer to turn the TV on and off at any piece is missing or broken, call your dealer. It is ...
User Manual (ENGLISH)
Page 11
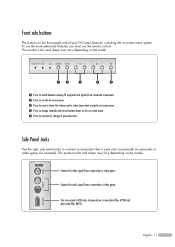
... vary depending on the model. Œ Press to switch between viewing TV programs and signals from connected components. ´ Press to see the on-screen menu. ˇ Press to raise or lower the volume and to...activate (or change) a particular item. The product color and shape may vary depending on -screen menu system. You can connect a USB mass storage device to connect a component that is used...camcorder or video game. Front side buttons The buttons on the front panel control your TV's basic features, including the on the model. English - 11 To use the more advanced features, you must ...
... vary depending on the model. Œ Press to switch between viewing TV programs and signals from connected components. ´ Press to see the on-screen menu. ˇ Press to raise or lower the volume and to...activate (or change) a particular item. The product color and shape may vary depending on -screen menu system. You can connect a USB mass storage device to connect a component that is used...camcorder or video game. Front side buttons The buttons on the front panel control your TV's basic features, including the on the model. English - 11 To use the more advanced features, you must ...
User Manual (ENGLISH)
Page 13
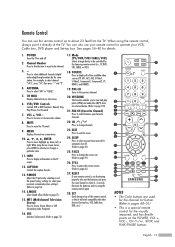
...27. STILL Press to pause the current screen. (Refer to exit the menu. 24. RESET If your VCR, Cable box, DVD player and Set-top box. English - 13 MENU Displays the main on the TV screen. 12. P.MODE Adjust the TV picture by the Samsung remote control (i.e., TV, DVD, STB, CABLE, or VCR).... 18. Mode (TV/DVD/STB/CABLE/VCR) Selects a target device to be controlled by selecting one of the ...
...27. STILL Press to pause the current screen. (Refer to exit the menu. 24. RESET If your VCR, Cable box, DVD player and Set-top box. English - 13 MENU Displays the main on the TV screen. 12. P.MODE Adjust the TV picture by the Samsung remote control (i.e., TV, DVD, STB, CABLE, or VCR).... 18. Mode (TV/DVD/STB/CABLE/VCR) Selects a target device to be controlled by selecting one of the ...
User Manual (ENGLISH)
Page 28
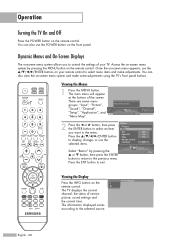
...pressing the MENU button on your TV. You can also view the on the front panel. Viewing the Menus 1 Press the MENU button. Selects the input options. The information displayed varies according to control the settings of the screen. Operation Turning the TV On and Off Press the ...POWER button on the Air remote control. 3 The TV displays the current channel, the status of certain picture, sound settings and the current ...
...pressing the MENU button on your TV. You can also view the on the front panel. Viewing the Menus 1 Press the MENU button. Selects the input options. The information displayed varies according to control the settings of the screen. Operation Turning the TV On and Off Press the ...POWER button on the Air remote control. 3 The TV displays the current channel, the status of certain picture, sound settings and the current ...
User Manual (ENGLISH)
Page 29
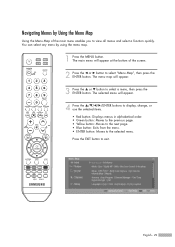
You can select any menu by Using the Menu Map Using the Menu Map of the screen. 2 Press the œ or √ button to exit. The selected menu will appear. 3 Press the ... The menu map will appear. 4 Press the ENTER buttons to ...
You can select any menu by Using the Menu Map Using the Menu Map of the screen. 2 Press the œ or √ button to exit. The selected menu will appear. 3 Press the ... The menu map will appear. 4 Press the ENTER buttons to ...
User Manual (ENGLISH)
Page 30
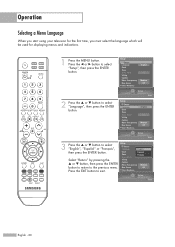
... be used for displaying menus and indications. 1 Press the MENU button. Setup Return Language Clock Timer Game Mode V-Chip Caption Menu Transparency Blue Screen † Color Weakness English Off Medium Off Setup Enter 3 Press the ... or † button, then press the ENTER button to return ...button to the previous menu. or † button to exit. † Color Weakness Setup Enter English - 30 V-Chip Caption Menu Transparency Blue Screen Medium Off Press the EXIT button to select "English", "Español" or "Français", Setup Return Language English then press the ...
... be used for displaying menus and indications. 1 Press the MENU button. Setup Return Language Clock Timer Game Mode V-Chip Caption Menu Transparency Blue Screen † Color Weakness English Off Medium Off Setup Enter 3 Press the ... or † button, then press the ENTER button to return ...button to the previous menu. or † button to exit. † Color Weakness Setup Enter English - 30 V-Chip Caption Menu Transparency Blue Screen Medium Off Press the EXIT button to select "English", "Español" or "Français", Setup Return Language English then press the ...
User Manual (ENGLISH)
Page 41
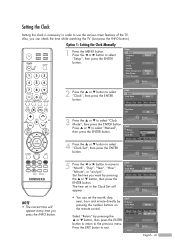
...press the ENTER button. Month / Day / Year Hour / Minute Time Zone DST Off Setup • You can check the time while watching the TV. (Just press the INFO button.) Option 1: Setting the Clock Manually 1 Press the MENU button. Setting the Clock Setting the clock is necessary in...; or √ button to select "Clock Mode", then press the ENTER button. Setup Return Language Clock Timer Game Mode V-Chip Caption Menu Transparency Blue Screen † Color Weakness English Off Medium Off 2 Press the ... or † to select "Setup", then press the ENTER button. or † ...
...press the ENTER button. Month / Day / Year Hour / Minute Time Zone DST Off Setup • You can check the time while watching the TV. (Just press the INFO button.) Option 1: Setting the Clock Manually 1 Press the MENU button. Setting the Clock Setting the clock is necessary in...; or √ button to select "Clock Mode", then press the ENTER button. Setup Return Language Clock Timer Game Mode V-Chip Caption Menu Transparency Blue Screen † Color Weakness English Off Medium Off 2 Press the ... or † to select "Setup", then press the ENTER button. or † ...
User Manual (ENGLISH)
Page 42
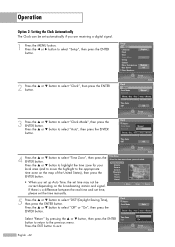
... √ button to select "DST"(Daylight Saving Time), then press the ENTER button. Setup Return Language Clock Timer Game Mode V-Chip Caption Menu Transparency Blue Screen † Color Weakness English Off Medium Off 2 Press the ... Press the EXIT button to select "Off" or "On", then press the ENTER button. Clock Return...
... √ button to select "DST"(Daylight Saving Time), then press the ENTER button. Setup Return Language Clock Timer Game Mode V-Chip Caption Menu Transparency Blue Screen † Color Weakness English Off Medium Off 2 Press the ... Press the EXIT button to select "Off" or "On", then press the ENTER button. Clock Return...
User Manual (ENGLISH)
Page 43
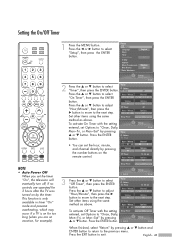
...button. Adjust Setup Enter 12 : 00 am Options Off --- English - 43 Setup Return Language Clock Timer Game Mode V-Chip Caption Menu Transparency Blue Screen † Color Weakness English Off Medium Off 2 Press the ... Volume 10 Off Timer Hour / Minute 12 : 00 am Set other items ...12 : 00 am Sleep Timer Setup Enter off Channel Air 3 Options Off off , if no controls are on vacation, for 3 hours after the TV was turned on the remote control. Press the ... Press the ENTER Return button. On Timer Press the ... Setup Enter Channel Air 3 Options Off...
...button. Adjust Setup Enter 12 : 00 am Options Off --- English - 43 Setup Return Language Clock Timer Game Mode V-Chip Caption Menu Transparency Blue Screen † Color Weakness English Off Medium Off 2 Press the ... Volume 10 Off Timer Hour / Minute 12 : 00 am Set other items ...12 : 00 am Sleep Timer Setup Enter off Channel Air 3 Options Off off , if no controls are on vacation, for 3 hours after the TV was turned on the remote control. Press the ... Press the ENTER Return button. On Timer Press the ... Setup Enter Channel Air 3 Options Off...
User Manual (ENGLISH)
Page 44
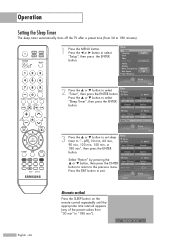
...Timer", then press the ENTER 12 : 00 am Options Daily --- 3 Press the ... or † button to set sleep timer to "- - (off the TV after a preset time (from "30 min" to 180 minutes). 1 Press the MENU button. Operation Setting the Sleep Timer The sleep timer automatically shuts off ), 30... 120 min, 150 min, or 180 min", then press the ENTER button. Setup Return Language Clock Timer Game Mode V-Chip Caption Menu Transparency Blue Screen † Color Weakness English Off Medium Off Setup Enter 2 Press the ... Press the œ or √ button to select Timer Return "Timer...
...Timer", then press the ENTER 12 : 00 am Options Daily --- 3 Press the ... or † button to set sleep timer to "- - (off the TV after a preset time (from "30 min" to 180 minutes). 1 Press the MENU button. Operation Setting the Sleep Timer The sleep timer automatically shuts off ), 30... 120 min, 150 min, or 180 min", then press the ENTER button. Setup Return Language Clock Timer Game Mode V-Chip Caption Menu Transparency Blue Screen † Color Weakness English Off Medium Off Setup Enter 2 Press the ... Press the œ or √ button to select Timer Return "Timer...

User Manual (ENGLISH)
Page 57
... or increase the value of a particular item. or † button to personal preference. or † button. Customizing the Picture Settings You can use the on-screen menus to change the "Contrast", "Brightness", "Sharpness", "Color", "Tint", and "Color Tone" according to select the desired picture mode (Dynamic, Standard, Movie, or Custom), then...
... or increase the value of a particular item. or † button to personal preference. or † button. Customizing the Picture Settings You can use the on-screen menus to change the "Contrast", "Brightness", "Sharpness", "Color", "Tint", and "Color Tone" according to select the desired picture mode (Dynamic, Standard, Movie, or Custom), then...
User Manual (ENGLISH)
Page 59
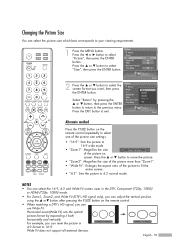
...8224; button to select My Color Control "Size", then press the ENTER button. NOTES • You can select the 16:9, 4:3 and Wide Fit screen sizes in 4 : 3 Wide Fit 4:3 format to 16:9. Size Zoom14:3 Digital NR Zoom2On Select "Return" by expanding it both horizontally and vertically....:9": Sets the picture to 16:9 wide mode. • "Zoom1": Magnifies the size Zoom1 ▲ ▼ Move of the picture to fit the entire screen. • "4:3": Sets the picture to select Picture Return Mode "Picture", then press the ENTER Size 16:9 button. Press the œ or √ ...
...8224; button to select My Color Control "Size", then press the ENTER button. NOTES • You can select the 16:9, 4:3 and Wide Fit screen sizes in 4 : 3 Wide Fit 4:3 format to 16:9. Size Zoom14:3 Digital NR Zoom2On Select "Return" by expanding it both horizontally and vertically....:9": Sets the picture to 16:9 wide mode. • "Zoom1": Magnifies the size Zoom1 ▲ ▼ Move of the picture to fit the entire screen. • "4:3": Sets the picture to select Picture Return Mode "Picture", then press the ENTER Size 16:9 button. Press the œ or √ ...
User Manual (ENGLISH)
Page 60
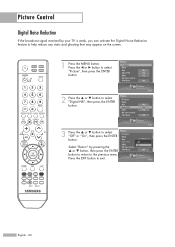
...press the ENTER Picture Return Mode button. Press the œ or √ button to help reduce any static and ghosting that may appear on the screen. 1 Press the MENU button. Picture Control Digital Noise Reduction If the broadcast signal received by pressing the DNIe On Off My Color Control ... or ... NR On DNIe On My Color Control Film Mode Off Picture Enter 3 Press the ... Size Digital NR 16:9 Off On Select "Return" by your TV is weak, you can activate the Digital Noise Reduction feature to select "Picture", then press the ENTER button. Enter English - 60
...press the ENTER Picture Return Mode button. Press the œ or √ button to help reduce any static and ghosting that may appear on the screen. 1 Press the MENU button. Picture Control Digital Noise Reduction If the broadcast signal received by pressing the DNIe On Off My Color Control ... or ... NR On DNIe On My Color Control Film Mode Off Picture Enter 3 Press the ... Size Digital NR 16:9 Off On Select "Return" by your TV is weak, you can activate the Digital Noise Reduction feature to select "Picture", then press the ENTER button. Enter English - 60
User Manual (ENGLISH)
Page 61
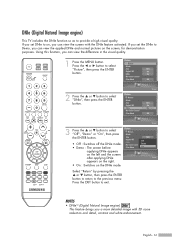
...Film Mode Off Picture Enter 3 Press the ... Press the EXIT button to provide a high visual quality. DNIe (Digital Natural Image engine) This TV includes the DNIe function so as to exit. If you set the DNIe to select "DNIe", then press the ENTER button. NOTES • ...DNIeTM (Digital Natural Image engine) This feature brings you can view the screen with 3D noise reduction and detail, contrast and white enhancement. English - 61 or † button to Demo, you can view the difference in the visual quality. 1 Press the MENU button...
...Film Mode Off Picture Enter 3 Press the ... Press the EXIT button to provide a high visual quality. DNIe (Digital Natural Image engine) This TV includes the DNIe function so as to exit. If you set the DNIe to select "DNIe", then press the ENTER button. NOTES • ...DNIeTM (Digital Natural Image engine) This feature brings you can view the screen with 3D noise reduction and detail, contrast and white enhancement. English - 61 or † button to Demo, you can view the difference in the visual quality. 1 Press the MENU button...
User Manual (ENGLISH)
Page 62
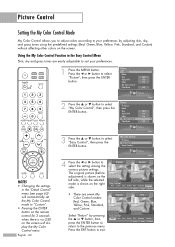
... Standard Custom Move Enter Return The original picture (before adjustment) is shown on the left side, while the selected mode is no OSD on the screen will automatically set the My Color Control mode to select "My Color Control", then press the ENTER button. 3 Press the ... Press the EXIT ...MENU button. or † button to "Custom". • Pressing the ENTER button on the remote control for 3 seconds when there is shown on the screen. Using the My Color Control Function in the "Detail Control" menu (see page 63) will display the My Color Control menu. NOTES • Changing ...
... Standard Custom Move Enter Return The original picture (before adjustment) is shown on the left side, while the selected mode is no OSD on the screen will automatically set the My Color Control mode to select "My Color Control", then press the ENTER button. 3 Press the ... Press the EXIT ...MENU button. or † button to "Custom". • Pressing the ENTER button on the remote control for 3 seconds when there is shown on the screen. Using the My Color Control Function in the "Detail Control" menu (see page 63) will display the My Color Control menu. NOTES • Changing ...

User Manual (ENGLISH)
Page 63
... the left side, while the picture after adjustment is shown on the right side, and an adjustment bar is shown on the bottom of the screen. Original Adjusted 6 Press the ENTER or MENU button to confirm the changes and return to previous menu. Reset Select Return by pressing the ... or †...
... the left side, while the picture after adjustment is shown on the right side, and an adjustment bar is shown on the bottom of the screen. Original Adjusted 6 Press the ENTER or MENU button to confirm the changes and return to previous menu. Reset Select Return by pressing the ... or †...
User Manual (ENGLISH)
Page 64
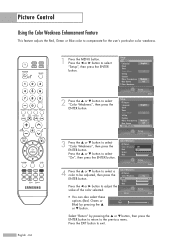
...; Color Weakness English Off Medium Off Setup Enter 2 Press the ... Setup Return Language English Clock Timer Game Mode Off V-Chip Caption Menu Transparency Medium Blue Screen Off † Color Weakness √ Setup Enter 3 Press the ... Red Press the ... or † button to select a color to the previous menu. or † button...
...; Color Weakness English Off Medium Off Setup Enter 2 Press the ... Setup Return Language English Clock Timer Game Mode Off V-Chip Caption Menu Transparency Medium Blue Screen Off † Color Weakness √ Setup Enter 3 Press the ... Red Press the ... or † button to select a color to the previous menu. or † button...


