User Manual (ENGLISH)
Page 2
...for licensed contents. Both HDTV formats are always broadcast in widescreen, and offer much higher picture quality than SDTV. • Dolby Surround Sound With DTV, you can transmit high definition TV (HDTV) images, Dolby digital surround audio, and new services such as multicasting (transmitting ... the use of this product unit. The first is Standard Definition Television (SDTV) and the second is Digital Television? A Guide to Digital TV • What is High Definition Television (HDTV). • SDTV program formats include 480-line interlaced (480i) and 480-line progressive (480p...
...for licensed contents. Both HDTV formats are always broadcast in widescreen, and offer much higher picture quality than SDTV. • Dolby Surround Sound With DTV, you can transmit high definition TV (HDTV) images, Dolby digital surround audio, and new services such as multicasting (transmitting ... the use of this product unit. The first is Standard Definition Television (SDTV) and the second is Digital Television? A Guide to Digital TV • What is High Definition Television (HDTV). • SDTV program formats include 480-line interlaced (480i) and 480-line progressive (480p...
User Manual (ENGLISH)
Page 5
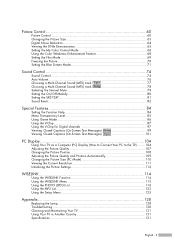
... a Computer (PC) Display (How to Connect Your PC to the TV) .........104 Adjusting the Picture Quality 107 Changing the Picture Position 108 Adjusting the Picture Quality and Position Automatically 109 Changing the Picture Size (PC Mode 110 Viewing the Current Resolution 111 Initializing the Picture Settings 112 WISELINK 114 Using the WISELINK Function 114 Using the...
... a Computer (PC) Display (How to Connect Your PC to the TV) .........104 Adjusting the Picture Quality 107 Changing the Picture Position 108 Adjusting the Picture Quality and Position Automatically 109 Changing the Picture Size (PC Mode 110 Viewing the Current Resolution 111 Initializing the Picture Settings 112 WISELINK 114 Using the WISELINK Function 114 Using the...
User Manual (ENGLISH)
Page 9
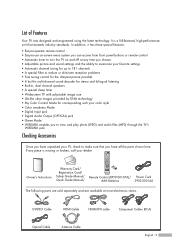
...enables you have all the parts shown here. If any time you choose • Adjustable picture and sound settings and the ability to memorize your dealer. List of Features Your TV was designed and engineered using the latest technology. Owner's Instructions Warranty Card/ Registration Card/... piece is a full-featured, high-performance unit that you to reduce or eliminate reception problems • Fine tuning control for the sharpest picture possible • A built-in multi-channel sound decoder for stereo and bilingual listening • Built-in, dual channel speakers • ...
...enables you have all the parts shown here. If any time you choose • Adjustable picture and sound settings and the ability to memorize your dealer. List of Features Your TV was designed and engineered using the latest technology. Owner's Instructions Warranty Card/ Registration Card/... piece is a full-featured, high-performance unit that you to reduce or eliminate reception problems • Fine tuning control for the sharpest picture possible • A built-in multi-channel sound decoder for stereo and bilingual listening • Built-in, dual channel speakers • ...
User Manual (ENGLISH)
Page 11
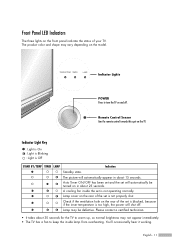
...picture will automatically appear in about 15 seconds. A cooling fan inside lamp from overheating. Remote Control Sensor Aim the remote control towards this spot on the model. Lamp cover on the rear of your TV. English - 11 Please contact a certified technician. • It takes about 30 seconds for the TV... to warm up, so normal brightness may not appear immediately. • The TV has a fan to turn the TV on and off . You...
...picture will automatically appear in about 15 seconds. A cooling fan inside lamp from overheating. Remote Control Sensor Aim the remote control towards this spot on the model. Lamp cover on the rear of your TV. English - 11 Please contact a certified technician. • It takes about 30 seconds for the TV... to warm up, so normal brightness may not appear immediately. • The TV has a fan to turn the TV on and off . You...
User Manual (ENGLISH)
Page 13
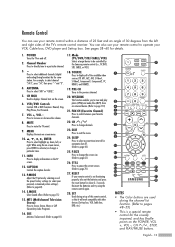
... points on the POWER, VOL +, VOL -, CH / , STOP, and PLAY/PAUSE buttons. English - 13 For example, to page 70) 27. P.MODE Adjust the TV picture by the Samsung remote control (i.e., TV, DVD, STB, CABLE, or VCR). 18. INFO Press to display all of 30 degrees from an external device. (Refer to change ) a particular item...
... points on the POWER, VOL +, VOL -, CH / , STOP, and PLAY/PAUSE buttons. English - 13 For example, to page 70) 27. P.MODE Adjust the TV picture by the Samsung remote control (i.e., TV, DVD, STB, CABLE, or VCR). 18. INFO Press to display all of 30 degrees from an external device. (Refer to change ) a particular item...

User Manual (ENGLISH)
Page 29
...the selected items. Use the ENTER button to exit. There are five menu groups: "Input", "Picture", "Sound", "Channel", and "Setup". 2 Press the ... Input Source List : TV √ Edit Name √ WISELINK √ Move Enter Exit Picture Mode : Dynamic √ Size : 16:9 √ Digital NR : On √ DNIe...8730; Move Enter Return 3 Press the EXIT button to enter items in the menu. Viewing the Display Press the INFO button on your TV. Air 3 Mono Picture Mode Sound Mode MTS Caption V-Chip 12:00 am : Dynamic : Custom : Mono : Off : Off English - 29 Access the ...
...the selected items. Use the ENTER button to exit. There are five menu groups: "Input", "Picture", "Sound", "Channel", and "Setup". 2 Press the ... Input Source List : TV √ Edit Name √ WISELINK √ Move Enter Exit Picture Mode : Dynamic √ Size : 16:9 √ Digital NR : On √ DNIe...8730; Move Enter Return 3 Press the EXIT button to enter items in the menu. Viewing the Display Press the INFO button on your TV. Air 3 Mono Picture Mode Sound Mode MTS Caption V-Chip 12:00 am : Dynamic : Custom : Mono : Off : Off English - 29 Access the ...

User Manual (ENGLISH)
Page 33
... not see channels that broadcast both a digital and analog signal. SD indicates the TV is used to the last channel you press the CH or CH button, the TV changes channels in sequence. Air 7-2 Mono Picture Mode Sound Mode MTS Caption V-Chip 12:00 am : Dynamic : Custom : English : Off : ...Off NOTE • HD indicates the TV is receiving a Digital High Definition signal. Changing Channels Using ...
... not see channels that broadcast both a digital and analog signal. SD indicates the TV is used to the last channel you press the CH or CH button, the TV changes channels in sequence. Air 7-2 Mono Picture Mode Sound Mode MTS Caption V-Chip 12:00 am : Dynamic : Custom : English : Off : ...Off NOTE • HD indicates the TV is receiving a Digital High Definition signal. Changing Channels Using ...

User Manual (ENGLISH)
Page 57
...-noise preamplifier boosts the incoming signal). 1 Press the MENU button. English - 57 or † button to be set individually for each channel. • If the picture is noisy with the LNA set to Air. or † button to select "On" or "Off", then press the ENTER button. 4 Press the EXIT button..., select Off. • The LNA setting needs to select "LNA", then press the ENTER button. 3 Press the ... Press the ... LNA (Low Noise Amplifier) If the TV is operating in each channel.
...-noise preamplifier boosts the incoming signal). 1 Press the MENU button. English - 57 or † button to be set individually for each channel. • If the picture is noisy with the LNA set to Air. or † button to select "On" or "Off", then press the ENTER button. 4 Press the EXIT button..., select Off. • The LNA setting needs to select "LNA", then press the ENTER button. 3 Press the ... Press the ... LNA (Low Noise Amplifier) If the TV is operating in each channel.
User Manual (ENGLISH)
Page 60
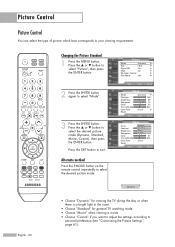
...remote control repeatedly to exit. Press the EXIT button to select the desired picture mode. Picture Control Picture Control You can select the type of picture which best corresponds to personal preference (see "Customizing the Picture Settings", page 61). Picture Mode : Dynamic √ Size : 16:9 √ Digital NR ... Move Enter Return Dynamic English - 60 • Choose "Dynamic" for viewing the TV during the day or when there is a bright light in the room. • Choose "Standard" for general TV watching mode. • Choose "Movie" when viewing a movie. • Choose...
...remote control repeatedly to exit. Press the EXIT button to select the desired picture mode. Picture Control Picture Control You can select the type of picture which best corresponds to personal preference (see "Customizing the Picture Settings", page 61). Picture Mode : Dynamic √ Size : 16:9 √ Digital NR ... Move Enter Return Dynamic English - 60 • Choose "Dynamic" for viewing the TV during the day or when there is a bright light in the room. • Choose "Standard" for general TV watching mode. • Choose "Movie" when viewing a movie. • Choose...

User Manual (ENGLISH)
Page 61
... Cool1 √ Move Enter Return 3 Press the ENTER button. Press the ... Picture Mode : Dynamic √ Size : 16:9 √ Digital NR : On ...Move Enter Return 2 Press the ENTER button to select the desired picture mode (Dynamic, Standard, Movie, Custom), then press the ENTER ..."Tint", and "Color Tone" according to personal preference. Customizing the Picture Settings You can also select these options (Contrast, Brightness, Sharpness, ...You can select "Standard" which automatically recalls your personalized picture settings. 1 Press the MENU button. Mode Mode Contrast...
... Cool1 √ Move Enter Return 3 Press the ENTER button. Press the ... Picture Mode : Dynamic √ Size : 16:9 √ Digital NR : On ...Move Enter Return 2 Press the ENTER button to select the desired picture mode (Dynamic, Standard, Movie, Custom), then press the ENTER ..."Tint", and "Color Tone" according to personal preference. Customizing the Picture Settings You can also select these options (Contrast, Brightness, Sharpness, ...You can select "Standard" which automatically recalls your personalized picture settings. 1 Press the MENU button. Mode Mode Contrast...
User Manual (ENGLISH)
Page 62
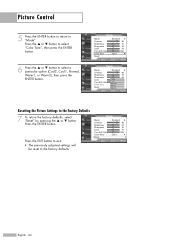
... particular option (Cool2, Cool1, Normal, Warm1, or Warm2), then press the ENTER button. Press the ... or † button to "Mode". Press the ENTER button. Picture Control 5 Press the ENTER button to return to select "Color Tone", then press the ENTER button. 6 Press the ... Mode Mode Contrast Brightness Sharpness Color Tint...Color Tint (G/R) G50 Color Tone Reset Move : Standard √ 80 50 Cool2 Cool1 Normal 50 50 R50 Warm1 Warm2 Enter Return Resetting the Picture Settings to the Factory Defaults 7 To return the factory defaults, select "Reset" by pressing the ...
... particular option (Cool2, Cool1, Normal, Warm1, or Warm2), then press the ENTER button. Press the ... or † button to "Mode". Press the ENTER button. Picture Control 5 Press the ENTER button to return to select "Color Tone", then press the ENTER button. 6 Press the ... Mode Mode Contrast Brightness Sharpness Color Tint...Color Tint (G/R) G50 Color Tone Reset Move : Standard √ 80 50 Cool2 Cool1 Normal 50 50 R50 Warm1 Warm2 Enter Return Resetting the Picture Settings to the Factory Defaults 7 To return the factory defaults, select "Reset" by pressing the ...
User Manual (ENGLISH)
Page 63
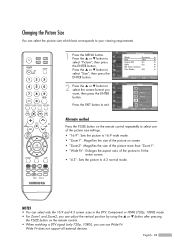
...and Zoom2, you want, then press the ENTER button. English - 63 Wide Fit does not support all external devices. Changing the Picture Size You can select the picture size which best corresponds to select "Size", then press the ENTER button. 2 Press the ... or † button to your... viewing requirements. 1 Press the MENU button. Picture Mode : Dynamic √ Size : 16:9 √ Digital NR : On √ DNIe : On √ My Color Control √ Film Mode : Off...
...and Zoom2, you want, then press the ENTER button. English - 63 Wide Fit does not support all external devices. Changing the Picture Size You can select the picture size which best corresponds to select "Size", then press the ENTER button. 2 Press the ... or † button to your... viewing requirements. 1 Press the MENU button. Picture Mode : Dynamic √ Size : 16:9 √ Digital NR : On √ DNIe : On √ My Color Control √ Film Mode : Off...

User Manual (ENGLISH)
Page 64
Picture Control Digital Noise Reduction If the broadcast signal received by your TV is weak, you can activate ...the Digital Noise Reduction feature to exit. Press the ... Press the EXIT button to help reduce any static and ghosting that may appear on the screen. 1 Press the MENU button. or † button to select "Picture...: On √ DNIe : On √ My Color Control √ Film Mode : Off √ Move Enter Return Picture Mode : Dynamic Size : 16:9 Digital NR : OOfnf DNIe : OOnn My Color Control Film Mode : Off Move Enter Return...
Picture Control Digital Noise Reduction If the broadcast signal received by your TV is weak, you can activate ...the Digital Noise Reduction feature to exit. Press the ... Press the EXIT button to help reduce any static and ghosting that may appear on the screen. 1 Press the MENU button. or † button to select "Picture...: On √ DNIe : On √ My Color Control √ Film Mode : Off √ Move Enter Return Picture Mode : Dynamic Size : 16:9 Digital NR : OOfnf DNIe : OOnn My Color Control Film Mode : Off Move Enter Return...
User Manual (ENGLISH)
Page 65
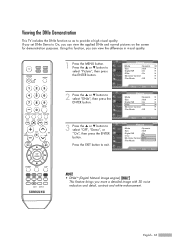
... NOTE • DNIeTM (Digital Natural Image engine) This feature brings you can view the applied DNIe and normal pictures on the screen for demonstration purposes. Viewing the DNIe Demonstration This TV includes the DNIe function so as to select "Off", "Demo", or "On", then press the ENTER button.... or † button to provide a high visual quality. or † button to exit. Press the EXIT button to select "Picture", then press the ENTER button....
... NOTE • DNIeTM (Digital Natural Image engine) This feature brings you can view the applied DNIe and normal pictures on the screen for demonstration purposes. Viewing the DNIe Demonstration This TV includes the DNIe function so as to select "Off", "Demo", or "On", then press the ENTER button.... or † button to provide a high visual quality. or † button to exit. Press the EXIT button to select "Picture", then press the ENTER button....

User Manual (ENGLISH)
Page 66
... colors according to exit. NOTES • Changing the settings in the "Detail Control" menu (see next page) will display the My Color Control menu. Picture Mode : Dynamic √ Size : 16:9 √ Digital NR : On √ DNIe : On √ My Color Control √ Film Mode...• "Blue": Emphasizes Clear Blues. • "Green": Emphasizes Mild Greens. • "Pink": Emphasizes Warm Skin Colors. • "Standard": Standard Picture. Using the Easy Control Menu 1 Press the MENU button. or † button to "Custom". • Pressing the ENTER button on the remote control for...
... colors according to exit. NOTES • Changing the settings in the "Detail Control" menu (see next page) will display the My Color Control menu. Picture Mode : Dynamic √ Size : 16:9 √ Digital NR : On √ DNIe : On √ My Color Control √ Film Mode...• "Blue": Emphasizes Clear Blues. • "Green": Emphasizes Mild Greens. • "Pink": Emphasizes Warm Skin Colors. • "Standard": Standard Picture. Using the Easy Control Menu 1 Press the MENU button. or † button to "Custom". • Pressing the ENTER button on the remote control for...

User Manual (ENGLISH)
Page 67
..."Pink", "Green" and "Blue". Detail Control Pink 50 Green 50 Blue 50 Reset Move Enter Return Press the EXIT button to select "Picture", then press the ENTER button. Custom Settings 1 Press the MENU button. or † button to exit. The previously adjusted My Color Control...to adjust the value of the color selected. Press the œ or √ button to select "Detail Control", then press the ENTER button. English - 67 Picture Mode : Dynamic √ Size : 16:9 √ Digital NR : On √ DNIe : On √ My Color Control √ Film Mode : ...
..."Pink", "Green" and "Blue". Detail Control Pink 50 Green 50 Blue 50 Reset Move Enter Return Press the EXIT button to select "Picture", then press the ENTER button. Custom Settings 1 Press the MENU button. or † button to exit. The previously adjusted My Color Control...to adjust the value of the color selected. Press the œ or √ button to select "Detail Control", then press the ENTER button. English - 67 Picture Mode : Dynamic √ Size : 16:9 √ Digital NR : On √ DNIe : On √ My Color Control √ Film Mode : ...

User Manual (ENGLISH)
Page 68
... ... English - 68 or † button to select "Color Weakness". or † button to select a color to the user's particular color weakness. 1 Press the MENU button. Picture Control Using the Color Weakness Enhancement Feature This feature adjusts the Red, Green or Blue color to enhance the...
... ... English - 68 or † button to select "Color Weakness". or † button to select a color to the user's particular color weakness. 1 Press the MENU button. Picture Control Using the Color Weakness Enhancement Feature This feature adjusts the Red, Green or Blue color to enhance the...

User Manual (ENGLISH)
Page 69
... Size : 16:9 √ Digital NR : On √ DNIe : On √ My Color Control √ Film Mode : Off √ Move Enter Return Picture Mode : Dynamic Size : 16:9 Digital NR : On DNIe : On My Color Control Film Mode : OOfff On Move Enter Return NOTE • Film mode is ...only. English - 69 or † button to select "Film Mode", then press the ENTER button. 3 Press the ... or † button to select "Picture", then press the ENTER button. 2 Press the ... Press the EXIT button to select "Off" or "On", then press the ENTER button. Setting the Film...
... Size : 16:9 √ Digital NR : On √ DNIe : On √ My Color Control √ Film Mode : Off √ Move Enter Return Picture Mode : Dynamic Size : 16:9 Digital NR : On DNIe : On My Color Control Film Mode : OOfff On Move Enter Return NOTE • Film mode is ...only. English - 69 or † button to select "Film Mode", then press the ENTER button. 3 Press the ... or † button to select "Picture", then press the ENTER button. 2 Press the ... Press the EXIT button to select "Off" or "On", then press the ENTER button. Setting the Film...

User Manual (ENGLISH)
Page 70
English - 70 Picture Control Freezing the Picture Press the STILL button to freeze a moving picture. (Normal sound will still be heard.) To cancel this function, press the STILL button again or press any button on the remote control.
English - 70 Picture Control Freezing the Picture Press the STILL button to freeze a moving picture. (Normal sound will still be heard.) To cancel this function, press the STILL button again or press any button on the remote control.

User Manual (ENGLISH)
Page 71
... ENTER button. 3 Press the ... or † button to select "Setup", then press the ENTER button. 2 Press the ... If you wish to continue viewing the poor picture, you must set the "Blue Screen" mode to select "Off" or "On", then press the ENTER button. or † button to "Off". 1 Press the MENU... Press the ... Setting the Blue Screen Mode If no signal is being received or the signal is very weak, a blue screen automatically replaces the noisy picture background.
... ENTER button. 3 Press the ... or † button to select "Setup", then press the ENTER button. 2 Press the ... If you wish to continue viewing the poor picture, you must set the "Blue Screen" mode to select "Off" or "On", then press the ENTER button. or † button to "Off". 1 Press the MENU... Press the ... Setting the Blue Screen Mode If no signal is being received or the signal is very weak, a blue screen automatically replaces the noisy picture background.


