
Open Source Guide (ENGLISH)
Page 1
... source code, to control the distribution of derivative or collective works based on a medium customarily used for most ordinary way, to print or display an announcement including an appropriate copyright notice and a notice that there is given a distinguishing version number. SHOULD THE PROGRAM PROVE DEFECTIVE, YOU ASSUME THE COST OF ALL NECESSARY SERVICING, REPAIR OR CORRECTION. 12. The original manual...
... source code, to control the distribution of derivative or collective works based on a medium customarily used for most ordinary way, to print or display an announcement including an appropriate copyright notice and a notice that there is given a distinguishing version number. SHOULD THE PROGRAM PROVE DEFECTIVE, YOU ASSUME THE COST OF ALL NECESSARY SERVICING, REPAIR OR CORRECTION. 12. The original manual...

Open Source Guide (ENGLISH)
Page 2
...exclusion of warranty; It is found. and each file should have at least the "copyright" line and a pointer to where the full notice is safest to attach them to the start of... these terms, attach the following notices to the public, we recommend making it free software that everyone can redistribute and change. 16. IN NO EVENT UNLESS REQUIRED BY APPLICABLE LAW OR AGREED TO IN ...USE OR INABILITY TO USE THE LIBRARY (INCLUDING BUT NOT LIMITED TO LOSS OF DATA OR DATA BEING RENDERED INACCURATE OR LOSSES SUSTAINED BY YOU OR THIRD PARTIES OR A FAILURE OF THE LIBRARY TO OPERATE WITH ANY OTHER SOFTWARE...
...exclusion of warranty; It is found. and each file should have at least the "copyright" line and a pointer to where the full notice is safest to attach them to the start of... these terms, attach the following notices to the public, we recommend making it free software that everyone can redistribute and change. 16. IN NO EVENT UNLESS REQUIRED BY APPLICABLE LAW OR AGREED TO IN ...USE OR INABILITY TO USE THE LIBRARY (INCLUDING BUT NOT LIMITED TO LOSS OF DATA OR DATA BEING RENDERED INACCURATE OR LOSSES SUSTAINED BY YOU OR THIRD PARTIES OR A FAILURE OF THE LIBRARY TO OPERATE WITH ANY OTHER SOFTWARE...

User Manual (ENGLISH)
Page 3
... much higher picture quality than one program on the same TV channel) and datacasting. No rights are essentially a digital version of Dolby digital audio formats from Dolby Surround 2.0 to your home audio system. The license only covers the use . Using DTV, broadcasters can transmit high definition TV (HDTV) images, Dolby digital surround audio, and new services such as multicasting (transmitting more than SDTV. • Dolby Surround Sound With DTV...
... much higher picture quality than one program on the same TV channel) and datacasting. No rights are essentially a digital version of Dolby digital audio formats from Dolby Surround 2.0 to your home audio system. The license only covers the use . Using DTV, broadcasters can transmit high definition TV (HDTV) images, Dolby digital surround audio, and new services such as multicasting (transmitting more than SDTV. • Dolby Surround Sound With DTV...
User Manual (ENGLISH)
Page 5
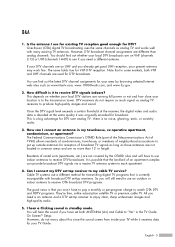
... TV antenna system to enjoy clear, sharp widescreen images and high-quality audio. 5. Can I use a different method for transmitting digital TV programs that the landlord of neighborhood associations to put up outside antennas for DTV over analog TV - English - 5 Q&A 1. DTV receivers do not worry about this since the sound comes from inside your TV Guide. Is the antenna I connect my DTV set -top receiver to each apartment. 4. This depends on VHF (channels...
... TV antenna system to enjoy clear, sharp widescreen images and high-quality audio. 5. Can I use a different method for transmitting digital TV programs that the landlord of neighborhood associations to put up outside antennas for DTV over analog TV - English - 5 Q&A 1. DTV receivers do not worry about this since the sound comes from inside your TV Guide. Is the antenna I connect my DTV set -top receiver to each apartment. 4. This depends on VHF (channels...
User Manual (ENGLISH)
Page 6
... Speaker 27 Operation 30 Turning the TV On and Off 30 Viewing the Menus and On-Screen Displays 30 Selecting a Menu Language 31 Memorizing the Channels 32 Adding and Erasing Channels 34 Changing Channels 35 Customizing Your Remote Control 36 Remote Control Codes 37 Setting the Clock...38 Setting the On/Off Timer 40 Setting the Sleep Timer 41 Viewing an External Signal Source 42 Assigning Names to External Input Mode 43 Channel Control 46 Selecting Your Favorite Channels 46 Viewing the Channel Lists...
... Speaker 27 Operation 30 Turning the TV On and Off 30 Viewing the Menus and On-Screen Displays 30 Selecting a Menu Language 31 Memorizing the Channels 32 Adding and Erasing Channels 34 Changing Channels 35 Customizing Your Remote Control 36 Remote Control Codes 37 Setting the Clock...38 Setting the On/Off Timer 40 Setting the Sleep Timer 41 Viewing an External Signal Source 42 Assigning Names to External Input Mode 43 Channel Control 46 Selecting Your Favorite Channels 46 Viewing the Channel Lists...
User Manual (ENGLISH)
Page 7
... Setting the Blue Screen Mode 73 Sound Control 76 Sound Control ...76 Setting the SRS TSXT 78 Auto Volume...79 Choosing a Multi-Channel Sound (MTS) track Digital 80 Choosing a Multi-Channel Sound (MTS) track Analog 81 Choosing a Digital Sound Format Digital 82 Selecting the Internal Mute 83 Setting the On/Off Melody 84 Setting up the Sub Woofer Output 85 Special Features 88 Setting the Function Help 88 Menu Transparency Level 89 Using the V-Chip...90 Viewing Closed Captions...
... Setting the Blue Screen Mode 73 Sound Control 76 Sound Control ...76 Setting the SRS TSXT 78 Auto Volume...79 Choosing a Multi-Channel Sound (MTS) track Digital 80 Choosing a Multi-Channel Sound (MTS) track Analog 81 Choosing a Digital Sound Format Digital 82 Selecting the Internal Mute 83 Setting the On/Off Melody 84 Setting up the Sub Woofer Output 85 Special Features 88 Setting the Function Help 88 Menu Transparency Level 89 Using the V-Chip...90 Viewing Closed Captions...
User Manual (ENGLISH)
Page 11
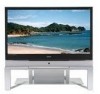
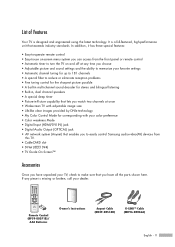
.... List of Features Your TV is missing or broken, call your TV, check to easily control Samsung audio-video(AV) devices from the front panel or remote control • Automatic timer to turn the TV on -screen menu system you can access from this TV. • CableCARD slot • D-Net (IEEE1394) • TV Guide On Screen™ Accessories Once you have all the parts shown here. If any time you choose • Adjustable picture and sound settings...
.... List of Features Your TV is missing or broken, call your TV, check to easily control Samsung audio-video(AV) devices from the front panel or remote control • Automatic timer to turn the TV on -screen menu system you can access from this TV. • CableCARD slot • D-Net (IEEE1394) • TV Guide On Screen™ Accessories Once you have all the parts shown here. If any time you choose • Adjustable picture and sound settings...
User Manual (ENGLISH)
Page 12
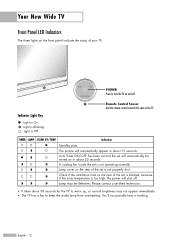
... : Light is Blinking : Light is not operating normally. English - 12 Please contact a certified technician. • It takes about 30 seconds for the TV to turn the TV on the rear of the set is too high, the power will automatically appear in about 15 seconds. Your New Wide TV Front Panel LED Indicators The three lights on the TV. Lamp cover on and off . TIMER LAMP STAND BY/TEMP Indication Standby state. POWER Press...
... : Light is Blinking : Light is not operating normally. English - 12 Please contact a certified technician. • It takes about 30 seconds for the TV to turn the TV on the rear of the set is too high, the power will automatically appear in about 15 seconds. Your New Wide TV Front Panel LED Indicators The three lights on the TV. Lamp cover on and off . TIMER LAMP STAND BY/TEMP Indication Standby state. POWER Press...

User Manual (ENGLISH)
Page 14
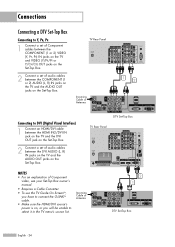
... Wide TV Rear Panel Jacks Œ ANTENNA terminals Two independent cables or antennas can also be used as a DVI connection with separate analog audio inputs. When using the optional HDMI/DVI adapter, the DVI analog audio inputs on your cable system. (Refer to pages 18~19) ´ S-VIDEO INPUT jacks Connects an S-Video signal from an S-VHS VCR or DVD player. (Refer to pages 20 and 22) ˇ VIDEO/AUDIO INPUT jacks Connect video/audio signals from external sources, such as VCR or DVD players...
... Wide TV Rear Panel Jacks Œ ANTENNA terminals Two independent cables or antennas can also be used as a DVI connection with separate analog audio inputs. When using the optional HDMI/DVI adapter, the DVI analog audio inputs on your cable system. (Refer to pages 18~19) ´ S-VIDEO INPUT jacks Connects an S-Video signal from an S-VHS VCR or DVD player. (Refer to pages 20 and 22) ˇ VIDEO/AUDIO INPUT jacks Connect video/audio signals from external sources, such as VCR or DVD players...
User Manual (ENGLISH)
Page 15
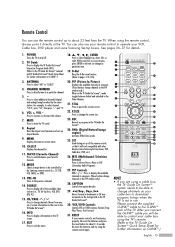
... (Digital Natural Image engine) Activates DNIe Demo mode. 25. CH.LIST Displays the channel list. 11. EXIT Press to exit the menu. 18 ENTER Press to switch between locked and unlocked in the Video Window. 21. NOTE • If you will work compatibly with other devices (some Samsung Set-top boxes. REC Records a program in the TV Guide On ScreenTM. 16. PIP Controls CH / : Press to about 2~3 seconds. RESET If your remote control is...
... (Digital Natural Image engine) Activates DNIe Demo mode. 25. CH.LIST Displays the channel list. 11. EXIT Press to exit the menu. 18 ENTER Press to switch between locked and unlocked in the Video Window. 21. NOTE • If you will work compatibly with other devices (some Samsung Set-top boxes. REC Records a program in the TV Guide On ScreenTM. 16. PIP Controls CH / : Press to about 2~3 seconds. RESET If your remote control is...
User Manual (ENGLISH)
Page 23
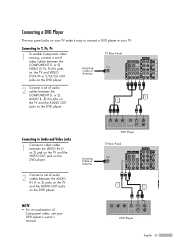
... it easy to connect a DVD player to your DVD player's owner's manual. Connecting to Audio and Video Jacks 1 Connect a video cable between the VIDEO IN (1 or 2) jack on the TV and the VIDEO OUT jack on the DVD player. 2 Connect a set of video cables between the AUDIO IN (1 or 2) jacks on the TV and the AUDIO OUT jacks on the DVD player. DVD Player English - 23 Connecting a DVD Player The rear panel jacks on the DVD player. TV Rear Panel Incoming Cable or Antenna 2 Connect a set of audio cables between the COMPONENT (1 or 2) AUDIO (L, R) IN jacks...
... it easy to connect a DVD player to your DVD player's owner's manual. Connecting to Audio and Video Jacks 1 Connect a video cable between the VIDEO IN (1 or 2) jack on the TV and the VIDEO OUT jack on the DVD player. 2 Connect a set of video cables between the AUDIO IN (1 or 2) jacks on the TV and the AUDIO OUT jacks on the DVD player. DVD Player English - 23 Connecting a DVD Player The rear panel jacks on the DVD player. TV Rear Panel Incoming Cable or Antenna 2 Connect a set of audio cables between the COMPONENT (1 or 2) AUDIO (L, R) IN jacks...
User Manual (ENGLISH)
Page 24
... jacks on the Set-Top Box. DTV Set-Top Box TV Rear Panel NOTES • For an explanation of audio cables between the HDMI IN2/DVI IN jack on the TV and the DVI OUT jack on the Set-Top Box. 2 Connect a set of Component video, see your Set-Top Box owner's manual. • Requires a Cable Converter. • To use the TV Guide On ScreenTM, you have to connect the G-LINKTM cable. • Make sure the HDMI/DVI source's power is on...
... jacks on the Set-Top Box. DTV Set-Top Box TV Rear Panel NOTES • For an explanation of audio cables between the HDMI IN2/DVI IN jack on the TV and the DVI OUT jack on the Set-Top Box. 2 Connect a set of Component video, see your Set-Top Box owner's manual. • Requires a Cable Converter. • To use the TV Guide On ScreenTM, you have to connect the G-LINKTM cable. • Make sure the HDMI/DVI source's power is on...
User Manual (ENGLISH)
Page 26
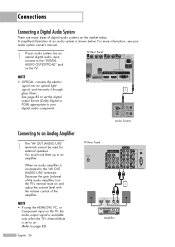
... 82 to set to on. (Refer to the "AV OUT (AUDIO L/R)" terminals: Decrease the gain (volume) of the audio amplifier, turn the TV's internal mute on and 1 adjust the volume level with the volume control of digital audio systems on the TV. TV Rear Panel NOTE • OPTICAL: converts the electric signal into an optical light signal, and transmits it through 1 glass fibers. Audio System Connecting to an amplifier. TV Rear Panel When an audio amplifier is shown...
... 82 to set to on. (Refer to the "AV OUT (AUDIO L/R)" terminals: Decrease the gain (volume) of the audio amplifier, turn the TV's internal mute on and 1 adjust the volume level with the volume control of digital audio systems on the TV. TV Rear Panel NOTE • OPTICAL: converts the electric signal into an optical light signal, and transmits it through 1 glass fibers. Audio System Connecting to an amplifier. TV Rear Panel When an audio amplifier is shown...
User Manual (ENGLISH)
Page 30
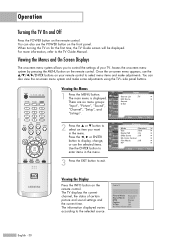
... first time, the TV Guide screen will be displayed. You can also use the POWER button on the remote control. The main menu is displayed. Picture Input Mode : Standard √ Picture Size Digital NR : 16:9 : On √ √ Sound DNIe Demo : Off √ My Color Control √ Channel Film Mode : Off √ Setup PIP √ Listings Move Enter Return 3 Press the EXIT button to enter items in the menu. Viewing the Menus and On-Screen Displays The on -screen menu system and make adjustments...
... first time, the TV Guide screen will be displayed. You can also use the POWER button on the remote control. The main menu is displayed. Picture Input Mode : Standard √ Picture Size Digital NR : 16:9 : On √ √ Sound DNIe Demo : Off √ My Color Control √ Channel Film Mode : Off √ Setup PIP √ Listings Move Enter Return 3 Press the EXIT button to enter items in the menu. Viewing the Menus and On-Screen Displays The on -screen menu system and make adjustments...
User Manual (ENGLISH)
Page 33
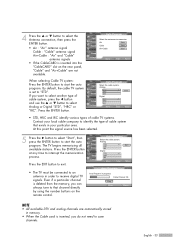
Input Picture Sound Channel Setup Listings Auto Program Select the antennas to receive digital TV signals. Press the EXIT button to exit. • The TV must be connected to an antenna in progress Cable Channel 26 Stop Enter Return NOTE • All available DTV and analog channels are not available. Analog STD HRC IRC Digital STD HRC IRC ✔ Start ✔ Move Enter Return Auto Program Auto Program in order to memorize. If you do not...
Input Picture Sound Channel Setup Listings Auto Program Select the antennas to receive digital TV signals. Press the EXIT button to exit. • The TV must be connected to an antenna in progress Cable Channel 26 Stop Enter Return NOTE • All available DTV and analog channels are not available. Analog STD HRC IRC Digital STD HRC IRC ✔ Start ✔ Move Enter Return Auto Program Auto Program in order to memorize. If you do not...
User Manual (ENGLISH)
Page 40
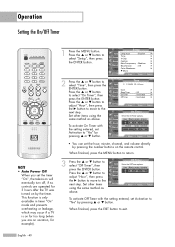
... Off Timer options. Setup Input Picture Sound Channel Setup Listings Language : English √ Time √ V-Chip √ Caption √ Menu Transparency : Medium √ Blue Screen : Off √ Color Weakness √ ▼ More Move Enter Return Time Input 1/ 1/ 2005/ 12 : 00 am No ▼ Move Adjust Return To activate Off Timer with the setting entered, set the hour, minute, channel, and volume directly by pressing the number buttons on vacation, for example). 1 Press the MENU button. Set other items using the...
... Off Timer options. Setup Input Picture Sound Channel Setup Listings Language : English √ Time √ V-Chip √ Caption √ Menu Transparency : Medium √ Blue Screen : Off √ Color Weakness √ ▼ More Move Enter Return Time Input 1/ 1/ 2005/ 12 : 00 am No ▼ Move Adjust Return To activate Off Timer with the setting entered, set the hour, minute, channel, and volume directly by pressing the number buttons on vacation, for example). 1 Press the MENU button. Set other items using the...
User Manual (ENGLISH)
Page 41
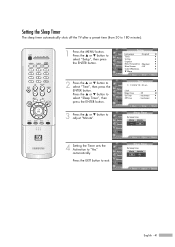
...V-Chip √ Caption √ Menu Transparency : Medium √ Blue Screen : Off √ Color Weakness √ ▼ More Move Enter Return Time Input 1/ 1/ 2005/ 12 : 00 am Picture Clock √ Sound Sleep Timer : Off √ Channel On Timer Off Timer : Inactivated √ : Inactivated √ Setup Listings Move Enter Return Input Picture Sound Channel Setup Listings Sleep Timer Set sleep timer. or † button to 180 minutes). 1 Press the MENU button. Minute ▲ --- ▼ Activation No Move Adjust Return Input Picture Sound Channel...
...V-Chip √ Caption √ Menu Transparency : Medium √ Blue Screen : Off √ Color Weakness √ ▼ More Move Enter Return Time Input 1/ 1/ 2005/ 12 : 00 am Picture Clock √ Sound Sleep Timer : Off √ Channel On Timer Off Timer : Inactivated √ : Inactivated √ Setup Listings Move Enter Return Input Picture Sound Channel Setup Listings Sleep Timer Set sleep timer. or † button to 180 minutes). 1 Press the MENU button. Minute ▲ --- ▼ Activation No Move Adjust Return Input Picture Sound Channel...

User Manual (ENGLISH)
Page 60
... Return Picture Input Mode : Standard √ Picture Size Digital NR : 16:9 : On √ √ Sound DNIe Demo : Off √ My Color Control √ Channel Film Mode : Off √ Setup PIP √ Listings Move Enter Return 3 Press the ENTER button to select "Easy Control". 4 Press the œ or √ button to "Custom". 1 Press the MENU button. Easy Control œ Red Green Blue √ Move Enter Return English - 60 Picture Control Setting the My Color Control Mode My Color Control allows you to adjust colors...
... Return Picture Input Mode : Standard √ Picture Size Digital NR : 16:9 : On √ √ Sound DNIe Demo : Off √ My Color Control √ Channel Film Mode : Off √ Setup PIP √ Listings Move Enter Return 3 Press the ENTER button to select "Easy Control". 4 Press the œ or √ button to "Custom". 1 Press the MENU button. Easy Control œ Red Green Blue √ Move Enter Return English - 60 Picture Control Setting the My Color Control Mode My Color Control allows you to adjust colors...
User Manual (ENGLISH)
Page 90
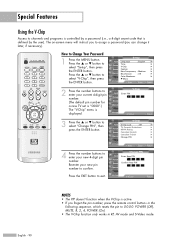
.... Special Features Using the V-Chip Access to channels and programs is controlled by the user). Press the ... Listings 0~9 Enter Return 3 Press the ... Picture * (The default pin number for Sound a new TV set is "0000".) Channel The "V-Chip" menu is defined by a password (i.e., a 4-digit secret code that is Setup displayed. V-Chip Input Picture Sound Channel Setup V-Chip Lock : Off TV Parental Guidelines MPAA Rating Canadian English Canadian French Change PIN Listings Move Enter Return Input Picture Sound Channel Setup Listings Change PIN Enter New...
.... Special Features Using the V-Chip Access to channels and programs is controlled by the user). Press the ... Listings 0~9 Enter Return 3 Press the ... Picture * (The default pin number for Sound a new TV set is "0000".) Channel The "V-Chip" menu is defined by a password (i.e., a 4-digit secret code that is Setup displayed. V-Chip Input Picture Sound Channel Setup V-Chip Lock : Off TV Parental Guidelines MPAA Rating Canadian English Canadian French Change PIN Listings Move Enter Return Input Picture Sound Channel Setup Listings Change PIN Enter New...

User Manual (ENGLISH)
Page 140
... TV Guide On ScreenTM Setup. Make sure the remote has batteries. No color, wrong colors or tints. Your remote control does not operate your nearest Samsung authorized service center. Make sure the TV is working. Check all wire connections. Digital broadcasting screen problem. Unplug the TV for 30 seconds, then try this list of these troubleshooting tips apply, then call your TV. Try another channel. Adjust the picture settings. Press the MODE button to the connection status in . Picture rolls vertically...
... TV Guide On ScreenTM Setup. Make sure the remote has batteries. No color, wrong colors or tints. Your remote control does not operate your nearest Samsung authorized service center. Make sure the TV is working. Check all wire connections. Digital broadcasting screen problem. Unplug the TV for 30 seconds, then try this list of these troubleshooting tips apply, then call your TV. Try another channel. Adjust the picture settings. Press the MODE button to the connection status in . Picture rolls vertically...


