User Manual (ENGLISH)
Page 6
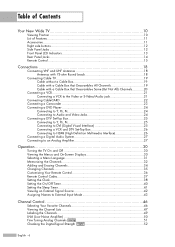
......11 Right side buttons 12 Side Panel Jacks 12 Front Panel LED Indicators 13 Rear Panel Jacks ...14 Remote Control...15 Connections 18 Connecting VHF and UHF Antennas 18 Antennas with 75-ohm Round Leads 18 Connecting Cable TV 19 Cable without a Cable Box 19 Cable with a Cable Box that Descrambles All... Box 25 Connecting to Y, PB, PR 25 Connecting to DVI (Digital Visual Interface 25 Connecting a VCR and DTV Set-Top Box 26 Connecting to HDMI (High Definition Multimedia Interface 26 Connecting a Digital Audio System 27 Connecting to an Analog Amplifier 27 Operation 30 Turning the...
......11 Right side buttons 12 Side Panel Jacks 12 Front Panel LED Indicators 13 Rear Panel Jacks ...14 Remote Control...15 Connections 18 Connecting VHF and UHF Antennas 18 Antennas with 75-ohm Round Leads 18 Connecting Cable TV 19 Cable without a Cable Box 19 Cable with a Cable Box that Descrambles All... Box 25 Connecting to Y, PB, PR 25 Connecting to DVI (Digital Visual Interface 25 Connecting a VCR and DTV Set-Top Box 26 Connecting to HDMI (High Definition Multimedia Interface 26 Connecting a Digital Audio System 27 Connecting to an Analog Amplifier 27 Operation 30 Turning the...
User Manual (ENGLISH)
Page 11
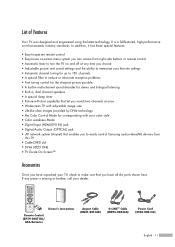
...MD96-00036A) Power Cord (3903-000144) English - 11 It is missing or broken, call your TV, check to make sure that you to easily control Samsung audio-video(AV) devices from right side buttons or remote control • Automatic timer to reduce or... eliminate reception problems • Fine tuning control for the sharpest picture possible • A built-in multi-channel sound decoder for corresponding with your color style • Color weakness Mode • Digital Input (HDMI...
...MD96-00036A) Power Cord (3903-000144) English - 11 It is missing or broken, call your TV, check to make sure that you to easily control Samsung audio-video(AV) devices from right side buttons or remote control • Automatic timer to reduce or... eliminate reception problems • Fine tuning control for the sharpest picture possible • A built-in multi-channel sound decoder for corresponding with your color style • Color weakness Mode • Digital Input (HDMI...
User Manual (ENGLISH)
Page 14
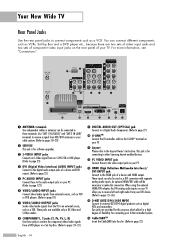
...Samsung Anynet-enabled devices. PC VIDEO INPUT jack Connect these to the video output jack on your D-Net controlled system. Æ CableCARDTM Insert the CableCARD into the slot. (Refer to external IEEE1394 digital products such as a DVI connection with HDMI output. Your New Wide TV Rear... Panel Jacks Use the rear panel jacks to these terminals. When using the optional HDMI/DVI adapter, the DVI analog audio inputs on your PC. Ò HDMI (High Definition Multimedia Interface)/ DVI INPUT jack ...
...Samsung Anynet-enabled devices. PC VIDEO INPUT jack Connect these to the video output jack on your D-Net controlled system. Æ CableCARDTM Insert the CableCARD into the slot. (Refer to external IEEE1394 digital products such as a DVI connection with HDMI output. Your New Wide TV Rear... Panel Jacks Use the rear panel jacks to these terminals. When using the optional HDMI/DVI adapter, the DVI analog audio inputs on your PC. Ò HDMI (High Definition Multimedia Interface)/ DVI INPUT jack ...

User Manual (ENGLISH)
Page 25
... jacks on the TV and the AUDIO OUT jacks on the Set-Top Box. Incoming Cable or Antenna 4 Connect a coaxial cable between the Antenna out terminal (i.e., "ANT.OUT") on the Set-Top Box and the ANT 1 IN (CABLE) on the TV. TV Rear Panel 2 Connect an HDMI/DVI video cable between the HDMI/DVI IN jack... on the TV and the DVI OUT jack on the Set-Top Box. 3 Connect the Video/Audio cables between the VIDEO or...
... jacks on the TV and the AUDIO OUT jacks on the Set-Top Box. Incoming Cable or Antenna 4 Connect a coaxial cable between the Antenna out terminal (i.e., "ANT.OUT") on the Set-Top Box and the ANT 1 IN (CABLE) on the TV. TV Rear Panel 2 Connect an HDMI/DVI video cable between the HDMI/DVI IN jack... on the TV and the DVI OUT jack on the Set-Top Box. 3 Connect the Video/Audio cables between the VIDEO or...

User Manual (ENGLISH)
Page 26
... source's power is on, or you have to HDMI (High Definition Multimedia Interface) 1 Connect an HDMI cable between the Antenna out 3 terminal (i.e., "ANT.OUT") on the Set-Top Box and the ANT 1 IN (CABLE) on the Set-Top Box. TV Rear Panel 2 Connect the Video/Audio cables between the VIDEO or S-VIDEO/...AUDIO input jacks on the TV and VIDEO or S-VIDEO/AUDIO output jacks on the Set-Top Box. 3 Connect a coaxial cable between the HDMI/DVI IN jack on the TV and the HDMI OUT jack on the VCR....
... source's power is on, or you have to HDMI (High Definition Multimedia Interface) 1 Connect an HDMI cable between the Antenna out 3 terminal (i.e., "ANT.OUT") on the Set-Top Box and the ANT 1 IN (CABLE) on the Set-Top Box. TV Rear Panel 2 Connect the Video/Audio cables between the VIDEO or S-VIDEO/...AUDIO input jacks on the TV and VIDEO or S-VIDEO/AUDIO output jacks on the Set-Top Box. 3 Connect a coaxial cable between the HDMI/DVI IN jack on the TV and the HDMI OUT jack on the VCR....

User Manual (ENGLISH)
Page 27
...light wave, S/PDIF format using the HDMI/DVI, PC, or Component input on the TV, the audio output signal is available only when the TV's Internal Mute is set to on in the TV's Sound Menu and adjust the volume level with the volume control of the amplifier. TV Rear Panel NOTE • OPTICAL: converts ..., set the digital output format (Dolby Digital or PCM) appropriate to your audio system has an optical digital audio input, connect to page 81) TV Rear Panel Amplifier English - 27 See page 80 to set the internal mute on . (Refer to the "DIGITAL AUDIO OUT(OPTICAL)" jack on the ...
...light wave, S/PDIF format using the HDMI/DVI, PC, or Component input on the TV, the audio output signal is available only when the TV's Internal Mute is set to on in the TV's Sound Menu and adjust the volume level with the volume control of the amplifier. TV Rear Panel NOTE • OPTICAL: converts ..., set the digital output format (Dolby Digital or PCM) appropriate to your audio system has an optical digital audio input, connect to page 81) TV Rear Panel Amplifier English - 27 See page 80 to set the internal mute on . (Refer to the "DIGITAL AUDIO OUT(OPTICAL)" jack on the ...
User Manual (ENGLISH)
Page 42
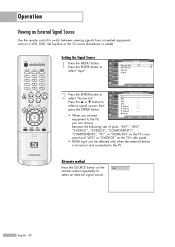
... remote control to switch between the following sets of jacks: "AV1", "AV2", "S-VIDEO1", "S-VIDEO2", "COMPONENT1", "COMPONENT2", "PC", or "HDMI/DVI" on the TV's rear panel and "AV3" or "S-VIDEO3" on the TV's side panel. • HDMI input can be selected only when the external device is turned on the AV1 remote control repeatedly to select...
... remote control to switch between the following sets of jacks: "AV1", "AV2", "S-VIDEO1", "S-VIDEO2", "COMPONENT1", "COMPONENT2", "PC", or "HDMI/DVI" on the TV's rear panel and "AV3" or "S-VIDEO3" on the TV's side panel. • HDMI input can be selected only when the external device is turned on the AV1 remote control repeatedly to select...
User Manual (ENGLISH)
Page 43
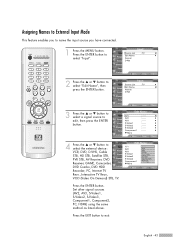
... other signal sources (AV2, AV3, S-Video1, S-Video2, S-Video3, Component1, Component2, PC, HDMI) using the same method as listed above. Press the ENTER button to name the input source you have connected. 1 Press the MENU button. Input Input Source List : TV Picture Edit Name Anynet Sound D-Net Channel Setup Listings Move Enter √...
... other signal sources (AV2, AV3, S-Video1, S-Video2, S-Video3, Component1, Component2, PC, HDMI) using the same method as listed above. Press the ENTER button to name the input source you have connected. 1 Press the MENU button. Input Input Source List : TV Picture Edit Name Anynet Sound D-Net Channel Setup Listings Move Enter √...

User Manual (ENGLISH)
Page 55
... 75 60 R 50 : Cool1 √ Enter Return ▲ Contrast 90 ▼ NOTES • "Tint" doesn't operate in HDMI or 480p Component or higher modes. • The Tint cannot be adjusted while watching Digital TV. Press the ... or † button to personal preference. Customizing the Picture Settings You can use the on-screen...
... 75 60 R 50 : Cool1 √ Enter Return ▲ Contrast 90 ▼ NOTES • "Tint" doesn't operate in HDMI or 480p Component or higher modes. • The Tint cannot be adjusted while watching Digital TV. Press the ... or † button to personal preference. Customizing the Picture Settings You can use the on-screen...
User Manual (ENGLISH)
Page 132
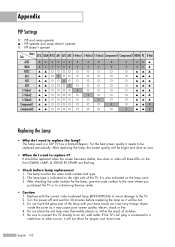
... swap operate ▲ : PIP operate and swap doesn't operate X : PIP doesn't operate Sub Main ATSC QAM NTSC AV1 AV2 AV3 S-Video1 S-Video2 S-Video3 Component1 Component2 HDMI PC D-Net ATSC X X X XXX X X X X QAM X X X XXX X X X X NTSC ▲ ▲ O OOO O O O O AV1 ▲ ▲ O X OO O O O O AV2 ▲ ▲ OOXO O...place the old lamp near flammable objects or within the reach of the TV. Be sure to connect this TV directly to a Samsung Service center. • Caution 1. The lamp used in a DLP TV has a limited lifespan. English - 132 It is indicated on the...
... swap operate ▲ : PIP operate and swap doesn't operate X : PIP doesn't operate Sub Main ATSC QAM NTSC AV1 AV2 AV3 S-Video1 S-Video2 S-Video3 Component1 Component2 HDMI PC D-Net ATSC X X X XXX X X X X QAM X X X XXX X X X X NTSC ▲ ▲ O OOO O O O O AV1 ▲ ▲ O X OO O O O O AV2 ▲ ▲ OOXO O...place the old lamp near flammable objects or within the reach of the TV. Be sure to connect this TV directly to a Samsung Service center. • Caution 1. The lamp used in a DLP TV has a limited lifespan. English - 132 It is indicated on the...


