User Manual (ENGLISH)
Page 6
... ...11 Right side buttons 12 Side Panel Jacks 12 Front Panel LED Indicators 13 Rear Panel Jacks ...14 Remote Control...15 Connections 18 Connecting VHF and UHF Antennas 18 Antennas with 75-ohm Round Leads 18 Connecting Cable TV 19 Cable without a Cable Box 19 Cable with a Cable Box that Descrambles All Channels... External Input Mode 43 Channel Control 46 Selecting Your Favorite Channels 46 Viewing the Channel Lists 47 Labeling the Channels 49 LNA (Low Noise Amplifier 50 Fine Tuning Analog Channels Analog 51 Checking the Digital-Signal Strength Digital 52 English - 6
... ...11 Right side buttons 12 Side Panel Jacks 12 Front Panel LED Indicators 13 Rear Panel Jacks ...14 Remote Control...15 Connections 18 Connecting VHF and UHF Antennas 18 Antennas with 75-ohm Round Leads 18 Connecting Cable TV 19 Cable without a Cable Box 19 Cable with a Cable Box that Descrambles All Channels... External Input Mode 43 Channel Control 46 Selecting Your Favorite Channels 46 Viewing the Channel Lists 47 Labeling the Channels 49 LNA (Low Noise Amplifier 50 Fine Tuning Analog Channels Analog 51 Checking the Digital-Signal Strength Digital 52 English - 6
User Manual (ENGLISH)
Page 7
... Messages) Analog 96 Viewing Closed Captions (On-Screen Text Messages) Digital 98 Setting the Remote Control Mode 100 Using the CableCARD 101 Using the CableCARD Setup Function 102 Using TV Guide On ScreenTM 104 Using the D-Net 106 How to connect compatible IEEE1394 Devices 106 Connection... control panel 112 Operating Tips ...114 Recording Tips...115 Tips on stopping recording 115 Troubleshooting (D-Net 116 PC Display 122 Using Your TV as a Computer (PC) Display 122 Adjusting the Picture Quality 125 Changing the Picture Position 126 Adjusting the Picture Quality and Position ...
... Messages) Analog 96 Viewing Closed Captions (On-Screen Text Messages) Digital 98 Setting the Remote Control Mode 100 Using the CableCARD 101 Using the CableCARD Setup Function 102 Using TV Guide On ScreenTM 104 Using the D-Net 106 How to connect compatible IEEE1394 Devices 106 Connection... control panel 112 Operating Tips ...114 Recording Tips...115 Tips on stopping recording 115 Troubleshooting (D-Net 116 PC Display 122 Using Your TV as a Computer (PC) Display 122 Adjusting the Picture Quality 125 Changing the Picture Position 126 Adjusting the Picture Quality and Position ...
User Manual (ENGLISH)
Page 11
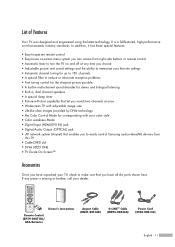
... latest technology. It is missing or broken, call your TV, check to easily control Samsung audio-video(AV) devices from this TV. • CableCARD slot • D-Net (IEEE1394) • TV Guide On Screen™ Accessories Once you have all the parts shown here. Owner's Instructions Remote Control (BP59-00071B)/ AAA Batteries Anynet Cable (BN39-00518B...
... latest technology. It is missing or broken, call your TV, check to easily control Samsung audio-video(AV) devices from this TV. • CableCARD slot • D-Net (IEEE1394) • TV Guide On Screen™ Accessories Once you have all the parts shown here. Owner's Instructions Remote Control (BP59-00071B)/ AAA Batteries Anynet Cable (BN39-00518B...
User Manual (ENGLISH)
Page 12
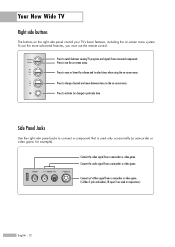
...used in conjunction.) English - 12 Your New Wide TV Right side buttons The buttons on the right side panel control your TV's basic features, including the on -screen menu. To use the more advanced features, you must use the remote control. Connect an S-Video signal from connected components....video signal from a camcorder or video game. Side Panel Jacks Use the right side panel jacks to activate (or change channels and move between viewing TV programs and signals from a camcorder or video game. (S-Video 3 jack and Audio L/R input 3 are used only occasionally (a camcorder or video ...
...used in conjunction.) English - 12 Your New Wide TV Right side buttons The buttons on the right side panel control your TV's basic features, including the on -screen menu. To use the more advanced features, you must use the remote control. Connect an S-Video signal from connected components....video signal from a camcorder or video game. Side Panel Jacks Use the right side panel jacks to activate (or change channels and move between viewing TV programs and signals from a camcorder or video game. (S-Video 3 jack and Audio L/R input 3 are used only occasionally (a camcorder or video ...
User Manual (ENGLISH)
Page 13
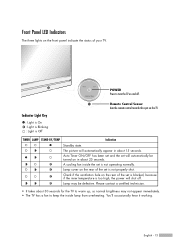
... LAMP STAND BY/TEMP Indication Standby state. English - 13 Lamp cover on the TV. Indicator Light Key : Light is On : Light is Blinking : Light is Off Remote Control Sensor Aim the remote control towards this spot on the rear of the set is too high, the power will automatically be defective. Auto Timer... ON/OFF has been set and the set will shut off . Check if the ventilation hole on in about 30 seconds for the TV to keep the...
... LAMP STAND BY/TEMP Indication Standby state. English - 13 Lamp cover on the TV. Indicator Light Key : Light is On : Light is Blinking : Light is Off Remote Control Sensor Aim the remote control towards this spot on the rear of the set is too high, the power will automatically be defective. Auto Timer... ON/OFF has been set and the set will shut off . Check if the ventilation hole on in about 30 seconds for the TV to keep the...
User Manual (ENGLISH)
Page 15
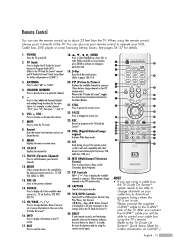
... and press the reset button for further information on -screen menu. 10. POWER Turns the TV on the TV screen. 17. Press to select additional channels (digital and analog) being broadcast by the Samsung remote control (i.e., TV, STB, VCR, CABLE, or DVD). 13. Anynet Runs the Anynet view functions and sets... control your VCR, Cable box, DVD player or some Samsung Set-top boxes, VCR, Cable box, DVD, etc.) 26. Remote Control You can also use your remote control to operate your cable box using the TV's remote. (Refer to the TV Guide On ScreenTM Quick Setup Sheet for about 23 feet...
... and press the reset button for further information on -screen menu. 10. POWER Turns the TV on the TV screen. 17. Press to select additional channels (digital and analog) being broadcast by the Samsung remote control (i.e., TV, STB, VCR, CABLE, or DVD). 13. Anynet Runs the Anynet view functions and sets... control your VCR, Cable box, DVD player or some Samsung Set-top boxes, VCR, Cable box, DVD, etc.) 26. Remote Control You can also use your remote control to operate your cable box using the TV's remote. (Refer to the TV Guide On ScreenTM Quick Setup Sheet for about 23 feet...

User Manual (ENGLISH)
Page 16
...not mix old and new batteries in the remote control should last about a year. NOTE • Do not mix battery types, i.e, alkaline and manganese. Your New Wide TV Installing Batteries in the Remote Control With normal use, the batteries in the remote control. Make sure to be replaced. ...Make sure you won't be using the remote, the batteries may need to match the "+" and "-" ends of the...
...not mix old and new batteries in the remote control should last about a year. NOTE • Do not mix battery types, i.e, alkaline and manganese. Your New Wide TV Installing Batteries in the Remote Control With normal use, the batteries in the remote control. Make sure to be replaced. ...Make sure you won't be using the remote, the batteries may need to match the "+" and "-" ends of the...
User Manual (ENGLISH)
Page 21
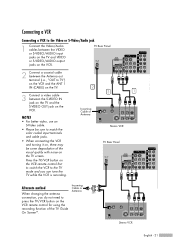
... or Antenna Stereo VCR English - 21 Press the TV/VCR button on the VCR remote control first to switch the VCR to the TV mode and you can tune the TV while the VCR is recording. 2 3 1 Incoming Cable or Antenna Stereo VCR TV Rear Panel Alternate method When changing the antenna connection, you...the VCR and turning it on, there may be some degradation of the TV Guide On ScreenTM. TV Rear Panel 2 Connect a coaxial cable between the Antenna out terminal (i.e., "OUT to TV") on the VCR and the ANT 1 IN (CABLE) on the TV. 3 Connect a video cable between the VIDEO or S-VIDEO/AUDIO input...
... or Antenna Stereo VCR English - 21 Press the TV/VCR button on the VCR remote control first to switch the VCR to the TV mode and you can tune the TV while the VCR is recording. 2 3 1 Incoming Cable or Antenna Stereo VCR TV Rear Panel Alternate method When changing the antenna connection, you...the VCR and turning it on, there may be some degradation of the TV Guide On ScreenTM. TV Rear Panel 2 Connect a coaxial cable between the Antenna out terminal (i.e., "OUT to TV") on the VCR and the ANT 1 IN (CABLE) on the TV. 3 Connect a video cable between the VIDEO or S-VIDEO/AUDIO input...
User Manual (ENGLISH)
Page 30
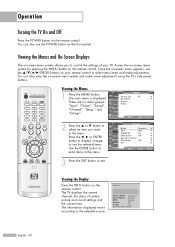
... Press the ... Press the œ, √ or ENTER button to enter items in the menu. The TV displays the current channel, the status of your remote control to select menu items and make some adjustments using the TV's side panel buttons. Viewing the Display Press the INFO button on the...Caption Off V-Chip Off No Time Information English - 30 Access the on-screen menu system by pressing the MENU button on the remote control. Operation Turning the TV On and Off Press the POWER button on -screen menu system allows you want in the menu. Picture Input Mode : Standard ...
... Press the ... Press the œ, √ or ENTER button to enter items in the menu. The TV displays the current channel, the status of your remote control to select menu items and make some adjustments using the TV's side panel buttons. Viewing the Display Press the INFO button on the...Caption Off V-Chip Off No Time Information English - 30 Access the on-screen menu system by pressing the MENU button on the remote control. Operation Turning the TV On and Off Press the POWER button on -screen menu system allows you want in the menu. Picture Input Mode : Standard ...
User Manual (ENGLISH)
Page 33
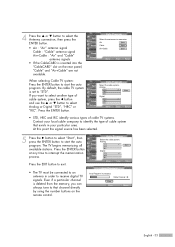
... cable TV system is set to select Analog or Digital "STD", "HRC" or "IRC". or † button to "STD". Press the ENTER button at any time to that exists in your local cable company to memorize. Even if a particular channel is inserted into the "CableCARD" slot on the remote control...; Move Enter Return • STD, HRC and IRC identify various types of cable system that channel directly by using the number buttons on the rear panel, "Cable" and "Air+Cable" are not available. Input Picture Sound Channel Setup Listings Auto Program Select the cable system. Input Picture Sound...
... cable TV system is set to select Analog or Digital "STD", "HRC" or "IRC". or † button to "STD". Press the ENTER button at any time to that exists in your local cable company to memorize. Even if a particular channel is inserted into the "CableCARD" slot on the remote control...; Move Enter Return • STD, HRC and IRC identify various types of cable system that channel directly by using the number buttons on the rear panel, "Cable" and "Air+Cable" are not available. Input Picture Sound Channel Setup Listings Auto Program Select the cable system. Input Picture Sound...
User Manual (ENGLISH)
Page 36
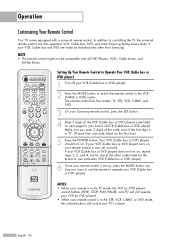
...brand of your particular VCR (Cable box or DVD player). 6 Once your remote control is a "0". (If more than Samsung). Make sure you want to use the remote to the VCR (CABLE or DVD) mode. In addition to controlling the TV, the universal remote control can also operate a VCR, Cable box, DVD, and some...now set up, press the MODE button any time you enter 3 digits of VCR (Cable box or DVD player). The remote control has five modes: TV, STB, VCR, CABLE, and DVD. 3 On your Samsung remote control, press the SET button. 4 Enter 3 digits of the VCR (Cable box or DVD player) code listed on ...
...brand of your particular VCR (Cable box or DVD player). 6 Once your remote control is a "0". (If more than Samsung). Make sure you want to use the remote to the VCR (CABLE or DVD) mode. In addition to controlling the TV, the universal remote control can also operate a VCR, Cable box, DVD, and some...now set up, press the MODE button any time you enter 3 digits of VCR (Cable box or DVD player). The remote control has five modes: TV, STB, VCR, CABLE, and DVD. 3 On your Samsung remote control, press the SET button. 4 Enter 3 digits of the VCR (Cable box or DVD player) code listed on ...
User Manual (ENGLISH)
Page 38
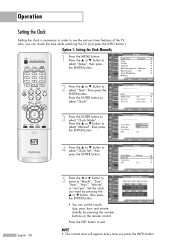
...press the ENTER button. or † button to select "Clock". Input Picture Sound Channel Setup Listings • You can check the time while watching the TV. (Just press the INFO button.) Option 1: Setting the Clock Manually 1 Press the MENU button. Press the ENTER button to select "Setup", then press...√ button to move to select "Clock Set", then press the ENTER button. Set the clock you want by pressing the number buttons on the remote control. or † button to select "Clock Mode". English - 38 NOTE • The current time will appear every time you can set the ...
...press the ENTER button. or † button to select "Clock". Input Picture Sound Channel Setup Listings • You can check the time while watching the TV. (Just press the INFO button.) Option 1: Setting the Clock Manually 1 Press the MENU button. Press the ENTER button to select "Setup", then press...√ button to move to select "Clock Set", then press the ENTER button. Set the clock you want by pressing the number buttons on the remote control. or † button to select "Clock Mode". English - 38 NOTE • The current time will appear every time you can set the ...
User Manual (ENGLISH)
Page 40
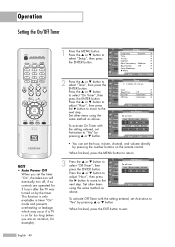
... button to the next step. or † button. Input Picture Sound Channel Setup Listings Off Timer Set off , if no controls are on the remote control. When finished, press the MENU button to select "Off Timer", then press the ENTER button. Operation Setting the On/Off Timer NOTE • ...example). 1 Press the MENU button. This function is only available in timer "On" mode and prevents overheating or leakage, which may occur if a TV is on for too long (when you set the timer "On", the television will eventually turn off timer. Press the ... Setup Input Picture Sound ...
... button to the next step. or † button. Input Picture Sound Channel Setup Listings Off Timer Set off , if no controls are on the remote control. When finished, press the MENU button to select "Off Timer", then press the ENTER button. Operation Setting the On/Off Timer NOTE • ...example). 1 Press the MENU button. This function is only available in timer "On" mode and prevents overheating or leakage, which may occur if a TV is on for too long (when you set the timer "On", the television will eventually turn off timer. Press the ... Setup Input Picture Sound ...
User Manual (ENGLISH)
Page 42
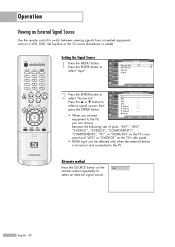
...Operation Viewing an External Signal Source Use the remote control to switch between the following sets of jacks: "AV1", "AV2", "S-VIDEO1", "S-VIDEO2", "COMPONENT1", "COMPONENT2", "PC", or "HDMI/DVI" on the TV's rear panel and "AV3" or "S-VIDEO3" on the TV's side panel. • HDMI input can ...choose between viewing signals from connected equipment, such as a VCR, DVD, Set-Top Box or the TV source (broadcast or cable). or † button to select...
...Operation Viewing an External Signal Source Use the remote control to switch between the following sets of jacks: "AV1", "AV2", "S-VIDEO1", "S-VIDEO2", "COMPONENT1", "COMPONENT2", "PC", or "HDMI/DVI" on the TV's rear panel and "AV3" or "S-VIDEO3" on the TV's side panel. • HDMI input can ...choose between viewing signals from connected equipment, such as a VCR, DVD, Set-Top Box or the TV source (broadcast or cable). or † button to select...

User Manual (ENGLISH)
Page 46
... Clear All : Press to deselect the selected channel and the check mark will appear. Channel Control Selecting Your Favorite Channels You can be set as TV and CATV). Press the ... Press the ENTER button again to clear all channels. English - 46 To Store Your Favorite Channels: 1 Press the MENU... button. or † button to quickly and easily find frequently watched channels by pressing the FAV.CH button on the remote control. This allows you to select "Channel", then press the ENTER button. To View Your Favorite Channels: Press the FAV.CH button repeatedly to...
... Clear All : Press to deselect the selected channel and the check mark will appear. Channel Control Selecting Your Favorite Channels You can be set as TV and CATV). Press the ... Press the ENTER button again to clear all channels. English - 46 To Store Your Favorite Channels: 1 Press the MENU... button. or † button to quickly and easily find frequently watched channels by pressing the FAV.CH button on the remote control. This allows you to select "Channel", then press the ENTER button. To View Your Favorite Channels: Press the FAV.CH button repeatedly to...

User Manual (ENGLISH)
Page 47
... All ▲ More 29 30 31 32 33 34 35 36 Page Channel List 2/3 37 45 38 46 39 47 40 48 41 49 42 50 43 51 44 52 ▼ More Favorite Exit Move Delete Return • Yellow button : Press to toggle between your favorite channels. 1 Press the MENU button... EXIT button : Press to display a list of all channels or your favorite channels or all channels. Alternate method Press the CH.LIST button on the remote control to exit.
... All ▲ More 29 30 31 32 33 34 35 36 Page Channel List 2/3 37 45 38 46 39 47 40 48 41 49 42 50 43 51 44 52 ▼ More Favorite Exit Move Delete Return • Yellow button : Press to toggle between your favorite channels. 1 Press the MENU button... EXIT button : Press to display a list of all channels or your favorite channels or all channels. Alternate method Press the CH.LIST button on the remote control to exit.

User Manual (ENGLISH)
Page 57
Input Picture Sound Channel Setup Listings Size 16:9 Panorama Zoom1 Zoom2 4:3 Move Enter Return Alternate method Press the P.SIZE button on the remote control repeatedly to select one of the picture size settings. • "16:9": Sets the picture to 16:9 wide mode. • "... Press the ... or † button to select the screen format you want, then press the ENTER button. Press the ... This is a standard TV screen size. NOTES • You can select the picture size which best corresponds to select "Picture", then press the ENTER button. Picture Input Mode :...
Input Picture Sound Channel Setup Listings Size 16:9 Panorama Zoom1 Zoom2 4:3 Move Enter Return Alternate method Press the P.SIZE button on the remote control repeatedly to select one of the picture size settings. • "16:9": Sets the picture to 16:9 wide mode. • "... Press the ... or † button to select the screen format you want, then press the ENTER button. Press the ... This is a standard TV screen size. NOTES • You can select the picture size which best corresponds to select "Picture", then press the ENTER button. Picture Input Mode :...
User Manual (ENGLISH)
Page 59
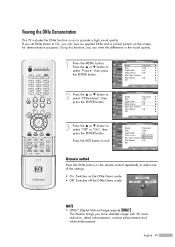
... Color Control On Film Mode : Off PIP Listings Move Enter Return Alternate method Press the DNIe button on the remote control repeatedly to provide a high visual quality. Viewing the DNIe Demonstration This TV includes the DNIe function so as to select one of the settings. • On: Switches on the screen, for...
... Color Control On Film Mode : Off PIP Listings Move Enter Return Alternate method Press the DNIe button on the remote control repeatedly to provide a high visual quality. Viewing the DNIe Demonstration This TV includes the DNIe function so as to select one of the settings. • On: Switches on the screen, for...
User Manual (ENGLISH)
Page 64
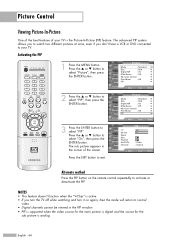
... "On", then press the ENTER button. The advanced PIP system allows you to watch two different pictures at once, even if you turn the TV off while watching and turn it on the remote control repeatedly to normal video. • Digital channels cannot be viewed in the corner of your... TV. Activating the PIP 1 Press the MENU button. Picture Control Viewing Picture-In-Picture One of the best features of the screen. or † button ...
... "On", then press the ENTER button. The advanced PIP system allows you to watch two different pictures at once, even if you turn the TV off while watching and turn it on the remote control repeatedly to normal video. • Digital channels cannot be viewed in the corner of your... TV. Activating the PIP 1 Press the MENU button. Picture Control Viewing Picture-In-Picture One of the best features of the screen. or † button ...
User Manual (ENGLISH)
Page 69
... √ Listings Move Enter Return 3 Press the ... PIP Input Picture Sound Channel Setup PIP Source Swap Size Position Air/CATV Channel Listings Move : On : TV : Cable ▲ : AiCr a3ble 11 ▼ Enter Return Press the EXIT button to exit. • You can select "Air" or "Cable" in... menu. • Air : "Air" antenna signal Cable : "Cable" antenna signal Alternate method Press the CH or CH button under the cover of the remote control to select "Picture", then press the ENTER button. 2 Press the ... or † button to select a channel you set the signal source (antenna...
... √ Listings Move Enter Return 3 Press the ... PIP Input Picture Sound Channel Setup PIP Source Swap Size Position Air/CATV Channel Listings Move : On : TV : Cable ▲ : AiCr a3ble 11 ▼ Enter Return Press the EXIT button to exit. • You can select "Air" or "Cable" in... menu. • Air : "Air" antenna signal Cable : "Cable" antenna signal Alternate method Press the CH or CH button under the cover of the remote control to select "Picture", then press the ENTER button. 2 Press the ... or † button to select a channel you set the signal source (antenna...


