
Open Source Guide (ENGLISH)
Page 1
... to control the distribution of the free software distribution system, which gives you have the freedom to distribute copies of a whole which everyone understands that refer to this License will be to refrain entirely from the Program, and can get the source code. The "Program", below, refers to any such program or work, and a "work under the Freetype Project. keep intact...
... to control the distribution of the free software distribution system, which gives you have the freedom to distribute copies of a whole which everyone understands that refer to this License will be to refrain entirely from the Program, and can get the source code. The "Program", below, refers to any such program or work, and a "work under the Freetype Project. keep intact...

Open Source Guide (ENGLISH)
Page 2
...can redistribute and change. To apply... you want it to be of the greatest possible use to the public, we recommend making it free software that everyone can do so by permitting redistribution under... the terms of each file should have at least the "copyright" line and a pointer...USE OR INABILITY TO USE THE LIBRARY (INCLUDING BUT NOT LIMITED TO LOSS OF DATA OR DATA BEING RENDERED INACCURATE OR LOSSES SUSTAINED BY YOU OR THIRD PARTIES OR A FAILURE OF THE LIBRARY TO OPERATE WITH ANY OTHER SOFTWARE...
...can redistribute and change. To apply... you want it to be of the greatest possible use to the public, we recommend making it free software that everyone can do so by permitting redistribution under... the terms of each file should have at least the "copyright" line and a pointer...USE OR INABILITY TO USE THE LIBRARY (INCLUDING BUT NOT LIMITED TO LOSS OF DATA OR DATA BEING RENDERED INACCURATE OR LOSSES SUSTAINED BY YOU OR THIRD PARTIES OR A FAILURE OF THE LIBRARY TO OPERATE WITH ANY OTHER SOFTWARE...

User Manual (ENGLISH)
Page 3
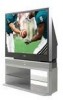
.../or decode audio files conforming to progressive-scan DVD movies in widescreen and are essentially a digital version of certain third parties. Other countries The product unit accompanying this license for licensed contents. No rights are granted under this user manual is High Definition Television (HDTV). • SDTV program formats include 480-line interlaced (480i) and 480-line progressive (480p) video. 480i programs are comparable...
.../or decode audio files conforming to progressive-scan DVD movies in widescreen and are essentially a digital version of certain third parties. Other countries The product unit accompanying this license for licensed contents. No rights are granted under this user manual is High Definition Television (HDTV). • SDTV program formats include 480-line interlaced (480i) and 480-line progressive (480p) video. 480i programs are comparable...

User Manual (ENGLISH)
Page 5
... antenna may work fine. How can provide broadcast DTV signals via a master TV antenna system to "Yes" in standby mode. Can I hear a Clicking sound in the TV Guide On ScreenTM Setup. I connect my DTV set -top receiver to see if you need a different antenna. However, DTV broadcast channel assignments are on VHF (channels 2-13) or UHF (channels 14-69) to enjoy clear, sharp widescreen images and high-quality audio. 5. If your DTV channels...
... antenna may work fine. How can provide broadcast DTV signals via a master TV antenna system to "Yes" in standby mode. Can I hear a Clicking sound in the TV Guide On ScreenTM Setup. I connect my DTV set -top receiver to see if you need a different antenna. However, DTV broadcast channel assignments are on VHF (channels 2-13) or UHF (channels 14-69) to enjoy clear, sharp widescreen images and high-quality audio. 5. If your DTV channels...
User Manual (ENGLISH)
Page 6
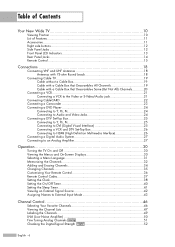
... Connecting a Digital Audio System 27 Connecting to an Analog Amplifier 27 Operation 30 Turning the TV On and Off 30 Viewing the Menus and On-Screen Displays 30 Selecting a Menu Language 31 Memorizing the Channels 32 Adding and Erasing Channels 34 Changing Channels 35 Customizing Your Remote Control 36 Remote Control Codes 37 Setting the Clock...38 Setting the On/Off Timer 40 Setting the Sleep Timer 41 Viewing an External Signal Source 42 Assigning Names to External Input Mode 43 Channel Control...
... Connecting a Digital Audio System 27 Connecting to an Analog Amplifier 27 Operation 30 Turning the TV On and Off 30 Viewing the Menus and On-Screen Displays 30 Selecting a Menu Language 31 Memorizing the Channels 32 Adding and Erasing Channels 34 Changing Channels 35 Customizing Your Remote Control 36 Remote Control Codes 37 Setting the Clock...38 Setting the On/Off Timer 40 Setting the Sleep Timer 41 Viewing an External Signal Source 42 Assigning Names to External Input Mode 43 Channel Control...
User Manual (ENGLISH)
Page 7
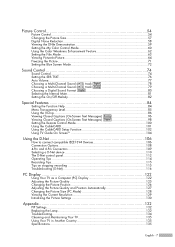
... control panel 112 Operating Tips ...114 Recording Tips...115 Tips on stopping recording 115 Troubleshooting (D-Net 116 PC Display 122 Using Your TV as a Computer (PC) Display 122 Adjusting the Picture Quality 125 Changing the Picture Position 126 Adjusting the Picture Quality and Position Automatically 127 Changing the Picture Size (PC Mode 128 Viewing the Current Resolution 129 Initializing the Picture Settings 130 Appendix 132 PIP Settings ...132 Replacing the Lamp 132 Troubleshooting 134 Cleaning and Maintaining Your TV...
... control panel 112 Operating Tips ...114 Recording Tips...115 Tips on stopping recording 115 Troubleshooting (D-Net 116 PC Display 122 Using Your TV as a Computer (PC) Display 122 Adjusting the Picture Quality 125 Changing the Picture Position 126 Adjusting the Picture Quality and Position Automatically 127 Changing the Picture Size (PC Mode 128 Viewing the Current Resolution 129 Initializing the Picture Settings 130 Appendix 132 PIP Settings ...132 Replacing the Lamp 132 Troubleshooting 134 Cleaning and Maintaining Your TV...
User Manual (ENGLISH)
Page 11
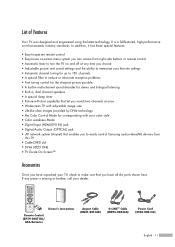
... your color style • Color weakness Mode • Digital Input (HDMI/DVI IN) jack • Digital Audio Output (OPTICAL) jack • AV network system (Anynet) that enables you to easily control Samsung audio-video(AV) devices from this TV. • CableCARD slot • D-Net (IEEE1394) • TV Guide On Screen™ Accessories Once you have unpacked your TV, check to turn the TV on -screen menu system you can access from right side buttons or remote control • Automatic timer...
... your color style • Color weakness Mode • Digital Input (HDMI/DVI IN) jack • Digital Audio Output (OPTICAL) jack • AV network system (Anynet) that enables you to easily control Samsung audio-video(AV) devices from this TV. • CableCARD slot • D-Net (IEEE1394) • TV Guide On Screen™ Accessories Once you have unpacked your TV, check to turn the TV on -screen menu system you can access from right side buttons or remote control • Automatic timer...
User Manual (ENGLISH)
Page 13
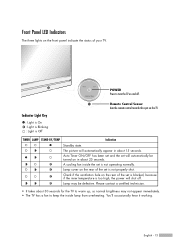
... takes about 15 seconds. Indicator Light Key : Light is On : Light is Blinking : Light is too high, the power will shut off . Lamp may not appear immediately. • The TV has a fan to turn the TV on the rear of your TV. Front Panel LED Indicators The three lights on the front panel indicate the status of the set is not operating normally. TIMER LAMP STAND BY/TEMP Indication Standby state. A cooling fan inside lamp from overheating. Lamp cover on and off .
... takes about 15 seconds. Indicator Light Key : Light is On : Light is Blinking : Light is too high, the power will shut off . Lamp may not appear immediately. • The TV has a fan to turn the TV on the rear of your TV. Front Panel LED Indicators The three lights on the front panel indicate the status of the set is not operating normally. TIMER LAMP STAND BY/TEMP Indication Standby state. A cooling fan inside lamp from overheating. Lamp cover on and off .
User Manual (ENGLISH)
Page 14
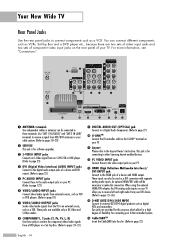
... video output jack on the rear panel of a device with separate analog audio inputs. These jacks are provided for software upgrades. ˇ S-VIDEO INPUT jacks Connects an S-Video signal from the TV to connect components such as a VCR. This jack is for this connection. For more information, see "Connections". Œ ANTENNA terminals Two independent cables or antennas can connect different components such as VCRs, Set-Top Box and a DVD player etc., because there are two sets...
... video output jack on the rear panel of a device with separate analog audio inputs. These jacks are provided for software upgrades. ˇ S-VIDEO INPUT jacks Connects an S-Video signal from the TV to connect components such as a VCR. This jack is for this connection. For more information, see "Connections". Œ ANTENNA terminals Two independent cables or antennas can connect different components such as VCRs, Set-Top Box and a DVD player etc., because there are two sets...
User Manual (ENGLISH)
Page 15
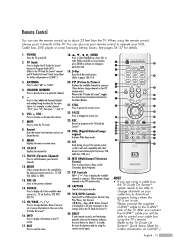
... in use the remote control up , down, left, or right. Anynet Runs the Anynet view functions and sets up of screen information to display all of the TV. CH.LIST Displays the channel list. 11. RESET If your cable box to switch between locked and unlocked in sequence. (These buttons change channels on the TV screen. 17. POWER Turns the TV on G-LINKTM.) English - 15 MTS (Multichannel Television Stereo) Press to increase or decrease the volume. 7. CHANNEL NUMBER Press...
... in use the remote control up , down, left, or right. Anynet Runs the Anynet view functions and sets up of screen information to display all of the TV. CH.LIST Displays the channel list. 11. RESET If your cable box to switch between locked and unlocked in sequence. (These buttons change channels on the TV screen. 17. POWER Turns the TV on G-LINKTM.) English - 15 MTS (Multichannel Television Stereo) Press to increase or decrease the volume. 7. CHANNEL NUMBER Press...

User Manual (ENGLISH)
Page 24
... - 24 DVD Player DVD Player TV Rear Panel Incoming Cable or Antenna 2 1 NOTE • For an explanation of Component video, see your TV. Connections Connecting a DVD Player The rear panel jacks on the DVD player. Connecting to your DVD player's owner's manual. TV Rear Panel Incoming Cable or Antenna 2 To enable Component video viewing, connect a set of video cables between the COMPONENT (1 or 2) VIDEO (Y, PB, PR) IN jacks on the TV and VIDEO (Y/PB/PR or Y/CB/CR) OUT jacks on the DVD player. 2 1 Connecting to Audio and Video Jacks 1 Connect a set of audio cables between...
... - 24 DVD Player DVD Player TV Rear Panel Incoming Cable or Antenna 2 1 NOTE • For an explanation of Component video, see your TV. Connections Connecting a DVD Player The rear panel jacks on the DVD player. Connecting to your DVD player's owner's manual. TV Rear Panel Incoming Cable or Antenna 2 To enable Component video viewing, connect a set of video cables between the COMPONENT (1 or 2) VIDEO (Y, PB, PR) IN jacks on the TV and VIDEO (Y/PB/PR or Y/CB/CR) OUT jacks on the DVD player. 2 1 Connecting to Audio and Video Jacks 1 Connect a set of audio cables between...

User Manual (ENGLISH)
Page 25
... (CABLE) on the TV. Incoming Cable or Antenna 4 Connect a coaxial cable between the Antenna out terminal (i.e., "ANT.OUT") on the Set-Top Box and the ANT 1 IN (CABLE) on the TV. DTV Set-Top Box Connecting to connect both the Video/Audio cable and the G-LINKTM cable. English - 25 TV Rear Panel 2 Connect a set of Component video, see your Set-Top Box owner's manual. • Requires a Cable Converter. • To use the TV Guide On ScreenTM, you have to DVI (Digital Visual Interface) 1 Connect a set of audio cables between the DVI AUDIO...
... (CABLE) on the TV. Incoming Cable or Antenna 4 Connect a coaxial cable between the Antenna out terminal (i.e., "ANT.OUT") on the Set-Top Box and the ANT 1 IN (CABLE) on the TV. DTV Set-Top Box Connecting to connect both the Video/Audio cable and the G-LINKTM cable. English - 25 TV Rear Panel 2 Connect a set of Component video, see your Set-Top Box owner's manual. • Requires a Cable Converter. • To use the TV Guide On ScreenTM, you have to DVI (Digital Visual Interface) 1 Connect a set of audio cables between the DVI AUDIO...

User Manual (ENGLISH)
Page 27
TV Rear Panel NOTE • OPTICAL: converts the electric signal into an optical light signal, and transmits it through glass fibers. A transmission system of digital audio in the form of a light wave, S/PDIF format using the HDMI/DVI, PC, or Component input on the TV, the audio output signal is available only when the TV's Internal Mute is set the internal mute on in the TV's Sound Menu and adjust the volume level with the volume control of the amplifier...
TV Rear Panel NOTE • OPTICAL: converts the electric signal into an optical light signal, and transmits it through glass fibers. A transmission system of digital audio in the form of a light wave, S/PDIF format using the HDMI/DVI, PC, or Component input on the TV, the audio output signal is available only when the TV's Internal Mute is set the internal mute on in the TV's Sound Menu and adjust the volume level with the volume control of the amplifier...
User Manual (ENGLISH)
Page 30
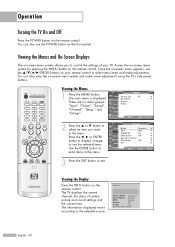
...; Setup PIP √ Listings Move Enter Return 3 Press the EXIT button to select menu items and make some adjustments using the TV's side panel buttons. Viewing the Display Press the INFO button on the remote control. Once the on-screen menu appears, use the ENTER buttons on your TV. The main menu is displayed. Cable 3 Picture Mode Standard Sound Mode Custom MTS Stereo Caption Off V-Chip Off No Time Information English - 30 Operation Turning the TV On and Off Press the POWER button on the remote control. Access...
...; Setup PIP √ Listings Move Enter Return 3 Press the EXIT button to select menu items and make some adjustments using the TV's side panel buttons. Viewing the Display Press the INFO button on the remote control. Once the on-screen menu appears, use the ENTER buttons on your TV. The main menu is displayed. Cable 3 Picture Mode Standard Sound Mode Custom MTS Stereo Caption Off V-Chip Off No Time Information English - 30 Operation Turning the TV On and Off Press the POWER button on the remote control. Access...
User Manual (ENGLISH)
Page 33
.... Press the ENTER button. Press the ENTER button at any time to receive digital TV signals. Even if a particular channel is deleted from the memory, you want to select the Antenna connection, then press the ENTER button. • Air : "Air" antenna signal Cable : "Cable" antenna signal Air+Cable : "Air" and "Cable" antenna signals • If the CableCARD is set to select Analog or Digital "STD", "HRC" or "IRC". Input Picture Sound Channel Setup Listings Auto Program Select the cable system. Press the...
.... Press the ENTER button. Press the ENTER button at any time to receive digital TV signals. Even if a particular channel is deleted from the memory, you want to select the Antenna connection, then press the ENTER button. • Air : "Air" antenna signal Cable : "Cable" antenna signal Air+Cable : "Air" and "Cable" antenna signals • If the CableCARD is set to select Analog or Digital "STD", "HRC" or "IRC". Input Picture Sound Channel Setup Listings Auto Program Select the cable system. Press the...
User Manual (ENGLISH)
Page 40
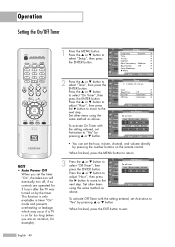
... you set the hour, minute, channel, and volume directly by pressing the number buttons on the remote control. Setup Input Picture Sound Channel Setup Listings Language : English √ Time √ V-Chip √ Caption √ Menu Transparency : Medium √ Blue Screen : Off √ Color Weakness √ ▼ More Move Enter Return Time Input 1/ 1/ 2005/ 12 : 00 am Air ▼ Channel Volume Activation 3 10 No Move Adjust Return • You can set the timer "On", the television will eventually turn off timer. Set other items using...
... you set the hour, minute, channel, and volume directly by pressing the number buttons on the remote control. Setup Input Picture Sound Channel Setup Listings Language : English √ Time √ V-Chip √ Caption √ Menu Transparency : Medium √ Blue Screen : Off √ Color Weakness √ ▼ More Move Enter Return Time Input 1/ 1/ 2005/ 12 : 00 am Air ▼ Channel Volume Activation 3 10 No Move Adjust Return • You can set the timer "On", the television will eventually turn off timer. Set other items using...
User Manual (ENGLISH)
Page 41
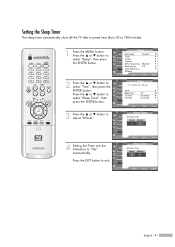
... adjust "Minute". 4 Setting the Timer sets the Activation to select "Time", then press the ENTER button. or † button to 180 minutes). 1 Press the MENU button. Setting the Sleep Timer The sleep timer automatically shuts off the TV after a preset time (from 30 to select "Sleep Timer", then press the ENTER button. 3 Press the ... Press the ... Setup Input Picture Sound Channel Setup Listings Language : English √ Time √ V-Chip √ Caption √ Menu Transparency : Medium √ Blue Screen : Off √ Color...
... adjust "Minute". 4 Setting the Timer sets the Activation to select "Time", then press the ENTER button. or † button to 180 minutes). 1 Press the MENU button. Setting the Sleep Timer The sleep timer automatically shuts off the TV after a preset time (from 30 to select "Sleep Timer", then press the ENTER button. 3 Press the ... Press the ... Setup Input Picture Sound Channel Setup Listings Language : English √ Time √ V-Chip √ Caption √ Menu Transparency : Medium √ Blue Screen : Off √ Color...
User Manual (ENGLISH)
Page 60
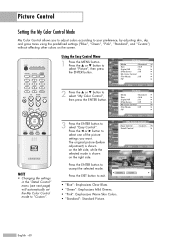
...; Sound DNIe Demo : Off √ My Color Control √ Channel Film Mode : Off √ Setup PIP √ Listings Move Enter Return 3 Press the ENTER button to your preference, by adjusting skin, sky, and grass tones using the predefined settings ("Blue", "Green", "Pink", "Standard", and "Custom") without affecting other colors on the right side. Press the EXIT button to "Custom". NOTE • Changing the settings in the "Detail Control" menu (see...
...; Sound DNIe Demo : Off √ My Color Control √ Channel Film Mode : Off √ Setup PIP √ Listings Move Enter Return 3 Press the ENTER button to your preference, by adjusting skin, sky, and grass tones using the predefined settings ("Blue", "Green", "Pink", "Standard", and "Custom") without affecting other colors on the right side. Press the EXIT button to "Custom". NOTE • Changing the settings in the "Detail Control" menu (see...
User Manual (ENGLISH)
Page 86
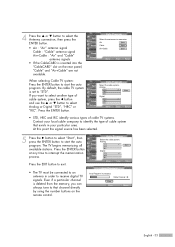
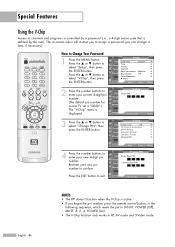
... your new pin number to select "V-Chip", then press the ENTER button. The on-screen menu will instruct you to assign a password (you forget the pin number, press the remote control buttons in the following sequence, which resets the pin to enter your current 4-digit pin V-Chip Input Enter PIN number. Special Features Using the V-Chip Access to Change Your Password 1 Press the MENU button. How to channels and programs is controlled by a password (i.e., a 4-digit secret code that is Setup displayed.
... your new pin number to select "V-Chip", then press the ENTER button. The on-screen menu will instruct you to assign a password (you forget the pin number, press the remote control buttons in the following sequence, which resets the pin to enter your current 4-digit pin V-Chip Input Enter PIN number. Special Features Using the V-Chip Access to Change Your Password 1 Press the MENU button. How to channels and programs is controlled by a password (i.e., a 4-digit secret code that is Setup displayed.

User Manual (ENGLISH)
Page 134
... TV. Try another channel. Press the SOURCE button. Make sure the program is a "clicking" sound repeatedly in . Make sure the TV is plugged in Standby mode. Digital broadcasting screen problem. Make sure the TV is plugged in the TV Guide On ScreenTM Setup. The TV won't switch on the screen. Try another channel. Check all wire connections. If you are set to "Yes" in . Please check the digital signal strength and input antenna. Adjust the antenna. Make sure the remote...
... TV. Try another channel. Press the SOURCE button. Make sure the program is a "clicking" sound repeatedly in . Make sure the TV is plugged in Standby mode. Digital broadcasting screen problem. Make sure the TV is plugged in the TV Guide On ScreenTM Setup. The TV won't switch on the screen. Try another channel. Check all wire connections. If you are set to "Yes" in . Please check the digital signal strength and input antenna. Adjust the antenna. Make sure the remote...


