
Open Source Guide (ENGLISH)
Page 1
... of the Program's source code as separate works. The precise terms and conditions for questions regarding open sources, contact Samsung via Email (vdswmanager@samsung. keep intact all the notices that work , complete source code means all . and give any associated interface definition ... a license from the same place counts as part of a whole which gives you must be distributed under the OpenSSL Project. com). This product uses some software programs which are distributed under this License. 3. Our General Public Licenses are not covered by software patents. ...
... of the Program's source code as separate works. The precise terms and conditions for questions regarding open sources, contact Samsung via Email (vdswmanager@samsung. keep intact all the notices that work , complete source code means all . and give any associated interface definition ... a license from the same place counts as part of a whole which gives you must be distributed under the OpenSSL Project. com). This product uses some software programs which are distributed under this License. 3. Our General Public Licenses are not covered by software patents. ...

Open Source Guide (ENGLISH)
Page 2
... change. How to Apply These Terms to Your New Libraries If you develop a new library, and you want it to be of the greatest possible use to where the full notice is found. It is safest to attach them to the start of each file should have at least the "copyright... THE LIBRARY AS PERMITTED ABOVE, BE LIABLE TO YOU FOR DAMAGES, INCLUDING ANY GENERAL, SPECIAL, INCIDENTAL OR CONSEQUENTIAL DAMAGES ARISING OUT OF THE USE OR INABILITY TO USE THE LIBRARY (INCLUDING BUT NOT LIMITED TO LOSS OF DATA OR DATA BEING RENDERED INACCURATE OR LOSSES SUSTAINED BY YOU OR THIRD PARTIES OR...
... change. How to Apply These Terms to Your New Libraries If you develop a new library, and you want it to be of the greatest possible use to where the full notice is found. It is safest to attach them to the start of each file should have at least the "copyright... THE LIBRARY AS PERMITTED ABOVE, BE LIABLE TO YOU FOR DAMAGES, INCLUDING ANY GENERAL, SPECIAL, INCIDENTAL OR CONSEQUENTIAL DAMAGES ARISING OUT OF THE USE OR INABILITY TO USE THE LIBRARY (INCLUDING BUT NOT LIMITED TO LOSS OF DATA OR DATA BEING RENDERED INACCURATE OR LOSSES SUSTAINED BY YOU OR THIRD PARTIES OR...
User Manual (ENGLISH)
Page 2
...to -use a mounting accessory recommended by the manufacturer or sold with care. If the plug still does not fit, contact an electrician to come. Important: One Federal Court has held that will fit into the outlet, try reversing the plug. Your new Samsung projection TV represents ...the latest in the operating instructions. • Unplug the TV from the wall outlet before operating your TV only from overheating. A falling TV can make the unit and cart unsteady and more likely to ...
...to -use a mounting accessory recommended by the manufacturer or sold with care. If the plug still does not fit, contact an electrician to come. Important: One Federal Court has held that will fit into the outlet, try reversing the plug. Your new Samsung projection TV represents ...the latest in the operating instructions. • Unplug the TV from the wall outlet before operating your TV only from overheating. A falling TV can make the unit and cart unsteady and more likely to ...
User Manual (ENGLISH)
Page 3
... cause harmful interference to radio or television receptions, which can be extremely careful to the unit. • Upon completion of Samsung 3351 Michelson Drive, Suite #290, Irvine, CA92612 USA Warning User must accept any kind on a circuit different from that interference...Instructions • Protect the power cord. Power supply cords should not be sure the service technician uses replacement parts specified by a qualified technician to restore the TV to qualified service personnel. Pay particular attention to provide reasonable protection against voltage surges and built ...
... cause harmful interference to radio or television receptions, which can be extremely careful to the unit. • Upon completion of Samsung 3351 Michelson Drive, Suite #290, Irvine, CA92612 USA Warning User must accept any kind on a circuit different from that interference...Instructions • Protect the power cord. Power supply cords should not be sure the service technician uses replacement parts specified by a qualified technician to restore the TV to qualified service personnel. Pay particular attention to provide reasonable protection against voltage surges and built ...
User Manual (ENGLISH)
Page 4
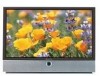
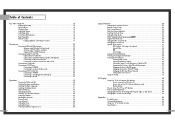
... Contents Your New Wide TV 10 Replacing the Lamp 10 List of Features ...12 Checking Parts...12 Side Panel Buttons 13 Side Panel Jacks 13 Front Panel LED Indicators 14 Rear Panel Jacks 15 Remote ... the Channels 37 Picture Control ...38 Sound Control ...40 Setting the Clock 42 Setting the Timers 43 Viewing an External Signal Source 46 6 Special Features 50 Setting Up Your Remote Control 50 Remote ...Channel 73 Selecting the Sound Source 74 Using the V-Chip 75 PC Display...82 Using Your TV as a Computer (PC) Display 82 How to connect Your PC to the TV 82 How to Set up Your PC ...
... Contents Your New Wide TV 10 Replacing the Lamp 10 List of Features ...12 Checking Parts...12 Side Panel Buttons 13 Side Panel Jacks 13 Front Panel LED Indicators 14 Rear Panel Jacks 15 Remote ... the Channels 37 Picture Control ...38 Sound Control ...40 Setting the Clock 42 Setting the Timers 43 Viewing an External Signal Source 46 6 Special Features 50 Setting Up Your Remote Control 50 Remote ...Channel 73 Selecting the Sound Source 74 Using the V-Chip 75 PC Display...82 Using Your TV as a Computer (PC) Display 82 How to connect Your PC to the TV 82 How to Set up Your PC ...
User Manual (ENGLISH)
Page 6
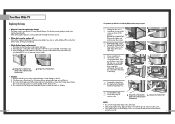
... not place the old lamp near flammable objects or within the reach of children. 10 • For replacement, you purchased the TV or to a Samsung Service center. ... HLN437W1/HLN507W1 ... For the best screen quality it needs to replace it? After replacing the lamp, the screen quality ... rubber cap and unscrew the screw.) 2 Remove the Lamp cover. (HLN467W1/HLN567W1: Exert a bit of gloves. 1 Unplug TV, then use a screwdriver to remove the screw as shown in a projection TV has a limited lifespan. After checking the code number for the lamp, give the code number to the store where you will...
... not place the old lamp near flammable objects or within the reach of children. 10 • For replacement, you purchased the TV or to a Samsung Service center. ... HLN437W1/HLN507W1 ... For the best screen quality it needs to replace it? After replacing the lamp, the screen quality ... rubber cap and unscrew the screw.) 2 Remove the Lamp cover. (HLN467W1/HLN567W1: Exert a bit of gloves. 1 Unplug TV, then use a screwdriver to remove the screw as shown in a projection TV has a limited lifespan. After checking the code number for the lamp, give the code number to the store where you will...
User Manual (ENGLISH)
Page 7
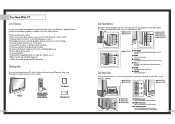
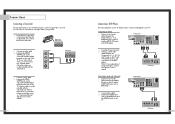
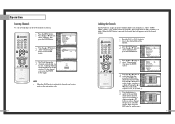
... to activate (or change channels and move between items on the on -screen menu system. Your New Wide TV List of Features Your TV was designed and engineered using the onscreen menu. ˆ ENTER Press to reduce or eliminate reception problems • Fine tuning control for...; CH ▲ Press to change ) a particular item. Ø POWER Press to memorize your TV's basic features, including the on -screen menu. ¨ VOL +, - Use the side panel jacks to connect a component that is used only occasionally (a camcorder or video game, for example). œ HLN467W1 œ HLN567W1 œ...
... to activate (or change channels and move between items on the on -screen menu system. Your New Wide TV List of Features Your TV was designed and engineered using the onscreen menu. ˆ ENTER Press to reduce or eliminate reception problems • Fine tuning control for...; CH ▲ Press to change ) a particular item. Ø POWER Press to memorize your TV's basic features, including the on -screen menu. ¨ VOL +, - Use the side panel jacks to connect a component that is used only occasionally (a camcorder or video game, for example). œ HLN467W1 œ HLN567W1 œ...
User Manual (ENGLISH)
Page 8
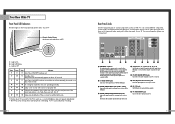
... to keep the inside the set is connected to connect components such as a Cable Set Top Box). You'll occasionally hear it working. 14 Rear Panel Jacks Use the rear panel jacks to ANT-A. ´ S-VIDEO INPUT jacks Connects an S-Video signal from an S-VHS VCR or DVD player. ˇ VIDEO/AUDIO INPUT...-Top Box and a DVD player etc., because there are two sets of video input jacks and three set of component video input jacks on the rear of your PC. 15 Use ANT-A and ANT-B terminals to receive a signal from the TV to the audio-output jacks on your...
... to keep the inside the set is connected to connect components such as a Cable Set Top Box). You'll occasionally hear it working. 14 Rear Panel Jacks Use the rear panel jacks to ANT-A. ´ S-VIDEO INPUT jacks Connects an S-Video signal from an S-VHS VCR or DVD player. ˇ VIDEO/AUDIO INPUT...-Top Box and a DVD player etc., because there are two sets of video input jacks and three set of component video input jacks on the rear of your PC. 15 Use ANT-A and ANT-B terminals to receive a signal from the TV to the audio-output jacks on your...
User Manual (ENGLISH)
Page 9
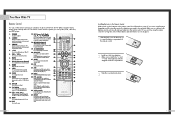
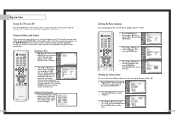
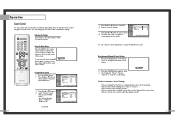
... your personal, customized sound settings.) 3. P.MODE Adjust the TV picture by the Samsung remote control (i.e., TV, VCR, Cable, or DVD). 12. MTS(Multichannel Television Stereo) Press to resume normal video. 10. PIP Activates picture in the TV's memory. If you notice a performance degradation while using the on TV. 5. Make sure to match the "+" and "-" ends of...
... your personal, customized sound settings.) 3. P.MODE Adjust the TV picture by the Samsung remote control (i.e., TV, VCR, Cable, or DVD). 12. MTS(Multichannel Television Stereo) Press to resume normal video. 10. PIP Activates picture in the TV's memory. If you notice a performance degradation while using the on TV. 5. Make sure to match the "+" and "-" ends of...

User Manual (ENGLISH)
Page 11
.... 1 Place the wires from the twin leads under the screws on the back panel of the TV. Connections Connecting VHF and UHF Antennas If you do not have two separate antennas for your TV (one VHF and one UHF), you must combine the two antenna signals before connecting them to the...an electronics store. 1 Connect both antenna leads to the combiner. 2 Plug the combiner into the ANT-A terminal on the back panel of the TV. Use a screwdriver to your TV. Antennas with 75-ohm Round Leads If your antenna looks like this : 1 Plug the antenna lead into the ANT-A terminal on the back panel...
.... 1 Place the wires from the twin leads under the screws on the back panel of the TV. Connections Connecting VHF and UHF Antennas If you do not have two separate antennas for your TV (one VHF and one UHF), you must combine the two antenna signals before connecting them to the...an electronics store. 1 Connect both antenna leads to the combiner. 2 Plug the combiner into the ANT-A terminal on the back panel of the TV. Use a screwdriver to your TV. Antennas with 75-ohm Round Leads If your antenna looks like this : 1 Plug the antenna lead into the ANT-A terminal on the back panel...

User Manual (ENGLISH)
Page 12
... cable that you do not need two coaxial cables. Connections Connecting Cable TV and VCR You can use the TV features. Connecting a Cable Converter Box and a VCR This connection allows you to record one audio cable. From Cable TV Rear Panel Caution: If you have a mono VCR, connect L/Mono to ...video1 simultaneously. You will need to ANT-A so that you can not program using the remote control, such as watch cable and premium channels. When...
... cable that you do not need two coaxial cables. Connections Connecting Cable TV and VCR You can use the TV features. Connecting a Cable Converter Box and a VCR This connection allows you to record one audio cable. From Cable TV Rear Panel Caution: If you have a mono VCR, connect L/Mono to ...video1 simultaneously. You will need to ANT-A so that you can not program using the remote control, such as watch cable and premium channels. When...
User Manual (ENGLISH)
Page 13
... 24 Connecting a DVD Player The rear panel jacks on your TV. They are usually included with the camcorder.) To watch a tape, follow your camera's instructions and the section on the DVD player. DVD Player 25 You can use your camcorder to your TV make it easy to connect a ...DVD player to view tapes without using a VCR. 1 Locate the A/V output jacks on the DVD player. TV Rear Panel Incoming Cable or Antenna DVD Player 2 Connect video cables between...
... 24 Connecting a DVD Player The rear panel jacks on your TV. They are usually included with the camcorder.) To watch a tape, follow your camera's instructions and the section on the DVD player. DVD Player 25 You can use your camcorder to your TV make it easy to connect a ...DVD player to view tapes without using a VCR. 1 Locate the A/V output jacks on the DVD player. TV Rear Panel Incoming Cable or Antenna DVD Player 2 Connect video cables between...
User Manual (ENGLISH)
Page 16
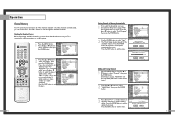
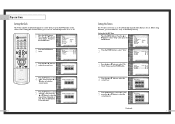
... Return You can also view the on-screen menu system and make adjustments. The Input menu is selected. Use the œ, √ or ENTER button to display, change, or use the ENTER on your TV on and off. or † button to exit the ▼ More menu. Sound Channel Favorite Channel ... the POWER button on the remote control or on the side panel to turn your remote control to select menu items and make some adjustments using the TV's side panel buttons. or † button to exit the menu. Viewing the Menus and Displays The on -screen menus: English, Spanish or French. 1...
... Return You can also view the on-screen menu system and make adjustments. The Input menu is selected. Use the œ, √ or ENTER button to display, change, or use the ENTER on your TV on and off. or † button to exit the ▼ More menu. Sound Channel Favorite Channel ... the POWER button on the remote control or on the side panel to turn your remote control to select menu items and make some adjustments using the TV's side panel buttons. or † button to exit the menu. Viewing the Menus and Displays The on -screen menus: English, Spanish or French. 1...
User Manual (ENGLISH)
Page 17
... Enter Return 2 Press the ... or † button to select the type of cable system: "STD", "HRC" or "IRC". (If you have, contact your TV is connected to, either an antenna or a cable system. 1 Press the MENU button. Press the EXIT button to add or delete the channel. Press the...Move Enter Return 2 Press the ... Channel Not In Memory Press Enter to select "Channel", then press the ENTER button. Operation Channel Memory Your TV can use the CH and CH buttons to scan through the available channels. If you are not sure which type of the channels available. If you must...
... Enter Return 2 Press the ... or † button to select the type of cable system: "STD", "HRC" or "IRC". (If you have, contact your TV is connected to, either an antenna or a cable system. 1 Press the MENU button. Press the EXIT button to add or delete the channel. Press the...Move Enter Return 2 Press the ... Channel Not In Memory Press Enter to select "Channel", then press the ENTER button. Operation Channel Memory Your TV can use the CH and CH buttons to scan through the available channels. If you are not sure which type of the channels available. If you must...
User Manual (ENGLISH)
Page 18
...press the ENTER button. or † button to select "Channel", then press the ENTER button. Press the ... You can be set as TV and CATV). Using the Channel Buttons Press the CH or CH buttons to change to another. or † button to select "Favorite Channel", then press the ...to exit the menu. Operation Changing Channels You can store your TV by using the CH and CH buttons, or by direct selection using the number buttons. Using the Previous Channel Press the PRE-CH button on the remote control, the TV displays only the favorite channels you previously stored, allowing you ...
...press the ENTER button. or † button to select "Channel", then press the ENTER button. Press the ... You can be set as TV and CATV). Using the Channel Buttons Press the CH or CH buttons to change to another. or † button to select "Favorite Channel", then press the ...to exit the menu. Operation Changing Channels You can store your TV by using the CH and CH buttons, or by direct selection using the number buttons. Using the Previous Channel Press the PRE-CH button on the remote control, the TV displays only the favorite channels you previously stored, allowing you ...
User Manual (ENGLISH)
Page 19
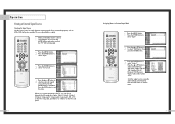
...or a blank. (Pressing the ... Input Picture Channel ▲ More Channel Scan LNA : Off Sound Channel Setup Move Enter √ √ Return 3 The TV will be labeled. 2 Press the MENU button. or † button to exit the menu. Press the ... Press the EXIT button to select "Channel", then ...4 Return Return NOTE • When the ANT-B mode is selected, the channel scan function works on the main picture only. 36 Labeling the Channels Use this feature to assign an easy-to-remember label to any channel (i.e., "CBS", "ESPN", "PBS2", CNN1", etc.) A label consists of the ...
...or a blank. (Pressing the ... Input Picture Channel ▲ More Channel Scan LNA : Off Sound Channel Setup Move Enter √ √ Return 3 The TV will be labeled. 2 Press the MENU button. or † button to exit the menu. Press the ... Press the EXIT button to select "Channel", then ...4 Return Return NOTE • When the ANT-B mode is selected, the channel scan function works on the main picture only. 36 Labeling the Channels Use this feature to assign an easy-to-remember label to any channel (i.e., "CBS", "ESPN", "PBS2", CNN1", etc.) A label consists of the ...

User Manual (ENGLISH)
Page 20
... the contrast, brightness, tint, color, and sharpness settings of ▲ Contrast 100 the item, using the on ▼ screen gauge as your TV's specifications. • Choose Dynamic for viewing the TV during the day or when there is bright light in PC, DVI or 480p-Component or higher modes...Press the P.MODE button on the remote control to change . Operation Picture Control Using the remote, you can continue to make adjustments, or press the EXIT button to raise or lower the value of the TV. The level indicator will disappear and the Video menu will see the items "Contrast...
... the contrast, brightness, tint, color, and sharpness settings of ▲ Contrast 100 the item, using the on ▼ screen gauge as your TV's specifications. • Choose Dynamic for viewing the TV during the day or when there is bright light in PC, DVI or 480p-Component or higher modes...Press the P.MODE button on the remote control to change . Operation Picture Control Using the remote, you can continue to make adjustments, or press the EXIT button to raise or lower the value of the TV. The level indicator will disappear and the Video menu will see the items "Contrast...
User Manual (ENGLISH)
Page 21
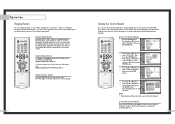
...Off √ MTS : Mono √ Auto Volume : Off √ Move Enter Return Continued... 40 3 Press the ... or † button to lower the volume. Using the Mute Button Press the MUTE button on screen gauge as your guide. Operation Sound Control You can control and customize the sound levels and... settings of the TV with the VOL - Adjusting the Volume Press VOL+ to select "Sound", then press the ENTER button. and VOL + buttons. Custom ...
...Off √ MTS : Mono √ Auto Volume : Off √ Move Enter Return Continued... 40 3 Press the ... or † button to lower the volume. Using the Mute Button Press the MUTE button on screen gauge as your guide. Operation Sound Control You can control and customize the sound levels and... settings of the TV with the VOL - Adjusting the Volume Press VOL+ to select "Sound", then press the ENTER button. and VOL + buttons. Custom ...
User Manual (ENGLISH)
Page 22
... 10 No Setup Move Enter Return 5 Press the √ button to select "am ▼ Vol Activation 03 10 No Setup Move Enter Return Continued... 43 Press the ... or † button to select the correct hour. or † button to select the correct minute. Input Picture Sound Channel On Timer.... or † button to select "Min", then press the ... Operation Setting the Clock This TV has a built-in clock that you choose. Setting this clock also allows you to use it to turn the TV on or off automatically at specific times that will appear on screen when you press the...
... 10 No Setup Move Enter Return 5 Press the √ button to select "am ▼ Vol Activation 03 10 No Setup Move Enter Return Continued... 43 Press the ... or † button to select the correct hour. or † button to select the correct minute. Input Picture Sound Channel On Timer.... or † button to select "Min", then press the ... Operation Setting the Clock This TV has a built-in clock that you choose. Setting this clock also allows you to use it to turn the TV on or off automatically at specific times that will appear on screen when you press the...
User Manual (ENGLISH)
Page 24
...√ Return 2 Press the ... or † button to to select "Input". Operation Viewing an External Signal Source Selecting the Signal Source Use the remote control to switch between the following sets of jacks: Video1, Video2, S-Video1, S-Video2, Component1, Component2, Component3, DVI or PC on the... TV's rear panel, and Video3 or S-Video3 on the TV's side panel. 46 Assigning Names to External Input Mode 1 Press the MENU button. Press the MODE button and make sure...
...√ Return 2 Press the ... or † button to to select "Input". Operation Viewing an External Signal Source Selecting the Signal Source Use the remote control to switch between the following sets of jacks: Video1, Video2, S-Video1, S-Video2, Component1, Component2, Component3, DVI or PC on the... TV's rear panel, and Video3 or S-Video3 on the TV's side panel. 46 Assigning Names to External Input Mode 1 Press the MENU button. Press the MODE button and make sure...


