
User Manual (ENGLISH)
Page 6
...11 Accessories ...11 Front Panel Buttons 12 Front Panel Information Window 13 Rear Panel Jacks ...14 Remote Control...15 Connections 18 Connecting VHF and UHF Antennas 18 Antennas with 75-ohm Round Leads 18 Connecting Cable TV 19 Cable without a Cable Box 19 Cable with a Cable Box... Multimedia Interface 25 Connecting a Digital Audio System 26 Connecting to an Analog Amplifier 26 Connecting to a Subwoofer Speaker 27 Operation 30 Turning the TV On and Off 30 Viewing the Menus and On-Screen Displays 30 Selecting a Menu Language 31 Memorizing the Channels 32 Adding and Erasing...
...11 Accessories ...11 Front Panel Buttons 12 Front Panel Information Window 13 Rear Panel Jacks ...14 Remote Control...15 Connections 18 Connecting VHF and UHF Antennas 18 Antennas with 75-ohm Round Leads 18 Connecting Cable TV 19 Cable without a Cable Box 19 Cable with a Cable Box... Multimedia Interface 25 Connecting a Digital Audio System 26 Connecting to an Analog Amplifier 26 Connecting to a Subwoofer Speaker 27 Operation 30 Turning the TV On and Off 30 Viewing the Menus and On-Screen Displays 30 Selecting a Menu Language 31 Memorizing the Channels 32 Adding and Erasing...

User Manual (ENGLISH)
Page 11
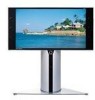
... that enables you to make sure that exceeds industry standards. List of Features Your TV was designed and engineered using the latest technology. It is missing or broken, call your TV, check to easily control Samsung audio-video(AV) devices from the front panel or remote control • Automatic ...timer to turn the TV on and off at any piece is a full-featured, high-performance unit that...
... that enables you to make sure that exceeds industry standards. List of Features Your TV was designed and engineered using the latest technology. It is missing or broken, call your TV, check to easily control Samsung audio-video(AV) devices from the front panel or remote control • Automatic ...timer to turn the TV on and off at any piece is a full-featured, high-performance unit that...
User Manual (ENGLISH)
Page 12
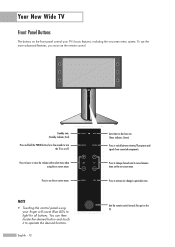
... Panel Buttons The buttons on the front panel control your finger will cause Blue LEDs to light for a few seconds to turn the TV on or off. Standby state. (Standby indicator; NOTE • Touching the control panel using the on has been set. (Timer indicator; To use the more ...advanced features, you must use the remote control. Green) Press to switch between items on the on the TV. Press to operate the desired function. You can then locate the desired button and touch it to see the on -screen menu system. Red) Press...
... Panel Buttons The buttons on the front panel control your finger will cause Blue LEDs to light for a few seconds to turn the TV on or off. Standby state. (Standby indicator; NOTE • Touching the control panel using the on has been set. (Timer indicator; To use the more ...advanced features, you must use the remote control. Green) Press to switch between items on the on the TV. Press to operate the desired function. You can then locate the desired button and touch it to see the on -screen menu system. Red) Press...
User Manual (ENGLISH)
Page 13
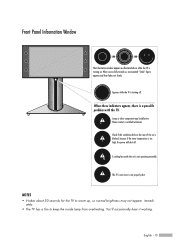
... other component may not appear immediately. • The TV has a fan to warm up, so normal brightness may be defective. Front Panel Information Window The Information window appears as illustrated above while the TV is turning on the rear of the set is not properly shut. Check if ...the ventilation hole on . You'll occasionally hear it working. When successfully turned on, an animated "Smile" figure appears and then fades out...
... other component may not appear immediately. • The TV has a fan to warm up, so normal brightness may be defective. Front Panel Information Window The Information window appears as illustrated above while the TV is turning on the rear of the set is not properly shut. Check if ...the ventilation hole on . You'll occasionally hear it working. When successfully turned on, an animated "Smile" figure appears and then fades out...
User Manual (ENGLISH)
Page 15
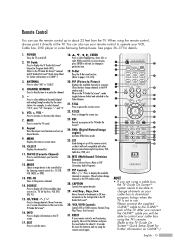
... use your remote control to operate your remote control is not in use. POWER Turns the TV on -screen menus, press ENTER to activate (or change channels. CH/PAGE / Press to the TV Guide On ScreenTM Quick Setup Sheet for further information on your favorite channels. 12....channel. 5. SOURCE Press to select additional channels (digital and analog) being broadcast by the Samsung remote control (i.e., TV, STB, VCR, CABLE, or DVD). 13. STILL Press to download program listings when the TV is not functioning properly, take out the batteries and press the reset button for details. 1....
... use your remote control to operate your remote control is not in use. POWER Turns the TV on -screen menus, press ENTER to activate (or change channels. CH/PAGE / Press to the TV Guide On ScreenTM Quick Setup Sheet for further information on your favorite channels. 12....channel. 5. SOURCE Press to select additional channels (digital and analog) being broadcast by the Samsung remote control (i.e., TV, STB, VCR, CABLE, or DVD). 13. STILL Press to download program listings when the TV is not functioning properly, take out the batteries and press the reset button for details. 1....

User Manual (ENGLISH)
Page 20
...TV mode and you can tune the TV while the VCR is recording. 2 Incoming Cable or Antenna TV Rear Panel Stereo VCR 13 Alternate method When changing the antenna connection, you do not need to press the TV... S-VIDEO IN jack on the TV and the S-VIDEO OUT jack on the TV screen. NOTES • For better video, use ...TV") on the VCR and the ANT 1 IN (CABLE) on the TV. 3 Connect a video cable between the VIDEO or S-VIDEO/AUDIO input jacks on the TV... recording function of the visual quality with noise on the VCR. TV Rear Panel 2 Connect a coaxial cable between the Antenna out terminal ...
...TV mode and you can tune the TV while the VCR is recording. 2 Incoming Cable or Antenna TV Rear Panel Stereo VCR 13 Alternate method When changing the antenna connection, you do not need to press the TV... S-VIDEO IN jack on the TV and the S-VIDEO OUT jack on the TV screen. NOTES • For better video, use ...TV") on the VCR and the ANT 1 IN (CABLE) on the TV. 3 Connect a video cable between the VIDEO or S-VIDEO/AUDIO input jacks on the TV... recording function of the visual quality with noise on the VCR. TV Rear Panel 2 Connect a coaxial cable between the Antenna out terminal ...

User Manual (ENGLISH)
Page 26
... simplified illustration of an audio system is set the digital output format (Dolby Digital or PCM) appropriate to page 83) English - 26 TV Rear Panel 1 Amplifier See page 82 to set to on. (Refer to your audio system has an optical digital audio input, connect to ...the "AV OUT (AUDIO L/R)" terminals: Decrease the gain (volume) of the audio amplifier, turn the TV's internal mute on the TV. TV Rear Panel 1 Audio System Connecting to an amplifier. NOTE • If using a glass conductor. For more information, see your audio system owner...
... simplified illustration of an audio system is set the digital output format (Dolby Digital or PCM) appropriate to page 83) English - 26 TV Rear Panel 1 Amplifier See page 82 to set to on. (Refer to your audio system has an optical digital audio input, connect to ...the "AV OUT (AUDIO L/R)" terminals: Decrease the gain (volume) of the audio amplifier, turn the TV's internal mute on the TV. TV Rear Panel 1 Audio System Connecting to an amplifier. NOTE • If using a glass conductor. For more information, see your audio system owner...
User Manual (ENGLISH)
Page 30
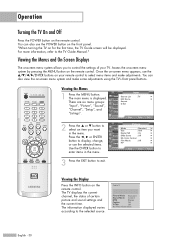
...Standard Sound Mode Custom MTS Stereo Caption Off V-Chip Off No Time Information English - 30 "When turning the TV on the remote control. or † button to select menu items and make some adjustments using the TV's front panel buttons. For more information, refer to exit. You can also view the on your... button on -screen menu system allows you want in the menu. Viewing the Menus and On-Screen Displays The on the front panel. Operation Turning the TV On and Off Press the POWER button on the remote control. Setup Listings Move Enter Exit 2 Press the ...
...Standard Sound Mode Custom MTS Stereo Caption Off V-Chip Off No Time Information English - 30 "When turning the TV on the remote control. or † button to select menu items and make some adjustments using the TV's front panel buttons. For more information, refer to exit. You can also view the on your... button on -screen menu system allows you want in the menu. Viewing the Menus and On-Screen Displays The on the front panel. Operation Turning the TV On and Off Press the POWER button on the remote control. Setup Listings Move Enter Exit 2 Press the ...
User Manual (ENGLISH)
Page 36
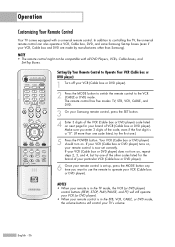
... equipped with all DVD Players, VCRs, Cable boxes, and Set-Top Boxes. The remote control has five modes: TV, STB, VCR, CABLE, and DVD. 3 On your Samsung remote control, press the SET button. 4 Enter 3 digits of VCR (Cable box or DVD player). Setting Up Your Remote Control to Operate Your VCR ...(Cable box or DVD player) 1 Turn off your brand of the VCR (Cable box or DVD player) code listed on , your TV's volume. If your...
... equipped with all DVD Players, VCRs, Cable boxes, and Set-Top Boxes. The remote control has five modes: TV, STB, VCR, CABLE, and DVD. 3 On your Samsung remote control, press the SET button. 4 Enter 3 digits of VCR (Cable box or DVD player). Setting Up Your Remote Control to Operate Your VCR ...(Cable box or DVD player) 1 Turn off your brand of the VCR (Cable box or DVD player) code listed on , your TV's volume. If your...

User Manual (ENGLISH)
Page 40
This function is only available in timer "On" mode and prevents overheating or leakage, which may occur if a TV is on for too long (when you set the hour, minute, channel, and volume directly by pressing ... or † button to return. 3 Press the ... or &#...; Channel Volume Activation 3 10 No Move Adjust Return • You can set the timer "On", the television will eventually turn off, if no controls are on vacation, for 3 hours after the TV was turned on the remote control. Press the ... Input Picture Sound Channel Setup Listings Off Timer Enter the Off Timer options...
This function is only available in timer "On" mode and prevents overheating or leakage, which may occur if a TV is on for too long (when you set the hour, minute, channel, and volume directly by pressing ... or † button to return. 3 Press the ... or &#...; Channel Volume Activation 3 10 No Move Adjust Return • You can set the timer "On", the television will eventually turn off, if no controls are on vacation, for 3 hours after the TV was turned on the remote control. Press the ... Input Picture Sound Channel Setup Listings Off Timer Enter the Off Timer options...
User Manual (ENGLISH)
Page 42
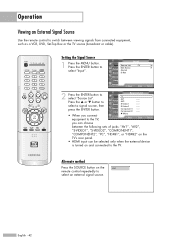
... Return you can be selected only when the external device is turned on the AV1 remote control repeatedly to select an external signal source. English - 42 Alternate method Press the SOURCE button on and connected to the TV. Setting the Signal Source 1 Press the MENU button. Input ... control to switch between the following sets of jacks: "AV1", "AV2", "S-VIDEO1", "S-VIDEO2", "COMPONENT1", "COMPONENT2", "PC", "HDMI1", or "HDMI2" on the TV's rear panel. • HDMI input can choose between viewing signals from connected equipment, such as a VCR, DVD, Set-Top Box or the...
... Return you can be selected only when the external device is turned on the AV1 remote control repeatedly to select an external signal source. English - 42 Alternate method Press the SOURCE button on and connected to the TV. Setting the Signal Source 1 Press the MENU button. Input ... control to switch between the following sets of jacks: "AV1", "AV2", "S-VIDEO1", "S-VIDEO2", "COMPONENT1", "COMPONENT2", "PC", "HDMI1", or "HDMI2" on the TV's rear panel. • HDMI input can choose between viewing signals from connected equipment, such as a VCR, DVD, Set-Top Box or the...

User Manual (ENGLISH)
Page 64
... Press the PIP button on again, then the mode will return to normal video. • Digital channels cannot be viewed in the corner of your TV. or † button to activate or deactivate the PIP. or † button to select "PIP". or † button to select "PIP", then...doesn't function when the "V-Chip" is analog. The advanced PIP system allows you to watch two different pictures at once, even if you turn the TV off while watching and turn it on the remote control repeatedly to select "Picture", then press the ENTER button. 2 Press the ... English - 64 Activating the PIP...
... Press the PIP button on again, then the mode will return to normal video. • Digital channels cannot be viewed in the corner of your TV. or † button to activate or deactivate the PIP. or † button to select "PIP". or † button to select "PIP", then...doesn't function when the "V-Chip" is analog. The advanced PIP system allows you to watch two different pictures at once, even if you turn the TV off while watching and turn it on the remote control repeatedly to select "Picture", then press the ENTER button. 2 Press the ... English - 64 Activating the PIP...
User Manual (ENGLISH)
Page 76
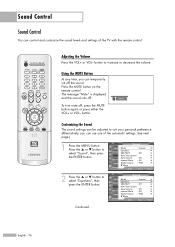
...; ▼ More Move Enter Return Continued... See next page.) 1 Press the MENU button. English - 76 Sound Control Sound Control You can use one of the TV with the remote control. Adjusting the Volume Press the VOL+ or VOL- The message "Mute" is displayed and the sound cuts off , press the MUTE...
...; ▼ More Move Enter Return Continued... See next page.) 1 Press the MENU button. English - 76 Sound Control Sound Control You can use one of the TV with the remote control. Adjusting the Volume Press the VOL+ or VOL- The message "Mute" is displayed and the sound cuts off , press the MUTE...
User Manual (ENGLISH)
Page 109
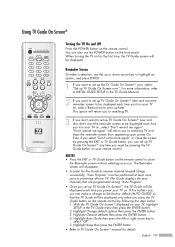
... ENTER button. 3. The Guide displays the very channels that the TV Guide will be displayed each time you turn your TV. For more information, refer to close the screen by pressing the EXIT or TV Guide button, you can set up TV Guide On ScreenTM any icon. "Don't remind me again" or...control to INITIAL GUIDE SETUP in the TV Guide menu then press the ENTER button. 2. With the TV Guide On ScreenTM displayed on the remote control. Using TV Guide On ScreenTM Turning the TV On and Off Press the POWER button on your TV, highlight SETUP in the TV Guide Manual. 2 If you want to...
... ENTER button. 3. The Guide displays the very channels that the TV Guide will be displayed each time you turn your TV. For more information, refer to close the screen by pressing the EXIT or TV Guide button, you can set up TV Guide On ScreenTM any icon. "Don't remind me again" or...control to INITIAL GUIDE SETUP in the TV Guide menu then press the ENTER button. 2. With the TV Guide On ScreenTM displayed on the remote control. Using TV Guide On ScreenTM Turning the TV On and Off Press the POWER button on your TV, highlight SETUP in the TV Guide Manual. 2 If you want to...

User Manual (ENGLISH)
Page 119
... of the DVHS, the Play command is possible to use direct keys on AVHDD, this Move to the DVHA through the equivalent buttons on the TV's remote control. • Not all IEEE1394 devices. • It is transmitted to the previous menu. English - 119 Start and stop ) To... The selected IEEE1394 device and its functions can be controlled through the IEEE 1394 connection. Play the digital stream from the selected digital device. Turn the Power of the selected device ON/OFF. Pause Play. Display the AVHDD program list. Fast rewind a digital stream from the selected digital device...
... of the DVHS, the Play command is possible to use direct keys on AVHDD, this Move to the DVHA through the equivalent buttons on the TV's remote control. • Not all IEEE1394 devices. • It is transmitted to the previous menu. English - 119 Start and stop ) To... The selected IEEE1394 device and its functions can be controlled through the IEEE 1394 connection. Play the digital stream from the selected digital device. Turn the Power of the selected device ON/OFF. Pause Play. Display the AVHDD program list. Fast rewind a digital stream from the selected digital device...
User Manual (ENGLISH)
Page 120
... device from the Device List, if detecting a video signal from the 1394 connection when they are turned off the power (power saving mode), the camcorder may provide two playbacks or recordings simultaneously. If.... 8) When connected to discover which is currently being displayed on the screen) depending on the TV screen and recorded using the MPEG-2 algorithm and transmits the data unit unlike for analog. Some AVHDD...device selected from the Device List. If the camcorder turns off . 5) When connecting another TV, the TV may cause a malfunction when multiple devices are connected.
... device from the Device List, if detecting a video signal from the 1394 connection when they are turned off the power (power saving mode), the camcorder may provide two playbacks or recordings simultaneously. If.... 8) When connected to discover which is currently being displayed on the screen) depending on the TV screen and recorded using the MPEG-2 algorithm and transmits the data unit unlike for analog. Some AVHDD...device selected from the Device List. If the camcorder turns off . 5) When connecting another TV, the TV may cause a malfunction when multiple devices are connected.
User Manual (ENGLISH)
Page 123
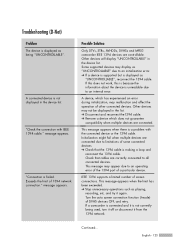
...of DVHS devices OFF, and retry. Initialization might fail when multiple devices are controllable. and try it from the 1394 network. Turn the auto screen connection function (I-mode) of 1394 network connection." Possible Solution Only DTVs, STBs, AVHDDs, DVHSs and MPEG camcorder ... number of some connected devices. ➔ Check that cables are connected. English - 123 A connected device is displayed as being used, turn it off or disconnect it again. This message appears when the limit has been exceeded. ➔ Stop unnecessary operations such as "UNCONTROLLABLE",...
...of DVHS devices OFF, and retry. Initialization might fail when multiple devices are controllable. and try it from the 1394 network. Turn the auto screen connection function (I-mode) of 1394 network connection." Possible Solution Only DTVs, STBs, AVHDDs, DVHSs and MPEG camcorder ... number of some connected devices. ➔ Check that cables are connected. English - 123 A connected device is displayed as being used, turn it off or disconnect it again. This message appears when the limit has been exceeded. ➔ Stop unnecessary operations such as "UNCONTROLLABLE",...
User Manual (ENGLISH)
Page 126
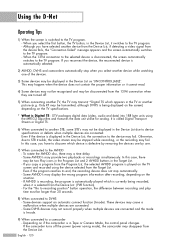
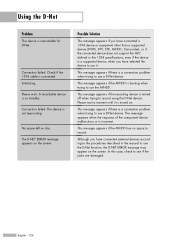
... D-Net function, the D-NET ERROR message may appear on the screen. In this case, check to record. English - 126 Check if the 1394 cable is turned off when trying to use it is not responding. The D-NET ERROR message appears on standby. This message appears if there is on the screen...
... D-Net function, the D-NET ERROR message may appear on the screen. In this case, check to record. English - 126 Check if the 1394 cable is turned off when trying to use it is not responding. The D-NET ERROR message appears on standby. This message appears if there is on the screen...
User Manual (ENGLISH)
Page 138
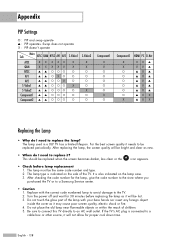
... lamp near flammable objects or within the reach of the lamp with the correct code numbered lamp to avoid damage to a Samsung Service center. • Caution 1. Be sure to connect this TV directly to a cable box or other source, it may cause poor screen quality, electric shock or fire. 4. It is... also indicated on the side of the TV. The lamp used in a DLP TV has a limited lifespan. This should be the same code number and type. 2. English - 138 Turn the power off and wait for 30 minutes before lamp replacement 1. Do not touch the ...
... lamp near flammable objects or within the reach of the lamp with the correct code numbered lamp to avoid damage to a Samsung Service center. • Caution 1. Be sure to connect this TV directly to a cable box or other source, it may cause poor screen quality, electric shock or fire. 4. It is... also indicated on the side of the TV. The lamp used in a DLP TV has a limited lifespan. This should be the same code number and type. 2. English - 138 Turn the power off and wait for 30 minutes before lamp replacement 1. Do not touch the ...

User Manual (ENGLISH)
Page 139
... the replacement Lamp is the same type. • After replacing the lamp, align the lamp cover with the groove and secure the screws. • The TV will not turn on if the lamp cover is not correctly closed (as this will need a 5.91-Inch screwdriver and a pair of gloves. 1 Unplug... TV, then use a screwdriver to remove the screws. 2 Remove the Lamp cover. 3 Remove the 2 press-pin screws securing the Lamp. 4 Separate the Lamp from the engine ...
... the replacement Lamp is the same type. • After replacing the lamp, align the lamp cover with the groove and secure the screws. • The TV will not turn on if the lamp cover is not correctly closed (as this will need a 5.91-Inch screwdriver and a pair of gloves. 1 Unplug... TV, then use a screwdriver to remove the screws. 2 Remove the Lamp cover. 3 Remove the 2 press-pin screws securing the Lamp. 4 Separate the Lamp from the engine ...


