
User Manual (ENGLISH)
Page 6
...11 Accessories ...11 Front Panel Buttons 12 Front Panel Information Window 13 Rear Panel Jacks ...14 Remote Control...15 Connections 18 Connecting VHF and UHF Antennas 18 Antennas with 75-ohm Round Leads 18 Connecting Cable TV 19 Cable without a Cable Box 19 Cable with a Cable Box... Multimedia Interface 25 Connecting a Digital Audio System 26 Connecting to an Analog Amplifier 26 Connecting to a Subwoofer Speaker 27 Operation 30 Turning the TV On and Off 30 Viewing the Menus and On-Screen Displays 30 Selecting a Menu Language 31 Memorizing the Channels 32 Adding and Erasing...
...11 Accessories ...11 Front Panel Buttons 12 Front Panel Information Window 13 Rear Panel Jacks ...14 Remote Control...15 Connections 18 Connecting VHF and UHF Antennas 18 Antennas with 75-ohm Round Leads 18 Connecting Cable TV 19 Cable without a Cable Box 19 Cable with a Cable Box... Multimedia Interface 25 Connecting a Digital Audio System 26 Connecting to an Analog Amplifier 26 Connecting to a Subwoofer Speaker 27 Operation 30 Turning the TV On and Off 30 Viewing the Menus and On-Screen Displays 30 Selecting a Menu Language 31 Memorizing the Channels 32 Adding and Erasing...

User Manual (ENGLISH)
Page 11
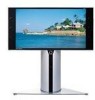
... remote control • Easy-to-use on-screen menu system you can access from the front panel or remote control • Automatic timer to turn the TV on and off at any piece is a full-featured, high-performance unit that you have all the parts shown here. It is missing or... broken, call your TV, check to easily control Samsung audio-video(AV) devices from this TV. • CableCARD slot • D-Net (IEEE1394) • TV Guide On Screen™ Accessories Once you have unpacked your dealer. If any time you choose...
... remote control • Easy-to-use on-screen menu system you can access from the front panel or remote control • Automatic timer to turn the TV on and off at any piece is a full-featured, high-performance unit that you have all the parts shown here. It is missing or... broken, call your TV, check to easily control Samsung audio-video(AV) devices from this TV. • CableCARD slot • D-Net (IEEE1394) • TV Guide On Screen™ Accessories Once you have unpacked your dealer. If any time you choose...
User Manual (ENGLISH)
Page 12
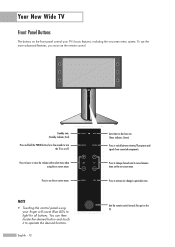
...Buttons The buttons on the front panel control your finger will cause Blue LEDs to light for a few seconds to turn the TV on or off. Press to select items when using your TV's basic features, including the on -screen menu. Standby state. (Standby indicator; NOTE • Touching the control ...; Red) Press and hold the POWER button for all buttons. You can then locate the desired button and touch it to move between viewing TV programs and signals from connected components. Press to lower or raise the volume and to change ) a particular item. To use the more advanced...
...Buttons The buttons on the front panel control your finger will cause Blue LEDs to light for a few seconds to turn the TV on or off. Press to select items when using your TV's basic features, including the on -screen menu. Standby state. (Standby indicator; NOTE • Touching the control ...; Red) Press and hold the POWER button for all buttons. You can then locate the desired button and touch it to move between viewing TV programs and signals from connected components. Press to lower or raise the volume and to change ) a particular item. To use the more advanced...
User Manual (ENGLISH)
Page 13
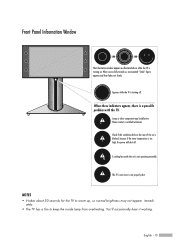
...brightness may be defective. You'll occasionally hear it working. Check if the ventilation hole on the rear of the set is too high, the power will shut off . The TV's rear cover is turning on , an animated "Smile" figure appears and then fades out slowly. Front Panel Information Window... The Information window appears as illustrated above while the TV is not properly shut. Lamp or other component may not appear...
...brightness may be defective. You'll occasionally hear it working. Check if the ventilation hole on the rear of the set is too high, the power will shut off . The TV's rear cover is turning on , an animated "Smile" figure appears and then fades out slowly. Front Panel Information Window... The Information window appears as illustrated above while the TV is not properly shut. Lamp or other component may not appear...
User Manual (ENGLISH)
Page 15
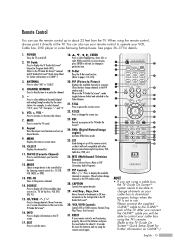
... be able to control your cable box using the TV's remote. (Refer to the TV Guide On ScreenTM Quick Setup Sheet for further information on the TV screen. 17. NOTE • If you will work compatibly with other devices (some Samsung Set-top boxes. ANTENNA Press to increase or decrease... for about 23 feet from one set up to change ) a particular item. 19. POWER Turns the TV on -screen menu. 10. Press to select additional channels (digital and analog) being broadcast by the Samsung remote control (i.e., TV, STB, VCR, CABLE, or DVD). 13. MUTE Press to pages 112~126) 20. ...
... be able to control your cable box using the TV's remote. (Refer to the TV Guide On ScreenTM Quick Setup Sheet for further information on the TV screen. 17. NOTE • If you will work compatibly with other devices (some Samsung Set-top boxes. ANTENNA Press to increase or decrease... for about 23 feet from one set up to change ) a particular item. 19. POWER Turns the TV on -screen menu. 10. Press to select additional channels (digital and analog) being broadcast by the Samsung remote control (i.e., TV, STB, VCR, CABLE, or DVD). 13. MUTE Press to pages 112~126) 20. ...

User Manual (ENGLISH)
Page 20
...When changing the antenna connection, you do not need to press the TV/VCR button on the TV screen. TV Rear Panel 2 Connect a coaxial cable between the Antenna out terminal (i.e., "OUT to TV") on the VCR and the ANT 1 IN (CABLE) on the TV. 3 Connect a video cable between the VIDEO or S-VIDEO/AUDIO ... input terminals and cable jacks. • When connecting the VCR and turning it on, there may be some degradation of the visual quality with noise on the VCR remote control for using the recording function of the TV Guide On ScreenTM. Connections Connecting a VCR Connecting a VCR to the ...
...When changing the antenna connection, you do not need to press the TV/VCR button on the TV screen. TV Rear Panel 2 Connect a coaxial cable between the Antenna out terminal (i.e., "OUT to TV") on the VCR and the ANT 1 IN (CABLE) on the TV. 3 Connect a video cable between the VIDEO or S-VIDEO/AUDIO ... input terminals and cable jacks. • When connecting the VCR and turning it on, there may be some degradation of the visual quality with noise on the VCR remote control for using the recording function of the TV Guide On ScreenTM. Connections Connecting a VCR Connecting a VCR to the ...

User Manual (ENGLISH)
Page 26
...shown below. When an audio amplifier is set the digital output format (Dolby Digital or PCM) appropriate to page 83) English - 26 TV Rear Panel 1 Amplifier TV Rear Panel 1 Audio System Connecting to an amplifier. You must hook them up to an Analog Amplifier 1 The "AV OUT (AUDIO L/R)" terminals...has an optical digital audio input, connect to the "AV OUT (AUDIO L/R)" terminals: Decrease the gain (volume) of the audio amplifier, turn the TV's internal mute on and adjust the volume level with the volume control of digital audio systems on . (Refer to your digital audio component.
...shown below. When an audio amplifier is set the digital output format (Dolby Digital or PCM) appropriate to page 83) English - 26 TV Rear Panel 1 Amplifier TV Rear Panel 1 Audio System Connecting to an amplifier. You must hook them up to an Analog Amplifier 1 The "AV OUT (AUDIO L/R)" terminals...has an optical digital audio input, connect to the "AV OUT (AUDIO L/R)" terminals: Decrease the gain (volume) of the audio amplifier, turn the TV's internal mute on and adjust the volume level with the volume control of digital audio systems on . (Refer to your digital audio component.
User Manual (ENGLISH)
Page 30
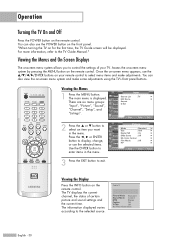
"When turning the TV on the remote control. Viewing the Menus Input 1 Press the MENU button. Access the on-screen menu system by pressing the MENU button on for the first time, the TV Guide screen will be displayed. or † button to select an item you to control... "Input", "Picture", "Sound", Sound D-Net "Channel", "Setup", and Channel "Listings". Setup Listings Move Enter Exit 2 Press the ... Operation Turning the TV On and Off Press the POWER button on -screen menu system and make adjustments. For more information, refer to the selected source. Press the ...
"When turning the TV on the remote control. Viewing the Menus Input 1 Press the MENU button. Access the on-screen menu system by pressing the MENU button on for the first time, the TV Guide screen will be displayed. or † button to select an item you to control... "Input", "Picture", "Sound", Sound D-Net "Channel", "Setup", and Channel "Listings". Setup Listings Move Enter Exit 2 Press the ... Operation Turning the TV On and Off Press the POWER button on -screen menu system and make adjustments. For more information, refer to the selected source. Press the ...
User Manual (ENGLISH)
Page 36
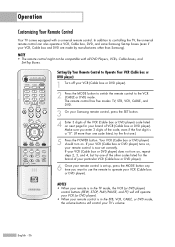
... button to switch the remote control to controlling the TV, the universal remote control can also operate a VCR, Cable box, DVD, and some Samsung Set-top boxes (even if your TV's volume. If your VCR (Cable box or DVD player) turns on . NOTE • The remote control might ...not be compatible with a universal remote control. Operation Customizing Your Remote Control Your TV comes equipped with all DVD Players, ...
... button to switch the remote control to controlling the TV, the universal remote control can also operate a VCR, Cable box, DVD, and some Samsung Set-top boxes (even if your TV's volume. If your VCR (Cable box or DVD player) turns on . NOTE • The remote control might ...not be compatible with a universal remote control. Operation Customizing Your Remote Control Your TV comes equipped with all DVD Players, ...

User Manual (ENGLISH)
Page 40
... to adjust "Hour", then press the √ button to move to "Yes" by pressing the number buttons on vacation, for 3 hours after the TV was turned on by pressing ... Hour Minute am/pm Activation ▲ 12 00 am No ▼ Move Adjust Return To activate Off Timer with the setting entered...function is only available in timer "On" mode and prevents overheating or leakage, which may occur if a TV is on for too long (when you set the timer "On", the television will eventually turn off, if no controls are on the remote control. English - 40 Set other items using the same...
... to adjust "Hour", then press the √ button to move to "Yes" by pressing the number buttons on vacation, for 3 hours after the TV was turned on by pressing ... Hour Minute am/pm Activation ▲ 12 00 am No ▼ Move Adjust Return To activate Off Timer with the setting entered...function is only available in timer "On" mode and prevents overheating or leakage, which may occur if a TV is on for too long (when you set the timer "On", the television will eventually turn off, if no controls are on the remote control. English - 40 Set other items using the same...
User Manual (ENGLISH)
Page 42
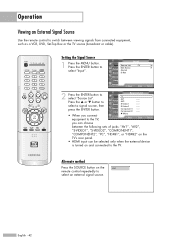
..."AV1", "AV2", "S-VIDEO1", "S-VIDEO2", "COMPONENT1", "COMPONENT2", "PC", "HDMI1", or "HDMI2" on the TV's rear panel. • HDMI input can be selected only when the external device is turned on the AV1 remote control repeatedly to select an external signal source. Input Input Source List... : TV Picture Edit Name Anynet Sound D-Net Channel Setup Listings Move Enter √ √ ...
..."AV1", "AV2", "S-VIDEO1", "S-VIDEO2", "COMPONENT1", "COMPONENT2", "PC", "HDMI1", or "HDMI2" on the TV's rear panel. • HDMI input can be selected only when the external device is turned on the AV1 remote control repeatedly to select an external signal source. Input Input Source List... : TV Picture Edit Name Anynet Sound D-Net Channel Setup Listings Move Enter √ √ ...

User Manual (ENGLISH)
Page 64
... Press the PIP button on again, then the mode will return to normal video. • Digital channels cannot be viewed in the corner of your TV. Activating the PIP 1 Press the MENU button. Press the ... Press the ... NOTES • This feature doesn't function when the "V-Chip" is active. &#... select "PIP". The advanced PIP system allows you to watch two different pictures at once, even if you turn the TV off while watching and turn it on the remote control repeatedly to your TV is analog. or † button to select "PIP", then press the ENTER button. 3 Press the ENTER...
... Press the PIP button on again, then the mode will return to normal video. • Digital channels cannot be viewed in the corner of your TV. Activating the PIP 1 Press the MENU button. Press the ... Press the ... NOTES • This feature doesn't function when the "V-Chip" is active. &#... select "PIP". The advanced PIP system allows you to watch two different pictures at once, even if you turn the TV off while watching and turn it on the remote control repeatedly to your TV is analog. or † button to select "PIP", then press the ENTER button. 3 Press the ENTER...
User Manual (ENGLISH)
Page 76
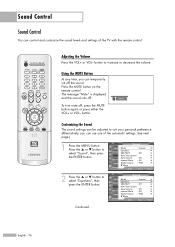
Mute To turn mute off . button to select "Sound", then press the ENTER button. 2 Press the ... Press the MUTE button on the remote control. or † button to ... temporarily cut off the sound. Adjusting the Volume Press the VOL+ or VOL- button. Customizing the Sound The sound settings can use one of the TV with the remote control. or † button to suit your personal preference. (Alternatively, you can control and customize the sound levels and settings of the...
Mute To turn mute off . button to select "Sound", then press the ENTER button. 2 Press the ... Press the MUTE button on the remote control. or † button to ... temporarily cut off the sound. Adjusting the Volume Press the VOL+ or VOL- button. Customizing the Sound The sound settings can use one of the TV with the remote control. or † button to suit your personal preference. (Alternatively, you can control and customize the sound levels and settings of the...
User Manual (ENGLISH)
Page 109
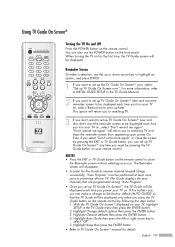
... Auto Guide then press the left or right arrow key to TV Guide On ScreenTM manual for details. When turning the TV on for the Guide to close the screen by pressing the EXIT or TV Guide button, you turn your TV on the remote control to receive channel lineup& listings successfully,...ENTER button. 4. "Don't remind me again" will be displayed each time you turn your TV, highlight SETUP in the TV Guide Manual. 2 If you press the TV Guide button on the remote control by pressing the TV Guide button on the front panel. Reminder Screen To make a change to the factory...
... Auto Guide then press the left or right arrow key to TV Guide On ScreenTM manual for details. When turning the TV on for the Guide to close the screen by pressing the EXIT or TV Guide button, you turn your TV on the remote control to receive channel lineup& listings successfully,...ENTER button. 4. "Don't remind me again" will be displayed each time you turn your TV, highlight SETUP in the TV Guide Manual. 2 If you press the TV Guide button on the remote control by pressing the TV Guide button on the front panel. Reminder Screen To make a change to the factory...

User Manual (ENGLISH)
Page 119
...Display the EIA-775 OSD receive to the DVHA through the equivalent buttons on the TV's remote control. • Not all functions are supported for controlling external IEEE 1394 devices with the TV remote control and not the remote control of the selected device ON/OFF. When in...moves to the previous menu. Fast rewind a digital stream from the selected digital device. Fast forward a digital stream from the selected digital device. Turn the Power of the external device. Display only Camcoder recordings. NOTES • Press the buttons on the remote control to select a control panel...
...Display the EIA-775 OSD receive to the DVHA through the equivalent buttons on the TV's remote control. • Not all functions are supported for controlling external IEEE 1394 devices with the TV remote control and not the remote control of the selected device ON/OFF. When in...moves to the previous menu. Fast rewind a digital stream from the selected digital device. Fast forward a digital stream from the selected digital device. Turn the Power of the external device. Display only Camcoder recordings. NOTES • Press the buttons on the remote control to select a control panel...
User Manual (ENGLISH)
Page 120
... Using the D-Net Operating Tips 1) When the screen is switched to the TV program. - It is called Digital Transport Stream or Digital TS. 6) When connected to device specifications or defects when multiple devices are turned off the power (power saving mode), the camcorder may not be disconnected from... from the Program List, the selected AVHDD program is in the Device List, the connection to the TV program. If the camcorder turns off . 5) When connecting another TV, the TV may be displayed in the Device List, it is automatically played which appears in the Device List due...
... Using the D-Net Operating Tips 1) When the screen is switched to the TV program. - It is called Digital Transport Stream or Digital TS. 6) When connected to device specifications or defects when multiple devices are turned off the power (power saving mode), the camcorder may not be disconnected from... from the Program List, the selected AVHDD program is in the Device List, the connection to the TV program. If the camcorder turns off . 5) When connecting another TV, the TV may be displayed in the Device List, it is automatically played which appears in the Device List due...
User Manual (ENGLISH)
Page 123
... may display as "UNCONTROLLABLE" due to an initialization error. ➔ If a device is supported but is displayed as being used, turn it off or disconnect it again. If this does not work, this is because the information about the device is not displayed in the... devices. message appears. This message appears when the limit has been exceeded. ➔ Stop unnecessary operations such as playing, recording, etc. Turn the auto screen connection function (I-mode) of 1394 network connection." English - 123 Initialization might fail when multiple devices are connected due to an...
... may display as "UNCONTROLLABLE" due to an initialization error. ➔ If a device is supported but is displayed as being used, turn it off or disconnect it again. If this does not work, this is because the information about the device is not displayed in the... devices. message appears. This message appears when the limit has been exceeded. ➔ Stop unnecessary operations such as playing, recording, etc. Turn the auto screen connection function (I-mode) of 1394 network connection." English - 123 Initialization might fail when multiple devices are connected due to an...
User Manual (ENGLISH)
Page 126
... a supported device, when you have selected the device to record using the D-Net device. In this case, check to record. Please wait. A recordable device is turned off when trying to use the AVHDD. The D-NET ERROR message appears on disc. This message appears if the recording device is on standby. This... wait a moment until it . Check if the 1394 cable is a connection problem when trying to use a D-Net device. Using the D-Net Problem This device is turned on.
... a supported device, when you have selected the device to record using the D-Net device. In this case, check to record. Please wait. A recordable device is turned off when trying to use the AVHDD. The D-NET ERROR message appears on disc. This message appears if the recording device is on standby. This... wait a moment until it . Check if the 1394 cable is a connection problem when trying to use a D-Net device. Using the D-Net Problem This device is turned on.
User Manual (ENGLISH)
Page 138
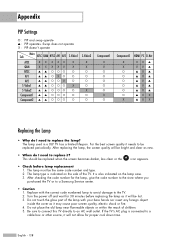
...Be sure to connect this TV directly to a Samsung Service center. • Caution 1. The lamp used in a DLP TV has a limited lifespan. The... lamp must be hot. 3. After checking the code number for the lamp, give the code number to the store where you purchased the TV...glass part of the TV. Do not place the old lamp near flammable objects or...English - 138 If the TV's AC plug is also indicated...as new. • When do I need to the TV. 2. For the best screen quality it needs to replace ...
...Be sure to connect this TV directly to a Samsung Service center. • Caution 1. The lamp used in a DLP TV has a limited lifespan. The... lamp must be hot. 3. After checking the code number for the lamp, give the code number to the store where you purchased the TV...glass part of the TV. Do not place the old lamp near flammable objects or...English - 138 If the TV's AC plug is also indicated...as new. • When do I need to the TV. 2. For the best screen quality it needs to replace ...

User Manual (ENGLISH)
Page 139
... the replacement Lamp is the same type. • After replacing the lamp, align the lamp cover with the groove and secure the screws. • The TV will not turn on if the lamp cover is not correctly closed (as this will need a 5.91-Inch screwdriver and a pair of gloves. 1 Unplug... TV, then use a screwdriver to remove the screws. 2 Remove the Lamp cover. 3 Remove the 2 press-pin screws securing the Lamp. 4 Separate the Lamp from the engine ...
... the replacement Lamp is the same type. • After replacing the lamp, align the lamp cover with the groove and secure the screws. • The TV will not turn on if the lamp cover is not correctly closed (as this will need a 5.91-Inch screwdriver and a pair of gloves. 1 Unplug... TV, then use a screwdriver to remove the screws. 2 Remove the Lamp cover. 3 Remove the 2 press-pin screws securing the Lamp. 4 Separate the Lamp from the engine ...


