User Manual (ENGLISH)
Page 7
... Digital Noise Reduction 58 Viewing the DNIe Demonstration 59 Setting the My Color Control Mode 60 Using the Color Weakness Enhancement Feature 62 Setting the Film Mode 63 Viewing Picture-In-Picture 64 Freezing the Picture 72 Setting the Blue Screen Mode 73 Sound Control 76 Sound ...Menu Transparency Level 89 Using the V-Chip...90 Viewing Closed Captions (On-Screen Text Messages) Analog 100 Viewing Closed Captions (On-Screen Text Messages) Digital 102 Setting the Port Selection Mode 104 Using the CableCARD 105 Using the CableCARD Setup Function 106 Using Game Mode 108 Using TV...
... Digital Noise Reduction 58 Viewing the DNIe Demonstration 59 Setting the My Color Control Mode 60 Using the Color Weakness Enhancement Feature 62 Setting the Film Mode 63 Viewing Picture-In-Picture 64 Freezing the Picture 72 Setting the Blue Screen Mode 73 Sound Control 76 Sound ...Menu Transparency Level 89 Using the V-Chip...90 Viewing Closed Captions (On-Screen Text Messages) Analog 100 Viewing Closed Captions (On-Screen Text Messages) Digital 102 Setting the Port Selection Mode 104 Using the CableCARD 105 Using the CableCARD Setup Function 106 Using Game Mode 108 Using TV...

User Manual (ENGLISH)
Page 11
... • Color weakness Mode • Digital Input (HDMI/DVI IN) jack • Digital Audio Output (OPTICAL) jack • AV network system (Anynet) that enables you to easily control Samsung audio-video(AV) devices from the front panel or remote control • Automatic timer to make...settings • Automatic channel tuning for up to 181 channels • A special filter to reduce or eliminate reception problems • Fine tuning control for the sharpest picture possible • A built-in multi-channel sound decoder for corresponding with your TV, check to turn the TV on -screen menu...
... • Color weakness Mode • Digital Input (HDMI/DVI IN) jack • Digital Audio Output (OPTICAL) jack • AV network system (Anynet) that enables you to easily control Samsung audio-video(AV) devices from the front panel or remote control • Automatic timer to make...settings • Automatic channel tuning for up to 181 channels • A special filter to reduce or eliminate reception problems • Fine tuning control for the sharpest picture possible • A built-in multi-channel sound decoder for corresponding with your TV, check to turn the TV on -screen menu...
User Manual (ENGLISH)
Page 30
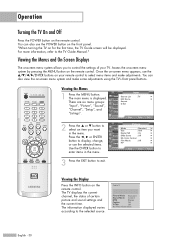
...to exit. Picture Input Mode : Standard √ Picture Size Digital NR : 16:9 : On √ √ Sound DNIe Demo : Off √ My Color Control √ Channel Film Mode : Off √ Setup PIP √ Listings Move Enter Return 3 Press the EXIT button to the... the first time, the TV Guide screen will be displayed. "When turning the TV on the remote control. The main menu is displayed. Setup Listings Move Enter Exit 2 Press the ... The information displayed varies according to control the settings of certain picture and sound settings and the current time. ...
...to exit. Picture Input Mode : Standard √ Picture Size Digital NR : 16:9 : On √ √ Sound DNIe Demo : Off √ My Color Control √ Channel Film Mode : Off √ Setup PIP √ Listings Move Enter Return 3 Press the EXIT button to the... the first time, the TV Guide screen will be displayed. "When turning the TV on the remote control. The main menu is displayed. Setup Listings Move Enter Exit 2 Press the ... The information displayed varies according to control the settings of certain picture and sound settings and the current time. ...
User Manual (ENGLISH)
Page 38
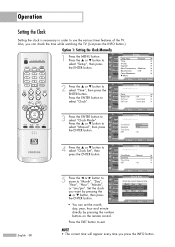
... √ Color Weakness √ ▼ More Move Enter Return 2 Press the ... or † button to exit. or † button to select "Clock Mode". Input Picture Sound Channel Setup Listings • You can check the time while watching the TV. (Just press the INFO button.) Option 1: Setting the Clock Manually 1 Press the MENU button. English...
... √ Color Weakness √ ▼ More Move Enter Return 2 Press the ... or † button to exit. or † button to select "Clock Mode". Input Picture Sound Channel Setup Listings • You can check the time while watching the TV. (Just press the INFO button.) Option 1: Setting the Clock Manually 1 Press the MENU button. English...
User Manual (ENGLISH)
Page 39
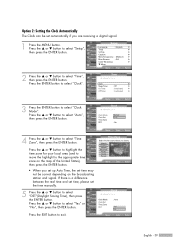
..., please set automatically if you are receiving a digital signal. 1 Press the MENU button. Press the ... or † button to exit. Setup Input Picture Sound Channel Setup Listings Language : English √ Time √ V-Chip √ Caption √ Menu Transparency : Medium √ Blue Screen : Off √ Color Weakness √ ▼ More Move Enter Return 2 Press the...
..., please set automatically if you are receiving a digital signal. 1 Press the MENU button. Press the ... or † button to exit. Setup Input Picture Sound Channel Setup Listings Language : English √ Time √ V-Chip √ Caption √ Menu Transparency : Medium √ Blue Screen : Off √ Color Weakness √ ▼ More Move Enter Return 2 Press the...

User Manual (ENGLISH)
Page 40
...; V-Chip √ Caption √ Menu Transparency : Medium √ Blue Screen : Off √ Color Weakness √ ▼ More Move Enter Return Time Input 1/ 1/ 2005/ 12 : 00 am No ▼ Move Adjust Return To activate Off Timer with the setting entered, set the timer "On", the television will eventually... Picture Sound Channel Setup Listings Off Timer Enter the Off Timer options. Operation Setting the On/Off Timer NOTE • Auto Power Off When you are operated for 3 hours after the TV was turned on by pressing ... This function is only available in timer ...
...; V-Chip √ Caption √ Menu Transparency : Medium √ Blue Screen : Off √ Color Weakness √ ▼ More Move Enter Return Time Input 1/ 1/ 2005/ 12 : 00 am No ▼ Move Adjust Return To activate Off Timer with the setting entered, set the timer "On", the television will eventually... Picture Sound Channel Setup Listings Off Timer Enter the Off Timer options. Operation Setting the On/Off Timer NOTE • Auto Power Off When you are operated for 3 hours after the TV was turned on by pressing ... This function is only available in timer ...

User Manual (ENGLISH)
Page 41
... shuts off the TV after a preset time (from 30 to exit. Press the ... Press the EXIT button to 180 minutes). 1 Press the MENU button. or † button to adjust "Minute". 4 Setting the Timer sets the Activation to select... "Time", then press the ENTER button. Minute 30 Activation ▲ Yes ▼ Move Adjust Return English - 41 Setup Input Picture Sound Channel Setup Listings Language : English √ Time √ V-Chip √ Caption √ Menu Transparency : Medium √ Blue Screen : Off √ Color...
... shuts off the TV after a preset time (from 30 to exit. Press the ... Press the EXIT button to 180 minutes). 1 Press the MENU button. or † button to adjust "Minute". 4 Setting the Timer sets the Activation to select... "Time", then press the ENTER button. Minute 30 Activation ▲ Yes ▼ Move Adjust Return English - 41 Setup Input Picture Sound Channel Setup Listings Language : English √ Time √ V-Chip √ Caption √ Menu Transparency : Medium √ Blue Screen : Off √ Color...

User Manual (ENGLISH)
Page 54
... again to exit. English - 54 Press the ... or † button to personal preference (see "Customizing the Picture Settings", page 55). Changing the Picture Standard 1 Press the MENU button. Press the ... Picture Input Mode : Standard √ Picture Size Digital NR : 16:9 : On √...Color Tint G 50 Color Tone Reset :DSyntaanmdicard Standard 90 Movie 50 Custom 65 60 R 50 : Warm1 Move Enter Return • Choose "Dynamic" for viewing the TV during the day or when there is a bright light in the room. • Choose "Standard" for the standard factory settings...
... again to exit. English - 54 Press the ... or † button to personal preference (see "Customizing the Picture Settings", page 55). Changing the Picture Standard 1 Press the MENU button. Press the ... Picture Input Mode : Standard √ Picture Size Digital NR : 16:9 : On √...Color Tint G 50 Color Tone Reset :DSyntaanmdicard Standard 90 Movie 50 Custom 65 60 R 50 : Warm1 Move Enter Return • Choose "Dynamic" for viewing the TV during the day or when there is a bright light in the room. • Choose "Standard" for the standard factory settings...

User Manual (ENGLISH)
Page 55
... modes. • The Tint cannot be adjusted while watching Digital TV. English - 55 Customizing the Picture Settings You can select "Standard" which automatically recalls your personalized picture settings. 1 Press the MENU button. Mode Input Picture Sound Channel Setup Listings Mode Contrast Brightness Sharpness Color Tint G 50 Color Tone Reset Move : Standard √ 90 50 65 60...
... modes. • The Tint cannot be adjusted while watching Digital TV. English - 55 Customizing the Picture Settings You can select "Standard" which automatically recalls your personalized picture settings. 1 Press the MENU button. Mode Input Picture Sound Channel Setup Listings Mode Contrast Brightness Sharpness Color Tint G 50 Color Tone Reset Move : Standard √ 90 50 65 60...
User Manual (ENGLISH)
Page 57
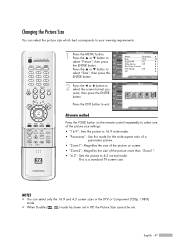
... the ENTER button. Picture Input Mode : Standard √ Picture Size Digital NR : 16:9 : On √ √ Sound DNIe Demo : Off √ My Color Control √ Channel Film Mode : Off √ Setup PIP √ Listings Move Enter Return 2 Press the œ or √ button to exit. Press the... the 16:9 and 4:3 screen sizes in the DTV or Component (720p, 1080i) mode. • When Double ( , ) mode has been set in PIP, the Picture Size cannot be set. or † button to your viewing requirements. 1 Press the MENU button. This is a standard TV screen size.
... the ENTER button. Picture Input Mode : Standard √ Picture Size Digital NR : 16:9 : On √ √ Sound DNIe Demo : Off √ My Color Control √ Channel Film Mode : Off √ Setup PIP √ Listings Move Enter Return 2 Press the œ or √ button to exit. Press the... the 16:9 and 4:3 screen sizes in the DTV or Component (720p, 1080i) mode. • When Double ( , ) mode has been set in PIP, the Picture Size cannot be set. or † button to your viewing requirements. 1 Press the MENU button. This is a standard TV screen size.

User Manual (ENGLISH)
Page 59
...TV includes the DNIe function so as to select "Picture", then press the ENTER button. 2 Press the ... or † button to provide a high visual quality. Picture Input Mode : Standard √ Picture Size Digital NR : 16:9 : On √ √ Sound DNIe Demo : Off √ My Color... √ Sound DNIe Demo : Off √ My Color Control √ Channel Film Mode : Off √ Setup... On DNIe Demo : OOfff My Color Control On Film Mode : Off ...; button to select one of the settings. • On: Switches on the...8224; button to exit. If you set DNIe Demo to On, you a...
...TV includes the DNIe function so as to select "Picture", then press the ENTER button. 2 Press the ... or † button to provide a high visual quality. Picture Input Mode : Standard √ Picture Size Digital NR : 16:9 : On √ √ Sound DNIe Demo : Off √ My Color... √ Sound DNIe Demo : Off √ My Color Control √ Channel Film Mode : Off √ Setup... On DNIe Demo : OOfff My Color Control On Film Mode : Off ...; button to select one of the settings. • On: Switches on the...8224; button to exit. If you set DNIe Demo to On, you a...
User Manual (ENGLISH)
Page 60
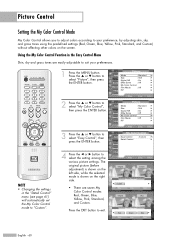
..., Green, Blue, Yellow, Pink, Standard, and Custom. Using the My Color Control Function in the "Detail Control" menu (see page 61) will automatically set the My Color Control mode to "Custom". 1 Press the MENU button. or † button to select the setting among the various picture settings. Picture Input Mode : Standard √ Picture Size Digital NR : 16...
..., Green, Blue, Yellow, Pink, Standard, and Custom. Using the My Color Control Function in the "Detail Control" menu (see page 61) will automatically set the My Color Control mode to "Custom". 1 Press the MENU button. or † button to select the setting among the various picture settings. Picture Input Mode : Standard √ Picture Size Digital NR : 16...

User Manual (ENGLISH)
Page 61
... † button to select "Detail Control", then press the ENTER button. My Color Control Custom Settings Users can adjust the 5 My Color Control colors (Red, Green, Blue, Yellow, and Pink). 1 Press the MENU button. English - 61 or † button to adjust the settings. Detail Control Input Picture Sound Channel Setup Red Green Blue Yellow Pink Reset...
... † button to select "Detail Control", then press the ENTER button. My Color Control Custom Settings Users can adjust the 5 My Color Control colors (Red, Green, Blue, Yellow, and Pink). 1 Press the MENU button. English - 61 or † button to adjust the settings. Detail Control Input Picture Sound Channel Setup Red Green Blue Yellow Pink Reset...

User Manual (ENGLISH)
Page 63
...to select "Picture", then press the ENTER button. 2 Press the ... Setting the Film Mode You can automatically sense and process film signals from all sources and adjust the picture for optimum quality. 1 Press the MENU button. or † button to exit. or † button to ...Return Picture Input Mode : Standard √ Picture Size Digital NR : 16:9 : On √ √ Sound DNIe Demo : Off √ My Color Control √ Channel Film Mode : Off √ Setup PIP √ Listings Move Enter Return Picture Input Picture Sound Channel Setup Mode : Standard Size ...
...to select "Picture", then press the ENTER button. 2 Press the ... Setting the Film Mode You can automatically sense and process film signals from all sources and adjust the picture for optimum quality. 1 Press the MENU button. or † button to exit. or † button to ...Return Picture Input Mode : Standard √ Picture Size Digital NR : 16:9 : On √ √ Sound DNIe Demo : Off √ My Color Control √ Channel Film Mode : Off √ Setup PIP √ Listings Move Enter Return Picture Input Picture Sound Channel Setup Mode : Standard Size ...

User Manual (ENGLISH)
Page 65
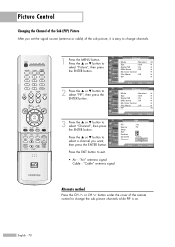
... select an external signal, then press the ENTER button. If you have not connected any equipment to the TV's input jacks, the signal from an external source, such as a VCR. 1 Press the MENU button. Picture Input Mode : Standard √ Picture Size Digital NR : 16:9 : On √... "Viewing an External Signal Source" (See page 42) and the "PIP Settings" (See page 138). Picture Input Mode : Standard √ Picture Size Digital NR : 16:9 : On √ √ Sound DNIe Demo : Off √ My Color Control √ Channel Film Mode : Off √ Setup PIP √...
... select an external signal, then press the ENTER button. If you have not connected any equipment to the TV's input jacks, the signal from an external source, such as a VCR. 1 Press the MENU button. Picture Input Mode : Standard √ Picture Size Digital NR : 16:9 : On √... "Viewing an External Signal Source" (See page 42) and the "PIP Settings" (See page 138). Picture Input Mode : Standard √ Picture Size Digital NR : 16:9 : On √ √ Sound DNIe Demo : Off √ My Color Control √ Channel Film Mode : Off √ Setup PIP √...
User Manual (ENGLISH)
Page 70
...PIP Input Picture Sound Channel Setup PIP Source Swap Size Position Air/CATV Channel Listings Move : On : TV : Cable ▲ : CaCbalbele311 ▼ Enter Return Press the EXIT button to exit. •...or † button to select a channel you set the signal source (antenna or cable) of the remote control to change channels. 1 Press the MENU button. Picture Input Mode : Standard √ ...Size Digital NR : 16:9 : On √ √ Sound DNIe Demo : Off √ My Color Control √ Channel Film Mode : Off √ Setup PIP √ Listings Move Enter Return 3 ...
...PIP Input Picture Sound Channel Setup PIP Source Swap Size Position Air/CATV Channel Listings Move : On : TV : Cable ▲ : CaCbalbele311 ▼ Enter Return Press the EXIT button to exit. •...or † button to select a channel you set the signal source (antenna or cable) of the remote control to change channels. 1 Press the MENU button. Picture Input Mode : Standard √ ...Size Digital NR : 16:9 : On √ √ Sound DNIe Demo : Off √ My Color Control √ Channel Film Mode : Off √ Setup PIP √ Listings Move Enter Return 3 ...

User Manual (ENGLISH)
Page 73
... Language Time V-Chip Caption Menu Transparency Blue Screen Color Weakness ▼ More Move : English : Medium : OOffff On Enter Return English - 73 Press the EXIT button to select "Setup", then press the ENTER button. 2 Press the ... or † button to exit. Setting the Blue Screen Mode If...weak, a blue screen automatically replaces the noisy picture background. or † button to "Off". 1 Press the MENU button. If you wish to continue viewing the poor picture, you must set the "Blue Screen" mode to select "Blue Screen", then press the ENTER button. 3 Press the ... or ...
... Language Time V-Chip Caption Menu Transparency Blue Screen Color Weakness ▼ More Move : English : Medium : OOffff On Enter Return English - 73 Press the EXIT button to select "Setup", then press the ENTER button. 2 Press the ... or † button to exit. Setting the Blue Screen Mode If...weak, a blue screen automatically replaces the noisy picture background. or † button to "Off". 1 Press the MENU button. If you wish to continue viewing the poor picture, you must set the "Blue Screen" mode to select "Blue Screen", then press the ENTER button. 3 Press the ... or ...

User Manual (ENGLISH)
Page 88
...ENTER button. Setup Input Picture Sound Channel Setup Listings Language : English √ Time √ V-Chip √ Caption √ Menu Transparency : Medium √ Blue Screen : Off √ Color Weakness √ ▼ More Move Enter Return Setup Input Picture Sound Channel Setup ▲ More PC Port Selection : G-Link ... : G-Link Function Help : OOfff CableCARDTM On CableCARDTM Setup Listings Move Enter Return Switches the Function Help on the menu functions. 1 Press the MENU button. Special Features Setting the Function Help Displays Help on .
...ENTER button. Setup Input Picture Sound Channel Setup Listings Language : English √ Time √ V-Chip √ Caption √ Menu Transparency : Medium √ Blue Screen : Off √ Color Weakness √ ▼ More Move Enter Return Setup Input Picture Sound Channel Setup ▲ More PC Port Selection : G-Link ... : G-Link Function Help : OOfff CableCARDTM On CableCARDTM Setup Listings Move Enter Return Switches the Function Help on the menu functions. 1 Press the MENU button. Special Features Setting the Function Help Displays Help on .
User Manual (ENGLISH)
Page 90
... Off √ Color Weakness √ ▼ More Move Enter Return 2 Press the number buttons to exit. Press the EXIT button to enter your new 4-digit pin number. Picture * (The default pin number for Sound a new TV set is "0000".) Channel The "V-Chip" menu is defined by a... password (i.e., a 4-digit secret code that is Setup displayed. V-Chip Input Picture Sound Channel Setup V-Chip Lock : Off TV Parental Guidelines MPAA Rating Canadian English Canadian ...
... Off √ Color Weakness √ ▼ More Move Enter Return 2 Press the number buttons to exit. Press the EXIT button to enter your new 4-digit pin number. Picture * (The default pin number for Sound a new TV set is "0000".) Channel The "V-Chip" menu is defined by a... password (i.e., a 4-digit secret code that is Setup displayed. V-Chip Input Picture Sound Channel Setup V-Chip Lock : Off TV Parental Guidelines MPAA Rating Canadian English Canadian ...

User Manual (ENGLISH)
Page 91
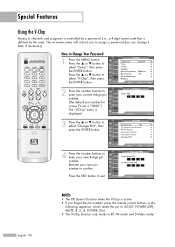
...Input Picture Sound Channel Setup Listings Language : English √ Time √ V-Chip √ Caption √ Menu Transparency : Medium √ Blue Screen : Off √ Color Weakness √ ▼ More Move Enter Return 2 Press the number buttons to exit. V-Chip Input Picture...pin V-Chip Input Enter PIN number. English - 91 Press the ... Picture * (The default pin number for Sound a new TV set is "0000".) Channel The "V-Chip" menu is "On". (Pressing the ... or † button will appear. Press the ... Listings 0~9 Enter Return 3 The "V-...
...Input Picture Sound Channel Setup Listings Language : English √ Time √ V-Chip √ Caption √ Menu Transparency : Medium √ Blue Screen : Off √ Color Weakness √ ▼ More Move Enter Return 2 Press the number buttons to exit. V-Chip Input Picture...pin V-Chip Input Enter PIN number. English - 91 Press the ... Picture * (The default pin number for Sound a new TV set is "0000".) Channel The "V-Chip" menu is "On". (Pressing the ... or † button will appear. Press the ... Listings 0~9 Enter Return 3 The "V-...


