
Open Source Guide (ENGLISH)
Page 1
... corresponding source code, to work that you can redistribute and change the software or use of this General Public License. Finally, any third party, for a fee. 2. To prevent this License would not permit royaltyfree redistribution of running the Program). keep intact all . and give any free program is not the purpose of the Program. b) You must cause any work written entirely...
... corresponding source code, to work that you can redistribute and change the software or use of this General Public License. Finally, any third party, for a fee. 2. To prevent this License would not permit royaltyfree redistribution of running the Program). keep intact all . and give any free program is not the purpose of the Program. b) You must cause any work written entirely...

Open Source Guide (ENGLISH)
Page 2
...by permitting redistribution under these terms, attach the following notices to the public, we recommend making it free software that everyone can redistribute and change. and each file should have at least the "copyright" line and a pointer to where the full notice is safest to attach them to the start of ... INABILITY TO USE THE LIBRARY (INCLUDING BUT NOT LIMITED TO LOSS OF DATA OR DATA BEING RENDERED INACCURATE OR LOSSES SUSTAINED BY YOU OR THIRD PARTIES OR A FAILURE OF THE LIBRARY TO OPERATE WITH ANY OTHER SOFTWARE), EVEN IF SUCH HOLDER OR OTHER PARTY HAS BEEN ADVISED OF THE POSSIBILITY...
...by permitting redistribution under these terms, attach the following notices to the public, we recommend making it free software that everyone can redistribute and change. and each file should have at least the "copyright" line and a pointer to where the full notice is safest to attach them to the start of ... INABILITY TO USE THE LIBRARY (INCLUDING BUT NOT LIMITED TO LOSS OF DATA OR DATA BEING RENDERED INACCURATE OR LOSSES SUSTAINED BY YOU OR THIRD PARTIES OR A FAILURE OF THE LIBRARY TO OPERATE WITH ANY OTHER SOFTWARE), EVEN IF SUCH HOLDER OR OTHER PARTY HAS BEEN ADVISED OF THE POSSIBILITY...
Quick Guide (ENGLISH)
Page 1
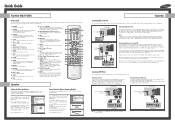
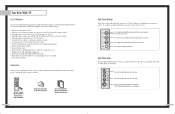
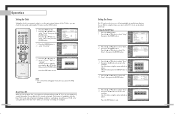
... start the auto program. If you to display information on -screen menu. 9. Press the EXIT button to choose Stereo, Mono or SAP (Separate Audio Program). 19. From Cable TV Rear Panel Connecting a Cable Converter Box This connection allows you are connected to change ) a particular item. 18. When you can not program using the remote control, such as programming your favorite channels and blocking channels. S.MODE Adjust the TV sound by the Samsung remote control (i.e., TV, STB, VCR, CABLE, or DVD). 12. P.SIZE Press to an antenna, press the...
... start the auto program. If you to display information on -screen menu. 9. Press the EXIT button to choose Stereo, Mono or SAP (Separate Audio Program). 19. From Cable TV Rear Panel Connecting a Cable Converter Box This connection allows you are connected to change ) a particular item. 18. When you can not program using the remote control, such as programming your favorite channels and blocking channels. S.MODE Adjust the TV sound by the Samsung remote control (i.e., TV, STB, VCR, CABLE, or DVD). 12. P.SIZE Press to an antenna, press the...
Quick Guide (ENGLISH)
Page 2
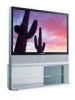
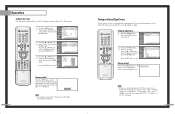
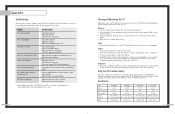
... volume from overheating. For projection TV, you watch from flammable articles and children. BP68-00335A-01 Front Panel LED Indicators : Light is On, : Light is Blinking, : Light is not operating normally. You'll occasionally hear it out. 2 Remove the Lamp cover. 3 Remove the screws securing the Lamp by sunlight is shone on the TV after turning off . Use cable converter for best projector operation. Turn on the center of the screen. Q & A White spot appears on screen. When power...
... volume from overheating. For projection TV, you watch from flammable articles and children. BP68-00335A-01 Front Panel LED Indicators : Light is On, : Light is Blinking, : Light is not operating normally. You'll occasionally hear it out. 2 Remove the Lamp cover. 3 Remove the screws securing the Lamp by sunlight is shone on the TV after turning off . Use cable converter for best projector operation. Turn on the center of the screen. Q & A White spot appears on screen. When power...
User Manual (ENGLISH)
Page 2
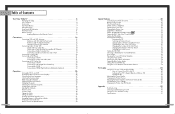
...-Channel Sound (MTS) track 65 Auto Volume ...66 Enjoying the Sound of External Speakers 67 Using the V-Chip (USA 68 Viewing Closed Caption Information 74 Setting the Blue Screen Mode 76 Setting The On/Off Melody 77 Using the Color Weakness Enhancement Feature 78 PC Display...80 Using Your TV as a Computer (PC) Display 80 How to Connect Your PC to the TV 80 Setting up Your PC Software (Based on Widows 98 81 Display Modes 82 Adjusting the Picture Quality...
...-Channel Sound (MTS) track 65 Auto Volume ...66 Enjoying the Sound of External Speakers 67 Using the V-Chip (USA 68 Viewing Closed Caption Information 74 Setting the Blue Screen Mode 76 Setting The On/Off Melody 77 Using the Color Weakness Enhancement Feature 78 PC Display...80 Using Your TV as a Computer (PC) Display 80 How to Connect Your PC to the TV 80 Setting up Your PC Software (Based on Widows 98 81 Display Modes 82 Adjusting the Picture Quality...
User Manual (ENGLISH)
Page 5
...-operate remote control • Easy-to-use on-screen menu system you can access from connected components. Press to activate (or change channels and move between viewing TV programs and signals from the side panel or remote control • Automatic timer to turn the TV on and off at once • Widescreen TV with adjustable image size • Life-like clear images provided by DNle technology • MCC (My Color Control) Mode for corresponding with your color style • Color...
...-operate remote control • Easy-to-use on-screen menu system you can access from connected components. Press to activate (or change channels and move between viewing TV programs and signals from the side panel or remote control • Automatic timer to turn the TV on and off at once • Widescreen TV with adjustable image size • Life-like clear images provided by DNle technology • MCC (My Color Control) Mode for corresponding with your color style • Color...
User Manual (ENGLISH)
Page 6
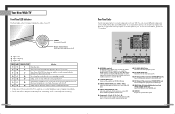
... DVI output. ˝ HDMI (High Definition Multimedia Interface) VIDEO/AUDIO INPUT jack Connect to turn the TV on and off . A cooling fan inside lamp from overheating. You'll occasionally hear it working. 10 Rear Panel Jacks Use the rear panel jacks to an external source, such as a VCR. The PIP channel can be defective. Auto Timer ON/OFF has been set and the set top box when using the component video input jacks. Ø PC AUDIO INPUT jacks Connect these to receive a signal from the TV to connect...
... DVI output. ˝ HDMI (High Definition Multimedia Interface) VIDEO/AUDIO INPUT jack Connect to turn the TV on and off . A cooling fan inside lamp from overheating. You'll occasionally hear it working. 10 Rear Panel Jacks Use the rear panel jacks to an external source, such as a VCR. The PIP channel can be defective. Auto Timer ON/OFF has been set and the set top box when using the component video input jacks. Ø PC AUDIO INPUT jacks Connect these to receive a signal from the TV to connect...
User Manual (ENGLISH)
Page 7
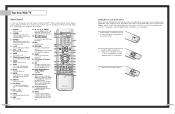
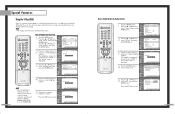
... factory settings (or select your favorite channels. 8. While using the remote control, always point it will work compatibly with the diagram inside the compartment. 3 Slide the cover back into place. 13 Press to select the size of the available video sources (i.e., TV, Set-Top box, VCR, DVD, DTV, PC). 14. Press to exchange the video signal that it directly at the TV. Press to display the available channels in sequence. (These buttons change...
... factory settings (or select your favorite channels. 8. While using the remote control, always point it will work compatibly with the diagram inside the compartment. 3 Slide the cover back into place. 13 Press to select the size of the available video sources (i.e., TV, Set-Top box, VCR, DVD, DTV, PC). 14. Press to exchange the video signal that it directly at the TV. Press to display the available channels in sequence. (These buttons change...

User Manual (ENGLISH)
Page 11
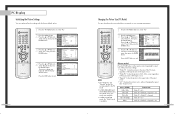
... of two cables. TV Rear Panel Incoming Cable or Antenna 2 To enable Component video viewing, connect a set of Component video, see your TV. They are usually included with a Camcorder. (If not, check your local electronics store.) If your camcorder is stereo, you have mono camcorder, connect L(mono) to camcorder audio out using a VCR. 1 Locate the A/V output jacks on the camcorder. Camcorder Output Jacks TV Side Panel Camcorder 20 Connecting a DVD Player The rear panel jacks on...
... of two cables. TV Rear Panel Incoming Cable or Antenna 2 To enable Component video viewing, connect a set of Component video, see your TV. They are usually included with a Camcorder. (If not, check your local electronics store.) If your camcorder is stereo, you have mono camcorder, connect L(mono) to camcorder audio out using a VCR. 1 Locate the A/V output jacks on the camcorder. Camcorder Output Jacks TV Side Panel Camcorder 20 Connecting a DVD Player The rear panel jacks on...

User Manual (ENGLISH)
Page 14
... - - : - - Input Picture Sound Channel Setup Setup Language Time V-Chip Caption Blue Screen Melody Color Weakness PC : EEnngglilsihsh Español √Français : Off : On Move Enter Return Selecting the Antenna Input You can connect to two different signal sources by pressing the MENU button on -screen menu system allows you want in the menu. Press the EXIT button to select menu items and make some adjustments using the TV's side panel buttons. Viewing the Menus and On-Screen Displays...
... - - : - - Input Picture Sound Channel Setup Setup Language Time V-Chip Caption Blue Screen Melody Color Weakness PC : EEnngglilsihsh Español √Français : Off : On Move Enter Return Selecting the Antenna Input You can connect to two different signal sources by pressing the MENU button on -screen menu system allows you want in the menu. Press the EXIT button to select menu items and make some adjustments using the TV's side panel buttons. Viewing the Menus and On-Screen Displays...

User Manual (ENGLISH)
Page 15
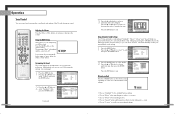
... previous page. 1 Press the MENU button. Selecting the Video Signal Source Before your TV can add channels that exists in Memory (Automatic Method) First, select the correct signal source ("Air", "STD", "HRC" or "IRC") as described on the remote control to the TV (i.e., an antenna or a cable system). 1 Press the MENU button. Input Picture Sound Channel Setup Channel Antenna : Ant.1 Air/CATV : Air Auto Program Add/Delete Favorite Channels Name Fine Tune ▼ More...
... previous page. 1 Press the MENU button. Selecting the Video Signal Source Before your TV can add channels that exists in Memory (Automatic Method) First, select the correct signal source ("Air", "STD", "HRC" or "IRC") as described on the remote control to the TV (i.e., an antenna or a cable system). 1 Press the MENU button. Input Picture Sound Channel Setup Channel Antenna : Ant.1 Air/CATV : Air Auto Program Add/Delete Favorite Channels Name Fine Tune ▼ More...

User Manual (ENGLISH)
Page 18
...'t operate in the room. • Choose "Standard" for the standard factory settings. • Choose "Cinema" when viewing a movie. 35 Resetting the Picture Settings to the Factory Defaults You can activate either "Dynamic", "Standard" or "Cinema" by pressing the P.MODE button (or by making a selection from the menu). Or, you can use the on the remote control repeatedly to select one of the automatic settings. Input Picture Sound Channel Setup Picture Mode Color Tone Size Digital...
...'t operate in the room. • Choose "Standard" for the standard factory settings. • Choose "Cinema" when viewing a movie. 35 Resetting the Picture Settings to the Factory Defaults You can activate either "Dynamic", "Standard" or "Cinema" by pressing the P.MODE button (or by making a selection from the menu). Or, you can use the on the remote control repeatedly to select one of the automatic settings. Input Picture Sound Channel Setup Picture Mode Color Tone Size Digital...
User Manual (ENGLISH)
Page 19
... the ENTER button. Using the MUTE Button At any time, you can use one of the automatic settings. Press the ... Input Picture Sound Channel Setup Sound Mode Equalizer SRS TSXT MTS Auto Volume Internal Mute : SSttannddaarrdd Music : OfMf ovie : SStepreeeoch : OCfuf stom : Off Move Enter Return Alternate method Press the S.MODE button on the remote control. Press the ... See next page.) 1 Press the MENU button. or † button to exit. Adjusting the Volume Press...
... the ENTER button. Using the MUTE Button At any time, you can use one of the automatic settings. Press the ... Input Picture Sound Channel Setup Sound Mode Equalizer SRS TSXT MTS Auto Volume Internal Mute : SSttannddaarrdd Music : OfMf ovie : SStepreeeoch : OCfuf stom : Off Move Enter Return Alternate method Press the S.MODE button on the remote control. Press the ... See next page.) 1 Press the MENU button. or † button to exit. Adjusting the Volume Press...
User Manual (ENGLISH)
Page 20
... example). 38 Setting the Timers This TV can check the time while watching the TV. (Just press the INFO button.) 1 Press the MENU button. Set other items using the same method as described previously. Input Picture Sound Time Clock Set Sleep Timer On Timer Off Timer 10 : 30 am √ Off √ 06 : 30 am Vol. Input Picture Sound Channel Setup Setup Language : English √ Time √ V-Chip √ Caption √ Blue Screen : Off √ Melody : On √ Color Weakness √...
... example). 38 Setting the Timers This TV can check the time while watching the TV. (Just press the INFO button.) 1 Press the MENU button. Set other items using the same method as described previously. Input Picture Sound Time Clock Set Sleep Timer On Timer Off Timer 10 : 30 am √ Off √ 06 : 30 am Vol. Input Picture Sound Channel Setup Setup Language : English √ Time √ V-Chip √ Caption √ Blue Screen : Off √ Melody : On √ Color Weakness √...
User Manual (ENGLISH)
Page 21
... the preset time you can choose between viewing signals from connected equipment, such as VCR, DVD, Set-Top box and the TV source (broadcast or cable). or † button to "180 Min."). 30 Min. Setting the Signal Source 1 Press the MENU button. to select "Setup", then press the ENTER button. or † button to select "Input". Input Picture Sound Channel Setup Setup Language : English √ Time √ V-Chip √ Caption √ Blue Screen : Off √ Melody : On √ Color Weakness...
... the preset time you can choose between viewing signals from connected equipment, such as VCR, DVD, Set-Top box and the TV source (broadcast or cable). or † button to "180 Min."). 30 Min. Setting the Signal Source 1 Press the MENU button. to select "Setup", then press the ENTER button. or † button to select "Input". Input Picture Sound Channel Setup Setup Language : English √ Time √ V-Chip √ Caption √ Blue Screen : Off √ Melody : On √ Color Weakness...

User Manual (ENGLISH)
Page 28
... grass tones using the predefined settings ("Turkish Blue", "Emerald Green", "Indian Pink", "Standard", "Custom") without affecting other colors on the screen. Special Features Setting the MCC (My Color Control) Mode MCC allows users to adjust colors to according to display the "Detail Control" menu. Easy Control Turkish Blue Emerald Green Indian Pink √ Move Enter Return • "Turkish Blue": Emphasizing Clear Blues. Detail Control Input Skin Tone 50 Green Grass 50 Picture Blue Sky 50 Reset Sound Channel Setup Move...
... grass tones using the predefined settings ("Turkish Blue", "Emerald Green", "Indian Pink", "Standard", "Custom") without affecting other colors on the screen. Special Features Setting the MCC (My Color Control) Mode MCC allows users to adjust colors to according to display the "Detail Control" menu. Easy Control Turkish Blue Emerald Green Indian Pink √ Move Enter Return • "Turkish Blue": Emphasizing Clear Blues. Detail Control Input Skin Tone 50 Green Grass 50 Picture Blue Sky 50 Reset Sound Channel Setup Move...
User Manual (ENGLISH)
Page 35
... the ENTER button. or † button to select "Change PIN", then press the ENTER button. Picture Enter PIN (The default pin number for Sound * a new TV set is "0000".) The "V-Chip" menu is Channel displayed. or † button to select "V-Chip", then press the ENTER button. Setup 0 9 Enter PIN Return 5 Re-enter your current 4-digit pin Input V-Chip number. Input Picture Sound Channel Setup Setup Language : English √ Time √ V-Chip √ Caption √ Blue Screen : Off √ Melody : On √ Color Weakness...
... the ENTER button. or † button to select "Change PIN", then press the ENTER button. Picture Enter PIN (The default pin number for Sound * a new TV set is "0000".) The "V-Chip" menu is Channel displayed. or † button to select "V-Chip", then press the ENTER button. Setup 0 9 Enter PIN Return 5 Re-enter your current 4-digit pin Input V-Chip number. Input Picture Sound Channel Setup Setup Language : English √ Time √ V-Chip √ Caption √ Blue Screen : Off √ Melody : On √ Color Weakness...

User Manual (ENGLISH)
Page 42
..., re-adjust the picture so that are supported for information about connecting your particular version of PC monitor and its resolution. or † button to select "PC". 2 Press the MENU button. Input Picture Sound Channel Setup Setup Language : English √ Time √ V-Chip √ Caption √ Blue Screen : Off √ Melody : On √ Color Weakness √ PC √ Move Enter Return 3 Press the ... Check your PC instruction book for the signal input to the DVI jack...
..., re-adjust the picture so that are supported for information about connecting your particular version of PC monitor and its resolution. or † button to select "PC". 2 Press the MENU button. Input Picture Sound Channel Setup Setup Language : English √ Time √ V-Chip √ Caption √ Blue Screen : Off √ Melody : On √ Color Weakness √ PC √ Move Enter Return 3 Press the ... Check your PC instruction book for the signal input to the DVI jack...
User Manual (ENGLISH)
Page 44
... input source. • "4:3": Displays the picture as it is available. Input Picture Sound Channel Setup Setup Language : English √ Time √ V-Chip √ Caption √ Blue Screen : Off √ Melody : On √ Color Weakness √ PC √ Move Enter Return 4 Press the ... Input Picture Sound PC Coarse Fine Position Auto Adjustment Recall Channel Setup Move Enter √ √ √ Return Press the EXIT button to exit. 86 Changing the Picture Size (PC Mode) You can replace all picture settings with the factory...
... input source. • "4:3": Displays the picture as it is available. Input Picture Sound Channel Setup Setup Language : English √ Time √ V-Chip √ Caption √ Blue Screen : Off √ Melody : On √ Color Weakness √ PC √ Move Enter Return 4 Press the ... Input Picture Sound PC Coarse Fine Position Auto Adjustment Recall Channel Setup Move Enter √ √ √ Return Press the EXIT button to exit. 86 Changing the Picture Size (PC Mode) You can replace all picture settings with the factory...
User Manual (ENGLISH)
Page 46
... TV set . Never use around the world. Check all wire connections. Picture rolls vertically. Adjust the antenna. Make sure the MUTE button is broadcasted in . Make sure the program is off. Appendix Troubleshooting If the TV seems to have formed inside the unit to a foreign country, please be aware of the different television systems that are using a VCR, check the tracking. Specifications Model Voltage Frequency of Operation Power Consumption Dimension (W x D x H) Weight HL-P4663W HL-P5063W HL-P5663W HL...
... TV set . Never use around the world. Check all wire connections. Picture rolls vertically. Adjust the antenna. Make sure the MUTE button is broadcasted in . Make sure the program is off. Appendix Troubleshooting If the TV seems to have formed inside the unit to a foreign country, please be aware of the different television systems that are using a VCR, check the tracking. Specifications Model Voltage Frequency of Operation Power Consumption Dimension (W x D x H) Weight HL-P4663W HL-P5063W HL-P5663W HL...


