User Manual (ENGLISH)
Page 4
...Screen Size 28 ■ Configuring Detailed Settings on the model 79 ■ Specifications 79 ■ Dimensions (FP-T5084 80 ■ Dimensions (FP-T6374 81 Button English - 4 Digital.. 35 ■ Choosing a Multi-Channel Sound (MTS) Track - Analog.. 36 ■ ... of the Sub (PIP) Picture .......... 37 Symbols Press One-Touch ➢ Note APPENDIX ■ Troubleshooting 76 ■ Auto Wall-mount adjustment (Sold separately 77 ■ Wall Mount Kit Specifications ( VESA 78 ■ How to the Sound of Features 5 ■ Accessories 5 ■ Viewing ...
...Screen Size 28 ■ Configuring Detailed Settings on the model 79 ■ Specifications 79 ■ Dimensions (FP-T5084 80 ■ Dimensions (FP-T6374 81 Button English - 4 Digital.. 35 ■ Choosing a Multi-Channel Sound (MTS) Track - Analog.. 36 ■ ... of the Sub (PIP) Picture .......... 37 Symbols Press One-Touch ➢ Note APPENDIX ■ Troubleshooting 76 ■ Auto Wall-mount adjustment (Sold separately 77 ■ Wall Mount Kit Specifications ( VESA 78 ■ How to the Sound of Features 5 ■ Accessories 5 ■ Viewing ...
User Manual (ENGLISH)
Page 7
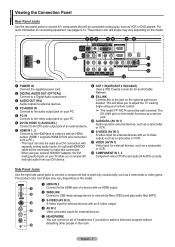
...the HDMI jack of a device with separate analog audio inputs. English - 7 For more information on your remote control. ➢ The model FP-T6374 cannot be connected continuously, such as a DVI connection with an HDMI output. (HDMI 1 supports HDMI-DVI IN and connection from your DVI device.... # COMPONENT IN 1, 2 Component video (Y/PB/PR) and audio (R-AUDIO-L) inputs. This will be wall mounted. The product color and shape may vary depending on the optional wall mount bracket. The product color and shape may vary depending on the model. 1 POWER IN Connect the supplied ...
...the HDMI jack of a device with separate analog audio inputs. English - 7 For more information on your remote control. ➢ The model FP-T6374 cannot be connected continuously, such as a DVI connection with an HDMI output. (HDMI 1 supports HDMI-DVI IN and connection from your DVI device.... # COMPONENT IN 1, 2 Component video (Y/PB/PR) and audio (R-AUDIO-L) inputs. This will be wall mounted. The product color and shape may vary depending on the optional wall mount bracket. The product color and shape may vary depending on the model. 1 POWER IN Connect the supplied ...
User Manual (ENGLISH)
Page 31
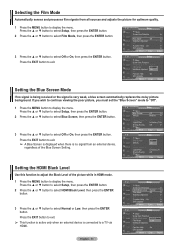
...to display the menu. T V Setup ▲ More Screen Burn Protection ► HDMI Black Level : Normal ► Film Mode : Off ► Wall-Mount Adjustment ► PIP ► Function Help : On ► SW Upgrade ► Move Enter Return T V Setup ▲ More Screen Burn Protection... HDMI Black Level : Normal Film Mode : OOff f Wall-Mount Adjustment On PIP Function Help : On SW Upgrade Move Enter Return Setting the Blue Screen Mode If no signal from all sources and adjusts ...
...to display the menu. T V Setup ▲ More Screen Burn Protection ► HDMI Black Level : Normal ► Film Mode : Off ► Wall-Mount Adjustment ► PIP ► Function Help : On ► SW Upgrade ► Move Enter Return T V Setup ▲ More Screen Burn Protection... HDMI Black Level : Normal Film Mode : OOff f Wall-Mount Adjustment On PIP Function Help : On SW Upgrade Move Enter Return Setting the Blue Screen Mode If no signal from all sources and adjusts ...
User Manual (ENGLISH)
Page 32
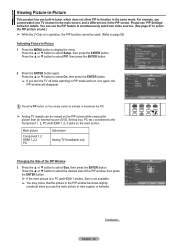
...; button to select Size, then press the ENTER button. T V Setup ▲ More Screen Burn Protection ► HDMI Black Level : Normal ► Film Mode : Off ► Wall-Mount Adjustment ► PIP ► Function Help : On ► SW Upgrade ► Move Enter Return T V PIP Size Position Channel PIP : OOfff : On : : DTV Air 3 - 0 Press the...
...; button to select Size, then press the ENTER button. T V Setup ▲ More Screen Burn Protection ► HDMI Black Level : Normal ► Film Mode : Off ► Wall-Mount Adjustment ► PIP ► Function Help : On ► SW Upgrade ► Move Enter Return T V PIP Size Position Channel PIP : OOfff : On : : DTV Air 3 - 0 Press the...
User Manual (ENGLISH)
Page 53
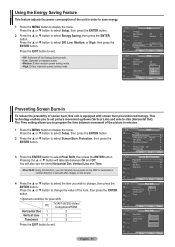
... the ENTER button. 3 Press the ENTER button to exit. T V Setup ▲ More Screen Burn Protection ► HDMI Black Level : Normal ► Film Mode : Off ► Wall-Mount Adjustment ► PIP ► Function Help : On ► SW Upgrade ► Move Enter Return T V Screen Burn Protection Pixel Shift White Scrolling Side Gray ► ►...
... the ENTER button. 3 Press the ENTER button to exit. T V Setup ▲ More Screen Burn Protection ► HDMI Black Level : Normal ► Film Mode : Off ► Wall-Mount Adjustment ► PIP ► Function Help : On ► SW Upgrade ► Move Enter Return T V Screen Burn Protection Pixel Shift White Scrolling Side Gray ► ►...

User Manual (ENGLISH)
Page 54
... to select Off or On, then press the ENTER button. English - 54 T V Setup ▲ More Screen Burn Protection HDMI Black Level : Normal Film Mode : Off Wall-Mount Adjustment PIP Function Help : On SW Upgrade Move Enter Return T V Setup ▲ More Screen Burn Protection HDMI Black Level : Normal Film Mode : Off...
... to select Off or On, then press the ENTER button. English - 54 T V Setup ▲ More Screen Burn Protection HDMI Black Level : Normal Film Mode : Off Wall-Mount Adjustment PIP Function Help : On SW Upgrade Move Enter Return T V Setup ▲ More Screen Burn Protection HDMI Black Level : Normal Film Mode : Off...
User Manual (ENGLISH)
Page 61
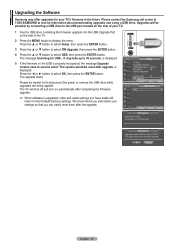
... would be reset after upgrade. The upgrade starts. Please contact the Samsung call center at 1-800-SAMSUNG to select USB, then press the ENTER button. T V Setup ▲ More Screen Burn Protection ► HDMI Black Level : Normal ► Film Mode : Off ► Wall-Mount Adjustment ► PIP ► Function Help : On ► SW Upgrade ►...
... would be reset after upgrade. The upgrade starts. Please contact the Samsung call center at 1-800-SAMSUNG to select USB, then press the ENTER button. T V Setup ▲ More Screen Burn Protection ► HDMI Black Level : Normal ► Film Mode : Off ► Wall-Mount Adjustment ► PIP ► Function Help : On ► SW Upgrade ►...
User Manual (ENGLISH)
Page 77
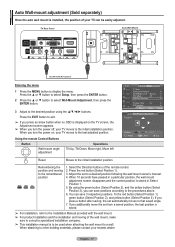
...Select Position 1. 5. When attaching to the initial installation position. Select the Direction buttons of your TV moves to a desired position following the wall mount owner's manual. 4. To the red button (Select Position 1), green button (Select Position 2), and yellow button (Select Position 3). English -..., please contact your TV moves to the procedures above. 6. By using the buttons. Remembering the position and moving of the wall mount, make sure to consult a specialized installation company. ➢ This installation manual is to be easily adjusted. If you can ...
...Select Position 1. 5. When attaching to the initial installation position. Select the Direction buttons of your TV moves to a desired position following the wall mount owner's manual. 4. To the red button (Select Position 1), green button (Select Position 2), and yellow button (Select Position 3). English -..., please contact your TV moves to the procedures above. 6. By using the buttons. Remembering the position and moving of the wall mount, make sure to consult a specialized installation company. ➢ This installation manual is to be easily adjusted. If you can ...

User Manual (ENGLISH)
Page 78
... of the TV set. ➢ For wall mounts that do not comply with VESA Specifications. Do not use screws that do not comply with the VESA standard screw specifications. Samsung is not liable for these kinds of accidents. ➢ Samsung is used or the consumer fails to follow...standard screw specifications, the length of the screws may differ depending on a ceiling or slanted wall, it may cause damage to fall and result in the table above. ➢ When purchasing our wall mount kit, a detailed installation manual and all parts necessary for assembly are provided. ➢ ...
... of the TV set. ➢ For wall mounts that do not comply with VESA Specifications. Do not use screws that do not comply with the VESA standard screw specifications. Samsung is not liable for these kinds of accidents. ➢ Samsung is used or the consumer fails to follow...standard screw specifications, the length of the screws may differ depending on a ceiling or slanted wall, it may cause damage to fall and result in the table above. ➢ When purchasing our wall mount kit, a detailed installation manual and all parts necessary for assembly are provided. ➢ ...
User Manual (ENGLISH)
Page 79
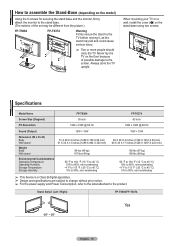
... on a wall, install the cover (1) on the model) Using the 6 screws for securing the stand base and the monitor, firmly attach the monitor to the stand base. (The exterior of possible damage to the product. Specifications Model Name Screen Size (Diagonal) PC Resolution FP-T5084 50 inch 1920 x 1080 @ 60 Hz FP-T6374 63...
... on a wall, install the cover (1) on the model) Using the 6 screws for securing the stand base and the monitor, firmly attach the monitor to the stand base. (The exterior of possible damage to the product. Specifications Model Name Screen Size (Diagonal) PC Resolution FP-T5084 50 inch 1920 x 1080 @ 60 Hz FP-T6374 63...


