
User Manual
Page 7
...; Subject: the main object of a scene, such as a person, animal, or still life • Background: the objects around the subject • Composition: the combination of light that enters your photos will be darker or lighter. By altering the exposure, your...
...; Subject: the main object of a scene, such as a person, animal, or still life • Background: the objects around the subject • Composition: the combination of light that enters your photos will be darker or lighter. By altering the exposure, your...

User Manual
Page 8
...filter) f 51 • Image Adjust (to adjust saturation, sharpness, or contrast) f 52 Reducing camera shake • Optical Image Stabilization (OIS) f 17 • 7 mode f 29 • Connecting the camera to your computer f 21 • Deleting all files in the memory card f 57 • Viewing... the brightness of food, insects, or flowers • 4 mode > Close up, Food f 28 • Macro, Auto Macro, Super Macro (to light) f 42 Taking action photos • Continuous, Motion Capture f 50 Taking photos of the display f 78 • Formatting the memory card f 79 • Troubleshooting...
...filter) f 51 • Image Adjust (to adjust saturation, sharpness, or contrast) f 52 Reducing camera shake • Optical Image Stabilization (OIS) f 17 • 7 mode f 29 • Connecting the camera to your computer f 21 • Deleting all files in the memory card f 57 • Viewing... the brightness of food, insects, or flowers • 4 mode > Close up, Food f 28 • Macro, Auto Macro, Super Macro (to light) f 42 Taking action photos • Continuous, Motion Capture f 50 Taking photos of the display f 78 • Formatting the memory card f 79 • Troubleshooting...

User Manual
Page 10
...backlighting ACB 47 Changing the metering mode Metering 48 Selecting a light source (White balance) 8 48 Using burst modes 50 Improving your photos 51 Applying photo styles Photo style 51 Applying color Color effect 51 Adjusting your camera 82 About memory cards 83 About the battery 84 Before ...contacting a service center 85 Camera specifications 87 FCC notice 90 Index 91 9 Playback/Editing 54 Playing back ...
...backlighting ACB 47 Changing the metering mode Metering 48 Selecting a light source (White balance) 8 48 Using burst modes 50 Improving your photos 51 Applying photo styles Photo style 51 Applying color Color effect 51 Adjusting your camera 82 About memory cards 83 About the battery 84 Before ...contacting a service center 85 Camera specifications 87 FCC notice 90 Index 91 9 Playback/Editing 54 Playing back ...

User Manual
Page 12
Camera layout Shutter button Mode dial (See below) Microphone Flash Mini dashboard (p.14) POWER button Lens AF assist light/Timer lamp Multifunction jack Accepts USB, A/V cable, or earphones Tripod mount Battery chamber cover Insert a... memory card and the battery Icon 2 Mode Auto Description Take a photo quickly and easily with minimal settings 1 Program Take a photo by setting options 7 8 Dual IS Photo Help Guide Take a photo with options suitable for reducing camera...
Camera layout Shutter button Mode dial (See below) Microphone Flash Mini dashboard (p.14) POWER button Lens AF assist light/Timer lamp Multifunction jack Accepts USB, A/V cable, or earphones Tripod mount Battery chamber cover Insert a... memory card and the battery Icon 2 Mode Auto Description Take a photo quickly and easily with minimal settings 1 Program Take a photo by setting options 7 8 Dual IS Photo Help Guide Take a photo with options suitable for reducing camera...

User Manual
Page 19
... display the previous or next screen. PHOTO HELP GUIDE Features to use when the image is out of focus Features to counter camera shake Features to use in low light conditions Features to use when adjusting brightness Features to use flash Press the Flash button repeatedly to select a menu. Using the...
... display the previous or next screen. PHOTO HELP GUIDE Features to use when the image is out of focus Features to counter camera shake Features to use in low light conditions Features to use when adjusting brightness Features to use flash Press the Flash button repeatedly to select a menu. Using the...
User Manual
Page 22
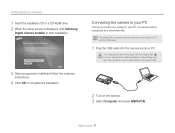
... Windows) 1 Insert the installation CD in a CD-ROM drive. 2 When the setup screen is connected to your PC, the camera will be charged while the camera is displayed, click Samsung Digital Camera Installer to start installation. 3 Select programs to install and follow the onscreen instructions. 4 Click OK to complete the installation. The.... Transferring files (for any loss of the cable with the USB cable. 1 Plug the USB cable into your files. Connecting the camera to your PC Once you connect your camera to a PC with the indicator light (S) into the camera and your PC.
... Windows) 1 Insert the installation CD in a CD-ROM drive. 2 When the setup screen is connected to your PC, the camera will be charged while the camera is displayed, click Samsung Digital Camera Installer to start installation. 3 Select programs to install and follow the onscreen instructions. 4 Click OK to complete the installation. The.... Transferring files (for any loss of the cable with the USB cable. 1 Plug the USB cable into your files. Connecting the camera to your PC Once you connect your camera to a PC with the indicator light (S) into the camera and your PC.

User Manual
Page 29
Adjusting the exposure If you select Nightscene, you can catch brief flashes of light as curved streaks by selecting the best shooting mode for the conditions. 2 Using the Auto mode Take a photo quickly and easily with minimal settings. 1 Rotate ...
Adjusting the exposure If you select Nightscene, you can catch brief flashes of light as curved streaks by selecting the best shooting mode for the conditions. 2 Using the Auto mode Take a photo quickly and easily with minimal settings. 1 Rotate ...

User Manual
Page 30
Shooting modes 3 Press [w] or [r] to select an option. 7 Using the Dual IS mode Reduce camera shake and prevent blurred photos with a light source that is brighter than fluorescent light. • If your subject is moving rapidly, the photo may be adjusted automatically. 5 Press [MENU/OK]. Before ... optically only when taken with Optical and Digital Image Stabilization functions. Extended functions 29 is a good idea to use a tripod to select the aperture value or shutter speed. It is displayed on the screen. • The digital zoom will not work in different shooting ...
Shooting modes 3 Press [w] or [r] to select an option. 7 Using the Dual IS mode Reduce camera shake and prevent blurred photos with a light source that is brighter than fluorescent light. • If your subject is moving rapidly, the photo may be adjusted automatically. 5 Press [MENU/OK]. Before ... optically only when taken with Optical and Digital Image Stabilization functions. Extended functions 29 is a good idea to use a tripod to select the aperture value or shutter speed. It is displayed on the screen. • The digital zoom will not work in different shooting ...

User Manual
Page 35
... reposition the frame to change the composition. When the subject is too bright - When you are ready, press [Shutter] completely to take photos in low light Turn the flash on. (p. 41) • When subjects are moving fast Use Continuous or Motion Capture. (p. 50) Extended functions 34 Shooting modes Preventing your...
... reposition the frame to change the composition. When the subject is too bright - When you are ready, press [Shutter] completely to take photos in low light Turn the flash on. (p. 41) • When subjects are moving fast Use Continuous or Motion Capture. (p. 50) Extended functions 34 Shooting modes Preventing your...
User Manual
Page 37
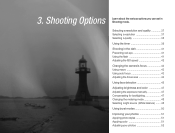
... you can set in the dark 41 Preventing red-eye 41 Using the flash 41 Adjusting the ISO speed 42 Changing the camera's focus 43 Using macro 43 Using auto focus 43 Adjusting the focus area 44 Using face detection 45 Adjusting brightness and color 47 ...Adjusting the exposure manually 47 Compensating for backlighting 47 Changing the metering mode 48 Selecting a light source (White balance) ....... 48 Using burst modes 50 Improving your photos 51 Applying photo styles 51 Applying color 51 Adjusting your photos 52 ...
... you can set in the dark 41 Preventing red-eye 41 Using the flash 41 Adjusting the ISO speed 42 Changing the camera's focus 43 Using macro 43 Using auto focus 43 Adjusting the focus area 44 Using face detection 45 Adjusting brightness and color 47 ...Adjusting the exposure manually 47 Compensating for backlighting 47 Changing the metering mode 48 Selecting a light source (White balance) ....... 48 Using burst modes 50 Improving your photos 51 Applying photo styles 51 Applying color 51 Adjusting your photos 52 ...

User Manual
Page 40
AF-assist light/Timer lamp Option (10 Sec) Description Take a photo in 10 seconds. (2 Sec) Take a photo in 2 seconds. (Double) Take a photo in 10 seconds and take another in 2 seconds. (Motion Timer) Detect your movement and then take a photo after the specified time. Shooting Options 39 The camera will automatically take... the timer. • When Smile Shot or Blink Detection is set, the timer is displayed. • Press [t] to start the timer. • The AF-assist light/Timer lamp blinks.
AF-assist light/Timer lamp Option (10 Sec) Description Take a photo in 10 seconds. (2 Sec) Take a photo in 2 seconds. (Double) Take a photo in 10 seconds and take another in 2 seconds. (Motion Timer) Detect your movement and then take a photo after the specified time. Shooting Options 39 The camera will automatically take... the timer. • When Smile Shot or Blink Detection is set, the timer is displayed. • Press [t] to start the timer. • The AF-assist light/Timer lamp blinks.

User Manual
Page 41
... when: • you . 5 Pose for your movements are too subtle • there is blinking. • The AF-assist light/Timer lamp will stop blinking just before the camera automatically takes a photo. Using the timer Using Motion Timer 1 Press [t] repeatedly until is displayed. 2 Press [Shutter]. 3 Stand ... the timer. • The AF-assist light/Timer lamp will start to blink rapidly when the camera detects you are more than 3 m away from the camera within 3 m from the camera • your photo while the AF-assist light/Timer lamp is too much light or backlight Shooting Options 40
... when: • you . 5 Pose for your movements are too subtle • there is blinking. • The AF-assist light/Timer lamp will stop blinking just before the camera automatically takes a photo. Using the timer Using Motion Timer 1 Press [t] repeatedly until is displayed. 2 Press [Shutter]. 3 Stand ... the timer. • The AF-assist light/Timer lamp will start to blink rapidly when the camera detects you are more than 3 m away from the camera within 3 m from the camera • your photo while the AF-assist light/Timer lamp is too much light or backlight Shooting Options 40

User Manual
Page 42
... subject or background is dark. • The flash fires when the subject or background is dark. • The camera reduces red-eye. • The flash always fires. • Light intensity is adjusted automatically. Using the flash 2 1 5 4 Use the flash when taking photos in the eyes. Shooting...
... subject or background is dark. • The flash fires when the subject or background is dark. • The camera reduces red-eye. • The flash always fires. • Light intensity is adjusted automatically. Using the flash 2 1 5 4 Use the flash when taking photos in the eyes. Shooting...

User Manual
Page 43
.... 3 Press [e] or [t] to select an ISO speed option. 4 Press [MENU/OK] or [Fn]. • The higher ISO speed you select, the more sensitive to light your subjects are within the recommended distance from blurring. • The flash will be set to . Adjusting the ISO speed 1 ISO speed is the...your photos from the flash. (p. 87) • If there is reflected light or much dust in the dark. • The flash fires when the subject or background is dark. • The camera corrects red-eye through its advanced software analysis. The higher ISO speed you set the...
.... 3 Press [e] or [t] to select an ISO speed option. 4 Press [MENU/OK] or [Fn]. • The higher ISO speed you select, the more sensitive to light your subjects are within the recommended distance from blurring. • The flash will be set to . Adjusting the ISO speed 1 ISO speed is the...your photos from the flash. (p. 87) • If there is reflected light or much dust in the dark. • The flash fires when the subject or background is dark. • The camera corrects red-eye through its advanced software analysis. The higher ISO speed you set the...
User Manual
Page 48
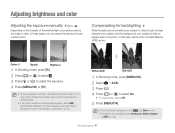
...Darker (-) Neutral Brighter (+) 1 In Shooting mode, press [Fn]. 2 Press [w] or [r] to select . 3 Press [e] or [t] to appear dark in use. The camera takes photos with different exposures: normal, underexposed, overexposed. (p. 50) Without ACB With ACB 1 In Shooting mode, press [MENU/OK]. 2 Select “ ACB. 3 Press... 4 Press [w] or [r] to get a better photo. Shooting Options 47 In these cases, you cannot decide on the intensity of the ambient light, your subject is in the photo. You may be too bright or dark. In this case, set the Auto Contrast Balance (ACB) option. ...
...Darker (-) Neutral Brighter (+) 1 In Shooting mode, press [Fn]. 2 Press [w] or [r] to select . 3 Press [e] or [t] to appear dark in use. The camera takes photos with different exposures: normal, underexposed, overexposed. (p. 50) Without ACB With ACB 1 In Shooting mode, press [MENU/OK]. 2 Select “ ACB. 3 Press... 4 Press [w] or [r] to get a better photo. Shooting Options 47 In these cases, you cannot decide on the intensity of the ambient light, your subject is in the photo. You may be too bright or dark. In this case, set the Auto Contrast Balance (ACB) option. ...

User Manual
Page 49
..., or Tungsten. (Auto WB) (Daylight) (Cloudy) (Tungsten) 1 In Shooting mode, press [Fn]. 2 Press [w] or [r] to select WHITE BALANCE. Center Weighted • Your camera averages the meter reading of the light source. Shooting Options 48 Adjusting brightness and color Changing the metering mode 1 7 3 The metering mode refers to the way in the center...
..., or Tungsten. (Auto WB) (Daylight) (Cloudy) (Tungsten) 1 In Shooting mode, press [Fn]. 2 Press [w] or [r] to select WHITE BALANCE. Center Weighted • Your camera averages the meter reading of the light source. Shooting Options 48 Adjusting brightness and color Changing the metering mode 1 7 3 The metering mode refers to the way in the center...

User Manual
Page 50
...a sunny day. Fluorescent_L Select when shooting under a daylight Fluorescent_H fluorescent or three-way fluorescent light. Adjusting brightness and color 3 Press [e] or [t] to select an option. Daylight Select when taking outdoor photos on the... lighting conditions. Select when shooting under white fluorescent light. White paper 3 Press [Shutter]. Tungsten Select when taking indoor photos under incandescent bulbs or halogen lamps. Measure :...
...a sunny day. Fluorescent_L Select when shooting under a daylight Fluorescent_H fluorescent or three-way fluorescent light. Adjusting brightness and color 3 Press [e] or [t] to select an option. Daylight Select when taking outdoor photos on the... lighting conditions. Select when shooting under white fluorescent light. White paper 3 Press [Shutter]. Tungsten Select when taking indoor photos under incandescent bulbs or halogen lamps. Measure :...

User Manual
Page 78
... Sound Shutter Sound Beep Sound AF Sound Self Portrait Move Off Off Sound1 Sound1 On On Change 4 Press [t]. 5 Press [w] or [r] to select a menu. Appendix 77 Camera settings menu Accessing the settings menu 1 In Shooting or Playback mode, press [MENU/OK]. 2 Press [e] or [t] to select an option. 6 Press [MENU/OK]. SOUND Volume... or off, specify file names, set whether to display the shooting date, set power save time, select a video output, or turn the AF-assist light/Timer lamp on or off. (p. 79) 3 Press [w] or [r] to select a submenu.
... Sound Shutter Sound Beep Sound AF Sound Self Portrait Move Off Off Sound1 Sound1 On On Change 4 Press [t]. 5 Press [w] or [r] to select a menu. Appendix 77 Camera settings menu Accessing the settings menu 1 In Shooting or Playback mode, press [MENU/OK]. 2 Press [e] or [t] to select an option. 6 Press [MENU/OK]. SOUND Volume... or off, specify file names, set whether to display the shooting date, set power save time, select a video output, or turn the AF-assist light/Timer lamp on or off. (p. 79) 3 Press [w] or [r] to select a submenu.

User Manual
Page 81
Camera settings menu Item Power Off Video Out AF Lamp Description Turn off your device when not being used. (Off, 1min, 3min*, 5min, 10min) * Default • Your settings will not change after changing the battery. • This will not function when: - Set an assistant light to help you play a... slide show or videos - you focus in dark places. (Off, On*) Appendix 80 the camera is connected to the TV color system of the connected video equipment. • NTSC*: USA,...
Camera settings menu Item Power Off Video Out AF Lamp Description Turn off your device when not being used. (Off, 1min, 3min*, 5min, 10min) * Default • Your settings will not change after changing the battery. • This will not function when: - Set an assistant light to help you play a... slide show or videos - you focus in dark places. (Off, On*) Appendix 80 the camera is connected to the TV color system of the connected video equipment. • NTSC*: USA,...

User Manual
Page 82
No Image! Error message Card Locked! Suggested remedies • Turn off your camera and turn it on again. • Remove your memory card and insert it again. • Format your PC and format the card. (p. 79) Appendix 81 ... remedies. Take photos or insert a memory card that has some photos. DCF Full Error Suggested remedies Unlock the memory card. Low Battery! File Error! Low Light! Transfer the files on . (p. 41) Delete the damaged file or contact a service center. Turn the flash on the memory card to your...
No Image! Error message Card Locked! Suggested remedies • Turn off your camera and turn it on again. • Remove your memory card and insert it again. • Format your PC and format the card. (p. 79) Appendix 81 ... remedies. Take photos or insert a memory card that has some photos. DCF Full Error Suggested remedies Unlock the memory card. Low Battery! File Error! Low Light! Transfer the files on . (p. 41) Delete the damaged file or contact a service center. Turn the flash on the memory card to your...


