
User Manual
Page 1
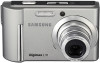
ENGLISH Please read this manual carefully before using the application software. This manual will guide you for buying a Samsung camera. User Manual Thank you through using the camera, including capturing images, downloading images and using your new camera.
ENGLISH Please read this manual carefully before using the application software. This manual will guide you for buying a Samsung camera. User Manual Thank you through using the camera, including capturing images, downloading images and using your new camera.
User Manual
Page 2
... that is turned off, press the camera button to turn it (e.g. Install the camera driver that the camera is operating properly prior to when you for loss or damage of their respective companies. Samsung camera takes no responsibility for buying a Samsung Digital Camera. ● Prior to using this manual...] Open Window's EXPLORER and search for a trip or an important event) to avoid disappointment. If the power is contained in this camera in the following order. Instructions ■ Use this manual are subject to change without prior notice. for [Removable Disk]. (p.67)...
... that is turned off, press the camera button to turn it (e.g. Install the camera driver that the camera is operating properly prior to when you for loss or damage of their respective companies. Samsung camera takes no responsibility for buying a Samsung Digital Camera. ● Prior to using this manual...] Open Window's EXPLORER and search for a trip or an important event) to avoid disappointment. If the power is contained in this camera in the following order. Instructions ■ Use this manual are subject to change without prior notice. for [Removable Disk]. (p.67)...
User Manual
Page 3
... in use, do not use this be carried out by your dealer or Samsung Camera Service centre. Switch off the camera, and then disconnect the power source. You must contact your dealer or Samsung Camera Service centre. ■ Please do not cover the camera or Charger. Warning WARNING indicates a potentially hazardous situation which , if not avoided...
... in use, do not use this be carried out by your dealer or Samsung Camera Service centre. Switch off the camera, and then disconnect the power source. You must contact your dealer or Samsung Camera Service centre. ■ Please do not cover the camera or Charger. Warning WARNING indicates a potentially hazardous situation which , if not avoided...
User Manual
Page 4
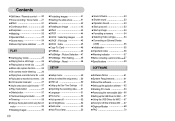
... chart 5 ●Identification of features 6 ■Front & Top 6 ■Back & Bottom 7 ■Bottom 8 ■Self-timer lamp 8 ■Camera Status Lamp 8 ●Connecting to a Power Source 9 ■SLB-0837B rechargeable battery Specification 9 ■How to charge the rechargeable battery (SLB-0837B) 10...the ASR (Advanced Shake Reduction) mode 17 ■Things to Watch Out for When Taking Pictures 18 RECORDING ●Using the camera buttons to set the camera 19 ■POWER button 19 ■Shutter button... 19 ■ZOOM W / T button 19 ■M (Mode) ...
... chart 5 ●Identification of features 6 ■Front & Top 6 ■Back & Bottom 7 ■Bottom 8 ■Self-timer lamp 8 ■Camera Status Lamp 8 ●Connecting to a Power Source 9 ■SLB-0837B rechargeable battery Specification 9 ■How to charge the rechargeable battery (SLB-0837B) 10...the ASR (Advanced Shake Reduction) mode 17 ■Things to Watch Out for When Taking Pictures 18 RECORDING ●Using the camera buttons to set the camera 19 ■POWER button 19 ■Shutter button... 19 ■ZOOM W / T button 19 ■M (Mode) ...
User Manual
Page 5
... back a still image 35 ■Playing back a movie clip 35 ■Movie clip capture function 35 ■On camera movie trimming 36 ■Playing back a recorded voice file 36 ■Playing back a recorded voice memo 36 ●LCD... monitor Indicator 37 ●Using the camera buttons to adjust the camera 37 ■Play mode button 37 ■Delete button 37 ■Thumbnail/ Enlargement button 38 ■Trimming... 67 ●Removing the USB Driver for Windows 98SE 67 ●Digimax Master 68 ●FAQ 70
... back a still image 35 ■Playing back a movie clip 35 ■Movie clip capture function 35 ■On camera movie trimming 36 ■Playing back a recorded voice file 36 ■Playing back a recorded voice memo 36 ●LCD... monitor Indicator 37 ●Using the camera buttons to adjust the camera 37 ■Play mode button 37 ■Delete button 37 ■Thumbnail/ Enlargement button 38 ■Trimming... 67 ●Removing the USB Driver for Windows 98SE 67 ●Digimax Master 68 ●FAQ 70

User Manual
Page 6
... Please check that you have the correct contents before using this product. To buy the optional equipment, contact your nearest Samsung dealer or Samsung service centre. < Included items > Camera case User manual, Product warranty Camera strap Software CD (see p.61) Computer (see p.65) PictBridge compatible printer (see p.46) DPOF compatible printer (see p.44) SD...
... Please check that you have the correct contents before using this product. To buy the optional equipment, contact your nearest Samsung dealer or Samsung service centre. < Included items > Camera case User manual, Product warranty Camera strap Software CD (see p.61) Computer (see p.65) PictBridge compatible printer (see p.46) DPOF compatible printer (see p.44) SD...

User Manual
Page 8
Identification of features Back & Bottom Camera status lamp LCD monitor Zoom W / T button (Digital zoom / Thumbnail) Camera strap eyelet 9 Key Touch Pad (Smart button) 《7》
Identification of features Back & Bottom Camera status lamp LCD monitor Zoom W / T button (Digital zoom / Thumbnail) Camera strap eyelet 9 Key Touch Pad (Smart button) 《7》

User Manual
Page 9
second intervals. Tripod socket USB / AV connection terminal Memory card slot Battery chamber cover ■ Camera Status Lamp Status Description After taking a picture A picture will be taken after initializing the device) Transmitting Data with a PC The lamp turns on (LCD monitor ...
second intervals. Tripod socket USB / AV connection terminal Memory card slot Battery chamber cover ■ Camera Status Lamp Status Description After taking a picture A picture will be taken after initializing the device) Transmitting Data with a PC The lamp turns on (LCD monitor ...
User Manual
Page 10
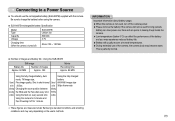
...Be sure to charge the battery before using the camera. ■ SLB-0837B rechargeable battery Specification Model Type Capacity Voltage Charging time (When the camera is not used for 1 minute. ※ These figures are measured under Samsung's standard conditions and shooting conditions and may vary... depending on the 30fps frame rate following Changing the zoom position between following shooting the Wide and the Tele after every shot. conditions Using the camera for 5 minutes and then ...
...Be sure to charge the battery before using the camera. ■ SLB-0837B rechargeable battery Specification Model Type Capacity Voltage Charging time (When the camera is not used for 1 minute. ※ These figures are measured under Samsung's standard conditions and shooting conditions and may vary... depending on the 30fps frame rate following Changing the zoom position between following shooting the Wide and the Tele after every shot. conditions Using the camera for 5 minutes and then ...

User Manual
Page 11
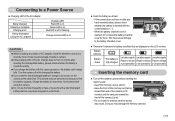
...Power Source ■ You can charge the rechargeable battery (SLB-0837B) by using the USB hub : Connect the camera to the PC directly. ● When other USB devices are assembled, it can be charged. ■ How ...C2). The SAC-45 consists of the PC doesn't meet the Power output standard (5V, 500mA), the camera may not be used as an AC cable. ● Using the SAC-45 as an USB cable : ...: Disconnect the other USB devices. ● When the USB is inserted, it can transmit data with this camera : Use the supplied USB cable. ● When using an SAC-45 KIT. You can be used as ...
...Power Source ■ You can charge the rechargeable battery (SLB-0837B) by using the USB hub : Connect the camera to the PC directly. ● When other USB devices are assembled, it can be charged. ■ How ...C2). The SAC-45 consists of the PC doesn't meet the Power output standard (5V, 500mA), the camera may not be used as an AC cable. ● Using the SAC-45 as an USB cable : ...: Disconnect the other USB devices. ● When the USB is inserted, it can transmit data with this camera : Use the supplied USB cable. ● When using an SAC-45 KIT. You can be used as ...
User Manual
Page 12
... the battery. ● If you have inserted battery, please check whether the battery is inserted with the correct polarity (+ / -). - The camera may cause breakage of cable or camera. ● If the charging LED of the AC Charger does not turn on or blink after inserting the rechargeable battery, please check... to recharge (Prepare to recharge or use spare battery) or use spare battery) or use the flash frequently or take a movie clip with the camera power on after you insert the fully discharged battery to charge it, do not insert by force. Do not insert the memory card the wrong...
... the battery. ● If you have inserted battery, please check whether the battery is inserted with the correct polarity (+ / -). - The camera may cause breakage of cable or camera. ● If the charging LED of the AC Charger does not turn on or blink after inserting the rechargeable battery, please check... to recharge (Prepare to recharge or use spare battery) or use spare battery) or use the flash frequently or take a movie clip with the camera power on after you insert the fully discharged battery to charge it, do not insert by force. Do not insert the memory card the wrong...

User Manual
Page 13
...a newly purchased memory for lost data. ● It is advisable to copy important data onto other media as this camera. ● Do not use a memory card formatted by the Samsung warranty. ● The memory card is an electronic precision device. When the memory card is blinking as back-up e.g....any heavy impact. ● Do not store the memory card in an environment with a different camera. ● Turn off or the memory card is removed while recording, deleting (formatting) or reading. ● Samsung cannot be the case, you will need to purchase a new memory card. To optimise the ...
...a newly purchased memory for lost data. ● It is advisable to copy important data onto other media as this camera. ● Do not use a memory card formatted by the Samsung warranty. ● The memory card is an electronic precision device. When the memory card is blinking as back-up e.g....any heavy impact. ● Do not store the memory card in an environment with a different camera. ● Turn off or the memory card is removed while recording, deleting (formatting) or reading. ● Samsung cannot be the case, you will need to purchase a new memory card. To optimise the ...

User Manual
Page 14
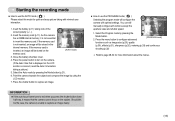
... 1533 - 30FPS - 00:11:24 00:22:13 15FPS - 00:22:13 01:05:57 * The recording times can be as follows. When Using the Camera for the First Time : Smart button ■ This button is used for shifting the menu cursor to select or for confirming the selected menu. By... variables such as image capacities can use SD Memory Cards and MMC (Multi Media Cards). Instructions on how to use the memory card ■ The camera can be cancelled. Recorded image size Super Fine Fine 7M 68 117 5M 93 159 Still image 3M 151 266 1M 572 795 VGA 1213...
... 1533 - 30FPS - 00:11:24 00:22:13 15FPS - 00:22:13 01:05:57 * The recording times can be as follows. When Using the Camera for the First Time : Smart button ■ This button is used for shifting the menu cursor to select or for confirming the selected menu. By... variables such as image capacities can use SD Memory Cards and MMC (Multi Media Cards). Instructions on how to use the memory card ■ The camera can be cancelled. Recorded image size Super Fine Fine 7M 68 117 5M 93 159 Still image 3M 151 266 1M 572 795 VGA 1213...
User Manual
Page 16
...the auto focus frame turns to red when you press the shutter button down half way, it is inserted, an image will configure the camera with minimal user interaction. 1. Should this be stored on the subject. You can still manually configure all functions except the aperture value and... shutter speed. 1. Starting the recording mode ■ How to use the PROGRAM mode ( ) Selecting the program mode will be the case, the camera is unable to capture an image clearly. 《15》 Press the menu button to configure advanced [PROGRAM mode] functions such as image size (p....
...the auto focus frame turns to red when you press the shutter button down half way, it is inserted, an image will configure the camera with minimal user interaction. 1. Should this be stored on the subject. You can still manually configure all functions except the aperture value and... shutter speed. 1. Starting the recording mode ■ How to use the PROGRAM mode ( ) Selecting the program mode will be the case, the camera is unable to capture an image clearly. 《15》 Press the menu button to configure advanced [PROGRAM mode] functions such as image size (p....

User Manual
Page 17
Select the MOVIE CLIP mode by using this mode. Point the camera towards the subject and compose the image by rotating the mode dial. (Available recording time will still be recorded for more information about the menus. [...
Select the MOVIE CLIP mode by using this mode. Point the camera towards the subject and compose the image by rotating the mode dial. (Available recording time will still be recorded for more information about the menus. [...

User Manual
Page 18
... for as long as the available recording time without voice allows. ■ Pausing while recording a movie clip (Successive Recording) This camera allows you wish to stop during unwanted scenes, while recording a movie clip. If you to temporarily stop recording, press the shutter ... allows. If the lighting condition is not displayed. 4. Using this function, you get a well-exposed image in [ASR mode] fluorescent lighting condition, camera shake warning indicator ( ) will reduce the effect of a movie clip] ■ How to use the ASR (Advanced Shake Reduction) mode ( )...
... for as long as the available recording time without voice allows. ■ Pausing while recording a movie clip (Successive Recording) This camera allows you wish to stop during unwanted scenes, while recording a movie clip. If you to temporarily stop recording, press the shutter ... allows. If the lighting condition is not displayed. 4. Using this function, you get a well-exposed image in [ASR mode] fluorescent lighting condition, camera shake warning indicator ( ) will reduce the effect of a movie clip] ■ How to use the ASR (Advanced Shake Reduction) mode ( )...
User Manual
Page 19
... high speed. - In this case, use the [Backlight] in the scene shooting mode (see page 34), fill-in a low lighting condition, the camera shake warning indicator ( ) may appear on the LCD monitor. When the surroundings are dark. 《18》 Press the shutter button all way down... solid surface or change to confirm focus and flash battery charge. Taking a picture against the sun, please use a tripod, support the camera on shooting conditions and camera settings. ■ When either the Flash Off or Slow synchro mode is selected in flash (see page 22), spot metering (see page ...
... high speed. - In this case, use the [Backlight] in the scene shooting mode (see page 34), fill-in a low lighting condition, the camera shake warning indicator ( ) may appear on the LCD monitor. When the surroundings are dark. 《18》 Press the shutter button all way down... solid surface or change to confirm focus and flash battery charge. Taking a picture against the sun, please use a tripod, support the camera on shooting conditions and camera settings. ■ When either the Flash Off or Slow synchro mode is selected in flash (see page 22), spot metering (see page ...

User Manual
Page 20
...; Used for more information about the auto power off function. If you select voice memo recording, the recording will be set up by using the camera buttons. Pressing the shutter button down fully takes and stores the image. ZOOM W / T button ● If the menu is not displayed, this button... STILL IMAGE mode : Pressing the shutter button down fully starts the process for as long as the OPTICAL ZOOM or DIGITAL ZOOM button. ● This camera has a 3X optical zoom and a 5X digital zoom function. Digital zoom TELE : When the maximum (3X) optical zoom is selected, pressing the ZOOM T...
...; Used for more information about the auto power off function. If you select voice memo recording, the recording will be set up by using the camera buttons. Pressing the shutter button down fully takes and stores the image. ZOOM W / T button ● If the menu is not displayed, this button... STILL IMAGE mode : Pressing the shutter button down fully starts the process for as long as the OPTICAL ZOOM or DIGITAL ZOOM button. ● This camera has a 3X optical zoom and a 5X digital zoom function. Digital zoom TELE : When the maximum (3X) optical zoom is selected, pressing the ZOOM T...

User Manual
Page 21
... Pressing the ZOOM W button. Allow time for the camera to process. This will set the camera to press the lens as this may cause a camera malfunction. ● When the camera is reached. Pressing the ZOOM W button continuously will zoom out from the camera. Releasing ZOOM W button stops digital zooming. Pressing the... using the digital zoom may take a little longer for this may notice a decrease in steps. If the image is dim, turn the camera power off and on again to modify the lens position. ● Take care not to its farthest from the subject i.e. Pressing the ZOOM...
... Pressing the ZOOM W button. Allow time for the camera to process. This will set the camera to press the lens as this may cause a camera malfunction. ● When the camera is reached. Pressing the ZOOM W button continuously will zoom out from the camera. Releasing ZOOM W button stops digital zooming. Pressing the... using the digital zoom may take a little longer for this may notice a decrease in steps. If the image is dim, turn the camera power off and on again to modify the lens position. ● Take care not to its farthest from the subject i.e. Pressing the ZOOM...

User Manual
Page 22
MENU button ■ When you press the MENU button, a menu related to each camera mode will return the LCD to the initial display. MODE ■ Mode icon MODE AUTO PROGRAM SPECIAL EFFECT MOVIE ASR PLAY ICON MODE NIGHT SCENE ...》 Select a desired mode by using the M (Mode) button located on the LCD monitor. Pressing it again will be displayed on the back of the camera. Press the M button and a menu show aside will display. M (Mode) button ■ You can select the desired working mode using the Smart button...
MENU button ■ When you press the MENU button, a menu related to each camera mode will return the LCD to the initial display. MODE ■ Mode icon MODE AUTO PROGRAM SPECIAL EFFECT MOVIE ASR PLAY ICON MODE NIGHT SCENE ...》 Select a desired mode by using the M (Mode) button located on the LCD monitor. Pressing it again will be displayed on the back of the camera. Press the M button and a menu show aside will display. M (Mode) button ■ You can select the desired working mode using the Smart button...


