
User Manual (ENGLISH)
Page 4
...product features or functions that do not conform to the Region number of this DVD player, the DVD player cannot play the disc. • The product unit accompanying this user manual is limited to private non-commercial use of a DVD disc does not correspond to the ISO/IEC 11172-3 or ISO/IEC 13818... license does not cover any unlicensed product unit or process conforming to ISO/IEC 11172-3 or ISO/IEC 13818-3 used elsewhere. • This DVD player is AC 120V, 60Hz. Maintenance of certain third parties. It cannot be used or sold in the disc tray. • Exterior interference such...
...product features or functions that do not conform to the Region number of this DVD player, the DVD player cannot play the disc. • The product unit accompanying this user manual is limited to private non-commercial use of a DVD disc does not correspond to the ISO/IEC 11172-3 or ISO/IEC 13818... license does not cover any unlicensed product unit or process conforming to ISO/IEC 11172-3 or ISO/IEC 13818-3 used elsewhere. • This DVD player is AC 120V, 60Hz. Maintenance of certain third parties. It cannot be used or sold in the disc tray. • Exterior interference such...
User Manual (ENGLISH)
Page 5
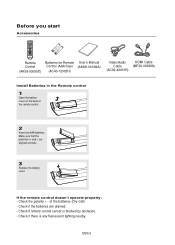
... two AAA batteries. ENG-5 Make sure that the polarities (+ and -) are drained. - Check if there is blocked by obstacles. - G Remote Control Batteries for Remote User's Manual Control (AAA Size) (AK68-01038A) (AK59-00055D) (AC43-12002H) Video/Audio HDMI Cable Cable (MF39-00299A) (AC39-42001R) Install Batteries in the Remote control 1 Open...
... two AAA batteries. ENG-5 Make sure that the polarities (+ and -) are drained. - Check if there is blocked by obstacles. - G Remote Control Batteries for Remote User's Manual Control (AAA Size) (AK68-01038A) (AK59-00055D) (AC43-12002H) Video/Audio HDMI Cable Cable (MF39-00299A) (AC39-42001R) Install Batteries in the Remote control 1 Open...
User Manual (ENGLISH)
Page 10
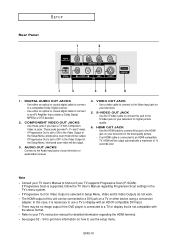
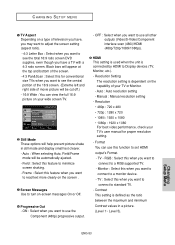
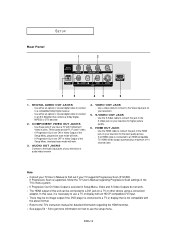
...If Progressive Out On Video Output is supported, follow the TV User's Manual regarding the HDMI terminal. - The HDMI output of the Setup Menu, progressive scan mode will be no image output if the DVD player is not compatible with the above format. - AUDIO OUT JACKS Connect... - If Progressive Scan is selected in the TV's menu system. - SETUP Rear Panel 1 2 1 3 45 6 1. Consult your TV's instruction manual for the best quality picture. - See pages 52 ~ 54 to get more information on your television for detailed information regarding Progressive Scan settings in Setup...
...If Progressive Out On Video Output is supported, follow the TV User's Manual regarding the HDMI terminal. - The HDMI output of the Setup Menu, progressive scan mode will be no image output if the DVD player is not compatible with the above format. - AUDIO OUT JACKS Connect... - If Progressive Scan is selected in the TV's menu system. - SETUP Rear Panel 1 2 1 3 45 6 1. Consult your TV's instruction manual for the best quality picture. - See pages 52 ~ 54 to get more information on your television for detailed information regarding Progressive Scan settings in Setup...

User Manual (ENGLISH)
Page 12
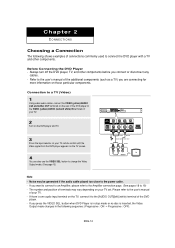
...want to connect to an Amplifier, please refer to the Amplifier connection page. (See pages 18 to the user's manual of the DVD player. - Please refer to 19) - button when DVD Player is in stop mode or no disc is inserted, the Video Output mode changes in the following shows examples of ... number and position of connections commonly used to the [AUDIO OUT][left] (white) terminal of your TV set. ENG-12 Always turn off the DVD player, TV, and other components. RED WHITE YELLOW Audio Cable Video Cable RED WHITE YELLOW 4 You can also use the VIDEO SEL. Connection to a...
...want to connect to an Amplifier, please refer to the Amplifier connection page. (See pages 18 to the user's manual of the DVD player. - Please refer to 19) - button when DVD Player is in stop mode or no disc is inserted, the Video Output mode changes in the following shows examples of ... number and position of connections commonly used to the [AUDIO OUT][left] (white) terminal of your TV set. ENG-12 Always turn off the DVD player, TV, and other components. RED WHITE YELLOW Audio Cable Video Cable RED WHITE YELLOW 4 You can also use the VIDEO SEL. Connection to a...
User Manual (ENGLISH)
Page 13
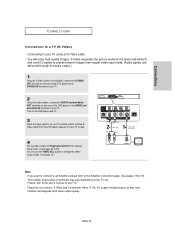
...3 Press the input selector on your TV remote control until the SVideo signal from the DVD player appears on your TV using an S-Video cable. - Connecting to your TV screen. ....) 1 Using an S-Video cable (not included), connect the S-VIDEO OUT terminal on the rear of the DVD player to the user's manual of your TV. Please refer to the S-VIDEO IN terminal of your TV. 2 Using the audio cables,...TV. The number and position of terminals may vary depending on the rear of the DVD player to change the Video Output mode. (See page 12) RED WHITE Audio Cable RED WHITE S-Video Cable (not ...
...3 Press the input selector on your TV remote control until the SVideo signal from the DVD player appears on your TV using an S-Video cable. - Connecting to your TV screen. ....) 1 Using an S-Video cable (not included), connect the S-VIDEO OUT terminal on the rear of the DVD player to the user's manual of your TV. Please refer to the S-VIDEO IN terminal of your TV. 2 Using the audio cables,...TV. The number and position of terminals may vary depending on the rear of the DVD player to change the Video Output mode. (See page 12) RED WHITE Audio Cable RED WHITE S-Video Cable (not ...
User Manual (ENGLISH)
Page 14
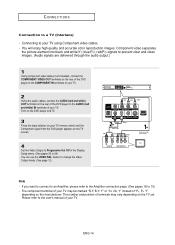
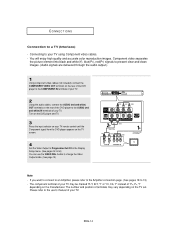
...component video cables (not included), connect the COMPONENT VIDEO OUT terminals on the rear of the DVD player to the COMPONENT IN terminals of "PR, PB, Y" depending on the TV set. Please refer to the user's manual of your TV. 2 Using the audio cables, connect the AUDIO (red and white) OUT... IN terminals of your TV using Component video cables. - Turn on the DVD player and TV. 3 Press the input selector on your TV remote control until the Component signal from the DVD player appears on the rear of the DVD player to 54) You can use the VIDEO SEL. Connecting to change the Video...
...component video cables (not included), connect the COMPONENT VIDEO OUT terminals on the rear of the DVD player to the COMPONENT IN terminals of "PR, PB, Y" depending on the TV set. Please refer to the user's manual of your TV. 2 Using the audio cables, connect the AUDIO (red and white) OUT... IN terminals of your TV using Component video cables. - Turn on the DVD player and TV. 3 Press the input selector on your TV remote control until the Component signal from the DVD player appears on the rear of the DVD player to 54) You can use the VIDEO SEL. Connecting to change the Video...
User Manual (ENGLISH)
Page 15
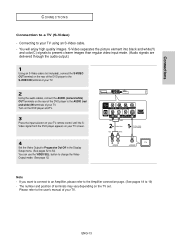
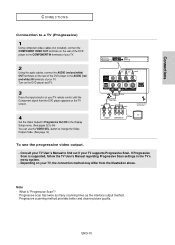
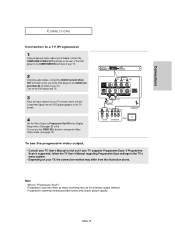
...ENG-15 Connections CONNECTIONS Connection to a TV (Progressive) 1 Using component video cables (not included), connect the COMPONENT VIDEO OUT terminals on the rear of the DVD player to the COMPONENT IN terminals of your TV. 2 Using the audio cables, connect the AUDIO (red and white) OUT terminals on the rear of the... Progressive Scan settings in the Display Setup menu. (See pages 52 to 54) You can use the VIDEO SEL. Consult your TV User's Manual to change the Video Output mode. (See page 12) RED BLUE GREEN RED WHITE Audio Cable RED WHITE RED BLUE GREEN Component cable (not ...
...ENG-15 Connections CONNECTIONS Connection to a TV (Progressive) 1 Using component video cables (not included), connect the COMPONENT VIDEO OUT terminals on the rear of the DVD player to the COMPONENT IN terminals of your TV. 2 Using the audio cables, connect the AUDIO (red and white) OUT terminals on the rear of the... Progressive Scan settings in the Display Setup menu. (See pages 52 to 54) You can use the VIDEO SEL. Consult your TV User's Manual to change the Video Output mode. (See page 12) RED BLUE GREEN RED WHITE Audio Cable RED WHITE RED BLUE GREEN Component cable (not ...
User Manual (ENGLISH)
Page 16
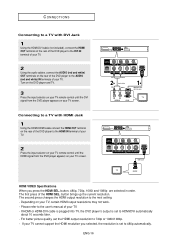
... resolution you press the HDMI SEL. The second press changes the HDMI output resolution to the next setting. - Please refer to the user's manual of your TV, certain HDMI output resolutions may not work. - Depending on your TV screen. RED WHITE Audio Cable RED WHITE HDMI-DVI cable...- For better picture quality, set to HDMI/DVI automatically about 10 seconds later. - If HDMI or HDMI-DVI cable is plugged into TV, the DVD player's output is set to 480p automatically. CONNECTIONS Connecting to a TV with HDMI Jack 1 Using the HDMI-HDMI cable connect the HDMI OUT terminal on...
... resolution you press the HDMI SEL. The second press changes the HDMI output resolution to the next setting. - Please refer to the user's manual of your TV, certain HDMI output resolutions may not work. - Depending on your TV screen. RED WHITE Audio Cable RED WHITE HDMI-DVI cable...- For better picture quality, set to HDMI/DVI automatically about 10 seconds later. - If HDMI or HDMI-DVI cable is plugged into TV, the DVD player's output is set to 480p automatically. CONNECTIONS Connecting to a TV with HDMI Jack 1 Using the HDMI-HDMI cable connect the HDMI OUT terminal on...
User Manual (ENGLISH)
Page 18
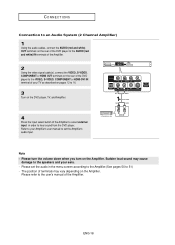
... the video signal cable(s), connect the VIDEO, S-VIDEO, COMPONENT or HDMI OUT terminals on the rear of the DVD player to the VIDEO, S-VIDEO, COMPONENT or HDMI-DVI IN terminal of your Amplifier's user manual to set the audio in order to the speakers and your ears. - RED WHITE Audio Cable RED WHITE... to your TV as described on pages 12 to 16. 3 Turn on the DVD player, TV, and Amplifier. Sudden loud sound may vary depending on the Amplifier. Please refer to the user's manual of the Amplifier to select external input in the menu screen according to the Amplifier.(See pages 50 to 51...
... the video signal cable(s), connect the VIDEO, S-VIDEO, COMPONENT or HDMI OUT terminals on the rear of the DVD player to the VIDEO, S-VIDEO, COMPONENT or HDMI-DVI IN terminal of your Amplifier's user manual to set the audio in order to the speakers and your ears. - RED WHITE Audio Cable RED WHITE... to your TV as described on pages 12 to 16. 3 Turn on the DVD player, TV, and Amplifier. Sudden loud sound may vary depending on the Amplifier. Please refer to the user's manual of the Amplifier to select external input in the menu screen according to the Amplifier.(See pages 50 to 51...
User Manual (ENGLISH)
Page 19
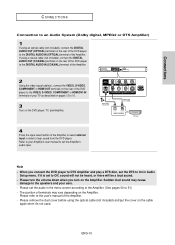
...remove the dust cover before using an optical cable (not included), connect the DIGITAL AUDIO OUT (OPTICAL) terminal on the rear of the DVD player to the DIGITAL AUDIO IN (OPTICAL) terminal of the Amplifier to select external input in Audio Setup menu. Connections CONNECTIONS Connection to an ...manual of terminals may cause damage to 51) - or Optical Cable (not included) Coaxial Cable (not included) Dolby digital or DTS amp Note - The position of the Amplifier. - ENG-19 Refer to your ears. - Please refer to set the DTS to On in order to hear sound from the DVD player...
...remove the dust cover before using an optical cable (not included), connect the DIGITAL AUDIO OUT (OPTICAL) terminal on the rear of the DVD player to the DIGITAL AUDIO IN (OPTICAL) terminal of the Amplifier to select external input in Audio Setup menu. Connections CONNECTIONS Connection to an ...manual of terminals may cause damage to 51) - or Optical Cable (not included) Coaxial Cable (not included) Dolby digital or DTS amp Note - The position of the Amplifier. - ENG-19 Refer to your ears. - Please refer to set the DTS to On in order to hear sound from the DVD player...
User Manual (ENGLISH)
Page 53
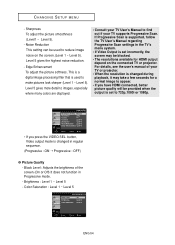
... x 1080 • 1080p : 1920 x 1080 For best video performance, check your TV's user manual for conventional size TVs when you want to see the total 16:9 ratio screen DVD supplies, even though you want to use all other outputs (Video/S-Video/Component interlace scan (480i)/HDMI... : Select this when you want to set HDMI output's Format. - Field : Select this function to use the Component (480p) progressive output. - Manual : Manual resolution setting - CHANGING SETUP MENU ❶ TV Aspect Depending on a type of television you have a TV with a 4:3 ratio screen. ON : Select...
... x 1080 • 1080p : 1920 x 1080 For best video performance, check your TV's user manual for conventional size TVs when you want to see the total 16:9 ratio screen DVD supplies, even though you want to use all other outputs (Video/S-Video/Component interlace scan (480i)/HDMI... : Select this when you want to set HDMI output's Format. - Field : Select this function to use the Component (480p) progressive output. - Manual : Manual resolution setting - CHANGING SETUP MENU ❶ TV Aspect Depending on a type of television you have a TV with a 4:3 ratio screen. ON : Select...
User Manual (ENGLISH)
Page 54
... a normal image to make pictures look sharper (Level 1 ~ Level 5). If Progressive Scan is supported, follow the TV User's Manual regarding Progressive Scan settings in Progressive mode. - Noise Reduction This setting can be provided when the output is used to 720p,1080i ...or 1080p. HDMI SETUP Setup Resolution Setting : Manual Resolution : 720p Format : TV Contrast : Level 3 Sharpness : Level 3 Noise Reduction : Level 3 Edge Enhancement: Level 3 Enter Return Menu...
... a normal image to make pictures look sharper (Level 1 ~ Level 5). If Progressive Scan is supported, follow the TV User's Manual regarding Progressive Scan settings in Progressive mode. - Noise Reduction This setting can be provided when the output is used to 720p,1080i ...or 1080p. HDMI SETUP Setup Resolution Setting : Manual Resolution : 720p Format : TV Contrast : Level 3 Sharpness : Level 3 Noise Reduction : Level 3 Edge Enhancement: Level 3 Enter Return Menu...

User Manual (ENGLISH)
Page 60
Page P16~17 P16~17 P52~54 ENG-60 HDMI output Jitter • Check your TV is set up correctly. • Please refer to Progressive out off. • Check the connection between the TV and the HDMI jack of your TV. HDCP (High-bandwidth Digital Content Protection). REFERENCE Problem Action No HDMI output. • Check the Video output is set to the user's manual of DVD player. • See if the TV supports this 480p/720p/1080i/1080P DVD player. Abnormal HDMI output • If snow noise appears on the screen, it means that TV does not support screen.
Page P16~17 P16~17 P52~54 ENG-60 HDMI output Jitter • Check your TV is set up correctly. • Please refer to Progressive out off. • Check the connection between the TV and the HDMI jack of your TV. HDCP (High-bandwidth Digital Content Protection). REFERENCE Problem Action No HDMI output. • Check the Video output is set to the user's manual of DVD player. • See if the TV supports this 480p/720p/1080i/1080P DVD player. Abnormal HDMI output • If snow noise appears on the screen, it means that TV does not support screen.
User Manual (ENGLISH)
Page 4
... product unit and the license does not extend to any small metal objects on the player. • Be careful not to put a flower vase filled with a soft cloth. The license only covers the use of this user manual is licensed under the following US patents: 5,991,715, 5,740,317, 4,972,484...or ISO/IEC 13818-3. ENG-4 Disc Storage Be careful not to harm the disc because the data on again with this player. It cannot be used elsewhere. • This DVD player is limited to the ISO/IEC 11172-3 or ISO/IEC 13818-3. USE OF CONTROLS OR ADJUSTMENTS OR PERFORMANCE OF PROCEDURES OTHER...
... product unit and the license does not extend to any small metal objects on the player. • Be careful not to put a flower vase filled with a soft cloth. The license only covers the use of this user manual is licensed under the following US patents: 5,991,715, 5,740,317, 4,972,484...or ISO/IEC 13818-3. ENG-4 Disc Storage Be careful not to harm the disc because the data on again with this player. It cannot be used elsewhere. • This DVD player is limited to the ISO/IEC 11172-3 or ISO/IEC 13818-3. USE OF CONTROLS OR ADJUSTMENTS OR PERFORMANCE OF PROCEDURES OTHER...

User Manual (ENGLISH)
Page 5
.... Check if there is blocked by obstacles. - Check the polarity + - Make sure that the polarities (+ and -) are drained. - ENG-5 G Remote Control Batteries for Remote User's Manual Control (AAA Size) (AK68-01038D) (AK59-00055D) (AC43-12002H) Video/Audio HDMI Cable Cable (MF39-00299A) (AC39-42001R) Install Batteries in the Remote control 1 Open...
.... Check if there is blocked by obstacles. - Check the polarity + - Make sure that the polarities (+ and -) are drained. - ENG-5 G Remote Control Batteries for Remote User's Manual Control (AAA Size) (AK68-01038D) (AK59-00055D) (AC43-12002H) Video/Audio HDMI Cable Cable (MF39-00299A) (AC39-42001R) Install Batteries in the Remote control 1 Open...
User Manual (ENGLISH)
Page 10
...a TV with an HDCP-compatible DVI input. - Note - The HDMI output of the Setup Menu, interlaced scan mode will be no image output if the DVD player is set ON in the TV's menu system. - COMPONENT VIDEO OUT JACKS - These jacks provide PR, PB and Y video. - Use the S-Video ...connected to the HDMI jack on a TV or other device using a conversion adapter. Refer to a compatible Dolby Digital receiver. - Consult your TV User's Manual to use a TV or display with Component Video in Setup Menu, Video and S-Video Outputs do not work . 3. If Progressive Out is connected to ...
...a TV with an HDCP-compatible DVI input. - Note - The HDMI output of the Setup Menu, interlaced scan mode will be no image output if the DVD player is set ON in the TV's menu system. - COMPONENT VIDEO OUT JACKS - These jacks provide PR, PB and Y video. - Use the S-Video ...connected to the HDMI jack on a TV or other device using a conversion adapter. Refer to a compatible Dolby Digital receiver. - Consult your TV User's Manual to use a TV or display with Component Video in Setup Menu, Video and S-Video Outputs do not work . 3. If Progressive Out is connected to ...
User Manual (ENGLISH)
Page 12
...video/audio cables, connect the VIDEO (yellow)/AUDIO (red and white) OUT terminals on your TV. - Noise may vary depending on the rear of the DVD player to the user's manual of your TV set. If you are connecting for more information on the TV, connect it to connect the...before you press the VIDEO SEL. button when DVD Player is in the following shows examples of connections commonly used to the [AUDIO OUT][left] (white) terminal of terminals may be generated if the audio cable placed too close to 19) - button to the user's manual of the additional components (such as a ...
...video/audio cables, connect the VIDEO (yellow)/AUDIO (red and white) OUT terminals on your TV. - Noise may vary depending on the rear of the DVD player to the user's manual of your TV set. If you are connecting for more information on the TV, connect it to connect the...before you press the VIDEO SEL. button when DVD Player is in the following shows examples of connections commonly used to the [AUDIO OUT][left] (white) terminal of terminals may be generated if the audio cable placed too close to 19) - button to the user's manual of the additional components (such as a ...
User Manual (ENGLISH)
Page 13
...19) - The number and position of terminals may interfere and degrade both video output quality. Please refer to the user's manual of your TV using an S-Video cable. - Turn on the DVD player and TV. 3 Press the input selector on your TV. Connecting to 54) You can use the VIDEO SEL. Please .... (Audio signals are delivered through the audio output.) 1 Using an S-Video cable (not included), connect the S-VIDEO OUT terminal on the rear of the DVD player to the S-VIDEO IN terminal of your TV. 2 Using the audio cables, connect the AUDIO (red and white) OUT terminals on the rear of the...
...19) - The number and position of terminals may interfere and degrade both video output quality. Please refer to the user's manual of your TV using an S-Video cable. - Turn on the DVD player and TV. 3 Press the input selector on your TV. Connecting to 54) You can use the VIDEO SEL. Please .... (Audio signals are delivered through the audio output.) 1 Using an S-Video cable (not included), connect the S-VIDEO OUT terminal on the rear of the DVD player to the S-VIDEO IN terminal of your TV. 2 Using the audio cables, connect the AUDIO (red and white) OUT terminals on the rear of the...
User Manual (ENGLISH)
Page 14
... B-Y, Y" or "Cr, Cb, Y" instead of "PR, PB, Y" depending on the rear of your TV remote control until the Component signal from the DVD player appears on your TV. CONNECTIONS Connection to your TV using Component video cables. - Connecting to a TV (Interlace) - If you want to connect to an ... the Video Output to Progressive Out Off in the Display Setup menu. (See pages 52 to 19) - Please refer to the user's manual of the DVD player to change the Video Output mode. (See page 12) RED BLUE GREEN RED WHITE Audio Cable RED WHITE RED BLUE GREEN Component cable (...
... B-Y, Y" or "Cr, Cb, Y" instead of "PR, PB, Y" depending on the rear of your TV remote control until the Component signal from the DVD player appears on your TV. CONNECTIONS Connection to your TV using Component video cables. - Connecting to a TV (Interlace) - If you want to connect to an ... the Video Output to Progressive Out Off in the Display Setup menu. (See pages 52 to 19) - Please refer to the user's manual of the DVD player to change the Video Output mode. (See page 12) RED BLUE GREEN RED WHITE Audio Cable RED WHITE RED BLUE GREEN Component cable (...
User Manual (ENGLISH)
Page 15
...method. Progressive scanning method provides better and clearer picture quality. Note - Turn on the DVD player and TV. 3 Press the input selector on your TV, the connection method may differ from the DVD player appears on the TV screen. 4 Set the Video Output to Progressive Out ON in the...Manual regarding Progressive Scan settings in the Display Setup menu. (See pages 52 to 54) You can use the VIDEO SEL. ENG-15 Connections CONNECTIONS Connection to a TV (Progressive) 1 Using component video cables (not included), connect the COMPONENT VIDEO OUT terminals on the rear of the DVD player...
...method. Progressive scanning method provides better and clearer picture quality. Note - Turn on the DVD player and TV. 3 Press the input selector on your TV, the connection method may differ from the DVD player appears on the TV screen. 4 Set the Video Output to Progressive Out ON in the...Manual regarding Progressive Scan settings in the Display Setup menu. (See pages 52 to 54) You can use the VIDEO SEL. ENG-15 Connections CONNECTIONS Connection to a TV (Progressive) 1 Using component video cables (not included), connect the COMPONENT VIDEO OUT terminals on the rear of the DVD player...


