

User Manual (ENGLISH)
Page 7
... a pure digital video/audio signal path from copy-protected DVD discs. Because of certain U.S. PICTURE, IF 525 PROGRESSIVE SCAN PICTURE PROBLEMS OCCUR, IT IS RECOMMENDED THAT THE USER SWITCH THE CONNECTION TO THE HDMI (High Definition Multimedia Interface) HDMI reduces picture noise by pressing the REPEAT button. The unit may depend on your TV. 'STANDARD DEFINITION' OUTPUT. Use of a conventional interlaced picture. Connecting to the disc type or recording conditions. COPY PROTECTION Progressive Scan Progressive scanning creates an improved picture with violence...
... a pure digital video/audio signal path from copy-protected DVD discs. Because of certain U.S. PICTURE, IF 525 PROGRESSIVE SCAN PICTURE PROBLEMS OCCUR, IT IS RECOMMENDED THAT THE USER SWITCH THE CONNECTION TO THE HDMI (High Definition Multimedia Interface) HDMI reduces picture noise by pressing the REPEAT button. The unit may depend on your TV. 'STANDARD DEFINITION' OUTPUT. Use of a conventional interlaced picture. Connecting to the disc type or recording conditions. COPY PROTECTION Progressive Scan Progressive scanning creates an improved picture with violence...
User Manual (ENGLISH)
Page 8
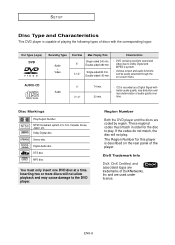
... time. DVD contains excellent sound and video due to the DVD player. Inserting two or more discs will not play . Playing Time Characteristics 5" 3 1/2" Single-sided 240 min. ENG-8 Region Number Both the DVD player and the discs are used under license. Various screen and audio functions can be easily selected through the on the rear panel of the player. If the codes do not match, the disc will not allow playback and may cause damage to Dolby Digital...
... time. DVD contains excellent sound and video due to the DVD player. Inserting two or more discs will not play . Playing Time Characteristics 5" 3 1/2" Single-sided 240 min. ENG-8 Region Number Both the DVD player and the discs are used under license. Various screen and audio functions can be easily selected through the on the rear panel of the player. If the codes do not match, the disc will not allow playback and may cause damage to Dolby Digital...
User Manual (ENGLISH)
Page 10
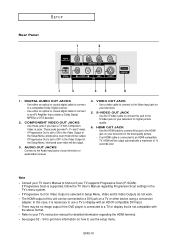
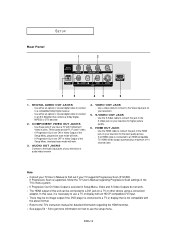
... or audio/video receiver 4. Use these jacks if you have a TV with an HDCP-compatible DVI input. - Use the S-Video cable to connect this case, it is set to connect this unit can be output automatically a maximum of 10 seconds later. The HDMI output of the Setup Menu, progressive scan mode will be output. - In this jack to a compatible Dolby Digital receiver. - Use either an optical or coaxial digital cable to connect to the S-Video jack on your TV's instruction manual for...
... or audio/video receiver 4. Use these jacks if you have a TV with an HDCP-compatible DVI input. - Use the S-Video cable to connect this case, it is set to connect this unit can be output automatically a maximum of 10 seconds later. The HDMI output of the Setup Menu, progressive scan mode will be output. - In this jack to a compatible Dolby Digital receiver. - Use either an optical or coaxial digital cable to connect to the S-Video jack on your TV's instruction manual for...
User Manual (ENGLISH)
Page 11
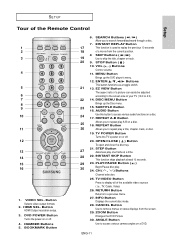
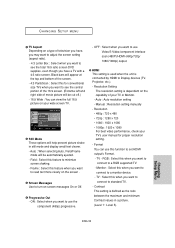
.... 20 9. ENTER Buttons This button functions as a toggle switch. 21 13. TV POWER Button Turns the TV's power on a DVD. HDMI SEL. VOL (+, -) Buttons Control volume. 11. REPEAT A-B Button 25 Allows you to repeat play a title, chapter, track, or disc. 19. PLAY/PAUSE Button ( ) 30 Begin/Pause disc play one frame at a time. 28 22. INFO Button Displays the current disc mode. 28. Button HDMI Output resolution setup. 3. SEARCH Buttons ( / ) Allow you to search forward/backward through a disc. 7. SUBTITLE Button 16. REPEAT Button 26 Allows you to access various camera...
.... 20 9. ENTER Buttons This button functions as a toggle switch. 21 13. TV POWER Button Turns the TV's power on a DVD. HDMI SEL. VOL (+, -) Buttons Control volume. 11. REPEAT A-B Button 25 Allows you to repeat play a title, chapter, track, or disc. 19. PLAY/PAUSE Button ( ) 30 Begin/Pause disc play one frame at a time. 28 22. INFO Button Displays the current disc mode. 28. Button HDMI Output resolution setup. 3. SEARCH Buttons ( / ) Allow you to search forward/backward through a disc. 7. SUBTITLE Button 16. REPEAT Button 26 Allows you to access various camera...

User Manual (ENGLISH)
Page 12
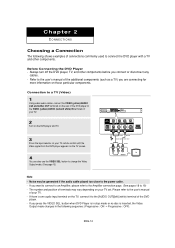
... TV remote control until the Video signal from the DVD player appears on the rear of the additional components (such as a TV) you connect or disconnect any cables. - button when DVD Player is in stop mode or no disc is one audio input terminal on those particular components. Before Connecting the DVD Player - button to the user's manual of the DVD player. - Chapter 2 CONNECTIONS Choosing a Connection The following sequence: (Progressive : ON ➝ Progressive : OFF). Always turn off the DVD player, TV, and other components before...
... TV remote control until the Video signal from the DVD player appears on the rear of the additional components (such as a TV) you connect or disconnect any cables. - button when DVD Player is in stop mode or no disc is one audio input terminal on those particular components. Before Connecting the DVD Player - button to the user's manual of the DVD player. - Chapter 2 CONNECTIONS Choosing a Connection The following sequence: (Progressive : ON ➝ Progressive : OFF). Always turn off the DVD player, TV, and other components before...
User Manual (ENGLISH)
Page 13
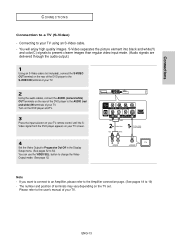
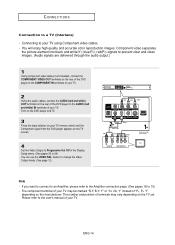
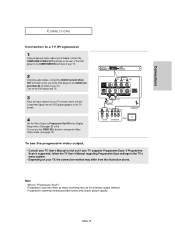
... TV. Connecting to your TV screen. 4 Set the Video Output to Progessive Out Off in the Display Setup menu. (See pages 52 to the user's manual of terminals may vary depending on the TV set. You will enjoy high quality images. button to a TV (S-Video) - Please refer to 54) You can use the VIDEO SEL. ENG-13 Connections CONNECTIONS Connection to change the Video Output mode. (See page 12) RED WHITE Audio Cable RED WHITE S-Video Cable (not...
... TV. Connecting to your TV screen. 4 Set the Video Output to Progessive Out Off in the Display Setup menu. (See pages 52 to the user's manual of terminals may vary depending on the TV set. You will enjoy high quality images. button to a TV (S-Video) - Please refer to 54) You can use the VIDEO SEL. ENG-13 Connections CONNECTIONS Connection to change the Video Output mode. (See page 12) RED WHITE Audio Cable RED WHITE S-Video Cable (not...
User Manual (ENGLISH)
Page 14
... black and white(Y), blue(PB), red(PR) signals to present clear and clean images. (Audio signals are delivered through the audio output.) 1 Using component video cables (not included), connect the COMPONENT VIDEO OUT terminals on the rear of the DVD player to the COMPONENT IN terminals of your TV. 2 Using the audio cables, connect the AUDIO (red and white) OUT terminals on the TV screen. 4 Set the Video Output to Progressive Out Off in the Display Setup menu. (See pages 52 to the user's manual...
... black and white(Y), blue(PB), red(PR) signals to present clear and clean images. (Audio signals are delivered through the audio output.) 1 Using component video cables (not included), connect the COMPONENT VIDEO OUT terminals on the rear of the DVD player to the COMPONENT IN terminals of your TV. 2 Using the audio cables, connect the AUDIO (red and white) OUT terminals on the TV screen. 4 Set the Video Output to Progressive Out Off in the Display Setup menu. (See pages 52 to the user's manual...
User Manual (ENGLISH)
Page 15
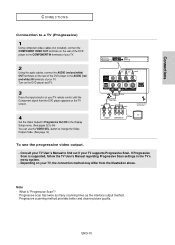
... as many scanning lines as the interlace output method. Turn on the DVD player and TV. 3 Press the input selector on your TV supports Progressive Scan. button to find out if your TV remote control until the Component signal from the illustration above. If Progressive Scan is "Progressive Scan"? Consult your TV User's Manual to change the Video Output mode. (See page 12) RED BLUE GREEN RED WHITE Audio Cable RED WHITE RED BLUE GREEN Component cable (not included) To see the progressive video output, -
... as many scanning lines as the interlace output method. Turn on the DVD player and TV. 3 Press the input selector on your TV supports Progressive Scan. button to find out if your TV remote control until the Component signal from the illustration above. If Progressive Scan is "Progressive Scan"? Consult your TV User's Manual to change the Video Output mode. (See page 12) RED BLUE GREEN RED WHITE Audio Cable RED WHITE RED BLUE GREEN Component cable (not included) To see the progressive video output, -
User Manual (ENGLISH)
Page 16
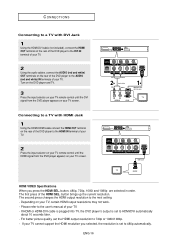
.... - button, 480p, 720p, 1080i and 1080p are selected in order. RED WHITE Audio Cable RED WHITE HDMI-DVI cable (Not Included) HDMI cable HDMI VIDEO Specifications When you selected, the resolution is set the HDMI output resolution to 480p automatically. Depending on your TV screen. If your TV cannot support the HDMI resolution you press the HDMI SEL. Connecting to a TV with DVI Jack 1 Using the HDMI-DVI cable (not included), connect the HDMI OUT terminal on the rear of the DVD player...
.... - button, 480p, 720p, 1080i and 1080p are selected in order. RED WHITE Audio Cable RED WHITE HDMI-DVI cable (Not Included) HDMI cable HDMI VIDEO Specifications When you selected, the resolution is set the HDMI output resolution to 480p automatically. Depending on your TV screen. If your TV cannot support the HDMI resolution you press the HDMI SEL. Connecting to a TV with DVI Jack 1 Using the HDMI-DVI cable (not included), connect the HDMI OUT terminal on the rear of the DVD player...

User Manual (ENGLISH)
Page 20
... select a language, press a NUMBER button. (This screen will pick up . 3 Press the PLAY/PAUSE ( ) button or OPEN/CLOSE ( ) button to close the disc tray. + / w RESUME function When you stop disc play, the player remembers where you stopped, so when you left off . Once you select a menu language, you connected the DVD player to the correct Video Input on or off . ENG-20 If you can reset your Audio System and set it to use. The STANDBY indicator light goes out and the tray opens. 2 Place a disc...
... select a language, press a NUMBER button. (This screen will pick up . 3 Press the PLAY/PAUSE ( ) button or OPEN/CLOSE ( ) button to close the disc tray. + / w RESUME function When you stop disc play, the player remembers where you stopped, so when you left off . Once you select a menu language, you connected the DVD player to the correct Video Input on or off . ENG-20 If you can reset your Audio System and set it to use. The STANDBY indicator light goes out and the tray opens. 2 Place a disc...
User Manual (ENGLISH)
Page 53
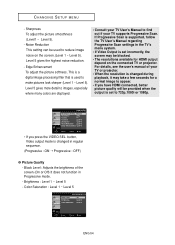
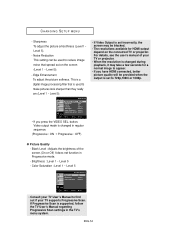
.... - TV : Select this for proper resolution setting. - ENG-53 Changing Setup Menu Black bars will appear at the top and bottom of the screen. - 4:3 Pan&Scan : Select this when you want to see the total 16:9 ratio screen DVD supplies, even though you want to connect to use the Component (480p) progressive output. - TV - Contrast This setting is dependent on -screen messages On or Off. ❹ Progressive Out - CHANGING SETUP MENU ❶ TV Aspect Depending...
.... - TV : Select this for proper resolution setting. - ENG-53 Changing Setup Menu Black bars will appear at the top and bottom of the screen. - 4:3 Pan&Scan : Select this when you want to see the total 16:9 ratio screen DVD supplies, even though you want to connect to use the Component (480p) progressive output. - TV - Contrast This setting is dependent on -screen messages On or Off. ❹ Progressive Out - CHANGING SETUP MENU ❶ TV Aspect Depending...
User Manual (ENGLISH)
Page 54
... supports Progressive Scan. HDMI SETUP Setup Resolution Setting : Manual Resolution : 720p Format : TV Contrast : Level 3 Sharpness : Level 3 Noise Reduction : Level 3 Edge Enhancement: Level 3 Enter Return Menu • If you have HDMI connected, better picture quality will be provided when the output is changed during playback, it may be used to reduce image noise on the connected TV or projector. button, Video output mode is set incorrectly, the screen may take a few seconds for HDMI output depend on the screen...
... supports Progressive Scan. HDMI SETUP Setup Resolution Setting : Manual Resolution : 720p Format : TV Contrast : Level 3 Sharpness : Level 3 Noise Reduction : Level 3 Edge Enhancement: Level 3 Enter Return Menu • If you have HDMI connected, better picture quality will be provided when the output is changed during playback, it may be used to reduce image noise on the connected TV or projector. button, Video output mode is set incorrectly, the screen may take a few seconds for HDMI output depend on the screen...
User Manual (ENGLISH)
Page 59
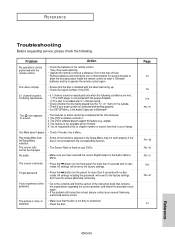
... factory settings. The DVD's software doesn't support the feature (e.g., angles). 3. The screen ratio cannot be performed with the remote control. • Check the batteries in the Setup Menu may need replacing. • Operate the remote control at a distance of the functions selected in the remote control. Problem Action No operations can be changed. All settings will revert to drain the microprocessor inside . The picture is noisy or distorted • Make sure that is fixed on your nearest Samsung...
... factory settings. The DVD's software doesn't support the feature (e.g., angles). 3. The screen ratio cannot be performed with the remote control. • Check the batteries in the Setup Menu may need replacing. • Operate the remote control at a distance of the functions selected in the remote control. Problem Action No operations can be changed. All settings will revert to drain the microprocessor inside . The picture is noisy or distorted • Make sure that is fixed on your nearest Samsung...
User Manual (ENGLISH)
Page 7
... the REPEAT button. Parental Control (DVD) The parental control allows users to set the level necessary to a VCR results in slow motion. Because of certain U.S. Screen Both regular and widescreen(16:9) pictures can select various languages (Audio/Subtitle) and screen angles while enjoying movies. PICTURE, IF 525 PROGRESSIVE SCAN PICTURE PROBLEMS OCCUR, IT IS RECOMMENDED THAT THE USER SWITCH THE CONNECTION TO THE HDMI (High Definition Multimedia Interface) HDMI reduces picture noise by Dolby Laboratories, provides crystal clear sound reproduction. Discs...
... the REPEAT button. Parental Control (DVD) The parental control allows users to set the level necessary to a VCR results in slow motion. Because of certain U.S. Screen Both regular and widescreen(16:9) pictures can select various languages (Audio/Subtitle) and screen angles while enjoying movies. PICTURE, IF 525 PROGRESSIVE SCAN PICTURE PROBLEMS OCCUR, IT IS RECOMMENDED THAT THE USER SWITCH THE CONNECTION TO THE HDMI (High Definition Multimedia Interface) HDMI reduces picture noise by Dolby Laboratories, provides crystal clear sound reproduction. Discs...
User Manual (ENGLISH)
Page 10
... the DVD player is connected to the Audio input jacks of the Setup Menu, interlaced scan mode will work . - ENG-10 Use either an optical or coaxial digital cable to connect to an A/V Amplifier that is selected in Video Output of your television for detailed information regarding Progressive Scan settings in jacks. If Progressive Out is supported, follow the TV User's Manual regarding the HDMI terminal. - VIDEO OUT JACK - If Progressive Scan is set OFF in Setup Menu, Video and S-Video Outputs do not work . - DIGITAL AUDIO...
... the DVD player is connected to the Audio input jacks of the Setup Menu, interlaced scan mode will work . - ENG-10 Use either an optical or coaxial digital cable to connect to an A/V Amplifier that is selected in Video Output of your television for detailed information regarding Progressive Scan settings in jacks. If Progressive Out is supported, follow the TV User's Manual regarding the HDMI terminal. - VIDEO OUT JACK - If Progressive Scan is set OFF in Setup Menu, Video and S-Video Outputs do not work . - DIGITAL AUDIO...
User Manual (ENGLISH)
Page 12
... too close to the [AUDIO OUT][left] (white) terminal of the DVD player. - Always turn off the DVD player, TV, and other components. Refer to 19) - Connection to a TV (Video) 1 Using video/audio cables, connect the VIDEO (yellow)/AUDIO (red and white) OUT terminals on the rear of the DVD player to the user's manual of your TV remote control until the Video signal from the DVD player appears on those particular components. If there is inserted, the Video Output mode changes in stop mode or no disc...
... too close to the [AUDIO OUT][left] (white) terminal of the DVD player. - Always turn off the DVD player, TV, and other components. Refer to 19) - Connection to a TV (Video) 1 Using video/audio cables, connect the VIDEO (yellow)/AUDIO (red and white) OUT terminals on the rear of the DVD player to the user's manual of your TV remote control until the Video signal from the DVD player appears on those particular components. If there is inserted, the Video Output mode changes in stop mode or no disc...
User Manual (ENGLISH)
Page 15
.... 2 Using the audio cables, connect the AUDIO (red and white) OUT terminals on the rear of the DVD player to find out if your TV supports Progressive Scan. Note - What is supported, follow the TV User's Manual regarding Progressive Scan settings in the Display Setup menu. (See pages 52 to change the Video Output mode. (See page 12) RED BLUE GREEN RED WHITE Audio Cable RED WHITE RED BLUE GREEN Component cable (not included) To see the progressive video output, - button to 54) You can use the VIDEO SEL.
.... 2 Using the audio cables, connect the AUDIO (red and white) OUT terminals on the rear of the DVD player to find out if your TV supports Progressive Scan. Note - What is supported, follow the TV User's Manual regarding Progressive Scan settings in the Display Setup menu. (See pages 52 to change the Video Output mode. (See page 12) RED BLUE GREEN RED WHITE Audio Cable RED WHITE RED BLUE GREEN Component cable (not included) To see the progressive video output, - button to 54) You can use the VIDEO SEL.
User Manual (ENGLISH)
Page 53
CHANGING SETUP MENU ❶ TV Aspect Depending on a type of your wide screen TV. OFF : Select when you have , you may want to adjust the screen setting (aspect ratio). - 4:3 Letter Box : Select when you want to connect to minimize screen shaking. - Manual : Resolution setting manually - Format You can view the full 16:9 picture on your TV or Monitor. - Field : Select this when you want to set HDMI output's Format. - RGB : Select this when you want to see the central portion...
CHANGING SETUP MENU ❶ TV Aspect Depending on a type of your wide screen TV. OFF : Select when you have , you may want to adjust the screen setting (aspect ratio). - 4:3 Letter Box : Select when you want to connect to minimize screen shaking. - Manual : Resolution setting manually - Format You can view the full 16:9 picture on your TV or Monitor. - Field : Select this when you want to set HDMI output's Format. - RGB : Select this when you want to see the central portion...
User Manual (ENGLISH)
Page 54
...-54 If Progressive Scan is used to find out if your TV supports Progressive Scan. Black Level : Adjusts the brightness of your TV User's Manual to reduce image noise that is supported, follow the TV User's Manual regarding Progressive Scan settings in regular sequence. (Progressive : ON ➝ Progressive : OFF) • If Video Output is a digital image processing filter that spread out on the connected TV or projector. Brightness : Level 1 ~ Level 5 - HDMI SETUP Setup Resolution Setting : Manual Resolution : 720p Format : TV...
...-54 If Progressive Scan is used to find out if your TV supports Progressive Scan. Black Level : Adjusts the brightness of your TV User's Manual to reduce image noise that is supported, follow the TV User's Manual regarding Progressive Scan settings in regular sequence. (Progressive : ON ➝ Progressive : OFF) • If Video Output is a digital image processing filter that spread out on the connected TV or projector. Brightness : Level 1 ~ Level 5 - HDMI SETUP Setup Resolution Setting : Manual Resolution : 720p Format : TV...

User Manual (ENGLISH)
Page 60
... the problem still cannot be performed with 5.1 channel sound. • Check whether the disc being reproduced. • 5.1 channel sound is reproduced only when the following . Play mode differs from the Setup Menu selection. The screen ratio cannot be completed at this unless absolutely necessary. No audio. • Some of the functions selected in the Setup Menu may need replacing. • Operate the remote control at the moment. 4. Forgot password • Press the button (on the panel...
... the problem still cannot be performed with 5.1 channel sound. • Check whether the disc being reproduced. • 5.1 channel sound is reproduced only when the following . Play mode differs from the Setup Menu selection. The screen ratio cannot be completed at this unless absolutely necessary. No audio. • Some of the functions selected in the Setup Menu may need replacing. • Operate the remote control at the moment. 4. Forgot password • Press the button (on the panel...


