
User Manual (ENGLISH)
Page 9
...)/ MP3 Disc Playback 66 Repeat Audio CD(CD-DA) & MP3 67 Playing an Audio CD(CD-DA)/MP3 VIEWING A PICTURE 69 69 Viewing a Picture 69 Slide Show/Speed 69 Rotate 70 Zoom 70 Go To Photo List USING THE USB FUNCTION 71 71 Playing Media Files Using the USB Host Feature... RADIO 73 73 Listening to Radio 73 Presetting Stations USING AN iPod 74 74 Listening to Music 76 Watching a Movie PC STREAMING FUNCTION 77 USING THE E-CONTENTS 79 77 Connecting...
...)/ MP3 Disc Playback 66 Repeat Audio CD(CD-DA) & MP3 67 Playing an Audio CD(CD-DA)/MP3 VIEWING A PICTURE 69 69 Viewing a Picture 69 Slide Show/Speed 69 Rotate 70 Zoom 70 Go To Photo List USING THE USB FUNCTION 71 71 Playing Media Files Using the USB Host Feature... RADIO 73 73 Listening to Radio 73 Presetting Stations USING AN iPod 74 74 Listening to Music 76 Watching a Movie PC STREAMING FUNCTION 77 USING THE E-CONTENTS 79 77 Connecting...
User Manual (ENGLISH)
Page 21
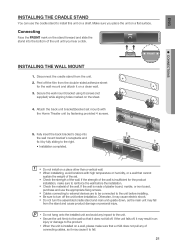
...-sided adhesive sheet for the product installation, make sure that cannot sustain the weight of the set mount) with the Home Theater unit by fully sliding to fall off , it does not fall . 21 Fully insert the back bracket's clasp into the bottom of connecting cables, as the main...provided 4 screws. 5. If the wall is made of the wall. Make sure you hear a click. Connecting Face the FRONT mark on the stand forward and slide the stand into the wall mount bracket's receptacle and fix it to the right. • Installation completed. Do not install on a wall, ...
...-sided adhesive sheet for the product installation, make sure that cannot sustain the weight of the set mount) with the Home Theater unit by fully sliding to fall off , it does not fall . 21 Fully insert the back bracket's clasp into the bottom of connecting cables, as the main...provided 4 screws. 5. If the wall is made of the wall. Make sure you hear a click. Connecting Face the FRONT mark on the stand forward and slide the stand into the wall mount bracket's receptacle and fix it to the right. • Installation completed. Do not install on a wall, ...

User Manual (ENGLISH)
Page 68
...;▼ button to the Music List, press the GREEN(B) or RETURN button. SONG01.mp3 CD 1/18 00:02:24 / 00:05:57 a Play Mode d Slide Show M To operate this procedure to MP3 files while you play Add Play MP3 & JPEG Simultaneous playback AGF You can enjoy listening to....TRACK 002 03.TRACK 003 B Music List C Playlist play MP3 and JPEG files simultaneously, audio drop may occur according to the Playlist. 4. The slide show speed. ► 001. To go to bitrate of MP3, size of JPEG image and method of encoding. 68 Repeat this function, you have to...
...;▼ button to the Music List, press the GREEN(B) or RETURN button. SONG01.mp3 CD 1/18 00:02:24 / 00:05:57 a Play Mode d Slide Show M To operate this procedure to MP3 files while you play Add Play MP3 & JPEG Simultaneous playback AGF You can enjoy listening to....TRACK 002 03.TRACK 003 B Music List C Playlist play MP3 and JPEG files simultaneously, audio drop may occur according to the Playlist. 4. The slide show speed. ► 001. To go to bitrate of MP3, size of JPEG image and method of encoding. 68 Repeat this function, you have to...

User Manual (ENGLISH)
Page 69
... 2000 18 JUL 2000 127 KB ► 27 KB 194 KB 191 KB 30 KB 76 KB 17 KB D Slide Show SLIDE SHOW/SPEED To setup, follow steps 1 and 3 above . 3. To stop the Slide Show Press the STOP or RETURN button. ► KE.JPG CD 03/07 D Speed ROTATE To setup, follow steps... the SKIP ( ) button. Press the buttons to rotate the image in a desired direction. _____1_.JPG 03/07 CD A r90° B u90° C Zoom D Speed Slide Show 69 Insert a JPEG disc into the Disc Slot. • The Menu screen is displayed. 3. Press the BLUE(D) button. • The...
... 2000 18 JUL 2000 127 KB ► 27 KB 194 KB 191 KB 30 KB 76 KB 17 KB D Slide Show SLIDE SHOW/SPEED To setup, follow steps 1 and 3 above . 3. To stop the Slide Show Press the STOP or RETURN button. ► KE.JPG CD 03/07 D Speed ROTATE To setup, follow steps... the SKIP ( ) button. Press the buttons to rotate the image in a desired direction. _____1_.JPG 03/07 CD A r90° B u90° C Zoom D Speed Slide Show 69 Insert a JPEG disc into the Disc Slot. • The Menu screen is displayed. 3. Press the BLUE(D) button. • The...

User Manual (ENGLISH)
Page 70
... zoom the image in/out. Press the ENTER button. BEACH.JPG 03/07 5. A r90° B u90° C Zoom D Speed Slide Show - CD 70 A r90° B u90° C Zoom D Speed Slide Show CCDD ◄ Video Music Photo Setup .. 176.JPG ◄ BEACH.JPG KE.JPG KE2.JPG MBHONG.JPG NEW_BEE.JPG _______1_... 2000 20 JUL 2000 08 JUL 2000 18 JUL 2000 127 KB 27 KB ► 194 KB 191 KB 30 KB 76 KB 17 KB D Slide Show Viewing a picture ZOOM To setup, follow steps 1 to 3 in "Viewing a Picture" on page 69. 4.
... zoom the image in/out. Press the ENTER button. BEACH.JPG 03/07 5. A r90° B u90° C Zoom D Speed Slide Show - CD 70 A r90° B u90° C Zoom D Speed Slide Show CCDD ◄ Video Music Photo Setup .. 176.JPG ◄ BEACH.JPG KE.JPG KE2.JPG MBHONG.JPG NEW_BEE.JPG _______1_... 2000 20 JUL 2000 08 JUL 2000 18 JUL 2000 127 KB 27 KB ► 194 KB 191 KB 30 KB 76 KB 17 KB D Slide Show Viewing a picture ZOOM To setup, follow steps 1 to 3 in "Viewing a Picture" on page 69. 4.


