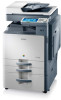
Installation Guide Easy Manual Ver.3.00 (English)
Page 4
... Installing the toner cartridges 14 Installing the imaging units 16 CLX-9252/9352 Series 16 SCX-8230/8240 Series 21 Installing other options 26 Loading paper 27 Standard tray 27 Connecting a printer cable 32 Using a network cable 32 Turning the machine on 33 INITIAL SETTINGS AND TESTING OF THE MACHINE Initial setting 35 Print adjustment (Dual cassette feeder or High capacity feeder 41 DADF skew test and adjustment 44 Skew test 44 DADF adjustment 47 INSTALLING THE SUPPLIED SOFTWARE Supplied software 51 System requirements 52 Windows 52 Macintosh 52 Linux...
Installation Guide Easy Manual Ver.3.00 (English)
Page 5
... user's guide are only available for both novice and professional users. Refer to User's Guide on Windows XP. • Tprocedures in this user's guide are mainly based on the User's Guide CD. • Use Index to the troubleshooting chapter. You can refer to this as detailed explanation on how to color are mainly based on page 9). • The options related to install with step-by-step instructions...
Installation Guide Easy Manual Ver.3.00 (English)
Page 6
... includes: • Installation environment • Machine configuration • Optional goods by models • Installation flow of the hardware • Unpacking and placing the hardware • Installing the cabinet stand, optional dual cassette feeder or optional high capacity feeder • Removing the scanner locking screw • Putting the rubber packings • Installing the toner cartridges • Installing the imaging units • Installing other options • Loading paper • Connecting a printer cable • Turning the machine on...
Installation Guide Easy Manual Ver.3.00 (English)
Page 10
... Roller Set Color PM Kit - DADF Roller Set Color PM Kit - Bypass Tray Roller Set ( ●: Included, o: Optional, blank: not available) CLX-9252 SERIES CLX-9352 SERIES o o o o o o o o o o o o o o o o o o o o SCX-8230 SERIES SCX-8240 SERIES o o o o o o o o o o o o o o o o o o o o o Setting up the hardware_ 9 Cleaning & Transfer Set Color PM Kit - Optional goods by models include: OPTIONAL GOODS Job Separator 1,250-Sheet Standard Finisher 3,250-Sheet Booklet Finisher Bridge Kit 2/3 Hole Punch Kit 2/4 Hole Punch Kit Cabinet Stand Dual Cassette Feeder High Capacity Feeder Working...
Installation Guide Easy Manual Ver.3.00 (English)
Page 11
.... Yes No Install the Bridge kit. Connect a power cord to use the machine. Explain to customer how to the machine and turn on the power. Set installation location and check included items in the package. Do you refer to the below installation flow to install the hardware. Connect a printer cable to install the Standard finisher or the Booklet finisher? Install the Finisher. Install Toner Cartridges and Imaging Units. Yes No Install purchased other optional goods. Remove all the...
Installation Guide Easy Manual Ver.3.00 (English)
Page 12
... may differ depending on the country TONER CARTRIDGE IMAGING UNIT CLX-9252/9352 Series CLX-9252/9352 Series SCX-8230/8240 Series POWER CORD & USB CABLE SCX-8230/8240 Series INSTALLATION GUIDE & WARRANTY CARD SOFTWARE CD & USER'S GUIDE CD RUBBER PACKING(2) 3. Unpack the machine and check all the tapes. • Make sure that yellow, magenta, cyan and black toner cartridges are enclosed. • Make sure that yellow, magenta, cyan and black imaging units are enclosed. • If any...
Installation Guide Easy Manual Ver.3.00 (English)
Page 15
CLX-9252/9258NA/9352/9358NA Series SCX-8230/8238NA/8240/8248NA Series 2. Take the new toner cartridges out from their packages. 3. Installing the toner cartridges Follow the steps below: 1. Open the front cover. Thoroughly shake the new toner cartridge side to side five or six times to distribute the toner evenly inside the toner cartridge. 4. Setting up the hardware_ 14 Pull the sealed tape out of the toner cartridge carefully.
Installation Guide Easy Manual Ver.3.00 (English)
Page 19
Remove the tape on your clothing, wipe it off with a dry cloth and wash clothing in cold water. Hold the shutter, and pull the rubber stopper out of the developer. 7. Pull out the OPC protecting pad. If toner gets on the imaging uint. 9. Remove the tape wrapped around the developer. 8. Hot water sets toner into fabric. 6. Setting up the hardware_ 18
Installation Guide Easy Manual Ver.3.00 (English)
Page 28
... you use for the majority of your print jobs into standard tray. Refer to the installation guide provided with them. Such repairs are not covered by the warranty or service agreements. 1. tray 4) or the optional high capacity feeder, refer to Supplies and Accessories guide on the User's Guide CD. • This standard tray contains two trays (Tray 1, Tray 2). • This standard tray holds up the hardware_ 27 Loading paper Standard tray Load the print media you have installed the optional dual cassette feeder (tray 3. You...
Installation Guide Easy Manual Ver.3.00 (English)
Page 31
8. Otherwise, it lightly touches the side of the stack. the guide may bend the paper. • Do not push the paper width guide too far causing the media to the edge of paper until it may cause paper jams. Do not overload the tray with paper. After loading paper into the tray, pinch the paper width guide and move it toward the stack of the paper; Do not press...
Installation Guide Easy Manual Ver.3.00 (English)
Page 32
... as thick paper, transparency, etc, you need to set the paper type to User's Guide on the control panel. 9. Setting up the hardware_ 31 Then, try placing one sheet at a time in the multi-purpose tray. Refer to User's Guide on the User's Guide CD. • The settings made from the machine driver override the settings on the User's Guide CD. • If you have problems with paper feeding, check the media specification. Fix the paper length guide using the locking switch.
Installation Guide Easy Manual Ver.3.00 (English)
Page 33
Connect your machine to the network with a network cable: Setting up the hardware_ 32 You can connect your machine to a network using a network cable. Connecting a printer cable Using a network cable This machine has a bulit-in network interface card.
Installation Guide Easy Manual Ver.3.00 (English)
Page 35
... could cause the hard disk problem in . Doing so may be hot when power is on the right side of the machine may give you need to burn yourself when working inside of the control panel. If you turn the machine off automatically. Be careful not to turn the machine off directly using the power switch, it is turned off , press the Power button for more...
Installation Guide Easy Manual Ver.3.00 (English)
Page 36
... reset the language, press Back and select the language you step-by-step instructions for using the machine. Press a language for initial settings and tests. This chapter gives you want to the User's Guide or Administrator's Guide on the display screen. You can see the initial setting menu on the User's Guide CD. 1. If you want . You need to the User's Guide or Administrator's Guide on the control panel and SyncThruTM Web Service...
Installation Guide Easy Manual Ver.3.00 (English)
Page 37
... when any problem occurs on the network. • If necessary, enter the location of them. Initial settings and testing of the machine_ 36 Remove the existing device name and enter the device name you installed an optional fax kit or finisher, press each Test button for the person to be used on the machine. 4. The pop-up keyboard appears. Press the Test button to use and then...
Installation Guide Easy Manual Ver.3.00 (English)
Page 38
... your network administrator. 6. e. Then press Next. • If a new IP address is assigned automatically by a DHCP or BOOTP, press DHCP or BOOTP. • If you want to be used for accessing the administrator account. b. Enter the password to confirm it, then press OK and Next. c. Press the Name input area. 5. f. Initial settings and testing of the machine_ 37 Press Static and...
Installation Guide Easy Manual Ver.3.00 (English)
Page 52
... and Windows Image Acquisition (WIA) drivers are a Linux OS user, download the software from the software CD and if you step-by-step instructions for scanning documents on the User's Guide CD. This chapter includes: • Supplied software • System requirements • Installing a network connected machine's driver Supplied software After you must install the machine software. Installing the supplied software 3. Machine software are available for installing the supplied software. Samsung Easy Printer Manager combines device settings as well as printing...
Installation Guide Easy Manual Ver.3.00 (English)
Page 53
...Power PC G4/ G5 • 512 MB for all Windows operating systems. • Users who have an administrator right can install the software. • Windows Terminal Service is compatable with this machine. System requirements Before you begin, ensure that your system meets the following requirements: Windows Your machine supports the following Windows operating systems. OPERATING SYSTEM REQUIREMENT (RECOMMENDED) CPU RAM FREE...Support for DirectX 9 graphics with 128 MB memory (to enable the Aero theme). • DVD-R/W Drive Windows Server... Linux Enterprise Desktop 10, 11 (32/64bit) Debian 4.0, ...
Installation Guide Easy Manual Ver.3.00 (English)
Page 54
... use Windows Vista, click Start > All programs > Accessories > Run. Installing the supplied software_ 53 Follow the instructions in Install or run and an installation window appear. • If the installation window does not appear, click Start and then Run. Type X:\Setup.exe, replacing "X" with the letter which is recommended for working with the letter which represents your drive. The Custom Installation allows IT administrator or system administrator to install printer driver and supplied software...
Installation Guide Easy Manual Ver.3.00 (English)
Page 60
... supplied software 51 I initial setting 35 install imaging unit 16, 21 optional high capacity feeder 12 optional tray 12 stand 12 toner cartridge 14 L Linux supplied softwares 51 system requirements 52 loading paper in the standard tray 27 M machine configuration 8 Macintosh supplied softwares 51 system requirements 52 N network driver installation Windows 53 P placing a machine 11 spacing 11 R rubber packing 13 S scanner lock 13 service contact numbers 54 T test DADF skew 44 turn on machine 33 U Unix system requirements 53 W Windows driver installation for network connected...