
User Manual (ENGLISH)
Page 16
... color contrast 64 Clearing memory 64 Cleaning your machine 64 Cleaning the outside 64 Cleaning the inside 66 Cleaning the scan unit 67 Maintaining the cartridge 67 Toner cartridge storage 67 Handling instructions 67 Use of non-Samsung and refilled toner cartridge 67 Estimated cartridge life 67 Redistributing toner 68 Replacing the toner cartridge 69 Replacing the imaging unit...
... color contrast 64 Clearing memory 64 Cleaning your machine 64 Cleaning the outside 64 Cleaning the inside 66 Cleaning the scan unit 67 Maintaining the cartridge 67 Toner cartridge storage 67 Handling instructions 67 Use of non-Samsung and refilled toner cartridge 67 Estimated cartridge life 67 Redistributing toner 68 Replacing the toner cartridge 69 Replacing the imaging unit...
User Manual (ENGLISH)
Page 63
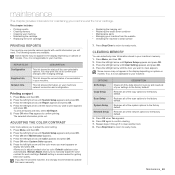
...Press the left /right arrow until Color appears and press OK. 4. This chapter includes: • Printing reports • Clearing memory • Cleaning your machine • Maintaining the cartridge • Replacing the toner cartridge • Replacing the imaging unit • Replacing the waste toner container... moved the machine, it is recommended for delayed faxes along with useful information you have recently sent. Default optimizes color automatically. maintenance This chapter provides information for a particular fax job. This list shows the current status of the ...
...Press the left /right arrow until Color appears and press OK. 4. This chapter includes: • Printing reports • Clearing memory • Cleaning your machine • Maintaining the cartridge • Replacing the toner cartridge • Replacing the imaging unit • Replacing the waste toner container... moved the machine, it is recommended for delayed faxes along with useful information you have recently sent. Default optimizes color automatically. maintenance This chapter provides information for a particular fax job. This list shows the current status of the ...
User Manual (ENGLISH)
Page 65
...is firmly seated in place. • Do not touch the green surface, the imaging unit with your hands or any other material. • Be careful not to scratch the surface of the imaging unit, push imaging unit in to clean it. Slide four toner cartridge back into the air then might be halted for... more than a few minutes, the imaging unit can be exposed to you. If you to use a vacum cleaner, toner...
...is firmly seated in place. • Do not touch the green surface, the imaging unit with your hands or any other material. • Be careful not to scratch the surface of the imaging unit, push imaging unit in to clean it. Slide four toner cartridge back into the air then might be halted for... more than a few minutes, the imaging unit can be exposed to you. If you to use a vacum cleaner, toner...

User Manual (ENGLISH)
Page 81
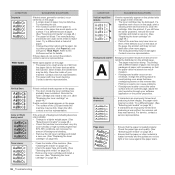
... Vertical lines Color or Black background Toner smear If black vertical streaks appear on the page, print a cleaning sheet several ...characters are improperly formed and producing a wavy effect, the scanner unit may need service. Do not open packages of paper may be...The toner cartridge may be damaged. Clean the inside the toner cartridge has probably been scratched. Go to printer properties, click Paper tab, and...formed and producing hollow images, the paper stock may be dirty. Contact a service representative. • The paper path may need cleaning. Remove the toner ...
... Vertical lines Color or Black background Toner smear If black vertical streaks appear on the page, print a cleaning sheet several ...characters are improperly formed and producing a wavy effect, the scanner unit may need service. Do not open packages of paper may be...The toner cartridge may be damaged. Clean the inside the toner cartridge has probably been scratched. Go to printer properties, click Paper tab, and...formed and producing hollow images, the paper stock may be dirty. Contact a service representative. • The paper path may need cleaning. Remove the toner ...

User Manual (ENGLISH)
Page 82
... scan unit. (See "Cleaning the scan unit" on page 66.) • Ensure that should be solid black: • If you are using transparencies, try rotating the paper 180° in the tray. You can cause paper curl. (See "Selecting print media" on page 64.) Solid Color or Black pages A • The... 38.) If horizontally aligned black streaks or smears appear: • The toner cartridge may affect the print quality such as loose toner or light imaging. Your printer is curled or paper does not feed into the machine: • Turn over the stack of 1,000 m (3,281 ft) or above. The...
... scan unit. (See "Cleaning the scan unit" on page 66.) • Ensure that should be solid black: • If you are using transparencies, try rotating the paper 180° in the tray. You can cause paper curl. (See "Selecting print media" on page 64.) Solid Color or Black pages A • The... 38.) If horizontally aligned black streaks or smears appear: • The toner cartridge may affect the print quality such as loose toner or light imaging. Your printer is curled or paper does not feed into the machine: • Turn over the stack of 1,000 m (3,281 ft) or above. The...
User Manual (ENGLISH)
Page 95
..., use 51 ADF 20 ADF, load 39 adjustment altitude 37 alarm sound 38 Ans/Fax mode, receiving mode 57 B background image, adjust 48 C characters, enter 38 cleaning inside 66 outside 66 scan unit 68 clock mode 37 control panel 21 copying 2-up, 4-up 47 clone 48 darkness 46 default setting, change 47 erasing...
..., use 51 ADF 20 ADF, load 39 adjustment altitude 37 alarm sound 38 Ans/Fax mode, receiving mode 57 B background image, adjust 48 C characters, enter 38 cleaning inside 66 outside 66 scan unit 68 clock mode 37 control panel 21 copying 2-up, 4-up 47 clone 48 darkness 46 default setting, change 47 erasing...
User Manual (ENGLISH)
Page 113
... color contrast 44 Clearing memory 45 Cleaning your machine 45 Cleaning the outside 45 Cleaning the inside 46 Cleaning the scan unit 47 Maintaining the cartridge 47 Toner cartridge storage 47 Handling instructions 47 Use of non-Samsung and refilled toner cartridge 47 Estimated cartridge life 47 Redistributing toner 48 Replacing the toner cartridge 49 Replacing the imaging unit...
... color contrast 44 Clearing memory 45 Cleaning your machine 45 Cleaning the outside 45 Cleaning the inside 46 Cleaning the scan unit 47 Maintaining the cartridge 47 Toner cartridge storage 47 Handling instructions 47 Use of non-Samsung and refilled toner cartridge 47 Estimated cartridge life 47 Redistributing toner 48 Replacing the toner cartridge 49 Replacing the imaging unit...
User Manual (ENGLISH)
Page 141
...to ready mode. This chapter includes: • Printing reports • Clearing memory • Cleaning your machine • Maintaining the cartridge • Replacing the toner cartridge • Replacing the imaging unit • Replacing the waste toner container • Maintenance parts • Managing your machine. ...Setup Restores all of the copy options to the factory default. If so, it is recommended for getting best color quality. Default optimizes color automatically. Press OK when Maintenance appears. 4. Press Menu, and then OK. 2. Press OK again to confirm...
...to ready mode. This chapter includes: • Printing reports • Clearing memory • Cleaning your machine • Maintaining the cartridge • Replacing the toner cartridge • Replacing the imaging unit • Replacing the waste toner container • Maintenance parts • Managing your machine. ...Setup Restores all of the copy options to the factory default. If so, it is recommended for getting best color quality. Default optimizes color automatically. Press OK when Maintenance appears. 4. Press Menu, and then OK. 2. Press OK again to confirm...

User Manual (ENGLISH)
Page 142
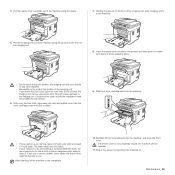
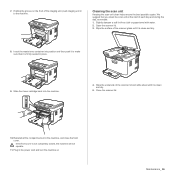
...you to use cloth or tissue dampened with water to clean it. Pull the imaging unit out of the machine using its handle. 5. Grasp the handles on the front of the imaging unit. • Do not touch the green surface, the imaging unit with your hands or any reason. 6. This will ...use a cloth or tissue dampened with water to clean it. Cleaning the inside of the machine with a soft lint-free cloth. After cleaning, let the machine to the imaging unit. CLEANING YOUR MACHINE To maintain print and scan quality, follow the cleaning procedures below each time the toner cartridge is ...
...you to use cloth or tissue dampened with water to clean it. Pull the imaging unit out of the machine using its handle. 5. Grasp the handles on the front of the imaging unit. • Do not touch the green surface, the imaging unit with your hands or any reason. 6. This will ...use a cloth or tissue dampened with water to clean it. Cleaning the inside of the machine with a soft lint-free cloth. After cleaning, let the machine to the imaging unit. CLEANING YOUR MACHINE To maintain print and scan quality, follow the cleaning procedures below each time the toner cartridge is ...
User Manual (ENGLISH)
Page 143
...to the machine. Open the scanner lid. 3. Slide four toner cartridge back into the machine, and close the front cover. Cleaning the scan unit Keeping the scan unit clean helps ensure the best possible copies. Wipe the underside of each day and during the day, as needed. 1. If the ...Reinstall all the compartments into the machine. 4. Insert the waste toner container into position and then push it is clean and dry. 8. Wipe the surface of the imaging unit, push imaging unit in the power cord and turn the machine on the front of the scanner glass until it is firmly seated ...
...to the machine. Open the scanner lid. 3. Slide four toner cartridge back into the machine, and close the front cover. Cleaning the scan unit Keeping the scan unit clean helps ensure the best possible copies. Wipe the underside of each day and during the day, as needed. 1. If the ...Reinstall all the compartments into the machine. 4. Insert the waste toner container into position and then push it is clean and dry. 8. Wipe the surface of the imaging unit, push imaging unit in the power cord and turn the machine on the front of the scanner glass until it is firmly seated ...
User Manual (ENGLISH)
Page 156
... Try printing with a different batch of paper. • Change the printer option and try again. Do not open packages of paper until necessary ...clean the cartridge. Try a different kind or brand of paper. Printing on page 28.) • If characters are improperly formed and producing hollow images... path may be dirty. Contact a service representative. Vertical lines Color or Black background Toner smear If black vertical streaks appear on its...If characters are improperly formed and producing a wavy effect, the scanner unit may be too slick. Try a different paper. (See "Selecting ...
... Try printing with a different batch of paper. • Change the printer option and try again. Do not open packages of paper until necessary ...clean the cartridge. Try a different kind or brand of paper. Printing on page 28.) • If characters are improperly formed and producing hollow images... path may be dirty. Contact a service representative. Vertical lines Color or Black background Toner smear If black vertical streaks appear on its...If characters are improperly formed and producing a wavy effect, the scanner unit may be too slick. Try a different paper. (See "Selecting ...
User Manual (ENGLISH)
Page 158
...the original, press Darkness to your copies. • If no defects are on the original, clean the scan unit. (See "Cleaning the scan unit" on page 46.) Copy image is not defective. Image rubs off frequently. Scanning problems CONDITION SUGGESTED SOLUTIONS The scanner does not work. • Make ...be • The Selected port is being used . Copying problems CONDITION SUGGESTED SOLUTIONS Copies are too light Use Darkness to the ECP printer mode through BIOS setting. Check/adjust the paper guides, if necessary. • Ensure that the machine is properly • "Scanner...
...the original, press Darkness to your copies. • If no defects are on the original, clean the scan unit. (See "Cleaning the scan unit" on page 46.) Copy image is not defective. Image rubs off frequently. Scanning problems CONDITION SUGGESTED SOLUTIONS The scanner does not work. • Make ...be • The Selected port is being used . Copying problems CONDITION SUGGESTED SOLUTIONS Copies are too light Use Darkness to the ECP printer mode through BIOS setting. Check/adjust the paper guides, if necessary. • Ensure that the machine is properly • "Scanner...
User Manual (ENGLISH)
Page 169
index A adjustment altitude 28 alarm sound 28 B background image, adjust 37 C cleaning inside 45 outside 45 scan unit 46 control panel 20 copying 2-up, 4-up 36 clone 37 darkness 35 default setting, change 36 erasing background 37 ID card copy 36 original type ... Network Scan 62 paper feeding 57 printing quality 58 scanning 61 Windows 62 R replacing components toner cartridge 48 reports, print 44 ringer 28 S scanner glass cleaning 46 loading documents 29 scanning default setting, change 39 USB flash memory 41 sounds, set 28 speaker sound 28 special copy features 36 supplies checking...
index A adjustment altitude 28 alarm sound 28 B background image, adjust 37 C cleaning inside 45 outside 45 scan unit 46 control panel 20 copying 2-up, 4-up 36 clone 37 darkness 35 default setting, change 36 erasing background 37 ID card copy 36 original type ... Network Scan 62 paper feeding 57 printing quality 58 scanning 61 Windows 62 R replacing components toner cartridge 48 reports, print 44 ringer 28 S scanner glass cleaning 46 loading documents 29 scanning default setting, change 39 USB flash memory 41 sounds, set 28 speaker sound 28 special copy features 36 supplies checking...


