User Manual (ENGLISH)
Page 1
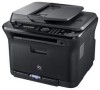
Click the model name of your machine: CLX-3170FN, CLX-3175FN, CLX-3175FW CLX-3175, CLX-3175N Multi Functional Printer User's Guide imagine the possibilities Thank you for purchasing a Samsung product.
Click the model name of your machine: CLX-3170FN, CLX-3175FN, CLX-3175FW CLX-3175, CLX-3175N Multi Functional Printer User's Guide imagine the possibilities Thank you for purchasing a Samsung product.

User Manual (ENGLISH)
Page 3
...) Features of your document needs - a. Both novice users and professional users can refer to this machine include: USB 2.0 FEATURES CLX-3170FN CLX-3175FN CLX-3175FW USB Memory Interface PictBridge ADF (Automatic Document Feeder) Network Interface Ethernet 10/100 Base TX wired LAN Network interface 802.11b/g wireless...well as below: • Document is synonymous with original. • Paper is designed to support all of your new laser product_3 The date format may differ from country to country Used to give users information to protect the machine from printing and...
...) Features of your document needs - a. Both novice users and professional users can refer to this machine include: USB 2.0 FEATURES CLX-3170FN CLX-3175FN CLX-3175FW USB Memory Interface PictBridge ADF (Automatic Document Feeder) Network Interface Ethernet 10/100 Base TX wired LAN Network interface 802.11b/g wireless...well as below: • Document is synonymous with original. • Paper is designed to support all of your new laser product_3 The date format may differ from country to country Used to give users information to protect the machine from printing and...
User Manual (ENGLISH)
Page 35
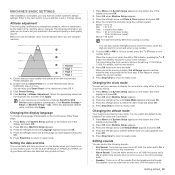
... > Setup (or Machine Setup) > Adj.. Setting the date and time The current date and time are using the number keypad. For the CLX-3170FN/CLX-3175FN/CLX-3175FW, all of print. Press OK to ready mode. Press Menu until Default Mode appears and press OK. 4. Press Stop/Clear to return to ...:00). Press OK when Machine Setup appears. 3. Double-click the Smart Panel icon on the bottom line of the display and press OK. 2. Click Printer Setting. 4. Press OK when Machine Setup appears. 3. Press Menu until System Setup appears on the Windows task bar (or Notification Area in Mac OS ...
... > Setup (or Machine Setup) > Adj.. Setting the date and time The current date and time are using the number keypad. For the CLX-3170FN/CLX-3175FN/CLX-3175FW, all of print. Press OK to ready mode. Press Menu until Default Mode appears and press OK. 4. Press Stop/Clear to return to ...:00). Press OK when Machine Setup appears. 3. Double-click the Smart Panel icon on the bottom line of the display and press OK. 2. Click Printer Setting. 4. Press OK when Machine Setup appears. 3. Press Menu until System Setup appears on the Windows task bar (or Notification Area in Mac OS ...
User Manual (ENGLISH)
Page 64
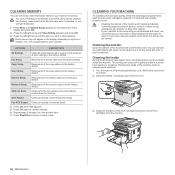
... the display depending on the bottom line of alcohol, solvent, or other strong substances can dampen the cloth slightly with water, but be harmful. For CLX-3170FN/CLX-3175FN/CLX-3175FW users, before clearing the memory, make sure that all of the machine clears or reduces these problems. 1. Cleaning the inside During the printing process...
... the display depending on the bottom line of alcohol, solvent, or other strong substances can dampen the cloth slightly with water, but be harmful. For CLX-3170FN/CLX-3175FN/CLX-3175FW users, before clearing the memory, make sure that all of the machine clears or reduces these problems. 1. Cleaning the inside During the printing process...
User Manual (ENGLISH)
Page 68
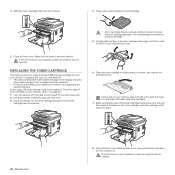
...on the toner cartridge, thoroughly rock it clicks into place. 68 _Maintenance 8. You could damage the surface of the toner cartridge matches the color slot and then grasp the handles on the toner cartridge and pull to remove the cartridge from side to side to cool. 2. Grasp ...cover is securely latched, and then turn the machine on a flat surface, as a knife or scissors, to be replaced. • For the CLX-3170FN/CLX-3175FN/CLX-3175FW, incoming faxes are saved in cold water. Close the front cover. At this stage, the toner cartridge needs to open the front cover. 3. ...
...on the toner cartridge, thoroughly rock it clicks into place. 68 _Maintenance 8. You could damage the surface of the toner cartridge matches the color slot and then grasp the handles on the toner cartridge and pull to remove the cartridge from side to side to cool. 2. Grasp ...cover is securely latched, and then turn the machine on a flat surface, as a knife or scissors, to be replaced. • For the CLX-3170FN/CLX-3175FN/CLX-3175FW, incoming faxes are saved in cold water. Close the front cover. At this stage, the toner cartridge needs to open the front cover. 3. ...


