
Universal Print Driver Guide (ENGLISH)
Page 9
... install the Smart Panel of the user's guide. You need to select Layout2 and install the Samsung Smart Panel program to see this window. • Update Now: Updates the selected printer's information. • Buy Supplies: Opens the website for configuring and managing your printer. Create a Favorite Folder: Creates a folder for favorite printers. • Settings: Displays options for a printer by the printer's IP address. • My Printer - Changing Samsung Universal Print Driver settings Setting the pop-up option You can only use this window...
... install the Smart Panel of the user's guide. You need to select Layout2 and install the Samsung Smart Panel program to see this window. • Update Now: Updates the selected printer's information. • Buy Supplies: Opens the website for configuring and managing your printer. Create a Favorite Folder: Creates a folder for favorite printers. • Settings: Displays options for a printer by the printer's IP address. • My Printer - Changing Samsung Universal Print Driver settings Setting the pop-up option You can only use this window...

User Manual (ENGLISH)
Page 5
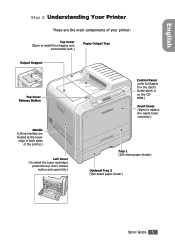
... main components of your printer: Top Cover (Open to install the imaging unit, and transfer belt.) Paper Output Tray Output Support Top Cover Release Button Handle (Lifting handles are located at the lower edge of both sides of the printer.) Left Cover (To install the toner cartridges press the top cover release button and open fully.) Control Panel (refer to Chapter 5 in the User's Guide which is on the CDROM.) Front Cover (Open to replace the waste toner container.) Tray 1 (250-sheet paper feeder) Optional Tray 2 (500-sheet paper feeder) SETUP GUIDE 5 English Step 2.
... main components of your printer: Top Cover (Open to install the imaging unit, and transfer belt.) Paper Output Tray Output Support Top Cover Release Button Handle (Lifting handles are located at the lower edge of both sides of the printer.) Left Cover (To install the toner cartridges press the top cover release button and open fully.) Control Panel (refer to Chapter 5 in the User's Guide which is on the CDROM.) Front Cover (Open to replace the waste toner container.) Tray 1 (250-sheet paper feeder) Optional Tray 2 (500-sheet paper feeder) SETUP GUIDE 5 English Step 2.

User Manual (ENGLISH)
Page 28
...; Samsung CLP-550 Series ¡ Printer Maintenance ¡ Repair ¡ Printer. Otherwise, just click Finish. If you have replaced the parallel cable with the parallel cable, remove the USB cable and connect the parallel cable. For detailed information, refer to repair the driver. • If your printer with the USB cable, do the same to the User's Guide of the printer. • After installation of the software, you want to use your printer doesn't work properly, reinstall the printer driver. •...
...; Samsung CLP-550 Series ¡ Printer Maintenance ¡ Repair ¡ Printer. Otherwise, just click Finish. If you have replaced the parallel cable with the parallel cable, remove the USB cable and connect the parallel cable. For detailed information, refer to repair the driver. • If your printer with the USB cable, do the same to the User's Guide of the printer. • After installation of the software, you want to use your printer doesn't work properly, reinstall the printer driver. •...
User Manual (ENGLISH)
Page 39
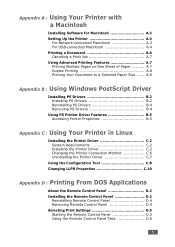
... Remote Control Panel D.4 Removing Remote Control Panel D.4 Selecting Print Settings D.5 Starting the Remote Control Panel D.5 Using the Remote Control Panel Tabs D.6 5 Appendix A : Using Your Printer with a Macintosh Installing Software for Macintosh A.2 Setting Up the Printer A.3 For Network-connected Macintosh A.3 For USB-connected Macintosh A.4 Printing a Document A.6 Canceling a Print Job A.7 Using Advanced Printing Features A.7 Printing Multiple Pages on One Sheet of Paper .......... A.7 Duplex Printing A.8 Printing Your Document to a Selected Paper Size ......
... Remote Control Panel D.4 Removing Remote Control Panel D.4 Selecting Print Settings D.5 Starting the Remote Control Panel D.5 Using the Remote Control Panel Tabs D.6 5 Appendix A : Using Your Printer with a Macintosh Installing Software for Macintosh A.2 Setting Up the Printer A.3 For Network-connected Macintosh A.3 For USB-connected Macintosh A.4 Printing a Document A.6 Canceling a Print Job A.7 Using Advanced Printing Features A.7 Printing Multiple Pages on One Sheet of Paper .......... A.7 Duplex Printing A.8 Printing Your Document to a Selected Paper Size ......

User Manual (ENGLISH)
Page 57
The color of the On Line/Continue button indicates the status of error messages, see page 7.26. • Press to switch between on-line and off -line and cannot print. Green • When the backlight blinks 2 slowly, the printer is receiving data from the computer. Check On the display message. Off • The printer is receiving and printing data. When data is off -line. • In menu mode, press to return to ready mode. The printer stops printing due...
The color of the On Line/Continue button indicates the status of error messages, see page 7.26. • Press to switch between on-line and off -line and cannot print. Green • When the backlight blinks 2 slowly, the printer is receiving data from the computer. Check On the display message. Off • The printer is receiving and printing data. When data is off -line. • In menu mode, press to return to ready mode. The printer stops printing due...
User Manual (ENGLISH)
Page 61
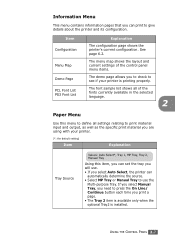
... selected language. 2 Paper Menu Use this menu to define all settings relating to print material input and output, as well as the specific print material you are using with your printer is installed. The font sample list shows all of the control panel menu items. The demo page allows you to check to see if your printer. (*: the default setting) Item Explanation Tray Source Values: Auto Select*, Tray 1, MP Tray, Tray 2, Manual Tray Using this item, you can set the tray you will use...
... selected language. 2 Paper Menu Use this menu to define all settings relating to print material input and output, as well as the specific print material you are using with your printer is installed. The font sample list shows all of the control panel menu items. The demo page allows you to check to see if your printer. (*: the default setting) Item Explanation Tray Source Values: Auto Select*, Tray 1, MP Tray, Tray 2, Manual Tray Using this item, you can set the tray you will use...

User Manual (ENGLISH)
Page 69
... page of images printed. USING THE CONTROL PANEL 2.15 Off: The printer does not display the warning message. Refer to check the total number of images printed. Maintenance This item allows you to maintain the toner cartridge and other consumables. • Check Others Imaging Unit: allows you to check the total number of a print job that does not end with a command to each line feed. On: The printer displays the warning message. When a print time-out occurs, the printer 2 prints the page in the print buffer. Fuser, Transfer...
... page of images printed. USING THE CONTROL PANEL 2.15 Off: The printer does not display the warning message. Refer to check the total number of images printed. Maintenance This item allows you to maintain the toner cartridge and other consumables. • Check Others Imaging Unit: allows you to check the total number of a print job that does not end with a command to each line feed. On: The printer displays the warning message. When a print time-out occurs, the printer 2 prints the page in the print buffer. Fuser, Transfer...
User Manual (ENGLISH)
Page 104
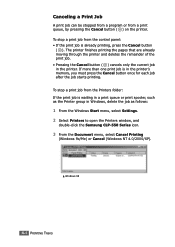
... the Cancel button ( ). To stop a print job from the control panel: • If the print job is waiting in a print queue or print spooler, such as the Printer group in Windows, delete the job as follows: 1 From the Windows Start menu, select Settings. 2 Select Printers to open the Printers window, and double-click the Samsung CLP-550 Series icon. 3 From the Document menu, select Cancel Printing (Windows 9x/Me) or Cancel (Windows NT 4.0/2000/XP). œ¤Windows 98 4.4 PRINTING TASKS The printer finishes printing the pages...
... the Cancel button ( ). To stop a print job from the control panel: • If the print job is waiting in a print queue or print spooler, such as the Printer group in Windows, delete the job as follows: 1 From the Windows Start menu, select Settings. 2 Select Printers to open the Printers window, and double-click the Samsung CLP-550 Series icon. 3 From the Document menu, select Cancel Printing (Windows 9x/Me) or Cancel (Windows NT 4.0/2000/XP). œ¤Windows 98 4.4 PRINTING TASKS The printer finishes printing the pages...
User Manual (ENGLISH)
Page 133
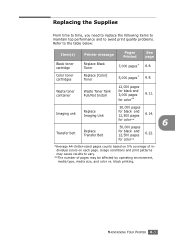
...Waste toner container Waste Toner Tank Full/Not Install 12,000 pages for black and 3,000 pages for color** *Average A4-/letter-sized pages counts based on each page. Replacing the Supplies From time to time, you need to replace the following items to maintain top performance and to avoid print quality problems. Refer to vary. **The number of individual colors on 5% coverage of pages may cause results to the table below: Item(s) Printer message Pages Printed See page Black toner cartridge Replace Black Toner 7,000 pages* 6.8. Color toner cartridges Replace [Color] Toner...
...Waste toner container Waste Toner Tank Full/Not Install 12,000 pages for black and 3,000 pages for color** *Average A4-/letter-sized pages counts based on each page. Replacing the Supplies From time to time, you need to replace the following items to maintain top performance and to avoid print quality problems. Refer to vary. **The number of individual colors on 5% coverage of pages may cause results to the table below: Item(s) Printer message Pages Printed See page Black toner cartridge Replace Black Toner 7,000 pages* 6.8. Color toner cartridges Replace [Color] Toner...
User Manual (ENGLISH)
Page 171
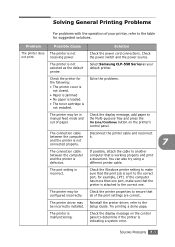
... in manual feed mode and out of paper. You can also try using a different printer cable. The printer may Reinstall the printer driver; The printer driver may be configured incorrectly. refer to the table for example, LPT1. The printer is not installed. Check the power switch and the power source. The port setting is not not print. Check the printer properties to make sure that all of your default printer. Solve the problems. The printer may be incorrectly installed. Check the Windows printer setting...
... in manual feed mode and out of paper. You can also try using a different printer cable. The printer may Reinstall the printer driver; The printer driver may be configured incorrectly. refer to the table for example, LPT1. The printer is not installed. Check the power switch and the power source. The port setting is not not print. Check the printer properties to make sure that all of your default printer. Solve the problems. The printer may be incorrectly installed. Check the Windows printer setting...

User Manual (ENGLISH)
Page 194
.... Install the imaging unit. Message ADC Not Confirm Error Cover Open CTD Calibration Error Dev. Motor Error Engine Fuser Low Heat Error Engine Fuser Over Heat Error Engine LSU Error Install [Color] Toner Install Imaging Unit Install Transfer Belt Status Do this... A problem has occurred Contact a service representative. The CTD sensor is abnormally low. The fuser temperature is polluted by dust or toner. NOTE: When you call for service. Install the corresponding color toner cartridge. Understanding Display Messages Messages appear on the display on the control panel to...
.... Install the imaging unit. Message ADC Not Confirm Error Cover Open CTD Calibration Error Dev. Motor Error Engine Fuser Low Heat Error Engine Fuser Over Heat Error Engine LSU Error Install [Color] Toner Install Imaging Unit Install Transfer Belt Status Do this... A problem has occurred Contact a service representative. The CTD sensor is abnormally low. The fuser temperature is polluted by dust or toner. NOTE: When you call for service. Install the corresponding color toner cartridge. Understanding Display Messages Messages appear on the display on the control panel to...
User Manual (ENGLISH)
Page 196
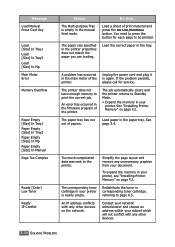
... your printer, see "Installing Printer Memory" on page F.2. Message Load Manual Press Cont Key Load [Size] In Tray1 Load [Size] In Tray2 Load [Size] In Mp Main Motor Error Memory Overflow Paper Empty [Size] In Tray1 Paper Empty [Size] In Tray2 Paper Empty [Size] In Mp Paper Empty [Size] In Manual Page Too Complex Ready [Color] Low Toner Ready IP Conflict Status Do this... If the problem persists, please call for each page to Standby Mode. • Expand the memory in the paper tray. Simplify the page...
... your printer, see "Installing Printer Memory" on page F.2. Message Load Manual Press Cont Key Load [Size] In Tray1 Load [Size] In Tray2 Load [Size] In Mp Main Motor Error Memory Overflow Paper Empty [Size] In Tray1 Paper Empty [Size] In Tray2 Paper Empty [Size] In Mp Paper Empty [Size] In Manual Page Too Complex Ready [Color] Low Toner Ready IP Conflict Status Do this... If the problem persists, please call for each page to Standby Mode. • Expand the memory in the paper tray. Simplify the page...
User Manual (ENGLISH)
Page 197
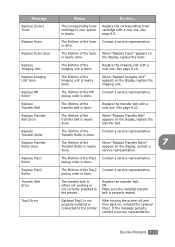
.... Replace the imaging unit with a new one . Optional Tray2 is either not working or not correctly installed in your printer is done. If the message persists, contact a service representative. The corresponding toner cartridge in the printer. Message Replace [Color] Toner Replace Fuser Replace Fuser Soon Replace Imaging Unit Replace Imaging Unit Soon Replace MP Roller Replace Transfer Belt Replace Transfer Belt Soon Replace Transfer Roller Replace Transfer Roller Soon Replace Tray1 Roller Replace Tray2 Roller Transfer Belt Error Tray2 Error Status Do...
.... Replace the imaging unit with a new one . Optional Tray2 is either not working or not correctly installed in your printer is done. If the message persists, contact a service representative. The corresponding toner cartridge in the printer. Message Replace [Color] Toner Replace Fuser Replace Fuser Soon Replace Imaging Unit Replace Imaging Unit Soon Replace MP Roller Replace Transfer Belt Replace Transfer Belt Soon Replace Transfer Roller Replace Transfer Roller Soon Replace Tray1 Roller Replace Tray2 Roller Transfer Belt Error Tray2 Error Status Do...
User Manual (ENGLISH)
Page 199
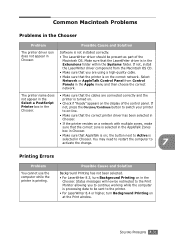
... activate the change. 7 Printing Errors Problem You cannot use the computer while the printer is in the Chooser. • Make sure that the cables are using a high-quality cable. • Make sure that you are connected correctly and the printer is on at the Print window. Software is selected in Chooser. Select Network or AppleTalk Control Panel from the Macintosh OS CD. • Make sure that the printer is turned on. • Check if...
... activate the change. 7 Printing Errors Problem You cannot use the computer while the printer is in the Chooser. • Make sure that the cables are using a high-quality cable. • Make sure that you are connected correctly and the printer is on at the Print window. Software is selected in Chooser. Select Network or AppleTalk Control Panel from the Macintosh OS CD. • Make sure that the printer is turned on. • Check if...

User Manual (ENGLISH)
Page 216
... with the PostScript driver, access the printer features and allow the computer to install an optional network interface card; For information about: • connecting with the parallel interface. • connecting with a network interface. Installing PS Drivers 1 Place the CD-ROM in the Open box (where x is the drive letter for the PPDs is already connected and turned on page F.8. For a CLP-550, you need to communicate with parallel, USB or network interface. see "Installing a Network Interface Card" on , this screen...
... with the PostScript driver, access the printer features and allow the computer to install an optional network interface card; For information about: • connecting with the parallel interface. • connecting with a network interface. Installing PS Drivers 1 Place the CD-ROM in the Open box (where x is the drive letter for the PPDs is already connected and turned on page F.8. For a CLP-550, you need to communicate with parallel, USB or network interface. see "Installing a Network Interface Card" on , this screen...
User Manual (ENGLISH)
Page 272
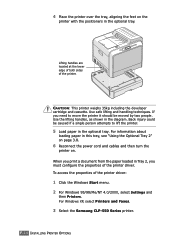
... the printer driver: 1 Click the Windows Start menu. 2 For Windows 95/98/Me/NT 4.0/2000, select Settings and then Printers. Use safe lifting and handling techniques. For information about loading paper in Tray 2, you must configure the properties of the printer driver. To access the properties of the printer. If you print a document from the paper loaded in this tray, see "Using the Optional Tray 2" on page 3.8. 6 Reconnect the power cord and cables and then turn the printer...
... the printer driver: 1 Click the Windows Start menu. 2 For Windows 95/98/Me/NT 4.0/2000, select Settings and then Printers. Use safe lifting and handling techniques. For information about loading paper in Tray 2, you must configure the properties of the printer driver. To access the properties of the printer. If you print a document from the paper loaded in this tray, see "Using the Optional Tray 2" on page 3.8. 6 Reconnect the power cord and cables and then turn the printer...

User Manual (ENGLISH)
Page 286
...color mode 4.9, 4.10 components 1.5 configuration page, print 6.2 connect Ethernet F.12 control panel 2.2 buttons 2.3 display 2.2 menus 2.5 custom-sized materials, print 3.21 D double-sided printing 5.2 E envelopes, print 3.14 error messages 7.26 Ethernet cable, print F.12 F Favorite setting, use 4.13 features printer 1.2 G graphic properties, set 4.9 H help, use 4.14 I imaging unit, replace 6.14 install Memory F.2 Network Interface Card F.8 optional Tray2 F.13 printer driver for Macintosh A.2 PS driver for Linux C.2 PS Drivers B.2 Remote Control Panel D.2 interface card, install F.8 L labels...
...color mode 4.9, 4.10 components 1.5 configuration page, print 6.2 connect Ethernet F.12 control panel 2.2 buttons 2.3 display 2.2 menus 2.5 custom-sized materials, print 3.21 D double-sided printing 5.2 E envelopes, print 3.14 error messages 7.26 Ethernet cable, print F.12 F Favorite setting, use 4.13 features printer 1.2 G graphic properties, set 4.9 H help, use 4.14 I imaging unit, replace 6.14 install Memory F.2 Network Interface Card F.8 optional Tray2 F.13 printer driver for Macintosh A.2 PS driver for Linux C.2 PS Drivers B.2 Remote Control Panel D.2 interface card, install F.8 L labels...

User Manual (ENGLISH)
Page 287
...network-connected printer, set E.6 parameters, configure E.6 n-up printing 5.6 O option, install memory DIMM F.2 network interface card F.8 paper tray 2 F.13 optional tray, install F.13 orientation, select 4.6 overlay, use 5.13 P paper choose 3.2 guideline 3.3 load 3.4 sizes and capacities 3.2 specifications G.4 paper jam in the duplex area 7.14 in the Multi-Purpose Tray 7.10 in the optional Tray 2 7.18 in the paper exit area 7.11 in the paper feed area 7.8 inside the printer 7.10 tips for avoiding 7.21 paper properties, set 4.7 paper size, change in the tray 3.7 paper size, set 4.7 paper size...
...network-connected printer, set E.6 parameters, configure E.6 n-up printing 5.6 O option, install memory DIMM F.2 network interface card F.8 paper tray 2 F.13 optional tray, install F.13 orientation, select 4.6 overlay, use 5.13 P paper choose 3.2 guideline 3.3 load 3.4 sizes and capacities 3.2 specifications G.4 paper jam in the duplex area 7.14 in the Multi-Purpose Tray 7.10 in the optional Tray 2 7.18 in the paper exit area 7.11 in the paper feed area 7.8 inside the printer 7.10 tips for avoiding 7.21 paper properties, set 4.7 paper size, change in the tray 3.7 paper size, set 4.7 paper size...
Quick Guide (ENGLISH)
Page 5
... are the main components of your printer: Top Cover (Open to install the imaging unit, and transfer belt.) Paper Output Tray Output Support Top Cover Release Button Handle (Lifting handles are located at the lower edge of both sides of the printer.) Left Cover (To install the toner cartridges press the top cover release button and open fully.) Control Panel (refer to Chapter 5 in the User's Guide which is on the CDROM.) Front Cover (Open to replace the waste toner container.) Tray 1 (250-sheet paper feeder) Optional Tray 2 (500-sheet paper feeder) SETUP GUIDE 5
... are the main components of your printer: Top Cover (Open to install the imaging unit, and transfer belt.) Paper Output Tray Output Support Top Cover Release Button Handle (Lifting handles are located at the lower edge of both sides of the printer.) Left Cover (To install the toner cartridges press the top cover release button and open fully.) Control Panel (refer to Chapter 5 in the User's Guide which is on the CDROM.) Front Cover (Open to replace the waste toner container.) Tray 1 (250-sheet paper feeder) Optional Tray 2 (500-sheet paper feeder) SETUP GUIDE 5

Quick Guide (ENGLISH)
Page 28
... ¡ Samsung CLP-550 Series ¡ Printer Maintenance ¡ Repair ¡ Printer. Also, you have replaced the parallel cable with the parallel cable, remove the USB cable and connect the parallel cable. If you can change the display language. For detailed information, see page 29 ~ page 30. 28 SETUP GUIDE For detailed information, refer to the User's Guide of the printer. • After installation of the software, you want to repair the driver. • If your printer with the USB cable, do the...
... ¡ Samsung CLP-550 Series ¡ Printer Maintenance ¡ Repair ¡ Printer. Also, you have replaced the parallel cable with the parallel cable, remove the USB cable and connect the parallel cable. If you can change the display language. For detailed information, see page 29 ~ page 30. 28 SETUP GUIDE For detailed information, refer to the User's Guide of the printer. • After installation of the software, you want to repair the driver. • If your printer with the USB cable, do the...


