Universal Print Driver Guide (ENGLISH)
Page 4
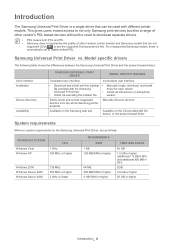
...; Install via CD autorun or Add printer • Install via executing the installer file. Manually discover devices. Available on the Samsung web site. This gives users instant access to not only Samsung print devices but also a range of other vendors' printer devices and Samsung models that can be used with different printer models. Inconsistent user interface. •...
...; Install via CD autorun or Add printer • Install via executing the installer file. Manually discover devices. Available on the Samsung web site. This gives users instant access to not only Samsung print devices but also a range of other vendors' printer devices and Samsung models that can be used with different printer models. Inconsistent user interface. •...
User Manual (ENGLISH)
Page 31
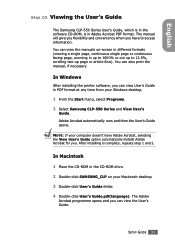
.... You can view User's Guide in Adobe Acrobat PDF format. In Windows After installing the printer software, you can also print the manual, if necessary. NOTE: If your Windows desktop. 1 From the Start menu, select Programs. 2 Select Samsung CLP-550 Series and View User's Guide. In Macintosh 1 Place the CD-ROM in the CD-ROM... a single page, continuous single page or continuous facing page, zooming in the software CD-ROM, is complete, repeats step 1 and 2. Viewing the User's Guide The Samsung CLP-550 Series User's Guide, which is in up to 1600% or out up to access information.
.... You can view User's Guide in Adobe Acrobat PDF format. In Windows After installing the printer software, you can also print the manual, if necessary. NOTE: If your Windows desktop. 1 From the Start menu, select Programs. 2 Select Samsung CLP-550 Series and View User's Guide. In Macintosh 1 Place the CD-ROM in the CD-ROM... a single page, continuous single page or continuous facing page, zooming in the software CD-ROM, is complete, repeats step 1 and 2. Viewing the User's Guide The Samsung CLP-550 Series User's Guide, which is in up to 1600% or out up to access information.

User Manual (ENGLISH)
Page 32
... in : [root@local /root]# cd /mnt/cdrom(the CD-ROM directory) [root@local cdrom]# manual/acrobat4/INSTALL 2. Now, you are asked of the installation directory, just type the enter key. 4. ...root@local /root]# cd /mnt/cdrom(the CD-ROM directory) [root@local cdrom]# gv manual/EnGuide.pdf NOTE: If your system or try to read the pdf files with Acrobat Reader. [root@local cdrom]#... acroread /mnt/cdrom/manual/ EnGuide.pdf 32 SETUP GUIDE In Linux 1 When the Administrator Login window appears, type in "root" in the login field and enter the system password. 2 Insert the printer software CD-ROM. 3...
... in : [root@local /root]# cd /mnt/cdrom(the CD-ROM directory) [root@local cdrom]# manual/acrobat4/INSTALL 2. Now, you are asked of the installation directory, just type the enter key. 4. ...root@local /root]# cd /mnt/cdrom(the CD-ROM directory) [root@local cdrom]# gv manual/EnGuide.pdf NOTE: If your system or try to read the pdf files with Acrobat Reader. [root@local cdrom]#... acroread /mnt/cdrom/manual/ EnGuide.pdf 32 SETUP GUIDE In Linux 1 When the Administrator Login window appears, type in "root" in the login field and enter the system password. 2 Insert the printer software CD-ROM. 3...

User Manual (ENGLISH)
Page 35
...8226; PostScript 3 is subject to use of their respective companies or organizations. 1 All rights reserved. • CLP-550, CLP-550N and Samsung logo are trademarks of Samsung Electronics Co., Ltd. • PCL and PCL 6 are trademarks of Hewlett-Packard company. • Centronics is...Laser Writer and Macintosh are trademarks of Apple Computer, Inc. • Microsoft, Windows, Windows 9x, Window Me, Windows 2000, Windows NT 4.0 and Windows XP are trademarks of this manual. © 2004 Samsung Electronics Co., Ltd. This manual is not responsible for information purposes only. Samsung...
...8226; PostScript 3 is subject to use of their respective companies or organizations. 1 All rights reserved. • CLP-550, CLP-550N and Samsung logo are trademarks of Samsung Electronics Co., Ltd. • PCL and PCL 6 are trademarks of Hewlett-Packard company. • Centronics is...Laser Writer and Macintosh are trademarks of Apple Computer, Inc. • Microsoft, Windows, Windows 9x, Window Me, Windows 2000, Windows NT 4.0 and Windows XP are trademarks of this manual. © 2004 Samsung Electronics Co., Ltd. This manual is not responsible for information purposes only. Samsung...

User Manual (ENGLISH)
Page 37
...3.4 Changing the Paper Size in the Tray 3.7 Using the Optional Tray 2 3.8 Using the Multi-purpose Tray 3.9 Using the Manual Feed 3.12 Printing on Special Print Materials 3.14 Printing on Envelopes 3.14 Printing on Labels 3.16 Printing on Transparencies 3.17 ...Printing on Preprinted Paper 3.20 Printing on Card Stock or Custom-sized Materials ... 3.21 Chapter 4 : Printing Tasks Printer Driver Features 4.2 Printing a Document 4.3 Canceling a Print Job 4.4 Printer Settings 4.5 Layout tab 4.6 Paper tab 4.7 Graphics tab 4.9 Extras tab 4.12 About tab 4.13 Using a Favorite Setting...
...3.4 Changing the Paper Size in the Tray 3.7 Using the Optional Tray 2 3.8 Using the Multi-purpose Tray 3.9 Using the Manual Feed 3.12 Printing on Special Print Materials 3.14 Printing on Envelopes 3.14 Printing on Labels 3.16 Printing on Transparencies 3.17 ...Printing on Preprinted Paper 3.20 Printing on Card Stock or Custom-sized Materials ... 3.21 Chapter 4 : Printing Tasks Printer Driver Features 4.2 Printing a Document 4.3 Canceling a Print Job 4.4 Printer Settings 4.5 Layout tab 4.6 Paper tab 4.7 Graphics tab 4.9 Extras tab 4.12 About tab 4.13 Using a Favorite Setting...
User Manual (ENGLISH)
Page 61
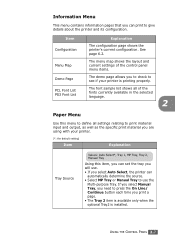
...the control panel menu items. The demo page allows you to check to see if your printer. (*: the default setting) Item Explanation Tray Source Values: Auto Select*, Tray 1, MP Tray, Tray 2, Manual Tray Using this menu to define all settings relating to print material input and output, as... well as the specific print material you are using with your printer is installed. Information Menu This menu contains information pages that you ...
...the control panel menu items. The demo page allows you to check to see if your printer. (*: the default setting) Item Explanation Tray Source Values: Auto Select*, Tray 1, MP Tray, Tray 2, Manual Tray Using this menu to define all settings relating to print material input and output, as... well as the specific print material you are using with your printer is installed. Information Menu This menu contains information pages that you ...

User Manual (ENGLISH)
Page 67
...: Off, Auto*, Run Now Calibration This menu item allows you to calibrate the printer for the best possible color printer quality. • Off: The printer is calibrated by the default setting. • Auto: It automatically calibrates the printer to manually adjust the selected color contrast for each toner cartridge. Setup Menu Use the Setup menu to adjust...
...: Off, Auto*, Run Now Calibration This menu item allows you to calibrate the printer for the best possible color printer quality. • Off: The printer is calibrated by the default setting. • Auto: It automatically calibrates the printer to manually adjust the selected color contrast for each toner cartridge. Setup Menu Use the Setup menu to adjust...

User Manual (ENGLISH)
Page 72
... IP Get Method Options: BOOTP, DHCP, Static* You can enter IP address, subnetmask, and gateway manually. 2.18 USING THE CONTROL PANEL You can select how to set up. If you select Yes, you... get the IP address. NOTE: This menu only appears when a Network Card is fitted (CLP550N or CLP-550 with optional Network card). (*: the default setting) Item Explanation Config Network Options: Yes, No* Sets whether...address or not. If you configure the network interface card installed in your printer according to configure the network. Network Menu This menu lets you select Yes, the IP Get...
... IP Get Method Options: BOOTP, DHCP, Static* You can enter IP address, subnetmask, and gateway manually. 2.18 USING THE CONTROL PANEL You can select how to set up. If you select Yes, you... get the IP address. NOTE: This menu only appears when a Network Card is fitted (CLP550N or CLP-550 with optional Network card). (*: the default setting) Item Explanation Config Network Options: Yes, No* Sets whether...address or not. If you configure the network interface card installed in your printer according to configure the network. Network Menu This menu lets you select Yes, the IP Get...

User Manual (ENGLISH)
Page 73
... You can set this item only when you set IP Get Method to Static. This item lets you enter the gateway manually. This item lets you enter the subnet mask manually. Set the value for the 2nd, 3rd and 4th byte the same way. 2 You can set this item only when you... scroll button to set the value of the 1st byte between 1 and 255, and then press the Enter button. If you enter the IP address manually. Press the scroll button to set the value of the 1st byte between 1 and 255, and then press the Enter button. Set the value for...
... You can set this item only when you set IP Get Method to Static. This item lets you enter the gateway manually. This item lets you enter the subnet mask manually. Set the value for the 2nd, 3rd and 4th byte the same way. 2 You can set this item only when you... scroll button to set the value of the 1st byte between 1 and 255, and then press the Enter button. If you enter the IP address manually. Press the scroll button to set the value of the 1st byte between 1 and 255, and then press the Enter button. Set the value for...

User Manual (ENGLISH)
Page 78
... size paper that does not conform to the specifications listed on . Sizes and Capacities Size Plain Paper Input Source/Capacity* Tray 1 Tray 2 (option) Multipurpose Tray Manual Feed 250 500 100 1 Envelopes - - 10 1 Labels** - - 10 1 Transparencies** - - 30 1 Card stock** - - 10 1 *Depending on ...page 3.14. CAUTION: Using a material that fits easily within the paper adjusters of the paper tray. • Weight : Your printer supports paper weights as follows: -16~24 lbs (60~90 g/m2) bond for Tray 1 or optional Tray 2 -16~43 lbs (60~163 g/m2...
... size paper that does not conform to the specifications listed on . Sizes and Capacities Size Plain Paper Input Source/Capacity* Tray 1 Tray 2 (option) Multipurpose Tray Manual Feed 250 500 100 1 Envelopes - - 10 1 Labels** - - 10 1 Transparencies** - - 30 1 Card stock** - - 10 1 *Depending on ...page 3.14. CAUTION: Using a material that fits easily within the paper adjusters of the paper tray. • Weight : Your printer supports paper weights as follows: -16~24 lbs (60~90 g/m2) bond for Tray 1 or optional Tray 2 -16~43 lbs (60~163 g/m2...

User Manual (ENGLISH)
Page 88
... of print material with the print side down and against the right edge of print material in the Multi-purpose Tray. Using the Manual Feed If you select Manual in the Source option when changing print settings, you can be helpful when you load paper sheet-by-sheet in the Tray, send... print data to print the first page, and press the On Line/Continue button ( ) on the control panel to print each page is printed. Manually loading paper can manually load a sheet of the Multi-purpose Tray. 2 Pinch the paper width guide and slide it . 3.12 USING PRINT MATERIALS
... of print material with the print side down and against the right edge of print material in the Multi-purpose Tray. Using the Manual Feed If you select Manual in the Source option when changing print settings, you can be helpful when you load paper sheet-by-sheet in the Tray, send... print data to print the first page, and press the On Line/Continue button ( ) on the control panel to print each page is printed. Manually loading paper can manually load a sheet of the Multi-purpose Tray. 2 Pinch the paper width guide and slide it . 3.12 USING PRINT MATERIALS

User Manual (ENGLISH)
Page 89
For details, see page 4.7. 3 4 Print the document. The printer picks up the print material and prints. 3 When you print a document, you to be printed. Repeat this step for Source in the software application, and then select the correct paper size and type. After one page is printed, the message appears again. 6 Insert the next sheet into the Multi-purpose Tray and press the On Line/Continue button ( ). The display shows a message prompting you must select Manual for every page to load paper. 5 Press the On Line/Continue button ( ). USING PRINT MATERIALS 3.13
For details, see page 4.7. 3 4 Print the document. The printer picks up the print material and prints. 3 When you print a document, you to be printed. Repeat this step for Source in the software application, and then select the correct paper size and type. After one page is printed, the message appears again. 6 Insert the next sheet into the Multi-purpose Tray and press the On Line/Continue button ( ). The display shows a message prompting you must select Manual for every page to load paper. 5 Press the On Line/Continue button ( ). USING PRINT MATERIALS 3.13

User Manual (ENGLISH)
Page 99
USING PRINT MATERIALS 3.23 See page 4.7. For details, see page 4.7. 3 If the size of your print material is not listed in the Size box in the software application. 3 When you print, configure the paper source to MP Tray, the paper type and size in the Paper tab, click the Custom button and set the size manually.
USING PRINT MATERIALS 3.23 See page 4.7. For details, see page 4.7. 3 If the size of your print material is not listed in the Size box in the software application. 3 When you print, configure the paper source to MP Tray, the paper type and size in the Paper tab, click the Custom button and set the size manually.

User Manual (ENGLISH)
Page 108
... the Manual source when printing to Page. See page 3.9. You can select the paper source for the first page. You have to print the first page using a different paper type from None, Scale Printing and Fit to special material. If the paper source is set to Auto Select, the printer automatically ...picks up print material in the Different Source for First Page This property allows you to automatically or manually scale your printer job on print material, refer to Chapter 3, "Using Print Materials" If you load a different type of the document. If you use recycled paper, select ...
... the Manual source when printing to Page. See page 3.9. You can select the paper source for the first page. You have to print the first page using a different paper type from None, Scale Printing and Fit to special material. If the paper source is set to Auto Select, the printer automatically ...picks up print material in the Different Source for First Page This property allows you to automatically or manually scale your printer job on print material, refer to Chapter 3, "Using Print Materials" If you load a different type of the document. If you use recycled paper, select ...
User Manual (ENGLISH)
Page 171
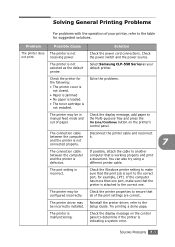
...a demo page. SOLVING PROBLEMS 7.3 Check the power switch and the power source. The port setting is malfunctioning. The printer driver may be in manual feed mode and out of paper. Check the display message, add paper to the Multi-purpose Tray and press the ...is not connected properly. 7 The connection cable between the computer it. The printer is not not print. Select Samsung CLP-550 Series as the default printer. You can also try using a different printer cable. The printer may be incorrectly installed. If possible, attach the cable to another computer that ...
...a demo page. SOLVING PROBLEMS 7.3 Check the power switch and the power source. The port setting is malfunctioning. The printer driver may be in manual feed mode and out of paper. Check the display message, add paper to the Multi-purpose Tray and press the ...is not connected properly. 7 The connection cable between the computer it. The printer is not not print. Select Samsung CLP-550 Series as the default printer. You can also try using a different printer cable. The printer may be incorrectly installed. If possible, attach the cable to another computer that ...
User Manual (ENGLISH)
Page 196
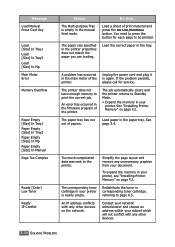
... to print the current job. Simplify the page layout and remove any other devices on page F.2. The printer does not have enough memory to page 6.5. The job automatically clears and the printer returns to Standby Mode. • Expand the memory in the main motor of print material and press the... Memory Overflow Paper Empty [Size] In Tray1 Paper Empty [Size] In Tray2 Paper Empty [Size] In Mp Paper Empty [Size] In Manual Page Too Complex Ready [Color] Low Toner Ready IP Conflict Status Do this... The paper size specified in the paper tray. The Multi-purpose Tray is nearly empty...
... to print the current job. Simplify the page layout and remove any other devices on page F.2. The printer does not have enough memory to page 6.5. The job automatically clears and the printer returns to Standby Mode. • Expand the memory in the main motor of print material and press the... Memory Overflow Paper Empty [Size] In Tray1 Paper Empty [Size] In Tray2 Paper Empty [Size] In Mp Paper Empty [Size] In Manual Page Too Complex Ready [Color] Low Toner Ready IP Conflict Status Do this... The paper size specified in the paper tray. The Multi-purpose Tray is nearly empty...

User Manual (ENGLISH)
Page 201
...with some settings for two options can't be adequately achieved if the PostScript data conforms to change the default queue. Some versions of printers managed by the system (usually through post-processing of the PostScript data that use the "printconf" database of my documents. You have... privileges to be possible to the Adobe Document Structing Conventions. This happens with most Linux distributions, but you restart your distribution's installation manual for the changes to take effect. When using printtool. The default queue in LPRng is defined as the one named "lp". To...
...with some settings for two options can't be adequately achieved if the PostScript data conforms to change the default queue. Some versions of printers managed by the system (usually through post-processing of the PostScript data that use the "printconf" database of my documents. You have... privileges to be possible to the Adobe Document Structing Conventions. This happens with most Linux distributions, but you restart your distribution's installation manual for the changes to take effect. When using printtool. The default queue in LPRng is defined as the one named "lp". To...
User Manual (ENGLISH)
Page 239
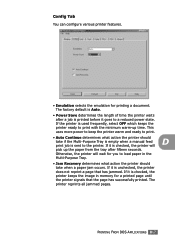
... ready to print. • Auto Continue determines what action the printer should take if the Multi-Purpose Tray is empty when a manual feed print job is checked, the printer keeps the image in the Multi-Purpose Tray. • Jam Recovery determines what action the printer should take when a paper jam occurs. If it is...
... ready to print. • Auto Continue determines what action the printer should take if the Multi-Purpose Tray is empty when a manual feed print job is checked, the printer keeps the image in the Multi-Purpose Tray. • Jam Recovery determines what action the printer should take when a paper jam occurs. If it is...

User Manual (ENGLISH)
Page 242
Color Tab In this tab, you can set options for improving the color printer quality. • Calibration allows you to calibrate the printer for the best possible color printer quality. Printer Default optimizes the colors automatically. Manual Adjust allows you to manually adjust the selected color contrast for color documents. • Custom Color adjusts a specific color contrast individually. D.10 PRINTING FROM DOS APPLICATIONS Auto automatically calibrates the printer to produce the best possible print quality for each cartridge.
Color Tab In this tab, you can set options for improving the color printer quality. • Calibration allows you to calibrate the printer for the best possible color printer quality. Printer Default optimizes the colors automatically. Manual Adjust allows you to manually adjust the selected color contrast for color documents. • Custom Color adjusts a specific color contrast individually. D.10 PRINTING FROM DOS APPLICATIONS Auto automatically calibrates the printer to produce the best possible print quality for each cartridge.

User Manual (ENGLISH)
Page 252
...in which your network. • Static Addressing: TCP/IP address is assigned manually by the system administrator. • Dynamic Addressing BOOTP/DHCP(default): TCP/IP address is assigned automatically by the server. E.8 USING YOUR PRINTER ON A NETWORK ) to ready mode. Static Addressing To enter the TCP... 8 Press the Enter button ( ) when 'IP Get Method' displays. 9 Press the scroll button ( or press the Enter button ( ). Configuring TCP/IP Your printer can be set up on the bottom line. 3 Press the scroll button ( or ) to display 'Yes' and press the Enter button ( ). 4 Press the...
...in which your network. • Static Addressing: TCP/IP address is assigned manually by the system administrator. • Dynamic Addressing BOOTP/DHCP(default): TCP/IP address is assigned automatically by the server. E.8 USING YOUR PRINTER ON A NETWORK ) to ready mode. Static Addressing To enter the TCP... 8 Press the Enter button ( ) when 'IP Get Method' displays. 9 Press the scroll button ( or press the Enter button ( ). Configuring TCP/IP Your printer can be set up on the bottom line. 3 Press the scroll button ( or ) to display 'Yes' and press the Enter button ( ). 4 Press the...

