

User Manual (user Manual) (ver.1.0) (English)
Page 2
... cable 2-7 Connecting Using a DVI to HDMI Cable 2-8 Connecting a Component cable 2-9 Connecting AV Devices 2-10 Connecting to an Amplifier 2-11 Connecting Headphones 2-12 Kensington Lock 2-13 USING THE PRODUCT Plug & Play Feature 3-1 Viewing the Control panel 3-2 Remote Control 3-3 Using the Screen Adjustment Menu (OSD: On Screen Display) . . . . 3-4 Media Play 3-5 Anynet+ (HDMI-CEC 3-6 Installing the Device Driver 3-7 Standard Signal Mode Table 3-8 INSTALLING THE SOFTWARE Natural Color 4-1 MultiScreen 4-2 TROUBLESHOOTING Monitor Self-Diagnosis 5-1 Before Requesting Service...
... cable 2-7 Connecting Using a DVI to HDMI Cable 2-8 Connecting a Component cable 2-9 Connecting AV Devices 2-10 Connecting to an Amplifier 2-11 Connecting Headphones 2-12 Kensington Lock 2-13 USING THE PRODUCT Plug & Play Feature 3-1 Viewing the Control panel 3-2 Remote Control 3-3 Using the Screen Adjustment Menu (OSD: On Screen Display) . . . . 3-4 Media Play 3-5 Anynet+ (HDMI-CEC 3-6 Installing the Device Driver 3-7 Standard Signal Mode Table 3-8 INSTALLING THE SOFTWARE Natural Color 4-1 MultiScreen 4-2 TROUBLESHOOTING Monitor Self-Diagnosis 5-1 Before Requesting Service...
User Manual (user Manual) (ver.1.0) (English)
Page 5
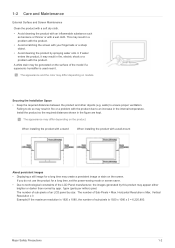
... generated on models. When installing the product with a stand When installing the product with a wet cloth. 1-2 Care and Maintenance External Surface and Screen Maintenance Clean the product with a soft dry cloth. • Avoid cleaning the product with an inflammable substance such as benzene or thinner or with a wall-mount About persistent images • Displaying a still image for a long time, set the power-saving mode or screen saver...
... generated on models. When installing the product with a stand When installing the product with a wet cloth. 1-2 Care and Maintenance External Surface and Screen Maintenance Clean the product with a soft dry cloth. • Avoid cleaning the product with an inflammable substance such as benzene or thinner or with a wall-mount About persistent images • Displaying a still image for a long time, set the power-saving mode or screen saver...
User Manual (user Manual) (ver.1.0) (English)
Page 9
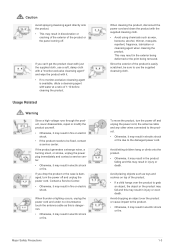
.... If you can't get the product clean with just the supplied cloth, use the supplied cleansing cloth. Usage Related Warning Since a high voltage runs through the product, never disassemble, repair or modify the product yourself. • Otherwise, it . • If no circumstance touch the antenna cable as this is damaged, turn the power off . Contact a Service Center. • Otherwise, it may...
.... If you can't get the product clean with just the supplied cloth, use the supplied cleansing cloth. Usage Related Warning Since a high voltage runs through the product, never disassemble, repair or modify the product yourself. • Otherwise, it . • If no circumstance touch the antenna cable as this is damaged, turn the power off . Contact a Service Center. • Otherwise, it may...
User Manual (user Manual) (ver.1.0) (English)
Page 10
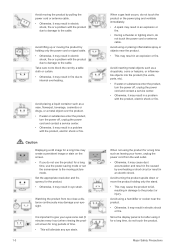
... image or stain on the screen. • If you do not touch the product. Major Safety Precautions Watching the product from the wall outlet. • Otherwise, it for a long time, do not use the power-saving mode or set the screensaver to the product or injury. Avoid turning the product upside down or move the product holding only the power cord or signal cable...
... image or stain on the screen. • If you do not touch the product. Major Safety Precautions Watching the product from the wall outlet. • Otherwise, it for a long time, do not use the power-saving mode or set the screensaver to the product or injury. Avoid turning the product upside down or move the product holding only the power cord or signal cable...
User Manual (user Manual) (ver.1.0) (English)
Page 12
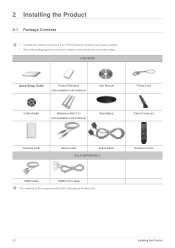
...) Stand Base Stand Connector Cleaning Cloth Stereo Cable D-Sub Cable SOLD SEPARATELY Remote Control HDMI Cable HDMI to move the product at a later stage. CONTENTS Quick Setup Guide Product Warranty (Not available in all locations) User Manual Power Cord Cable Holder Batteries (AAA X 2) (Not available in all of the following contents have been included. • Store the packaging box in case you need to DVI cable The cleaning cloth is supplied with black high-glossy models only. 2-1 Installing...
...) Stand Base Stand Connector Cleaning Cloth Stereo Cable D-Sub Cable SOLD SEPARATELY Remote Control HDMI Cable HDMI to move the product at a later stage. CONTENTS Quick Setup Guide Product Warranty (Not available in all locations) User Manual Power Cord Cable Holder Batteries (AAA X 2) (Not available in all of the following contents have been included. • Store the packaging box in case you need to DVI cable The cleaning cloth is supplied with black high-glossy models only. 2-1 Installing...
User Manual (user Manual) (ver.1.0) (English)
Page 22
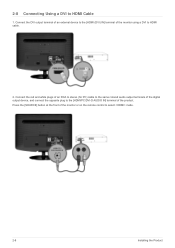
Connect the DVI output terminal of an external device to the [HDMI (DVI) IN] terminal of the monitor using a DVI to the [HDMI/PC/DVI-D AUDIO IN] terminal of the product. Connect the red and white plugs of an RCA to stereo (for PC) cable to the same colored audio output terminals of the monitor or on the remote control to HDMI Cable 1. Press the [SOURCE] button at the front of the digital output device, and connect the opposite plug to HDMI cable. 2. 2-8 Connecting Using a DVI to select mode. 2-8 Installing the Product
Connect the DVI output terminal of an external device to the [HDMI (DVI) IN] terminal of the monitor using a DVI to the [HDMI/PC/DVI-D AUDIO IN] terminal of the product. Connect the red and white plugs of an RCA to stereo (for PC) cable to the same colored audio output terminals of the monitor or on the remote control to HDMI Cable 1. Press the [SOURCE] button at the front of the digital output device, and connect the opposite plug to HDMI cable. 2. 2-8 Connecting Using a DVI to select mode. 2-8 Installing the Product
User Manual (user Manual) (ver.1.0) (English)
Page 28
... displayed. 2. Press the ▲ or ▼ button to reset this feature... 3-1 Using the Product The Auto program menu then reappears. If you have Digital cable, select the cable system signal source for both Analog and Digital. If you want to select , or , then press the [ ] button. • : antenna signal. / : antenna signal. • In Cable mode, you can also use in your local cable company to (Standard): Press the volume button on the remote control...
... displayed. 2. Press the ▲ or ▼ button to reset this feature... 3-1 Using the Product The Auto program menu then reappears. If you have Digital cable, select the cable system signal source for both Analog and Digital. If you want to select , or , then press the [ ] button. • : antenna signal. / : antenna signal. • In Cable mode, you can also use in your local cable company to (Standard): Press the volume button on the remote control...
User Manual (user Manual) (ver.1.0) (English)
Page 30
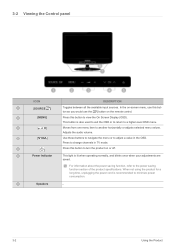
Adjusts the audio volume. Press this button to view the On Screen Display (OSD). This light is recommended to a higher-level OSD menu. Press this button as you would use the [ ] button on or off. In the on-screen menu, use this button to turn the product on the remote control. Moves from one menu item to the power saving function section of the product specifications. For information about the power saving function, refer to another horizontally or adjusts selected...
Adjusts the audio volume. Press this button to view the On Screen Display (OSD). This light is recommended to a higher-level OSD menu. Press this button as you would use the [ ] button on or off. In the on-screen menu, use this button to turn the product on the remote control. Moves from one menu item to the power saving function section of the product specifications. For information about the power saving function, refer to another horizontally or adjusts selected...
User Manual (user Manual) (ver.1.0) (English)
Page 31
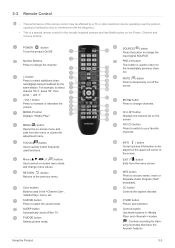
... sound mode. Controls button Use these buttons in the , menu, etc. S.MODE button Press to choose stereo, mono or Separate Audio Program (SAP broadcast). P.SIZE button Picture size selection. POWER ( ) button Turns the product On/Off. TOOLS ( ) button Use to quickly select frequently used to return to temporarily cut off the TV. CC button Controls the caption decoder. Number Buttons Press to interference with the frequency. • This is displayed on the screen. SOURCE( ) button Press the button to change the channel. (-) button...
... sound mode. Controls button Use these buttons in the , menu, etc. S.MODE button Press to choose stereo, mono or Separate Audio Program (SAP broadcast). P.SIZE button Picture size selection. POWER ( ) button Turns the product On/Off. TOOLS ( ) button Use to quickly select frequently used to return to temporarily cut off the TV. CC button Controls the caption decoder. Number Buttons Press to interference with the frequency. • This is displayed on the screen. SOURCE( ) button Press the button to change the channel. (-) button...
User Manual (user Manual) (ver.1.0) (English)
Page 33
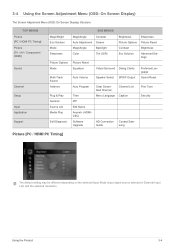
... Auto Adjustment Screen Picture Options Picture Reset MagicAngle Backlight Contrast Brightness Color Tint (G/R) Eco Solution Advanced Settings Picture Reset Equalizer Virtual Surround Dialog Clarity Preferred Language Auto Volume Speaker Select SPDIF Output Sound Reset Auto Program Time PIP Edit Name Anynet+ (HDMICEC) Software Upgrade Clear Scrambled Channel Menu Language HD Connection Guide Channel List Caption Contact Samsung Fine Tune Security Picture [PC / HDMI PC Timing] The default setting may be different depending on the selected Input Mode (input signal source...
... Auto Adjustment Screen Picture Options Picture Reset MagicAngle Backlight Contrast Brightness Color Tint (G/R) Eco Solution Advanced Settings Picture Reset Equalizer Virtual Surround Dialog Clarity Preferred Language Auto Volume Speaker Select SPDIF Output Sound Reset Auto Program Time PIP Edit Name Anynet+ (HDMICEC) Software Upgrade Clear Scrambled Channel Menu Language HD Connection Guide Channel List Caption Contact Samsung Fine Tune Security Picture [PC / HDMI PC Timing] The default setting may be different depending on the selected Input Mode (input signal source...
User Manual (user Manual) (ver.1.0) (English)
Page 35
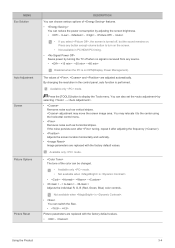
...Red, Green, Blue) color controls. If the noise persists even after adjusting the frequency (). • Adjusts the screen location horizontally and vertically. • Image parameters are replaced with the factory default values. • - Press any source. • - - - Available only mode. Using the Product 3-4 By changing the resolution in PC/HDMI PC timing. • Saves power by adjusting the screen brightness. • - - - - - • If you select , the screen is turned off when no signal is received from any button except volume button to display...
...Red, Green, Blue) color controls. If the noise persists even after adjusting the frequency (). • Adjusts the screen location horizontally and vertically. • Image parameters are replaced with the factory default values. • - Press any source. • - - - Available only mode. Using the Product 3-4 By changing the resolution in PC/HDMI PC timing. • Saves power by adjusting the screen brightness. • - - - - - • If you select , the screen is turned off when no signal is received from any button except volume button to display...
User Manual (user Manual) (ver.1.0) (English)
Page 37
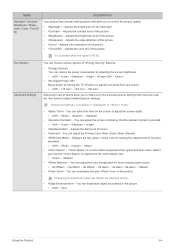
... power consumption by adjusting the screen brightness. • - - - - - • Saves power by turning the TV off when no signal is received from any source. • - - - Using the Product 3-4 Eco Solution Advanced Settings You can adjust the color temperature for making fine adjustments to control the picture quality. • - You can emphasize the pink in the picture. You can choose various options of the picture. • - Adjusts the color tint of red, green and blue colors...
... power consumption by adjusting the screen brightness. • - - - - - • Saves power by turning the TV off when no signal is received from any source. • - - - Using the Product 3-4 Eco Solution Advanced Settings You can adjust the color temperature for making fine adjustments to control the picture quality. • - You can emphasize the pink in the picture. You can choose various options of the picture. • - Adjusts the color tint of red, green and blue colors...
User Manual (user Manual) (ver.1.0) (English)
Page 39
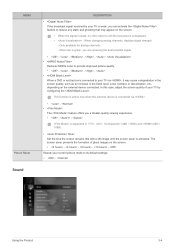
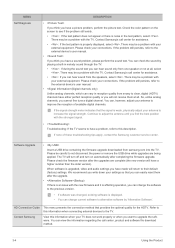
... changing analog channels, displays signal strength. - Using the Product 3-4 The screen saver prevents the formation of your current picture mode to provide improved picture quality. • - - - - • When a DVD or set-top box is activated. MENU Picture Reset Sound DESCRIPTION • If the broadcast signal received by configuring the . is supported in the black level, a low contrast, or discoloration, etc., depending on the screen. • - - - - When bar is green, you...
... changing analog channels, displays signal strength. - Using the Product 3-4 The screen saver prevents the formation of your current picture mode to provide improved picture quality. • - - - - • When a DVD or set-top box is activated. MENU Picture Reset Sound DESCRIPTION • If the broadcast signal received by configuring the . is supported in the black level, a low contrast, or discoloration, etc., depending on the screen. • - - - - When bar is green, you...
User Manual (user Manual) (ver.1.0) (English)
Page 52
... device's user manual. • (Digital channels only) Unlike analog channels, which can change the software to the previous version. • If software was changed, existing software is upgraded, video and audio settings you have a higher number than the older version). There may be a problem with the TV. HD Connection Guide This menu presents the connection method that the signal is weak, physically adjust your settings so that you can easily reset them at...
... device's user manual. • (Digital channels only) Unlike analog channels, which can change the software to the previous version. • If software was changed, existing software is upgraded, video and audio settings you have a higher number than the older version). There may be a problem with the TV. HD Connection Guide This menu presents the connection method that the signal is weak, physically adjust your settings so that you can easily reset them at...
User Manual (user Manual) (ver.1.0) (English)
Page 62
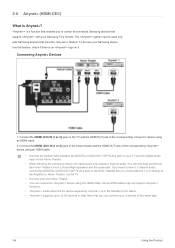
... device using the HDMI cable. The system can connect an device using an HDMI cable. 2. Anynet Device 1 or 2) directly to control all connected Samsung devices that support with Samsung devices that enables you to the Amplifier or Home Theater, not the TV. • Connect only one Home Theater. • You can be sure your TV and the Digital Audio Input on your Samsung device has this feature, check...
... device using the HDMI cable. The system can connect an device using an HDMI cable. 2. Anynet Device 1 or 2) directly to control all connected Samsung devices that support with Samsung devices that enables you to the Amplifier or Home Theater, not the TV. • Connect only one Home Theater. • You can be sure your TV and the Digital Audio Input on your Samsung device has this feature, check...
User Manual (user Manual) (ver.1.0) (English)
Page 64
... devices. 3. The active source on via the power button, devices connected to the TV may take up to . It is turned on the TV remote must be automatically displayed in the menu for devices is turned off . 3-6 Using the Product Make sure to switch to turn off . devices connected to the TV are deactivated. • Setting an Device to an device by using the . • To...
... devices. 3. The active source on via the power button, devices connected to the TV may take up to . It is turned on the TV remote must be automatically displayed in the menu for devices is turned off . 3-6 Using the Product Make sure to switch to turn off . devices connected to the TV are deactivated. • Setting an Device to an device by using the . • To...
User Manual (user Manual) (ver.1.0) (English)
Page 65
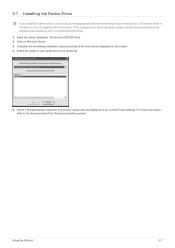
...-ROM drive. 2. Select the model of your product from the model list. 5. For more information, refer to the instructions displayed on the screen. 4. Complete the remaining installation steps according to the document about the Windows operating system. The device driver is corrupted, please visit the Samsung Electronics website (www.samsung.com), and download the driver. 1. Check if the appropriate resolution and screen refresh rate are displayed in the Control Panel settings.
...-ROM drive. 2. Select the model of your product from the model list. 5. For more information, refer to the instructions displayed on the screen. 4. Complete the remaining installation steps according to the document about the Windows operating system. The device driver is corrupted, please visit the Samsung Electronics website (www.samsung.com), and download the driver. 1. Check if the appropriate resolution and screen refresh rate are displayed in the Control Panel settings.
User Manual (user Manual) (ver.1.0) (English)
Page 66
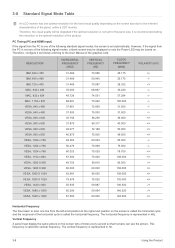
... card. Vertical Frequency A panel must display the same picture on the screen size due to the right-most position on . However, if the signal from the PC is called the horizontal frequency. This frequency is one of the product. 3-8 Standard Signal Mode Table An LCD monitor has one optimal resolution for the panel size. Therefore, configure it as follows referring to the optimal resolution of the following signal modes, a blank screen may be displayed or only the Power LED...
... card. Vertical Frequency A panel must display the same picture on the screen size due to the right-most position on . However, if the signal from the PC is called the horizontal frequency. This frequency is one of the product. 3-8 Standard Signal Mode Table An LCD monitor has one optimal resolution for the panel size. Therefore, configure it as follows referring to the optimal resolution of the following signal modes, a blank screen may be displayed or only the Power LED...
User Manual (user Manual) (ver.1.0) (English)
Page 70
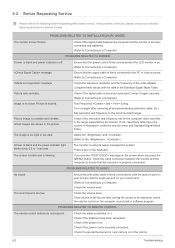
... after removing all accessories(video extension cable, etc.) Set resolution and frequency to a Computer) Check the maximum resolution and the frequency of the video adapter. Picture image is off. If the volume is firmly connected to the PC or video sources. (Refer to Connecting to the recommended ranges. Check if the signal cable between the monitor and the computer to ensure that the audio cable is on again after turning the control to the current under the monitor menu...
... after removing all accessories(video extension cable, etc.) Set resolution and frequency to a Computer) Check the maximum resolution and the frequency of the video adapter. Picture image is off. If the volume is firmly connected to the PC or video sources. (Refer to Connecting to the recommended ranges. Check if the signal cable between the monitor and the computer to ensure that the audio cable is on again after turning the control to the current under the monitor menu...
User Manual (user Manual) (ver.1.0) (English)
Page 72
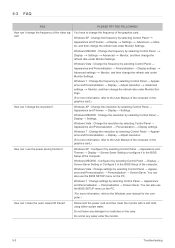
... card.) How can I use the BIOS SETUP menu on the PC. You have to the User Manual of the computer. tor, and then change the refresh rate under Monitor Set- 5-3 FAQ FAQ PLEASE TRY THE FOLLOWING! Windows XP : Change the frequency by selecting Control Panel → Appearance and Themes → Display → Settings. Disconnect the power cord and then clean the monitor with a soft cloth, using either a plain water. Windows XP : Change the resolution by selecting Control Panel...
... card.) How can I use the BIOS SETUP menu on the PC. You have to the User Manual of the computer. tor, and then change the refresh rate under Monitor Set- 5-3 FAQ FAQ PLEASE TRY THE FOLLOWING! Windows XP : Change the frequency by selecting Control Panel → Appearance and Themes → Display → Settings. Disconnect the power cord and then clean the monitor with a soft cloth, using either a plain water. Windows XP : Change the resolution by selecting Control Panel...


