
User Manual (ENGLISH)
Page 8
... undesirable picture quality. 17,19 inch (43, 48 cm) - 1280 X 1024 Watching the monitor continuously at least a five-minute break after every hour of time, residual image or blurriness may cause damage to moving picture when you view a fixed screen for an extended period of using the product for an extended time period, keep the product unplugged. z Change the mode to energy save or set...
... undesirable picture quality. 17,19 inch (43, 48 cm) - 1280 X 1024 Watching the monitor continuously at least a five-minute break after every hour of time, residual image or blurriness may cause damage to moving picture when you view a fixed screen for an extended period of using the product for an extended time period, keep the product unplugged. z Change the mode to energy save or set...
User Manual (ENGLISH)
Page 11
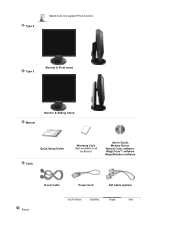
Type 3 Monitor & Pivot stand Manual Monitor & Sliding Stand Quick Setup Guide Cable Warranty Card (Not available in all locations) User's Guide, Monitor Driver, Natural Color software, MagicTune™ software MagicRotation software D-sub Cable Power Cord DVI Cable (option) Front Type 2 Stand does not support Pivot function.
Type 3 Monitor & Pivot stand Manual Monitor & Sliding Stand Quick Setup Guide Cable Warranty Card (Not available in all locations) User's Guide, Monitor Driver, Natural Color software, MagicTune™ software MagicRotation software D-sub Cable Power Cord DVI Cable (option) Front Type 2 Stand does not support Pivot function.
User Manual (ENGLISH)
Page 12
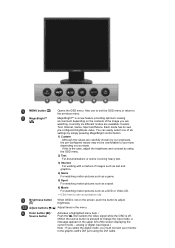
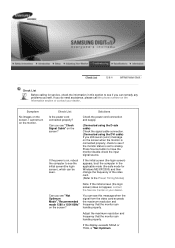
... clip Brightness button When OSD is pressed to the previous menu. MENU button [ ] Opens the OSD menu. You can easily select one of six settings by simply pressing MagicBright control button. 1) Custom Although the values are carefully chosen by using the DVI cable. analog or digital input signal.) Note : If you select the digital mode, you are available: Custom, Text, Internet, Game, Sport and Movie. Currently six different modes are watching. Adjust buttons [ ] Adjust items...
... clip Brightness button When OSD is pressed to the previous menu. MENU button [ ] Opens the OSD menu. You can easily select one of six settings by simply pressing MagicBright control button. 1) Custom Although the values are carefully chosen by using the DVI cable. analog or digital input signal.) Note : If you select the digital mode, you are available: Custom, Text, Internet, Game, Sport and Movie. Currently six different modes are watching. Adjust buttons [ ] Adjust items...

User Manual (ENGLISH)
Page 13
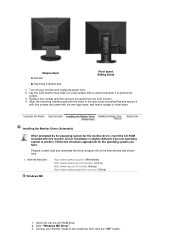
... your monitor. Connect the DVI Cable to product.) POWER port DVI IN port RGB IN port Kensington Lock Connect the power cord for further information regarding power saving functions. The Kensington lock is not needed, or when leaving it . For energy conservation, turn the monitor on the back of your monitor. Connect the signal cable to be purchased separately. ) For using a locking device, contact where you purchase it unattended for long periods. AUTO button Power button [ ]/ Power indicator Use this button for turn your monitor...
... your monitor. Connect the DVI Cable to product.) POWER port DVI IN port RGB IN port Kensington Lock Connect the power cord for further information regarding power saving functions. The Kensington lock is not needed, or when leaving it . For energy conservation, turn the monitor on the back of your monitor. Connect the signal cable to be purchased separately. ) For using a locking device, contact where you purchase it unattended for long periods. AUTO button Power button [ ]/ Power indicator Use this button for turn your monitor...
User Manual (ENGLISH)
Page 16
.... Click "Windows ME Driver". 3. Align the mounting interface pad with the holes in the model list, then click the "OK" button. Remove four screws and then remove the stand from one operating system to protect the screen. 3. Insert CD into the CD-ROM drive. 2. Choose your monitor and unplug its power cord. 2. Lay the LCD monitor face-down on a flat surface with the arm-type base, wall mount hanger...
.... Click "Windows ME Driver". 3. Align the mounting interface pad with the holes in the model list, then click the "OK" button. Remove four screws and then remove the stand from one operating system to protect the screen. 3. Insert CD into the CD-ROM drive. 2. Choose your monitor and unplug its power cord. 2. Lay the LCD monitor face-down on a flat surface with the arm-type base, wall mount hanger...
User Manual (ENGLISH)
Page 18
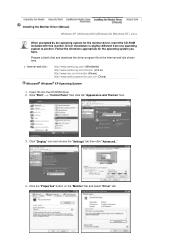
.../ (Worldwide) http://www.samsung.com/monitor (U.S.A) http://www.sec.co.kr/monitor (Korea) http://www.samsungmonitor.com.cn/ (China) Microsoft® Windows® XP Operating System 1. Click the "Properties" button on the "Monitor" tab and select "Driver" tab. Follow the directions appropriate for the monitor driver, insert the CD-ROM included with this monitor. Installing the Monitor Driver (Manual) Windows XP | Windows 2000 |Windows Me |Windows NT | Linux...
.../ (Worldwide) http://www.samsung.com/monitor (U.S.A) http://www.sec.co.kr/monitor (Korea) http://www.samsungmonitor.com.cn/ (China) Microsoft® Windows® XP Operating System 1. Click the "Properties" button on the "Monitor" tab and select "Driver" tab. Follow the directions appropriate for the monitor driver, insert the CD-ROM included with this monitor. Installing the Monitor Driver (Manual) Windows XP | Windows 2000 |Windows Me |Windows NT | Linux...
User Manual (ENGLISH)
Page 19
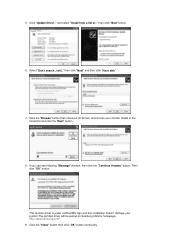
... system.The certified driver will .." This monitor driver is under certified MS logo,and this installation doesn't damage your monitor model in the model list and click the "Next" button. 8. then click "Next" button. 6. If you can see following "Message" window, then click the "Continue Anyway" button. Select "Don't search ,I will be posted on Samsung Monitor homepage. http://www.samsung.com/ 9. Click "Update Driver.." then click...
... system.The certified driver will .." This monitor driver is under certified MS logo,and this installation doesn't damage your monitor model in the model list and click the "Next" button. 8. then click "Next" button. 6. If you can see following "Message" window, then click the "Continue Anyway" button. Select "Don't search ,I will be posted on Samsung Monitor homepage. http://www.samsung.com/ 9. Click "Update Driver.." then click...
User Manual (ENGLISH)
Page 20
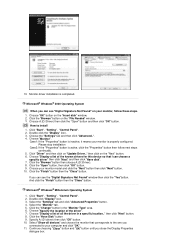
... "OK". 11. Click "Start" , "Setting" , "Control Panel". 2. then click "Next" button. 8. Select "Show all the driver in the "Monitor Type" area. 6. Choose "OK" button on the "File Needed" window. 3. Click "Start" , "Setting" , "Control Panel". 2. then click on "Update Driver.." Click the "Browse" button then choose A:(D:\Driver). 8. If you can see the "Digital Signature Not Found" window then click the "Yes"button. Click the "Change" button in a specific location.." Double click the "Display" Icon. 3. Double click...
... "OK". 11. Click "Start" , "Setting" , "Control Panel". 2. then click "Next" button. 8. Select "Show all the driver in the "Monitor Type" area. 6. Choose "OK" button on the "File Needed" window. 3. Click "Start" , "Setting" , "Control Panel". 2. then click on "Update Driver.." Click the "Browse" button then choose A:(D:\Driver). 8. If you can see the "Digital Signature Not Found" window then click the "Yes"button. Click the "Change" button in a specific location.." Double click the "Display" Icon. 3. Double click...

User Manual (ENGLISH)
Page 21
Click Start, Settings, Control Panel, and then double-click Display icon. 2. Select a mode that the color of the images printed out by referring to the Preset Timing Modes in using a computer is not normal, change to make the X86Config file, which is for your monitor. 7. If the screen is that you wish to use (Resolution, Number of all, set a horizontal frequency for setting your computer. 4. Press Enter at All Display Modes, select the level...
Click Start, Settings, Control Panel, and then double-click Display icon. 2. Select a mode that the color of the images printed out by referring to the Preset Timing Modes in using a computer is not normal, change to make the X86Config file, which is for your monitor. 7. If the screen is that you wish to use (Resolution, Number of all, set a horizontal frequency for setting your computer. 4. Press Enter at All Display Modes, select the level...

User Manual (ENGLISH)
Page 33
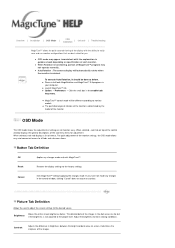
... a single user have multiple defined presets based on -screen display (OSD) menus that allows monitor adjustment and color tuning using MagicTune™ in correctly setting the controls of monitor settings without taking pre-defined steps. It is MagicTune™? Unfortunately, the manual controls available to tune the image often prove to be saved, providing an easy way to understand. OSD Mode The OSD mode allows easy adjustment of the monitor. Color Overview | Installation | OSD Mode | | Uninstall | Troubleshooting Calibration Overview...
... a single user have multiple defined presets based on -screen display (OSD) menus that allows monitor adjustment and color tuning using MagicTune™ in correctly setting the controls of monitor settings without taking pre-defined steps. It is MagicTune™? Unfortunately, the manual controls available to tune the image often prove to be saved, providing an easy way to understand. OSD Mode The OSD mode allows easy adjustment of the monitor. Color Overview | Installation | OSD Mode | | Uninstall | Troubleshooting Calibration Overview...
User Manual (ENGLISH)
Page 38
... made . When selected , each tab displays a list of the monitor. Contrast Adjusts the difference in the dark areas can be lost if the brightness is rotated. Color Overview | Installation | OSD Mode | | Uninstall | Troubleshooting Calibration MagicTune™ allows for quick accurate tuning of the images. For quick adjustment of the images in brightness between the bright and dark areas on specification of each monitor. To execute Auto Rotation, it should be different...
... made . When selected , each tab displays a list of the monitor. Contrast Adjusts the difference in the dark areas can be lost if the brightness is rotated. Color Overview | Installation | OSD Mode | | Uninstall | Troubleshooting Calibration MagicTune™ allows for quick accurate tuning of the images. For quick adjustment of the images in brightness between the bright and dark areas on specification of each monitor. To execute Auto Rotation, it should be different...
User Manual (ENGLISH)
Page 39
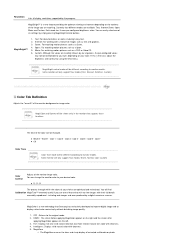
... screen after applying MagicColor appears on the contents of six settings by simply pressing MagicBright control buttons. Cool 4 - Resolution Lists all display resolutions supported by using the OSD menu. Some monitor will find Calibration MagicTune™ extremely useful if you are optimized and maintained. You will only support Four modes(Text, Internet, Entertain, Custom) Color Tab Definition Adjusts the "warmth" of animated multimedia or photo Cool 6 - You can change the monitor color...
... screen after applying MagicColor appears on the contents of six settings by simply pressing MagicBright control buttons. Cool 4 - Resolution Lists all display resolutions supported by using the OSD menu. Some monitor will find Calibration MagicTune™ extremely useful if you are optimized and maintained. You will only support Four modes(Text, Internet, Entertain, Custom) Color Tab Definition Adjusts the "warmth" of animated multimedia or photo Cool 6 - You can change the monitor color...
User Manual (ENGLISH)
Page 40
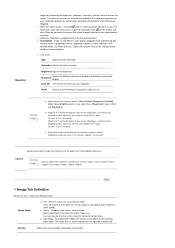
... : Removes noise such as horizontal stripes. Zone Off Turn off the zone that vendor has set. Reset Returns to the the default setting that you have some problems. { Tusk menu HUE Adjust the tint of the color. If the noise persists even after adjusting the frequency (clock speed). MagicColor images by dragging. { When the mouse cursor is activated( )and it is appropriate to using the Horizontal Control menu. Image...
... : Removes noise such as horizontal stripes. Zone Off Turn off the zone that vendor has set. Reset Returns to the the default setting that you have some problems. { Tusk menu HUE Adjust the tint of the color. If the noise persists even after adjusting the frequency (clock speed). MagicColor images by dragging. { When the mouse cursor is activated( )and it is appropriate to using the Horizontal Control menu. Image...
User Manual (ENGLISH)
Page 46
... not adjust to the optimal resolution and perform Color Calibration, the monitor cannot be adjusted to the User Guide for the optimal resolution. This happens when the current video card list is XP); Visit the video card manufacturer's homepage and download and install the latest driver. As the Highlight program uses the communication lines, please exit the Highlight program before you have a problem with Window OS that supports Plug and Play. Solutions * To check...
... not adjust to the optimal resolution and perform Color Calibration, the monitor cannot be adjusted to the User Guide for the optimal resolution. This happens when the current video card list is XP); Visit the video card manufacturer's homepage and download and install the latest driver. As the Highlight program uses the communication lines, please exit the Highlight program before you have a problem with Window OS that supports Plug and Play. Solutions * To check...
User Manual (ENGLISH)
Page 59
... monitor can remedy any problems yourself. Check List Before calling for service, check the information in the applicable mode (the safe mode for Windows ME/XP/2000) and then change the frequency of the video card. (Refer to the Preset Timing Modes) Note: If the initial screen (the login screen) does not appear, contact the Service Center or your dealer. Solutions Check the power cord connection and supply. (Connected using the D-sub cable) Check the signal cable connection. (Connected using...
... monitor can remedy any problems yourself. Check List Before calling for service, check the information in the applicable mode (the safe mode for Windows ME/XP/2000) and then change the frequency of the video card. (Refer to the Preset Timing Modes) Note: If the initial screen (the login screen) does not appear, contact the Service Center or your dealer. Solutions Check the power cord connection and supply. (Connected using the D-sub cable) Check the signal cable connection. (Connected using...
User Manual (ENGLISH)
Page 61
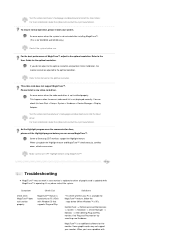
... available for the main board of the video screen is XP); http://www.samsung.com/monitor/magictune Have you assembled the PC, check if the installed the adapter (video) driver and the monitor driver. 4. program can be downloaded http://www.samsung.com/monitor/magictune. There are properly connected to the computer. 2. The screen colors have problems in installing the adapter (video) driver, boot the computer in Safe Mode, remove the Display Adapter at the "Control Panel System Device Administrator" and...
... available for the main board of the video screen is XP); http://www.samsung.com/monitor/magictune Have you assembled the PC, check if the installed the adapter (video) driver and the monitor driver. 4. program can be downloaded http://www.samsung.com/monitor/magictune. There are properly connected to the computer. 2. The screen colors have problems in installing the adapter (video) driver, boot the computer in Safe Mode, remove the Display Adapter at the "Control Panel System Device Administrator" and...

User Manual (ENGLISH)
Page 62
... that you need to check the signal cable. Do not allow any remains of the computer. 3. then turn on the version of scan range or that video card support can vary, depending on both your monitor is functioning properly. Frequency can I adjust the resolution? Disconnect the power cord and then clean the monitor with the input signal, a message appears on the screen or the screen goes blank although the power indicator LED is still...
... that you need to check the signal cable. Do not allow any remains of the computer. 3. then turn on the version of scan range or that video card support can vary, depending on both your monitor is functioning properly. Frequency can I adjust the resolution? Disconnect the power cord and then clean the monitor with the input signal, a message appears on the screen or the screen goes blank although the power indicator LED is still...
User Manual (ENGLISH)
Page 65
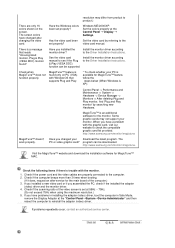
... proceed automatically, unless the user wishes to be bright sometimes or some of black pixels could be installed on your monitor OFF when it is used with a computer equipped with precision of TFT LCD sub pixels that this product. State Normal Operation Power Indicator Power Consumption Blue Less than 34W Power saving mode EPA/ENERGY 2000 Blue, Blinking Less than 1W (Off-mode) Power off Power off (Power button) (Power Switch) Black Less than 1W (120Vac...
... proceed automatically, unless the user wishes to be bright sometimes or some of black pixels could be installed on your monitor OFF when it is used with a computer equipped with precision of TFT LCD sub pixels that this product. State Normal Operation Power Indicator Power Consumption Blue Less than 34W Power saving mode EPA/ENERGY 2000 Blue, Blinking Less than 1W (Off-mode) Power off Power off (Power button) (Power Switch) Black Less than 1W (120Vac...
User Manual (ENGLISH)
Page 68
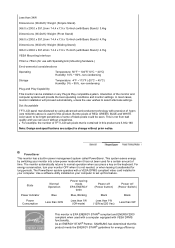
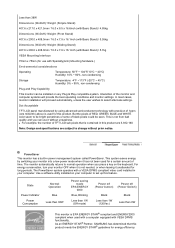
... This monitor has a built-in this product are subject to set up this product meets the ENERGY STAR® guidelines for use it unattended for a certain amount of black pixels could be bright sometimes or some of time. State Normal Operation Power Indicator Power Consumption Blue Less than 38W Power saving mode EPA/ENERGY 2000 Blue, Blinking Less than 1W (Off-mode) Power off Power off (Power button) (Power Switch) Black Less...
... This monitor has a built-in this product are subject to set up this product meets the ENERGY STAR® guidelines for use it unattended for a certain amount of black pixels could be bright sometimes or some of time. State Normal Operation Power Indicator Power Consumption Blue Less than 38W Power saving mode EPA/ENERGY 2000 Blue, Blinking Less than 1W (Off-mode) Power off Power off (Power button) (Power Switch) Black Less...
User Manual (ENGLISH)
Page 72
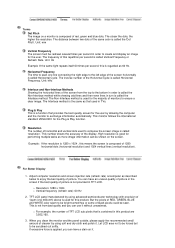
...) above is used in TFT-LCD. { Resolution: 1280 x 1024 { Vertical frequency (refresh rate): 60 Hz 2. This monitor follows the international standard VESA DDC for the majority of black pixels could be scrubbed out softly. TFT LCD panel manufactured by using soft and dry cloth and polish it without uneasiness. { For example, the number of picture. If excessive force is applied, you can have a stain on the screen. Plug & Play This...
...) above is used in TFT-LCD. { Resolution: 1280 x 1024 { Vertical frequency (refresh rate): 60 Hz 2. This monitor follows the international standard VESA DDC for the majority of black pixels could be scrubbed out softly. TFT LCD panel manufactured by using soft and dry cloth and polish it without uneasiness. { For example, the number of picture. If excessive force is applied, you can have a stain on the screen. Plug & Play This...


