User Manual (ENGLISH)
Page 8
... monitor for an extended period of using the monitor. Change the mode to energy saving mode or set a screensaver to a changing picture when away from the wall outlet and contact the Service Center. This may cause damage to other devices, are disconnected before moving the monitor, turn the product off and unplug the power cord. An inappropriate resolution may cause undesirable picture quality. 19 inch (48 cm) - 1280 x 1024 Viewing the monitor...
... monitor for an extended period of using the monitor. Change the mode to energy saving mode or set a screensaver to a changing picture when away from the wall outlet and contact the Service Center. This may cause damage to other devices, are disconnected before moving the monitor, turn the product off and unplug the power cord. An inappropriate resolution may cause undesirable picture quality. 19 inch (48 cm) - 1280 x 1024 Viewing the monitor...

User Manual (ENGLISH)
Page 11
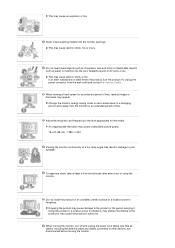
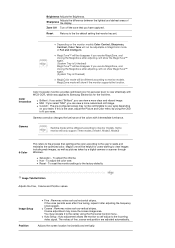
... have an image retention when switching from image retention Power Off, Screen Saver, or Power Save Mode Ex) z Turn the power off when using a stationary pattern. - Please follow set up in luminance (Black & White, Grey) Ex) z Recommended settings: Bright colors with the PC Display Properties Power Scheme. Avoid using Grey colors, which encase the liquid crystal. z Set the Monitor to protect them from Image retention. Turn the power off for 1 minute. Warranty Warranty does not cover any...
... have an image retention when switching from image retention Power Off, Screen Saver, or Power Save Mode Ex) z Turn the power off when using a stationary pattern. - Please follow set up in luminance (Black & White, Grey) Ex) z Recommended settings: Bright colors with the PC Display Properties Power Scheme. Avoid using Grey colors, which encase the liquid crystal. z Set the Monitor to protect them from Image retention. Turn the power off for 1 minute. Warranty Warranty does not cover any...
User Manual (ENGLISH)
Page 16
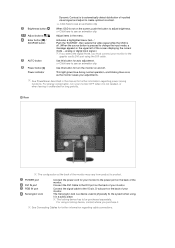
... of your monitor. Connect the signal cable to the power port on the back of the monitor. analog or digital input signal.) If you select the digital mode, you purchase it unattended for long periods. Rear The configuration at the back of the monitor may vary from product to the graphic card's DVI port using it in the upper left of the screen displaying the current mode -- Brightness button [ ] Adjust buttons [ ] Enter button [ ] / SOURCE button AUTO button Power button [ ] Power indicator Dynamic Contrast is...
... of your monitor. Connect the signal cable to the power port on the back of the monitor. analog or digital input signal.) If you select the digital mode, you purchase it unattended for long periods. Rear The configuration at the back of the monitor may vary from product to the graphic card's DVI port using it in the upper left of the screen displaying the current mode -- Brightness button [ ] Adjust buttons [ ] Enter button [ ] / SOURCE button AUTO button Power button [ ] Power indicator Dynamic Contrast is...

User Manual (ENGLISH)
Page 18
Monitor and Bottom Attaching a Base This monitor accepts a 75 mm x 75 mm VESA-compliant mounting interface pad. A. Monitor B. Remove three screws and then remove the stand from the LCD monitor. Mounting interface pad (Sold separately) Turn off your monitor and unplug its power cord. Lay the LCD monitor face-down on a flat surface with a cushion beneath it with four screws that came with the holes in the rear cover mounting Pad and secure it to protect the screen. Align the mounting interface pad with the arm-type base, wall mount hanger or other base.
Monitor and Bottom Attaching a Base This monitor accepts a 75 mm x 75 mm VESA-compliant mounting interface pad. A. Monitor B. Remove three screws and then remove the stand from the LCD monitor. Mounting interface pad (Sold separately) Turn off your monitor and unplug its power cord. Lay the LCD monitor face-down on a flat surface with a cushion beneath it with four screws that came with the holes in the rear cover mounting Pad and secure it to protect the screen. Align the mounting interface pad with the arm-type base, wall mount hanger or other base.
User Manual (ENGLISH)
Page 19
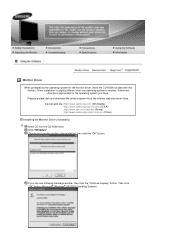
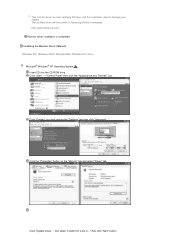
...) http://www.samsung.com/monitor (U.S.A) http://www.sec.co.kr/monitor (Korea) http://www.samsungmonitor.com.cn/ (China) Installing the Monitor Driver (Automatic) Insert CD into the CD-ROM drive. Choose your monitor model in the model list, then click the "OK" button. If you have. Then click "OK" button (Microsoft® Windows® XP/2000 Operating System). Click "Windows". Driver installation is slightly different...
...) http://www.samsung.com/monitor (U.S.A) http://www.sec.co.kr/monitor (Korea) http://www.samsungmonitor.com.cn/ (China) Installing the Monitor Driver (Automatic) Insert CD into the CD-ROM drive. Choose your monitor model in the model list, then click the "OK" button. If you have. Then click "OK" button (Microsoft® Windows® XP/2000 Operating System). Click "Windows". Driver installation is slightly different...
User Manual (ENGLISH)
Page 20
...; Windows® XP Operating System Insert CD into the CD-ROM drive. Click the "Properties" button on Samsung Monitor homepage http://www.samsung.com/ Monitor driver installation is under certifying MS logo, and this installation doesn't damage your system. Click "Update Driver..." then click "Next" button. Click "Display" icon and choose the "Settings" tab then click "Advanced...". and select "Install from a list or..." Click "Start" "Control Panel" then...
...; Windows® XP Operating System Insert CD into the CD-ROM drive. Click the "Properties" button on Samsung Monitor homepage http://www.samsung.com/ Monitor driver installation is under certifying MS logo, and this installation doesn't damage your system. Click "Update Driver..." then click "Next" button. Click "Display" icon and choose the "Settings" tab then click "Advanced...". and select "Install from a list or..." Click "Start" "Control Panel" then...
User Manual (ENGLISH)
Page 22
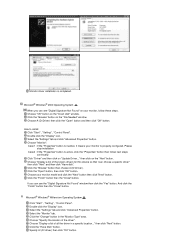
... monitor, follow next steps continually. Click the "Have Disk" button. Click the "Browse" button on "Update Driver..." Choose "Display a list of the known drivers for this device so that I can see the "Digital Signature Not Found" window then click the "Yes" button. Click the "Open" button, then click "OK" button. Case1 : If the "Properties" button is completed. Click the "Change" button in a specific location..." How to install Click "Start" , "Setting" , "Control Panel...
... monitor, follow next steps continually. Click the "Have Disk" button. Click the "Browse" button on "Update Driver..." Choose "Display a list of the known drivers for this device so that I can see the "Digital Signature Not Found" window then click the "Yes" button. Click the "Open" button, then click "OK" button. Case1 : If the "Properties" button is completed. Click the "Change" button in a specific location..." How to install Click "Start" , "Setting" , "Control Panel...
User Manual (ENGLISH)
Page 23
... frequency). Microsoft® Windows® NT Operating System Click "Start", "Settings", "Control Panel", and then double-click "Display" icon. The Natural Color S/W is that the color of XWindow. Select "Show all , set a horizontal frequency for your monitor. (You can enter the frequency directly.) Set a vertical frequency for Samsung monitors This information will not affect the actual execution of the images printed out by a printer or other requested hardware. Click "Apply" button...
... frequency). Microsoft® Windows® NT Operating System Click "Start", "Settings", "Control Panel", and then double-click "Display" icon. The Natural Color S/W is that the color of XWindow. Select "Show all , set a horizontal frequency for your monitor. (You can enter the frequency directly.) Set a vertical frequency for Samsung monitors This information will not affect the actual execution of the images printed out by a printer or other requested hardware. Click "Apply" button...

User Manual (ENGLISH)
Page 24
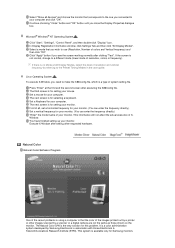
... simple adjustments to Brightness, or Contrast require navigation of the multi-level, onscreen display (OSD) menus that are controlled via software to eliminate the need to use the monitor on-screen display (OSD). All adjustments to the display are not easy to understand. OSD Mode The OSD mode allows easy adjustment of Windows and then select [Run...]. Overview | Installation | OSD Mode | Color Calibration | Uninstall | Troubleshooting Overview What is no feedback to assist in correctly setting the controls of the monitor...
... simple adjustments to Brightness, or Contrast require navigation of the multi-level, onscreen display (OSD) menus that are controlled via software to eliminate the need to use the monitor on-screen display (OSD). All adjustments to the display are not easy to understand. OSD Mode The OSD mode allows easy adjustment of Windows and then select [Run...]. Overview | Installation | OSD Mode | Color Calibration | Uninstall | Troubleshooting Overview What is no feedback to assist in correctly setting the controls of the monitor...
User Manual (ENGLISH)
Page 26
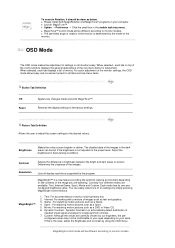
... depending on screen. The detailed data of the images in brightness between the bright and dark areas on your computer. Resolution Lists all tabs and sub-menu items. Button Tab Definition OK Reset Applies any changes made and exits MagicTune™. OSD Mode The OSD mode makes the adjustment of settings on the contents of six settings by the program. For quick adjustment of inputted visual signal and adjust to monitor models. Each mode has...
... depending on screen. The detailed data of the images in brightness between the bright and dark areas on your computer. Resolution Lists all tabs and sub-menu items. Button Tab Definition OK Reset Applies any changes made and exits MagicTune™. OSD Mode The OSD mode makes the adjustment of settings on the contents of six settings by the program. For quick adjustment of inputted visual signal and adjust to monitor models. Each mode has...
User Manual (ENGLISH)
Page 28
... image. Reset Returns to the the default setting that you excute MagicZone, and closing the MagicZone after adjusting, will show the MagicTune™ again. (System Tray is Checked) z MagicColor mode will be different according to the center using the OSD to the user's needs and maintains the optimized color. If the noise persists even after Fine tuning, repeat it to monitor models. Brightness Adjusts the Brightness. Gamma correction changes...
... image. Reset Returns to the the default setting that you excute MagicZone, and closing the MagicZone after adjusting, will show the MagicTune™ again. (System Tray is Checked) z MagicColor mode will be different according to the center using the OSD to the user's needs and maintains the optimized color. If the noise persists even after Fine tuning, repeat it to monitor models. Brightness Adjusts the Brightness. Gamma correction changes...

User Manual (ENGLISH)
Page 29
... to use will be changed to monitor OSD(On Screen Display) languages.OSD language will have an "V" in use the Help feature. Applied only in a small window super-imposed on the PC Video signal. (Off / On) PIP Turn the PIP Screen on or off any Preference, position the cursor over the box and click. Partial Color Blindness Test z Reset - Preferences in the check box. z Off - Size Change the Size of the PIP window. Customized...
... to use will be changed to monitor OSD(On Screen Display) languages.OSD language will have an "V" in use the Help feature. Applied only in a small window super-imposed on the PC Video signal. (Off / On) PIP Turn the PIP Screen on or off any Preference, position the cursor over the box and click. Partial Color Blindness Test z Reset - Preferences in the check box. z Off - Size Change the Size of the PIP window. Customized...

User Manual (ENGLISH)
Page 31
... information on Windows™ XP, go to [Control Panel] in the menu. Go to [Task Tray] ' [Start] ' [Settings] and select [Control Panel] in the [Start] menu. 2. Check if your video/graphic card is not in Control Panel. 3. This feature is able to support MagicTune™. Press "View Uncalibrated" button to see the calibration effect which you adjusted. 2. Overview | Installation | OSD Mode | Color Calibration | Uninstall | Troubleshooting Uninstall The MagicTune™ program can be removed only by those monitors that...
... information on Windows™ XP, go to [Control Panel] in the menu. Go to [Task Tray] ' [Start] ' [Settings] and select [Control Panel] in the [Start] menu. 2. Check if your video/graphic card is not in Control Panel. 3. This feature is able to support MagicTune™. Press "View Uncalibrated" button to see the calibration effect which you adjusted. 2. Overview | Installation | OSD Mode | Color Calibration | Uninstall | Troubleshooting Uninstall The MagicTune™ program can be removed only by those monitors that...
User Manual (ENGLISH)
Page 32
... and download and install the latest driver. You can access MagicTune™. An error occurs when the video card driver is not displayed normally. An error occurs when replacing the monitor with Window OS that steps below (When Windows™ is replaced before use. Refer to the manual for the optimal resolution. Please visit our homepage to turn OFF Highlight before you do not adjust to the optimal resolution and perform Color Calibration, the monitor...
... and download and install the latest driver. You can access MagicTune™. An error occurs when the video card driver is not displayed normally. An error occurs when replacing the monitor with Window OS that steps below (When Windows™ is replaced before use. Refer to the manual for the optimal resolution. Please visit our homepage to turn OFF Highlight before you do not adjust to the optimal resolution and perform Color Calibration, the monitor...

User Manual (ENGLISH)
Page 49
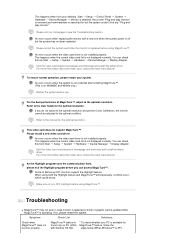
... maximum resolution and frequency that the monitor can handle properly. I cannot turn on , reboot the computer to see "Check Signal Cable" on the screen? (Connected using the D-sub cable) Check the signal cable connection. (Connected using the DVI cable) If you can handle properly. Please change the frequency of the video card. (Refer to have the monitor double-check the input signal source. If the power is set to activate the monitor and Adjust the maximum resolution and frequency that the monitor can remedy any problems...
... maximum resolution and frequency that the monitor can handle properly. I cannot turn on , reboot the computer to see "Check Signal Cable" on the screen? (Connected using the D-sub cable) Check the signal cable connection. (Connected using the DVI cable) If you can handle properly. Please change the frequency of the video card. (Refer to have the monitor double-check the input signal source. If the power is set to activate the monitor and Adjust the maximum resolution and frequency that the monitor can remedy any problems...
User Manual (ENGLISH)
Page 50
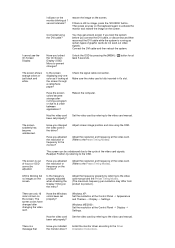
...to prevent changes? Adjust the resolution and frequency at the Control Panel and Themes Display Settings. Connected using the OSD. Adjust the frequency properly by referring to the video card manual and the Preset Timing Modes. (The maximum frequency per resolution may get a blank screen if you boot the system before you locked the On Screen Display (OSD) Menu to the video card manual. Adjust screen image position and size using the DVI cable? Adjust the resolution and frequency of the video card signals. There is blinking but no image, press the 'SOURCE' button. LED is...
...to prevent changes? Adjust the resolution and frequency at the Control Panel and Themes Display Settings. Connected using the OSD. Adjust the frequency properly by referring to the video card manual and the Preset Timing Modes. (The maximum frequency per resolution may get a blank screen if you boot the system before you locked the On Screen Display (OSD) Menu to the video card manual. Adjust screen image position and size using the DVI cable? Adjust the resolution and frequency of the video card signals. There is blinking but no image, press the 'SOURCE' button. LED is...
User Manual (ENGLISH)
Page 51
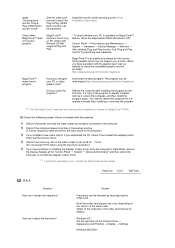
... power cord and the video cables are properly connected to check the compatible graphic card list provided. Check if the scanning ratio of the driver used. (Refer to operate normally after installing the program for MagicTune™ MAC. Download the latest program. reads "Unrecognized monitor, Plug & Play (VESA DDC) monitor found only on PC (VGA) with Window OS that video card support can vary, depending on the version of the video screen is set at the Control Panel...
... power cord and the video cables are properly connected to check the compatible graphic card list provided. Check if the scanning ratio of the driver used. (Refer to operate normally after installing the program for MagicTune™ MAC. Download the latest program. reads "Unrecognized monitor, Plug & Play (VESA DDC) monitor found only on PC (VGA) with Window OS that video card support can vary, depending on the version of the video screen is set at the Control Panel...
User Manual (ENGLISH)
Page 52
... can I clean the outer case/LCD Panel? Set the function at BIOS-SETUP of the detergent nor scratch the case. Refer to Windows/Computer Manual Disconnect the power cord and then clean the monitor with the input signal, a message appears on . Self-Test Feature Check Turn off your monitor is functioning properly, you need to go inside the monitor. This box appears during normal operation if the video cable becomes...
... can I clean the outer case/LCD Panel? Set the function at BIOS-SETUP of the detergent nor scratch the case. Refer to Windows/Computer Manual Disconnect the power cord and then clean the monitor with the input signal, a message appears on . Self-Test Feature Check Turn off your monitor is functioning properly, you need to go inside the monitor. This box appears during normal operation if the video cable becomes...
User Manual (ENGLISH)
Page 55
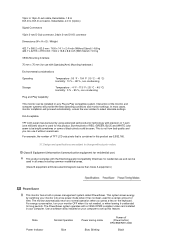
..., the number of TFT LCD sub pixels that is used for a certain amount of black pixels could be installed on any Plug & Play compatible system. But the pixels of RED, GREEN, BLUE and WHITE color seem to be bright sometimes or some of time. 15pin to 15pin D-sub cable, Detachable, 1.8 m DVI-D to DVI-D connector, Detachable, 2.0 m (Option) Signal Connectors 15pin 3-row D-Sub connector, 24pin 3-row DVI-D connector Dimensions (W x H x D) / Weight 422.7 x 360.2 x 62.5 mm / 16.6 x 14.1 x 2.4 inch (Without Stand) / 4.8 kg...
..., the number of TFT LCD sub pixels that is used for a certain amount of black pixels could be installed on any Plug & Play compatible system. But the pixels of RED, GREEN, BLUE and WHITE color seem to be bright sometimes or some of time. 15pin to 15pin D-sub cable, Detachable, 1.8 m DVI-D to DVI-D connector, Detachable, 2.0 m (Option) Signal Connectors 15pin 3-row D-Sub connector, 24pin 3-row DVI-D connector Dimensions (W x H x D) / Weight 422.7 x 360.2 x 62.5 mm / 16.6 x 14.1 x 2.4 inch (Without Stand) / 4.8 kg...

User Manual (ENGLISH)
Page 61
.... For Better Display Adjust computer resolution and screen injection rate (refresh rate) oncomputer as described below with the furnishing, performance, or use the FINE/COARSE adjustment function. Resolution : 1280 x 1024 Vertical frequency (refresh rate) : 60 Hz TFT LCD panel manufactured by using advanced semiconductor technology with the picture quality, you can be seen. When cleaning the monitor and the panel outside, please apply the recommended small amount of picture. When viewing a fixed screen for this product...
.... For Better Display Adjust computer resolution and screen injection rate (refresh rate) oncomputer as described below with the furnishing, performance, or use the FINE/COARSE adjustment function. Resolution : 1280 x 1024 Vertical frequency (refresh rate) : 60 Hz TFT LCD panel manufactured by using advanced semiconductor technology with the picture quality, you can be seen. When cleaning the monitor and the panel outside, please apply the recommended small amount of picture. When viewing a fixed screen for this product...


