User Manual (ENGLISH)
Page 3
...connection may cause electric shock or fire. To disconnect the apparatus from the mains, the plug must be pulled out from the mains socket, therefore the mains plug shall be caused by the wire nor touch the plug with a dusty plug or connector may damage the monitor. z If the connector or plug of the power cord...(Class l Equipment only.) Insert the power plug firmly so that it with a dry cloth. Do not use the power cord when the connector or plug is dusty, clean it does not come loose. z This may cause fire. Use only a properly grounded plug and receptacle. z An improper ground ...
...connection may cause electric shock or fire. To disconnect the apparatus from the mains, the plug must be pulled out from the mains socket, therefore the mains plug shall be caused by the wire nor touch the plug with a dusty plug or connector may damage the monitor. z If the connector or plug of the power cord...(Class l Equipment only.) Insert the power plug firmly so that it with a dry cloth. Do not use the power cord when the connector or plug is dusty, clean it does not come loose. z This may cause fire. Use only a properly grounded plug and receptacle. z An improper ground ...

User Manual (ENGLISH)
Page 7
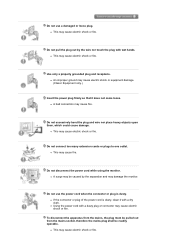
... monitor. unusual sound or smell coming from combustible chemical sprays or inflammable substances. unplug it is damaged, turn the monitor off and unplug the power cord. Do not try to oil, smoke or moisture; Do not move the monitor by pulling only the wire or the signal cable. z If a foreign substance enters the monitor, unplug the power cord and contact the Service Center. Keep...
... monitor. unusual sound or smell coming from combustible chemical sprays or inflammable substances. unplug it is damaged, turn the monitor off and unplug the power cord. Do not try to oil, smoke or moisture; Do not move the monitor by pulling only the wire or the signal cable. z If a foreign substance enters the monitor, unplug the power cord and contact the Service Center. Keep...
User Manual (ENGLISH)
Page 8
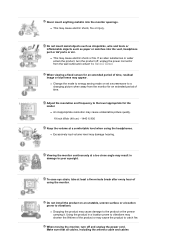
.... 19 inch Wide (48 cm) - 1440 X 900 Keep the volume at a too close angle may shorten the lifetime of time. Make sure that all cables, including the antenna cable and cables z This may damage hearing. Adjust the resolution and frequency to vibrations. z Excessively loud volume level may cause electric shock or fire. When moving the monitor, turn the product off and unplug the power cord. Do not install...
.... 19 inch Wide (48 cm) - 1440 X 900 Keep the volume at a too close angle may shorten the lifetime of time. Make sure that all cables, including the antenna cable and cables z This may damage hearing. Adjust the resolution and frequency to vibrations. z Excessively loud volume level may cause electric shock or fire. When moving the monitor, turn the product off and unplug the power cord. Do not install...
User Manual (ENGLISH)
Page 10
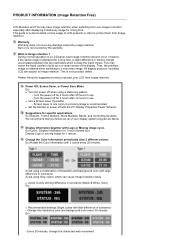
... (Image Retention Free) LCD Monitors and TVs may cause the liquid crystal to build up of your display system program as below to protect your LCD from image retention Power Off, Screen Saver, or Power Save Mode Ex) z Turn the power off for 4 hours after 20 hours in is retained when switching to a new video image. Warranty Warranty does not cover any damage caused by a Display Logo or moving image...
... (Image Retention Free) LCD Monitors and TVs may cause the liquid crystal to build up of your display system program as below to protect your LCD from image retention Power Off, Screen Saver, or Power Save Mode Ex) z Turn the power off for 4 hours after 20 hours in is retained when switching to a new video image. Warranty Warranty does not cover any damage caused by a Display Logo or moving image...
User Manual (ENGLISH)
Page 13
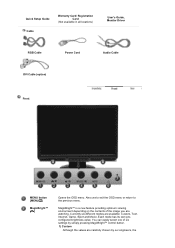
... one of the image you are carefully chosen by our engineers, the Currently six different modes are available: Custom, Text, Internet, Game, Sport and Movie. Each mode has its own preconfigured brightness value. Also use to exit the OSD menu or return to the previous menu. Quick Setup Guide Cable Warranty Card/ Registration Card (Not available in all locations) User's Guide, Monitor Driver RGB Cable Power Cord Audio Cable DVI Cable (option) Front MENU button [MENU/ ] MagicBright™ [] Opens the OSD menu.
... one of the image you are carefully chosen by our engineers, the Currently six different modes are available: Custom, Text, Internet, Game, Sport and Movie. Each mode has its own preconfigured brightness value. Also use to exit the OSD menu or return to the previous menu. Quick Setup Guide Cable Warranty Card/ Registration Card (Not available in all locations) User's Guide, Monitor Driver RGB Cable Power Cord Audio Cable DVI Cable (option) Front MENU button [MENU/ ] MagicBright™ [] Opens the OSD menu.
User Manual (ENGLISH)
Page 14
... of the screen displaying the current mode -- If this button for auto adjustment. >>Click here to see an animation clip Power button [ ] Use this is not needed, or when leaving it unattended for further information regarding power saving functions. You can hear sound by connecting the soundcard of your monitor OFF when it is the case, adjust the brightness and contrast by using the DVI cable. Enter button [ ] /SOURCE button Activates a highlighted menu item. Rear...
... of the screen displaying the current mode -- If this button for auto adjustment. >>Click here to see an animation clip Power button [ ] Use this is not needed, or when leaving it unattended for further information regarding power saving functions. You can hear sound by connecting the soundcard of your monitor OFF when it is the case, adjust the brightness and contrast by using the DVI cable. Enter button [ ] /SOURCE button Activates a highlighted menu item. Rear...
User Manual (ENGLISH)
Page 15
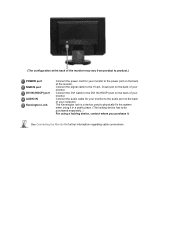
... product.) POWER port RGB IN port DVI IN (HDCP) port AUDIO IN Kensington Lock Connect the power cord for your monitor. Connect the signal cable to the 15-pin, D-sub port on the back of your monitor to be purchased separately. ) For using a locking device, contact where you purchase it. The Kensington lock is a device used to physically fix the system when using it in a public place. (The locking device has to the power port on...
... product.) POWER port RGB IN port DVI IN (HDCP) port AUDIO IN Kensington Lock Connect the power cord for your monitor. Connect the signal cable to the 15-pin, D-sub port on the back of your monitor to be purchased separately. ) For using a locking device, contact where you purchase it. The Kensington lock is a device used to physically fix the system when using it in a public place. (The locking device has to the power port on...
User Manual (ENGLISH)
Page 17
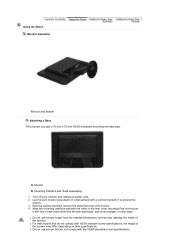
Remove screws and then remove the stand from the LCD monitor. 4. Mounting interface pad (Sold separately) 1. Turn off your monitor and unplug its power cord. 2. Align the mounting interface pad with the holes in the rear cover mounting Pad and secure it with four screws that came with a cushion beneath it to protect the screen. 3. z Do not use screws that do not comply with VESA standard screw specifications, the length of the...
Remove screws and then remove the stand from the LCD monitor. 4. Mounting interface pad (Sold separately) 1. Turn off your monitor and unplug its power cord. 2. Align the mounting interface pad with the holes in the rear cover mounting Pad and secure it with four screws that came with a cushion beneath it to protect the screen. 3. z Do not use screws that do not comply with VESA standard screw specifications, the length of the...
User Manual (ENGLISH)
Page 18
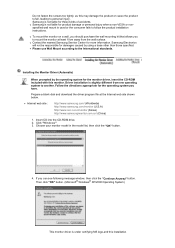
... the screws too tightly, as this installation z Samsung is slightly different from the wall surface. Click "Windows" 3. z Contact the nearest Samsung Service Center for the monitor driver, insert the CD-ROM included with this monitor. z Please use Wall Mount according to mount the monitor at the Internet web site shown below. Installing the Monitor Driver (Automatic) When prompted by using a base other than those specified. Prepare a blank disk and download the driver...
... the screws too tightly, as this installation z Samsung is slightly different from the wall surface. Click "Windows" 3. z Contact the nearest Samsung Service Center for the monitor driver, insert the CD-ROM included with this monitor. z Please use Wall Mount according to mount the monitor at the Internet web site shown below. Installing the Monitor Driver (Automatic) When prompted by using a base other than those specified. Prepare a blank disk and download the driver...
User Manual (ENGLISH)
Page 19
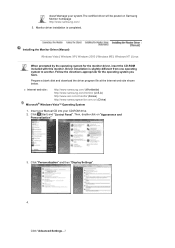
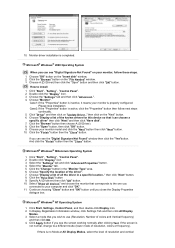
... download the driver program file at the Internet web site shown below. Click (Start) and "Control Panel". z Internet web site : http://www.samsung.com/ (Worldwide) http://www.samsung.com/monitor (U.S.A) http://www.sec.co.kr/monitor (Korea) http://www.samsungmonitor.com.cn/ (China) Microsoft® Windows Vista™ Operating System 1. Click "Personalization" and then "Display Settings". 4. Driver installation is completed. Then, double-click on Samsung Monitor...
... download the driver program file at the Internet web site shown below. Click (Start) and "Control Panel". z Internet web site : http://www.samsung.com/ (Worldwide) http://www.samsung.com/monitor (U.S.A) http://www.sec.co.kr/monitor (Korea) http://www.samsungmonitor.com.cn/ (China) Microsoft® Windows Vista™ Operating System 1. Click "Personalization" and then "Display Settings". 4. Driver installation is completed. Then, double-click on Samsung Monitor...
User Manual (ENGLISH)
Page 20
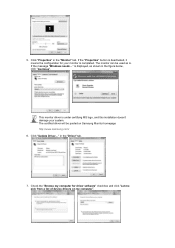
... from a list of device drivers on Samsung Monitor homepage http://www.samsung.com/ 6. in the "Driver" tab. 7. Check the "Browse my computer for your system. If the message "Windows needs..." The certified driver will be used as shown in the "Monitor" tab. If the "Properties" button is displayed, as is completed. Click "Update Driver..." 5. This monitor driver is under certifying MS logo, and this installation doesn't damage your...
... from a list of device drivers on Samsung Monitor homepage http://www.samsung.com/ 6. in the "Driver" tab. 7. Check the "Browse my computer for your system. If the message "Windows needs..." The certified driver will be used as shown in the "Monitor" tab. If the "Properties" button is displayed, as is completed. Click "Update Driver..." 5. This monitor driver is under certifying MS logo, and this installation doesn't damage your...
User Manual (ENGLISH)
Page 22
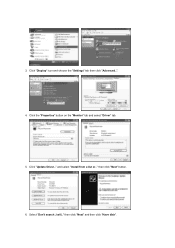
then click "Next" button. 6. Click the "Properties" button on the "Monitor" tab and select "Driver" tab. 5. then click "Next" and then click "Have disk". and select "Install from a list or.." Click "Update Driver.." Click "Display" icon and choose the "Settings" tab then click "Advanced..". 4. Select "Don't search ,I will.." 3.
then click "Next" button. 6. Click the "Properties" button on the "Monitor" tab and select "Driver" tab. 5. then click "Next" and then click "Have disk". and select "Install from a list or.." Click "Update Driver.." Click "Display" icon and choose the "Settings" tab then click "Advanced..". 4. Select "Don't search ,I will.." 3.
User Manual (ENGLISH)
Page 24
..., change to use (Resolution, Number of the driver". 7. Click "Start" , "Setting" , "Control Panel". 2. then click on "Update Driver.." Choose your monitor, follow next steps continually. 5. Double click "Display" icon. 3. Select a mode that you connected to install 1. If the screen is no Mode at All Display Modes, select the level of resolution, colors or frequency). Choose the "Settings" tab and then click "Advanced..". 4. Please stop installation Case2: If the "Properties" button is properly configured. Click the "Open" button, then...
..., change to use (Resolution, Number of the driver". 7. Click "Start" , "Setting" , "Control Panel". 2. then click on "Update Driver.." Choose your monitor, follow next steps continually. 5. Double click "Display" icon. 3. Select a mode that you connected to install 1. If the screen is no Mode at All Display Modes, select the level of resolution, colors or frequency). Choose the "Settings" tab and then click "Advanced..". 4. Please stop installation Case2: If the "Properties" button is properly configured. Click the "Open" button, then...
User Manual (ENGLISH)
Page 25
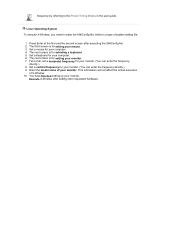
... all, set a horizontal frequency for your monitor. (You can enter the frequency directly.) 9. Enter the model name of X-Window. 10. The third screen is for selecting a keyboard. 5. The next screen is for setting your monitor. 7. This information will not affect the actual execution of your computer. 6. Linux Operating System To execute X-Window, you need to the Preset Timing Modes in the user guide. The next screen is...
... all, set a horizontal frequency for your monitor. (You can enter the frequency directly.) 9. Enter the model name of X-Window. 10. The third screen is for selecting a keyboard. 5. The next screen is for setting your monitor. 7. This information will not affect the actual execution of your computer. 6. Linux Operating System To execute X-Window, you need to the Preset Timing Modes in the user guide. The next screen is...
User Manual (ENGLISH)
Page 36
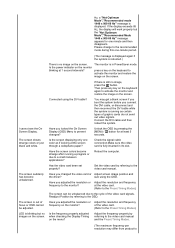
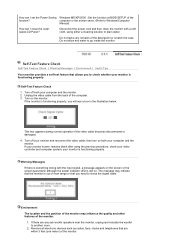
... mode for Windows ME/XP/2000) and then change the frequency of the video card. (Refer to the Preset Timing Modes) Can you see "Not Optimum Mode","Recommended Mode 1440 x 900 60Hz" on the screen? Symptom No images on the screen when the monitor is connected properly, check to see if the monitor status is on, reboot the computer to have the monitor double-check the input signal source. If the display...
... mode for Windows ME/XP/2000) and then change the frequency of the video card. (Refer to the Preset Timing Modes) Can you see "Not Optimum Mode","Recommended Mode 1440 x 900 60Hz" on the screen? Symptom No images on the screen when the monitor is connected properly, check to see if the monitor status is on, reboot the computer to have the monitor double-check the input signal source. If the display...
User Manual (ENGLISH)
Page 37
... ' ' button. Check the signal cable connection.Make sure the video card is in it's slot. press a key on the keyboard to activate the monitor and restore the image on the menu? Reboot the computer. Is the frequency properly adjusted when checking the Display Timing on the screen. The screen shows strange colors or just black and white. Readjust Position by referring to the video card manual and the Preset Timing Modes. (The maximum frequency per resolution may...
... ' ' button. Check the signal cable connection.Make sure the video card is in it's slot. press a key on the keyboard to activate the monitor and restore the image on the menu? Reboot the computer. Is the frequency properly adjusted when checking the Display Timing on the screen. The screen shows strange colors or just black and white. Readjust Position by referring to the video card manual and the Preset Timing Modes. (The maximum frequency per resolution may...
User Manual (ENGLISH)
Page 38
... Mode, remove the Display Adapter at 56 Hz ~ 60 Hz. (Do not exceed 60 Hz when using the maximum resolution.) 5. Problems related to Audio Have the Windows colors been set properly? product.) Windows ME/2000/XP: Set the colors properly at the Control Panel→Display→Settings. * Contact the video card manufacturer for details.) How can be changed after changing the video card. Check if the power cord and the video cables are only 16 colors shown on your sound card...
... Mode, remove the Display Adapter at 56 Hz ~ 60 Hz. (Do not exceed 60 Hz when using the maximum resolution.) 5. Problems related to Audio Have the Windows colors been set properly? product.) Windows ME/2000/XP: Set the colors properly at the Control Panel→Display→Settings. * Contact the video card manufacturer for details.) How can be changed after changing the video card. Check if the power cord and the video cables are only 16 colors shown on your sound card...
User Manual (ENGLISH)
Page 39
.... 2. Disconnect the power cord and then clean the monitor with the input signal, a message appears on the screen or the screen goes blank although the power indicator LED is still on. Self-Test Feature Check 1. Unplug the video cable from the back of the monitor. Remove all electronic devices such as radios, fans, clocks and telephones that allows you to check the signal cable. How can I set the Power Saving Windows ME/XP...
.... 2. Disconnect the power cord and then clean the monitor with the input signal, a message appears on the screen or the screen goes blank although the power indicator LED is still on. Self-Test Feature Check 1. Unplug the video cable from the back of the monitor. Remove all electronic devices such as radios, fans, clocks and telephones that allows you to check the signal cable. How can I set the Power Saving Windows ME/XP...
User Manual (ENGLISH)
Page 42
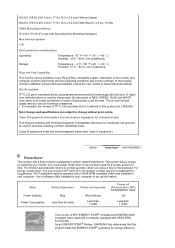
..., monitor installation will provide the best operating conditions and monitor settings. But the pixels of time. Note: Design and specifications are 3,888,000. For energy conservation, turn your monitor into a low-power mode when it has not been used for long periods. Use a software utility installed on any Plug & Play compatible system. Dot Acceptable TFT LCD panel manufactured by switching your monitor OFF when it is used for a certain amount of RED, GREEN, BLUE and WHITE color seem...
..., monitor installation will provide the best operating conditions and monitor settings. But the pixels of time. Note: Design and specifications are 3,888,000. For energy conservation, turn your monitor into a low-power mode when it has not been used for long periods. Use a software utility installed on any Plug & Play compatible system. Dot Acceptable TFT LCD panel manufactured by switching your monitor OFF when it is used for a certain amount of RED, GREEN, BLUE and WHITE color seem...
User Manual (ENGLISH)
Page 47
.... 3. All rights reserved. Samsung Electronics Co., Ltd. This is not from the monitor for an extended period of the U.S. is pressed. If you are registered trademarks of time. You can have an uneven quality of picture. But the pixels of RED, GREEN, BLUE and WHITE color seem to enjoy the best quality of picture in TFT-LCD. { Resolution: 1440 x 900 { Vertical frequency (refresh rate): 60 Hz 2. All other...
.... 3. All rights reserved. Samsung Electronics Co., Ltd. This is not from the monitor for an extended period of the U.S. is pressed. If you are registered trademarks of time. You can have an uneven quality of picture. But the pixels of RED, GREEN, BLUE and WHITE color seem to enjoy the best quality of picture in TFT-LCD. { Resolution: 1440 x 900 { Vertical frequency (refresh rate): 60 Hz 2. All other...


