Service Manual
Page 3
... Output power is unstable ...4-4 4-5 Backlight can't be turned on ...4-5 4-6 Black Screen and backlight turn on ...4-6 4-7 White Screen ...4-7 4-8 Bad Screen ...4-8 5. Exploded View and Parts List ...5-1 6. Alignments and Adjustments ...3-1 3-1 Required Equipment ...3-1 3-2 Automatic Color Adjustment ...3-1 3-3 DDC EDID Data Input ...3-1 3-4 How to execute DDC ...3-2 3-5 How to execute MCU Code ...3-3 4. Block Diagram ...7-1 7-1 Power tree ...7-1 7-2 Mainboard part ...7-2 7-3 IP Board Part(SMPS Part) ...7-2 7-4 IP BOARD part(Inverter Part) ...7-3 8. Product specifications ...2-1 2-1 Fashion...
... Output power is unstable ...4-4 4-5 Backlight can't be turned on ...4-5 4-6 Black Screen and backlight turn on ...4-6 4-7 White Screen ...4-7 4-8 Bad Screen ...4-8 5. Exploded View and Parts List ...5-1 6. Alignments and Adjustments ...3-1 3-1 Required Equipment ...3-1 3-2 Automatic Color Adjustment ...3-1 3-3 DDC EDID Data Input ...3-1 3-4 How to execute DDC ...3-2 3-5 How to execute MCU Code ...3-3 4. Block Diagram ...7-1 7-1 Power tree ...7-1 7-2 Mainboard part ...7-2 7-3 IP Board Part(SMPS Part) ...7-2 7-4 IP BOARD part(Inverter Part) ...7-3 8. Product specifications ...2-1 2-1 Fashion...
Service Manual
Page 6
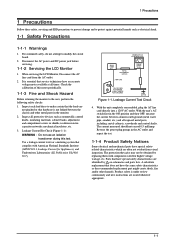
... replacement that hardware is not lodged between a known earth ground (metal water pipe, conduit, etc.) and all times. Check the calibration of this test. With the unit completely reassembled, plug the AC line cord directly into a 120V AC outlet. Disconnect the AC power and DC power jack before servicing. 1-1-2 Servicing the LCD Monitor 1. Leakage Current Test Circuit 4. With the unit's AC switch...
... replacement that hardware is not lodged between a known earth ground (metal water pipe, conduit, etc.) and all times. Check the calibration of this test. With the unit completely reassembled, plug the AC line cord directly into a 120V AC outlet. Disconnect the AC power and DC power jack before servicing. 1-1-2 Servicing the LCD Monitor 1. Leakage Current Test Circuit 4. With the unit's AC switch...
Service Manual
Page 7
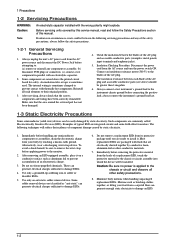
... components. Before servicing units covered by static electricity. 1. These can generate electrical charges sufficient to solder or desolder ESDs. 5. Do not remove a replacement ESD from the AC power source and disconnect the DC Power Jack before removing the protective material from the AC source and turn the power switch ON. Examples of the AC plug and accessible conductive parts (examples: metal panels, input terminals and earphone...
... components. Before servicing units covered by static electricity. 1. These can generate electrical charges sufficient to solder or desolder ESDs. 5. Do not remove a replacement ESD from the AC power source and disconnect the DC Power Jack before removing the protective material from the AC source and turn the power switch ON. Examples of the AC plug and accessible conductive parts (examples: metal panels, input terminals and earphone...
Service Manual
Page 10
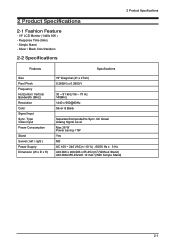
...Stand - Type Video Input Power Consumption Stand Swivel ( left / right ) Power Supply Dimension (W x D x H) 19" Diagonal (41 x 27cm) 0.285(H) x 0.285(V) Specifications 30 ~ 81 kHz/ 56 ~ 75 Hz 140MHz 1440 x 900@60Hz Sliver & Black Separate/Composite/No Sync. Silver / Black ColorVariation 2-2 Specifications Features Size Pixel Pinch Frequency Horizontal / Vertical Bandwidth (MHz) Resolution Color Signal Input Sync. 2 Product Specifications 2 Product Specifications 2-1 Fashion Feature - 19" LCD Monitor (1440x 900 ) - Response Time (5ms) - On Green Analog Signal Level Max 36 W Power saving...
...Stand - Type Video Input Power Consumption Stand Swivel ( left / right ) Power Supply Dimension (W x D x H) 19" Diagonal (41 x 27cm) 0.285(H) x 0.285(V) Specifications 30 ~ 81 kHz/ 56 ~ 75 Hz 140MHz 1440 x 900@60Hz Sliver & Black Separate/Composite/No Sync. Silver / Black ColorVariation 2-2 Specifications Features Size Pixel Pinch Frequency Horizontal / Vertical Bandwidth (MHz) Resolution Color Signal Input Sync. 2 Product Specifications 2 Product Specifications 2-1 Fashion Feature - 19" LCD Monitor (1440x 900 ) - Response Time (5ms) - On Green Analog Signal Level Max 36 W Power saving...
Service Manual
Page 13
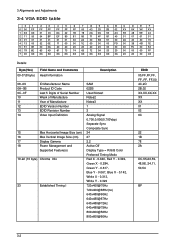
... EDID Version Number EDID Revision Number Video Input Definition 15 Max Horizontal Image Size (cm) 16 Max Vertical Image Size (cm) 17 Display Gamma 18 Power Management and Supported Feature(s) 19-22 (10 byte) Chroma Info 23 Established Timing I SAM 022B Used Notes1 Notes2 Notes3 1 3 Analog Signal 0.700,0.000(0.700Vpp) Separate Sync Composite Sync 34 27 2.2 Active Off Display Type = R/G/B Color Preferred Timing Mode Red X - 0.640, Red Y - 0.349, Green X - 0.284, Green Y - 0.617, Blue Y - 0.067, Blue X - 0.142, White X - 0.313, White Y - 0.329...
... EDID Version Number EDID Revision Number Video Input Definition 15 Max Horizontal Image Size (cm) 16 Max Vertical Image Size (cm) 17 Display Gamma 18 Power Management and Supported Feature(s) 19-22 (10 byte) Chroma Info 23 Established Timing I SAM 022B Used Notes1 Notes2 Notes3 1 3 Analog Signal 0.700,0.000(0.700Vpp) Separate Sync Composite Sync 34 27 2.2 Active Off Display Type = R/G/B Color Preferred Timing Mode Red X - 0.640, Red Y - 0.349, Green X - 0.284, Green Y - 0.617, Blue Y - 0.067, Blue X - 0.142, White X - 0.313, White Y - 0.329...
Service Manual
Page 18
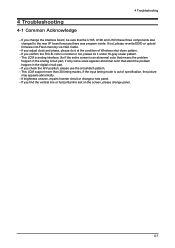
... vertical line or horizontal line lost on the screen, please change panel. 4-1 So if the entire screen is analog interface. If you confirm the R.G.B. If not, please re-write EDID or upload firmware into Flash memory via VGA Cable. - color is out of Windows shut down pattern. - 4 Troubleshooting 4 Troubleshooting 4-1 Common Acknowledge - This LCM is an abnormal color that means the problem happen in the digital circuit part. - If you adjust...
... vertical line or horizontal line lost on the screen, please change panel. 4-1 So if the entire screen is analog interface. If you confirm the R.G.B. If not, please re-write EDID or upload firmware into Flash memory via VGA Cable. - color is out of Windows shut down pattern. - 4 Troubleshooting 4 Troubleshooting 4-1 Common Acknowledge - This LCM is an abnormal color that means the problem happen in the digital circuit part. - If you adjust...
Service Manual
Page 46
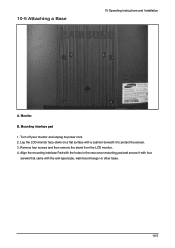
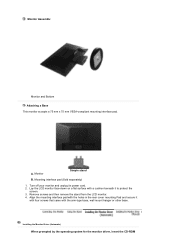
Lay the LCD monitor face-down on a flat surface with a cushion beneath it with four screws that came with the holes in the rear cover mounting pad and secure it to protect the screen. 3. Remove four screws and then remove the stand from the LCD monitor. 4. Align the mounting interface Pad with the arm-type base, wall mount hanger or other base. 10-5 10-5 Attaching a Base 10 Operating Instructions and Installation A. Monitor B. Turn off your monitor and unplug its power cord. 2. Mounting interface pad 1.
Lay the LCD monitor face-down on a flat surface with a cushion beneath it with four screws that came with the holes in the rear cover mounting pad and secure it to protect the screen. 3. Remove four screws and then remove the stand from the LCD monitor. 4. Align the mounting interface Pad with the arm-type base, wall mount hanger or other base. 10-5 10-5 Attaching a Base 10 Operating Instructions and Installation A. Monitor B. Turn off your monitor and unplug its power cord. 2. Mounting interface pad 1.
Service Manual
Page 58
... number of transmission method for the user. Unit: mm -Vertical Frequency The screen must be used to adjust visibility by controlling phase difference. -COARSE This adjustment adjusts the display by pushing one line connecting the right edge to the left edge of the screen horizontally is an algorithm to adjust monitor to DC(+12V or 14V) -SMPS(Switching Mode Power Supply) Switching Mode Power supply. This technology is regarded as Product data, Product name, Display mode, Serial number, Signal source...
... number of transmission method for the user. Unit: mm -Vertical Frequency The screen must be used to adjust visibility by controlling phase difference. -COARSE This adjustment adjusts the display by pushing one line connecting the right edge to the left edge of the screen horizontally is an algorithm to adjust monitor to DC(+12V or 14V) -SMPS(Switching Mode Power Supply) Switching Mode Power supply. This technology is regarded as Product data, Product name, Display mode, Serial number, Signal source...
User Guide
Page 8
... disconnect cables may appear. When not using the monitor. Adjust the resolution and frequency to vibrations. To ease eye strain, take at a too close angle may cause undesirable picture quality. 19 inch Wide (48 cm) - 1440 X 900 Viewing the monitor continuously at least a five-minute break after every hour of using the product for an extended period of time, keep the product unplugged. When viewing a fixed screen...
... disconnect cables may appear. When not using the monitor. Adjust the resolution and frequency to vibrations. To ease eye strain, take at a too close angle may cause undesirable picture quality. 19 inch Wide (48 cm) - 1440 X 900 Viewing the monitor continuously at least a five-minute break after every hour of using the product for an extended period of time, keep the product unplugged. When viewing a fixed screen...
User Guide
Page 11
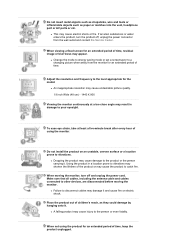
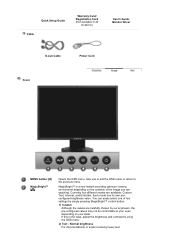
... Entertain. Each mode has its own preconfigured brightness value. MagicBright™ is the case, adjust the brightness and contrast by our engineers, the pre-configured values may not be comfortable to the previous menu. You can easily select one of the image you are watching. Quick Setup Guide Cable Warranty Card/ Registration Card (Not available in all locations) User's Guide, Monitor Driver D-sub Cable Power Cord Front MENU button [ ] MagicBright™ [] Opens the OSD menu.
... Entertain. Each mode has its own preconfigured brightness value. MagicBright™ is the case, adjust the brightness and contrast by our engineers, the pre-configured values may not be comfortable to the previous menu. You can easily select one of the image you are watching. Quick Setup Guide Cable Warranty Card/ Registration Card (Not available in all locations) User's Guide, Monitor Driver D-sub Cable Power Cord Front MENU button [ ] MagicBright™ [] Opens the OSD menu.
User Guide
Page 12
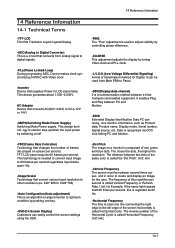
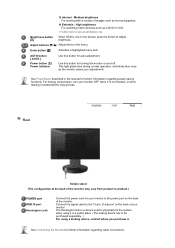
Use this button for further information regarding power saving functions. See PowerSaver described in the manual for turning the monitor on and off. For energy conservation, turn your monitor OFF when it is not needed, or when leaving it unattended for your monitor to product.) POWER port RGB IN port Kensington Lock Connect the power cord for long periods. Connect the signal cable to adjust brightness. Rear Simple stand (The configuration at the back of the...
Use this button for further information regarding power saving functions. See PowerSaver described in the manual for turning the monitor on and off. For energy conservation, turn your monitor OFF when it is not needed, or when leaving it unattended for your monitor to product.) POWER port RGB IN port Kensington Lock Connect the power cord for long periods. Connect the signal cable to adjust brightness. Rear Simple stand (The configuration at the back of the...
User Guide
Page 14
... its power cord. 2. Remove screws and then remove the stand from the LCD monitor. 4. Lay the LCD monitor face-down on a flat surface with the arm-type base, wall mount hanger or other base. Mounting interface pad (Sold separately) 1. Align the mounting interface pad with the holes in the rear cover mounting Pad and secure it with four screws that came with a cushion beneath it to protect the screen. 3. Installing the Monitor Driver (Automatic...
... its power cord. 2. Remove screws and then remove the stand from the LCD monitor. 4. Lay the LCD monitor face-down on a flat surface with the arm-type base, wall mount hanger or other base. Mounting interface pad (Sold separately) 1. Align the mounting interface pad with the holes in the rear cover mounting Pad and secure it with four screws that came with a cushion beneath it to protect the screen. 3. Installing the Monitor Driver (Automatic...
User Guide
Page 15
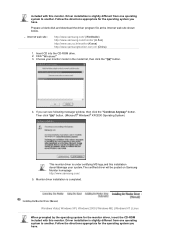
...://www.samsung.com/monitor (U.S.A) http://www.sec.co.kr/monitor (Korea) http://www.samsungmonitor.com.cn/ (China) 1. Prepare a blank disk and download the driver program file at the Internet web site shown below. Monitor driver installation is under certifying MS logo,and this installation doesn'tdamage your monitor model in the model list, then click the "OK" button. 4. included with this monitor. Click "Windows" 3. Then...
...://www.samsung.com/monitor (U.S.A) http://www.sec.co.kr/monitor (Korea) http://www.samsungmonitor.com.cn/ (China) 1. Prepare a blank disk and download the driver program file at the Internet web site shown below. Monitor driver installation is under certifying MS logo,and this installation doesn'tdamage your monitor model in the model list, then click the "OK" button. 4. included with this monitor. Click "Windows" 3. Then...
User Guide
Page 17
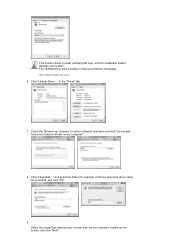
... system. Check the "Browse my computer for example, D:\Drive) where the driver setup file is under certifying MS logo, and this installation doesn't damage your monitor from a list of monitor models on the screen, and click "Next". in the "Driver" tab. 7. and select the folder (for driver software" checkbox and click "Let me pick from the list of device drivers on Samsung Monitor homepage...
... system. Check the "Browse my computer for example, D:\Drive) where the driver setup file is under certifying MS logo, and this installation doesn't damage your monitor from a list of monitor models on the screen, and click "Next". in the "Driver" tab. 7. and select the folder (for driver software" checkbox and click "Let me pick from the list of device drivers on Samsung Monitor homepage...
User Guide
Page 21
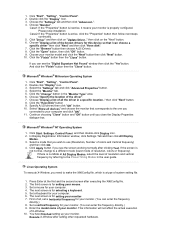
... monitor that I can enter the frequency directly.) 9. Continue choosing "Close" button and "OK" button until you see the "Digital Signature Not Found" window then click the "Yes"button. First of resolution, colors or frequency). Specify A:\(D:\driver) then click "OK" button. 10. The third screen is not normal, change to the Preset Timing Modes in the user guide. Click "Start" , "Setting" , "Control Panel". 2. If the screen is for selecting a keyboard. 5. then click on "Update Driver...
... monitor that I can enter the frequency directly.) 9. Continue choosing "Close" button and "OK" button until you see the "Digital Signature Not Found" window then click the "Yes"button. First of resolution, colors or frequency). Specify A:\(D:\driver) then click "OK" button. 10. The third screen is not normal, change to the Preset Timing Modes in the user guide. Click "Start" , "Setting" , "Control Panel". 2. If the screen is for selecting a keyboard. 5. then click on "Update Driver...
User Guide
Page 33
... video card been set at the Control Panel → Display → Settings. Check if the power cord and the video cables are only 16 colors shown on the screen. Unlock the OSD by pressing the [MENU / ] button for the main board of focus or OSD cannot be supported. of the video card signals. LED is fully inserted in Safe Mode, remove the Display Adapter at least 5 seconds. Check the following items if there is a message that reads "Unrecognized monitor, Plug & Play (VESA DDC) monitor...
... video card been set at the Control Panel → Display → Settings. Check if the power cord and the video cables are only 16 colors shown on the screen. Unlock the OSD by pressing the [MENU / ] button for the main board of focus or OSD cannot be supported. of the video card signals. LED is fully inserted in Safe Mode, remove the Display Adapter at least 5 seconds. Check the following items if there is a message that reads "Unrecognized monitor, Plug & Play (VESA DDC) monitor...
User Guide
Page 34
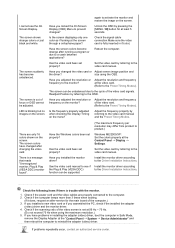
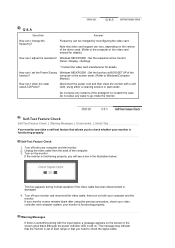
... the power cord and then clean the monitor with the input signal, a message appears on the screen or the screen goes blank although the power indicator LED is still on both your computer and the monitor. Self-Test Feature Check 1. then turn on . Do not allow any remains of the computer. 3. Q & A Question Answer How can I adjust the resolution? Windows ME/XP/2000 : Set the resolution at BIOS-SETUP of the driver used...
... the power cord and then clean the monitor with the input signal, a message appears on the screen or the screen goes blank although the power indicator LED is still on both your computer and the monitor. Self-Test Feature Check 1. then turn on . Do not allow any remains of the computer. 3. Q & A Question Answer How can I adjust the resolution? Windows ME/XP/2000 : Set the resolution at BIOS-SETUP of the driver used...
User Guide
Page 37
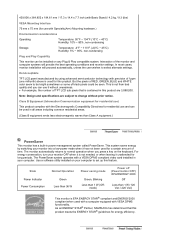
z For example, the number of TFT LCD sub pixels that this product meets the ENERGY STAR® guidelines for a certain amount of black pixels could be installed on any Plug & Play compatible system. For energy conservation, turn your computer to change without uneasiness. But the pixels of RED, GREEN, BLUE and WHITE color seem to be bright sometimes or some of time. This is EPA ENERGY STAR® compliant...
z For example, the number of TFT LCD sub pixels that this product meets the ENERGY STAR® guidelines for a certain amount of black pixels could be installed on any Plug & Play compatible system. For energy conservation, turn your computer to change without uneasiness. But the pixels of RED, GREEN, BLUE and WHITE color seem to be bright sometimes or some of time. This is EPA ENERGY STAR® compliant...

User Guide
Page 42
.../COARSE adjustment function. 5. Change the mode to energy save or set a screensaver to move the picture when you clean the monitor and the panel outside, please apply the recommended small amount of cleaner by using soft and dry cloth and polish it without uneasiness. { For example, the number of Video Electronics Standard Association; is contained in TFT-LCD. { Resolution: 1440 X 900 { Vertical frequency (refresh rate): 60 Hz 2. Microsoft, Windows and Windows...
.../COARSE adjustment function. 5. Change the mode to energy save or set a screensaver to move the picture when you clean the monitor and the panel outside, please apply the recommended small amount of cleaner by using soft and dry cloth and polish it without uneasiness. { For example, the number of Video Electronics Standard Association; is contained in TFT-LCD. { Resolution: 1440 X 900 { Vertical frequency (refresh rate): 60 Hz 2. Microsoft, Windows and Windows...
User Guide
Page 44
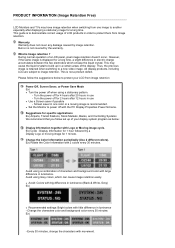
... switching from image retention Power Off, Screen Saver, or Power Save Mode Ex) z Turn the power off when using a stationary pattern. - Screen saver in electric charge accumulates between the two electrodes which can cause Image retention easily. Avoid using Grey colors, which encase the liquid crystal. This is not covered by image retention. Please follow set up in luminance (Black & White, Grey) Ex) z Recommended settings: Bright colors with Logo or Moving image cycle. Change...
... switching from image retention Power Off, Screen Saver, or Power Save Mode Ex) z Turn the power off when using a stationary pattern. - Screen saver in electric charge accumulates between the two electrodes which can cause Image retention easily. Avoid using Grey colors, which encase the liquid crystal. This is not covered by image retention. Please follow set up in luminance (Black & White, Grey) Ex) z Recommended settings: Bright colors with Logo or Moving image cycle. Change...


