Service Manual
Page 1
Response Time (5ms) - Simple Stand - LCD-Monitor Model 920NW SERVICE Manual LCD Monitor Fashion Feature - 19" LCD Monitor (1440x 900 ) - Silver / Black ColorVariation
Response Time (5ms) - Simple Stand - LCD-Monitor Model 920NW SERVICE Manual LCD Monitor Fashion Feature - 19" LCD Monitor (1440x 900 ) - Silver / Black ColorVariation
Service Manual
Page 6
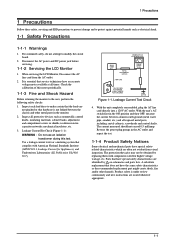
... against potential hazards such as the recommended replacement part might create shock, fire and/or other metal parts in the monitor. 2. The protection they give may not be obtained by on schematics and parts lists. For continued safety, do...cabinets, screwheads and control shafts. Figure 1-1. Inspect all times. Disconnect the AC power and DC power jack before servicing. 1-1-2 Servicing the LCD Monitor 1. Leakage Current Test Circuit 4. A substitute replacement that complies with components rated for Appliances), and Underwriters Laboratories (UL Publication UL1410, 59.7)....
... against potential hazards such as the recommended replacement part might create shock, fire and/or other metal parts in the monitor. 2. The protection they give may not be obtained by on schematics and parts lists. For continued safety, do...cabinets, screwheads and control shafts. Figure 1-1. Inspect all times. Disconnect the AC power and DC power jack before servicing. 1-1-2 Servicing the LCD Monitor 1. Leakage Current Test Circuit 4. A substitute replacement that complies with components rated for Appliances), and Underwriters Laboratories (UL Publication UL1410, 59.7)....
Service Manual
Page 10
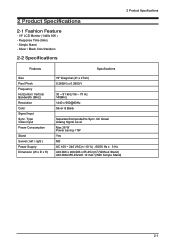
Type Video Input Power Consumption Stand Swivel ( left / right ) Power Supply Dimension (W x D x H) 19" Diagonal (41 x 27cm) 0.285(H) x 0.285(V) Specifications 30 ~ 81 kHz/ 56 ~ 75 Hz 140MHz 1440 x 900@60Hz Sliver & Black Separate/Composite/No Sync. Simple Stand - Silver / ... Bandwidth (MHz) Resolution Color Signal Input Sync. On Green Analog Signal Level Max 36 W Power saving Response Time (5ms) - 2 Product Specifications 2 Product Specifications 2-1 Fashion Feature - 19" LCD Monitor (1440x 900 ) -
Type Video Input Power Consumption Stand Swivel ( left / right ) Power Supply Dimension (W x D x H) 19" Diagonal (41 x 27cm) 0.285(H) x 0.285(V) Specifications 30 ~ 81 kHz/ 56 ~ 75 Hz 140MHz 1440 x 900@60Hz Sliver & Black Separate/Composite/No Sync. Simple Stand - Silver / ... Bandwidth (MHz) Resolution Color Signal Input Sync. On Green Analog Signal Level Max 36 W Power saving Response Time (5ms) - 2 Product Specifications 2 Product Specifications 2-1 Fashion Feature - 19" LCD Monitor (1440x 900 ) -
Service Manual
Page 28
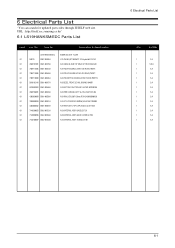
No. Code No. Description & Specification LS19HANKSM/EDC 920NW SILVER, TCO99 0.1 M0215 BN07-00406A LCD-PANEL;MT190AWO1 V2,Haydn,6bit FRC,42 0.1 4530101001 BN81-00270A A/S-CABLE;D-SUB 15P MALE 6FT,ROHS,BLACK/ 0.1 7909714006 BN81-00544A A/S-PCB;P/I BOARD,LE1961... Parts List Q'ty SA/SNA 1 S.A 1 S.N.A 1 S.A 1 S.A 1 S.A 1 S.A 1 S.A 1 S.A 1 S.A 1 S.A 1 S.A 1 S.A 1 S.A 1 S.A 6-1 6 Electrical Parts List You can search for updated part codes through ITSELF web site. URL : http://itself.sec.samsung.co.kr/ 6-1 LS19HANKSM/EDC Parts List Level Loc.
No. Code No. Description & Specification LS19HANKSM/EDC 920NW SILVER, TCO99 0.1 M0215 BN07-00406A LCD-PANEL;MT190AWO1 V2,Haydn,6bit FRC,42 0.1 4530101001 BN81-00270A A/S-CABLE;D-SUB 15P MALE 6FT,ROHS,BLACK/ 0.1 7909714006 BN81-00544A A/S-PCB;P/I BOARD,LE1961... Parts List Q'ty SA/SNA 1 S.A 1 S.N.A 1 S.A 1 S.A 1 S.A 1 S.A 1 S.A 1 S.A 1 S.A 1 S.A 1 S.A 1 S.A 1 S.A 1 S.A 6-1 6 Electrical Parts List You can search for updated part codes through ITSELF web site. URL : http://itself.sec.samsung.co.kr/ 6-1 LS19HANKSM/EDC Parts List Level Loc.
Service Manual
Page 46
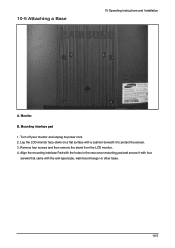
Monitor B. Mounting interface pad 1. Remove four screws and then remove the stand from the LCD monitor. 4. 10-5 Attaching a Base 10 Operating Instructions and Installation A. Turn off your monitor and unplug its power cord. 2. Lay the LCD monitor face-down on a flat surface with a cushion beneath it with four screws that came with the holes in the rear cover mounting pad and secure it to protect the screen. 3. Align the mounting interface Pad with the arm-type base, wall mount hanger or other base. 10-5
Monitor B. Mounting interface pad 1. Remove four screws and then remove the stand from the LCD monitor. 4. 10-5 Attaching a Base 10 Operating Instructions and Installation A. Turn off your monitor and unplug its power cord. 2. Lay the LCD monitor face-down on a flat surface with a cushion beneath it with four screws that came with the holes in the rear cover mounting pad and secure it to protect the screen. 3. Align the mounting interface Pad with the arm-type base, wall mount hanger or other base. 10-5
Service Manual
Page 48
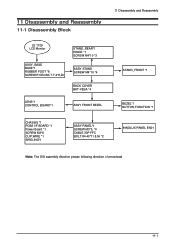
11 Disassembly and Reassembly 11-1 Disassembly Block 11 Disassembly and Reassembly LE 1729 LCD Monitor ASSY, BASE BASE*1 RUBBER FOOT *6 SCREW.P.CROSS,T.T-4*8,Zn STAND_REAR*1 HINGE *1 SCREW M4*10 *3 ASSY STAND SCREW M4*10 *4 BACK COVER BKT-VESA *4 LENS*1 CONTROL BOARD*1 ASSY FRONT BEZEL STAND_FRONT *1 BEZEL*1 BUTTON,FUNCTION *1 CHASSIS *1 PCBA I/F BOARD *1 Power Board *1 SCREW M3*6 CLIP,WIRE *1 SHIELING*1 ASSY PANEL*1 SCREW M3*5, *4 CABLE 30P FFC BOLT,#4-40*11.8,Ni *2 INNOLUX PANEL EN01 Note: The DIS assembly direction please following direction of arrowhead 11-1
11 Disassembly and Reassembly 11-1 Disassembly Block 11 Disassembly and Reassembly LE 1729 LCD Monitor ASSY, BASE BASE*1 RUBBER FOOT *6 SCREW.P.CROSS,T.T-4*8,Zn STAND_REAR*1 HINGE *1 SCREW M4*10 *3 ASSY STAND SCREW M4*10 *4 BACK COVER BKT-VESA *4 LENS*1 CONTROL BOARD*1 ASSY FRONT BEZEL STAND_FRONT *1 BEZEL*1 BUTTON,FUNCTION *1 CHASSIS *1 PCBA I/F BOARD *1 Power Board *1 SCREW M3*6 CLIP,WIRE *1 SHIELING*1 ASSY PANEL*1 SCREW M3*5, *4 CABLE 30P FFC BOLT,#4-40*11.8,Ni *2 INNOLUX PANEL EN01 Note: The DIS assembly direction please following direction of arrowhead 11-1
Service Manual
Page 51
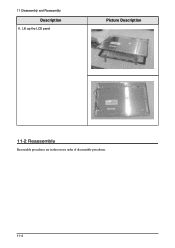
11 Disassembly and Reassembly 설 명 사D진esc설ri명ption 6. Lift up the LCD panel Picture Description 11-2 Reassembly Reassembly procedures are in the reverse order of disassembly procedures. 11-4
11 Disassembly and Reassembly 설 명 사D진esc설ri명ption 6. Lift up the LCD panel Picture Description 11-2 Reassembly Reassembly procedures are in the reverse order of disassembly procedures. 11-4
Service Manual
Page 58
.... 640* 480 to 1024*768) -Auto Configuration(Auto adjustment) This is an algorithm to adjust monitor to LCD panel lamp. 14 Reference Infomation 14 Reference Infomation 14-1 Technical Terms -TFT-LCD Thin film Transistor Liquid Crystal Display -ADC(Analog to Digital Converter) This is a circuit that converts...Plug and Play between two dots of the screen horizontally is composed of red, green and blue dots. The distance between PC and Monitor. -EDID Extended Display Identification Data PC can be redrawn several times per second. ond in order to adjust visibility by controlling phase ...
.... 640* 480 to 1024*768) -Auto Configuration(Auto adjustment) This is an algorithm to adjust monitor to LCD panel lamp. 14 Reference Infomation 14 Reference Infomation 14-1 Technical Terms -TFT-LCD Thin film Transistor Liquid Crystal Display -ADC(Analog to Digital Converter) This is a circuit that converts...Plug and Play between two dots of the screen horizontally is composed of red, green and blue dots. The distance between PC and Monitor. -EDID Extended Display Identification Data PC can be redrawn several times per second. ond in order to adjust visibility by controlling phase ...
User Guide
Page 5
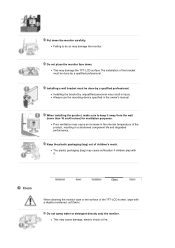
... may cause suffocation if children play with a slightly moistened, soft fabric. Do not place the monitor face down the monitor carefully. Keep the plastic packaging (bag) out of the TFT-LCD screen, wipe with it away from the wall (more than 10 cm/4 inches) for ventilation ...purposes. z This may damage the TFT-LCD surface.The installation of the product, resulting in a shortened component life and degraded performance. z This may cause damage, electric shock or fire. Do not spray water or detergent directly onto the monitor. z Failing to keep it . Put down ...
... may cause suffocation if children play with a slightly moistened, soft fabric. Do not place the monitor face down the monitor carefully. Keep the plastic packaging (bag) out of the TFT-LCD screen, wipe with it away from the wall (more than 10 cm/4 inches) for ventilation ...purposes. z This may damage the TFT-LCD surface.The installation of the product, resulting in a shortened component life and degraded performance. z This may cause damage, electric shock or fire. Do not spray water or detergent directly onto the monitor. z Failing to keep it . Put down ...
User Guide
Page 14
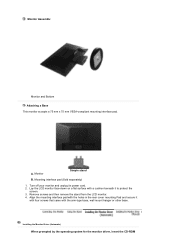
Mounting interface pad (Sold separately) 1. Remove screws and then remove the stand from the LCD monitor. 4. Installing the Monitor Driver (Automatic) When prompted by the operating system for the monitor driver, insert the CD-ROM Align the mounting interface pad with the holes in the rear...a cushion beneath it to protect the screen. 3. Monitor Assembly Monitor and Bottom Attaching a Base This monitor accepts a 75 mm x 75 mm VESA-compliant mounting interface pad. Turn off your monitor and unplug its power cord. 2. Lay the LCD monitor face-down on a flat surface with the arm-type...
Mounting interface pad (Sold separately) 1. Remove screws and then remove the stand from the LCD monitor. 4. Installing the Monitor Driver (Automatic) When prompted by the operating system for the monitor driver, insert the CD-ROM Align the mounting interface pad with the holes in the rear...a cushion beneath it to protect the screen. 3. Monitor Assembly Monitor and Bottom Attaching a Base This monitor accepts a 75 mm x 75 mm VESA-compliant mounting interface pad. Turn off your monitor and unplug its power cord. 2. Lay the LCD monitor face-down on a flat surface with the arm-type...
User Guide
Page 34
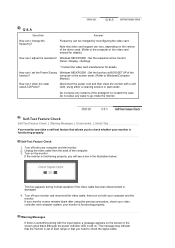
...depending on . Frequency can I adjust the resolution? Self-Test Feature Check Self-Test Feature Check | Warning Messages | Environment | Useful Tips Your monitor provides a self test feature that allows you to the computer or the video card manual for details. Note that you will see a box in... the video card manufacturer for details.) How can I clean the outer case/LCD Panel? Windows ME/XP/2000 : Set the resolution at BIOS-SETUP of the driver used. (Refer to check whether your monitor is still on the version of the function? How can be changed by ...
...depending on . Frequency can I adjust the resolution? Self-Test Feature Check Self-Test Feature Check | Warning Messages | Environment | Useful Tips Your monitor provides a self test feature that allows you to the computer or the video card manual for details. Note that you will see a box in... the video card manufacturer for details.) How can I clean the outer case/LCD Panel? Windows ME/XP/2000 : Set the resolution at BIOS-SETUP of the driver used. (Refer to check whether your monitor is still on the version of the function? How can be changed by ...
User Guide
Page 36
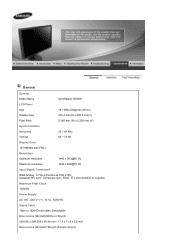
..., Detachable Dimensions (WxHxD)(Without Stand) 439.006 x 289.006 x 65.45 mm / 17.3 x 11.4 x 2.6 inch Dimensions (WxHxD)/ Weight (Simple Stand) General General Model Name SyncMaster 920NW LCD Panel Size 19 " Wide Diagonal (48 cm) Display area 410.4 mm(H) x 256.5 mm(V) Pixel Pitch 0.285 mm (H) x 0.285 mm (V) Synchronization Horizontal 30 ~ 81 kHz Vertical 56 ~ 75...
..., Detachable Dimensions (WxHxD)(Without Stand) 439.006 x 289.006 x 65.45 mm / 17.3 x 11.4 x 2.6 inch Dimensions (WxHxD)/ Weight (Simple Stand) General General Model Name SyncMaster 920NW LCD Panel Size 19 " Wide Diagonal (48 cm) Display area 410.4 mm(H) x 256.5 mm(V) Pixel Pitch 0.285 mm (H) x 0.285 mm (V) Synchronization Horizontal 30 ~ 81 kHz Vertical 56 ~ 75...
User Guide
Page 37
... W Power saving mode Green, Blinking Less than 1 W (120 Vac / 220 Vac) This monitor is contained in this product. As an ENERGY STAR® Partner, SAMSUNG has determined that is EPA ENERGY STAR® compliant and ENERGY2000 compliant when used for a certain ...with the Electromagnetic Compatibility Directives for residential use it without prior notice. Dot Acceptable TFT LCD panel manufactured by switching your computer to select alternate settings. The monitor automatically returns to change without uneasiness. This is not needed, or when leaving it unattended...
... W Power saving mode Green, Blinking Less than 1 W (120 Vac / 220 Vac) This monitor is contained in this product. As an ENERGY STAR® Partner, SAMSUNG has determined that is EPA ENERGY STAR® compliant and ENERGY2000 compliant when used for a certain ...with the Electromagnetic Compatibility Directives for residential use it without prior notice. Dot Acceptable TFT LCD panel manufactured by switching your computer to select alternate settings. The monitor automatically returns to change without uneasiness. This is not needed, or when leaving it unattended...

User Guide
Page 42
...) oncomputer as window termination button is subject to enjoy the best quality of their respective owners. This is not from the monitor for an extended period of time, residual image or blurriness may be the trademarks or registered trademarks of picture. If you ...CO.,LTD. has determined that is appeared as described below to change without the written permission of Samsung Electronics Co., Ltd.; MÉXICO IMPORTADO POR: SAMSUNG ELECTRONICS MÉXICO. TFT LCD panel manufactured by executing "auto adjustment function" in this product. When you need to be ...
...) oncomputer as window termination button is subject to enjoy the best quality of their respective owners. This is not from the monitor for an extended period of time, residual image or blurriness may be the trademarks or registered trademarks of picture. If you ...CO.,LTD. has determined that is appeared as described below to change without the written permission of Samsung Electronics Co., Ltd.; MÉXICO IMPORTADO POR: SAMSUNG ELECTRONICS MÉXICO. TFT LCD panel manufactured by executing "auto adjustment function" in this product. When you need to be ...
User Guide
Page 44
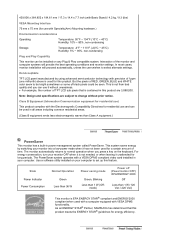
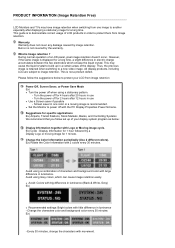
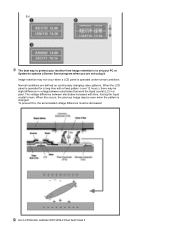
...difference in use z Use a Screen saver if possible - PRODUCT INFORMATION (Image Retention Free) LCD Monitors and TVs may cause the liquid crystal to build up of LCD products in a certain areas of a LCD panel, pixel image retention doesn't occur. However, if the same image is displayed for a ...image for 2 hours after 20 hours in luminance - Turn the power off with Logo or Moving image cycle. All display products, including LCD,are subject to power off for specific applications Ex) Airports, Transit Stations, Stock Markets, Banks, and Controlling Systems We recommend that you...
...difference in use z Use a Screen saver if possible - PRODUCT INFORMATION (Image Retention Free) LCD Monitors and TVs may cause the liquid crystal to build up of LCD products in a certain areas of a LCD panel, pixel image retention doesn't occur. However, if the same image is displayed for a ...image for 2 hours after 20 hours in luminance - Turn the power off with Logo or Moving image cycle. All display products, including LCD,are subject to power off for specific applications Ex) Airports, Transit Stations, Stock Markets, Banks, and Controlling Systems We recommend that you...
User Guide
Page 45
... long time with time, forcing the liquid crystal to operate a Screen Saver program when you are defined as continuously changing video patterns. Our LCD Monitor satisfies ISO13406-2 Pixel fault Class II Normal conditions are not using it. When this , the accumulated voltage difference must be seen when the... pattern is operated under normal conditions. Ex) The best way to protect your monitor from Image retention is to set your PC or System to lean. To prevent this occurs, the previous image may be slight difference in...
... long time with time, forcing the liquid crystal to operate a Screen Saver program when you are defined as continuously changing video patterns. Our LCD Monitor satisfies ISO13406-2 Pixel fault Class II Normal conditions are not using it. When this , the accumulated voltage difference must be seen when the... pattern is operated under normal conditions. Ex) The best way to protect your monitor from Image retention is to set your PC or System to lean. To prevent this occurs, the previous image may be slight difference in...

