
Quick Guide (easy Manual) (ver.1.0) (English)
Page 3
... or plugs to do so may cause an electric shock or fire. Failure to do so may cause an electric shock or fire. Put your monitor in a location with low humidity and a minimum of dust. Installation Be sure to your set . z This may cause serious damage to contact an authorized... or low temperatures, high humidity, and chemical substances, or where it does not come loose. z This may cause an electric shock or fire inside the monitor. z Failure to an outlet. Do not use a damaged or loose plug. z This may cause fire. z A bad connection may cause fire. Do not pull the ...
... or plugs to do so may cause an electric shock or fire. Failure to do so may cause an electric shock or fire. Put your monitor in a location with low humidity and a minimum of dust. Installation Be sure to your set . z This may cause serious damage to contact an authorized... or low temperatures, high humidity, and chemical substances, or where it does not come loose. z This may cause an electric shock or fire inside the monitor. z Failure to an outlet. Do not use a damaged or loose plug. z This may cause fire. z A bad connection may cause fire. Do not pull the ...
Quick Guide (easy Manual) (ver.1.0) (English)
Page 4
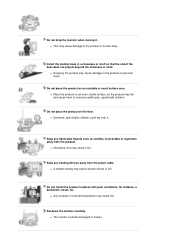
... or broken. z Otherwise, this may lead to the product or human body. z A melted coating may cause a fire. Set down the monitor carefully. z Dropping the product may fall and cause harm to the product or personal injury. Keep any flammable objects such as the product may cause... showcase or shelf. Keep any heating devices away from the product. z The monitor could trip over it . Install the monitor base in places with poor ventilation, for instance, a bookshelf, closet, etc. Do not drop the monitor when moving it . z Place the product on an even, stable surface, as...
... or broken. z Otherwise, this may lead to the product or human body. z A melted coating may cause a fire. Set down the monitor carefully. z Dropping the product may fall and cause harm to the product or personal injury. Keep any flammable objects such as the product may cause... showcase or shelf. Keep any heating devices away from the product. z The monitor could trip over it . Install the monitor base in places with poor ventilation, for instance, a bookshelf, closet, etc. Do not drop the monitor when moving it . z Place the product on an even, stable surface, as...
Quick Guide (easy Manual) (ver.1.0) (English)
Page 5
... a slightly moistened, soft fabric. Do not spray water or detergent directly on the monitor. Do not place the monitor face down. Clean When cleaning the monitor case or the surface of the product, resulting in the internal temperature of the TFT-LCD screen, wipe with a dry cloth. Use the recommended detergent with a smooth cloth...
... a slightly moistened, soft fabric. Do not spray water or detergent directly on the monitor. Do not place the monitor face down. Clean When cleaning the monitor case or the surface of the product, resulting in the internal temperature of the TFT-LCD screen, wipe with a dry cloth. Use the recommended detergent with a smooth cloth...

Quick Guide (easy Manual) (ver.1.0) (English)
Page 6
... unplug the power cord. Keep the product away from the power outlet and wipe the product using a soft, dry cloth. If the monitor is dropped or the casing is not used for interior cleaning once a year. Disconnect the plug from it - Contact the Service Center ...or service. Others Do not remove cover (or back). z This may cause an electric shock or fire. z Especially avoid operating the monitor near water or outdoors where the monitor could be exposed to qualified service personnel. z Failure to do not install inside a vehicle. z Refer servicing to snow or rain. ...
... unplug the power cord. Keep the product away from the power outlet and wipe the product using a soft, dry cloth. If the monitor is dropped or the casing is not used for interior cleaning once a year. Disconnect the plug from it - Contact the Service Center ...or service. Others Do not remove cover (or back). z This may cause an electric shock or fire. z Especially avoid operating the monitor near water or outdoors where the monitor could be exposed to qualified service personnel. z Failure to do not install inside a vehicle. z Refer servicing to snow or rain. ...

Quick Guide (easy Manual) (ver.1.0) (English)
Page 7
... port or AV ports. Do not insert metal objects such as chopsticks, wire and gimlet or inflammable objects such as paper and match into the monitor openings. z Bad ventilation may cause malfunction, an electric shock or fire. z This may cause a breakdown or fire. Keep the product away from ...the wall outlet and contact Service Center. z Change the mode to energy save or set a screensaver to move the monitor right or left by pulling only the wire or the signal cable. z This may cause a fire or an electric shock. z It may cause a ...
... port or AV ports. Do not insert metal objects such as chopsticks, wire and gimlet or inflammable objects such as paper and match into the monitor openings. z Bad ventilation may cause malfunction, an electric shock or fire. z This may cause a breakdown or fire. Keep the product away from ...the wall outlet and contact Service Center. z Change the mode to energy save or set a screensaver to move the monitor right or left by pulling only the wire or the signal cable. z This may cause a fire or an electric shock. z It may cause a ...

Quick Guide (easy Manual) (ver.1.0) (English)
Page 8
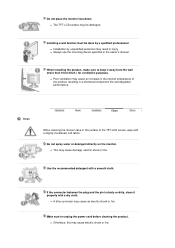
.... z Failure to do so may cause fire. z Failure to do so may cause fire. z Do not use . Watching the monitor continuously at least a five-minute break after every hour of using the monitor. To ease eye strain, take at a too close angle may result in eyesight damage. Keep all power adapters apart...
.... z Failure to do so may cause fire. z Failure to do so may cause fire. z Do not use . Watching the monitor continuously at least a five-minute break after every hour of using the monitor. To ease eye strain, take at a too close angle may result in eyesight damage. Keep all power adapters apart...

Quick Guide (easy Manual) (ver.1.0) (English)
Page 9
When moving the monitor. Make sure that may cause damage to fire or an electric shock. The product could damage it by hanging onto it and lead to the ... an extended time period, keep the product unplugged z Otherwise, this may try to climb on the product to other devices, are disconnected before moving the monitor, turn off and unplug the power cord. Do not place children's favorite objects (or anything else that all cables, including the antenna cable and cables...
When moving the monitor. Make sure that may cause damage to fire or an electric shock. The product could damage it by hanging onto it and lead to the ... an extended time period, keep the product unplugged z Otherwise, this may try to climb on the product to other devices, are disconnected before moving the monitor, turn off and unplug the power cord. Do not place children's favorite objects (or anything else that all cables, including the antenna cable and cables...
Quick Guide (easy Manual) (ver.1.0) (English)
Page 10
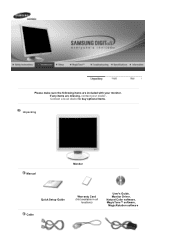
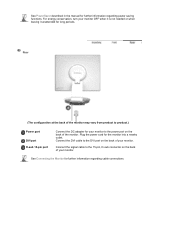
Please make sure the following items are missing, contact your monitor. Contact a local dealer to buy optional items. Unpacking Manual Monitor Quick Setup Guide Cable Warranty Card (Not available in all locations) User's Guide, Monitor Driver, Natural Color software, MagicTune™ software, MagicRotation software If any items are included with your dealer.
Please make sure the following items are missing, contact your monitor. Contact a local dealer to buy optional items. Unpacking Manual Monitor Quick Setup Guide Cable Warranty Card (Not available in all locations) User's Guide, Monitor Driver, Natural Color software, MagicTune™ software, MagicRotation software If any items are included with your dealer.

Quick Guide (easy Manual) (ver.1.0) (English)
Page 11
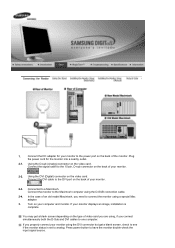
...analog source.) Auto adjustment : Press the power button and listen for two beeps, then release to switch the input source to turn the monitor on and off . Bracket D-Sub Cable Power Cord DC-Adapter Bracket Sold separately VESA Mounting Bracket DVI Cable Front Power indicator Power button ...This light glows blue during normal operation, and blinks blue once as the monitor saves your adjustments. Use this button for one beep, to analog or digital. Power On/Off : Press the power button and listen...
...analog source.) Auto adjustment : Press the power button and listen for two beeps, then release to switch the input source to turn the monitor on and off . Bracket D-Sub Cable Power Cord DC-Adapter Bracket Sold separately VESA Mounting Bracket DVI Cable Front Power indicator Power button ...This light glows blue during normal operation, and blinks blue once as the monitor saves your adjustments. Use this button for one beep, to analog or digital. Power On/Off : Press the power button and listen...
Quick Guide (easy Manual) (ver.1.0) (English)
Page 12
...periods. Connect the DVI cable to the DVI port on the back of the monitor. For energy conservation, turn your monitor. Connect the signal cable to the 15-pin, D-sub connector on the back of your monitor to product.) Power port DVI port D-sub 15-pin port Connect the DC adapter... for your monitor. See Connecting the Monitor for further information regarding power saving functions. See PowerSaver described in the manual for ...
...periods. Connect the DVI cable to the DVI port on the back of the monitor. For energy conservation, turn your monitor. Connect the signal cable to the 15-pin, D-sub connector on the back of your monitor to product.) Power port DVI port D-sub 15-pin port Connect the DC adapter... for your monitor. See Connecting the Monitor for further information regarding power saving functions. See PowerSaver described in the manual for ...
Quick Guide (easy Manual) (ver.1.0) (English)
Page 13
.... Connected to the Macintosh computer using a special Mac adapter. 3. Plug the power cord for your monitor displays an image, installation is set to connect the monitor using the D-SUB connection cable. 2-4. Connect the monitor to a Macintosh. If you connect simultaneously both the D-Sub and DVI cables to the power port... on the type of an old model Macintosh, you need to analog. You may get a blank screen, check to see if the monitor status is complete. In the case of video card you are using the DVI connector but get a blank screen depending on the back of...
.... Connected to the Macintosh computer using a special Mac adapter. 3. Plug the power cord for your monitor displays an image, installation is set to connect the monitor using the D-SUB connection cable. 2-4. Connect the monitor to a Macintosh. If you connect simultaneously both the D-Sub and DVI cables to the power port... on the type of an old model Macintosh, you need to analog. You may get a blank screen, check to see if the monitor status is complete. In the case of video card you are using the DVI connector but get a blank screen depending on the back of...

Quick Guide (easy Manual) (ver.1.0) (English)
Page 14
... more than 45 degrees and then pivot it tightly in place with four screws. Pivot Stand (When pivoting the monitor, rotation angle is connected faces down. Failure to do so may reach to the floor. Turn it so that the side to the bottom...which the cable is displayed on screen of the monitor.) 0° 90° 180° Caution : When pivoting the monitor, the corner of the monitor may damage the monitor. VESA Stand VESA Mounting Bracket Fold the monitor stand. Align the holes of the stand. Attaching a Base This monitor accepts a 75mm x 75mm VESA-compliant mounting ...
... more than 45 degrees and then pivot it tightly in place with four screws. Pivot Stand (When pivoting the monitor, rotation angle is connected faces down. Failure to do so may reach to the floor. Turn it so that the side to the bottom...which the cable is displayed on screen of the monitor.) 0° 90° 180° Caution : When pivoting the monitor, the corner of the monitor may damage the monitor. VESA Stand VESA Mounting Bracket Fold the monitor stand. Align the holes of the stand. Attaching a Base This monitor accepts a 75mm x 75mm VESA-compliant mounting ...
Quick Guide (easy Manual) (ver.1.0) (English)
Page 15
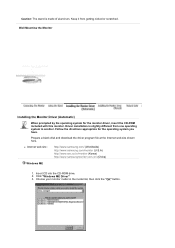
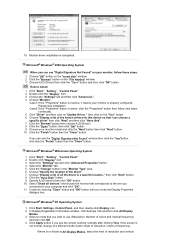
... from getting nicked or scratched. z Internet web site : http://www.samsung.com/ (Worldwide) http://www.samsung.com/monitor (U.S.A) http://www.sec.co.kr/monitor (Korea) http://www.samsungmonitor.com.cn/ (China) Windows ME 1. Insert CD into the CD-ROM drive. 2. Follow the directions appropriate for the monitor driver, insert the CD-ROM included with this...
... from getting nicked or scratched. z Internet web site : http://www.samsung.com/ (Worldwide) http://www.samsung.com/monitor (U.S.A) http://www.sec.co.kr/monitor (Korea) http://www.samsungmonitor.com.cn/ (China) Windows ME 1. Insert CD into the CD-ROM drive. 2. Follow the directions appropriate for the monitor driver, insert the CD-ROM included with this...
Quick Guide (easy Manual) (ver.1.0) (English)
Page 16
... CD into the CD-ROM drive. 2. If you have. This monitor driver is completed. Monitor driver installation is under certified MS logo,and this monitor. 4. Choose your system.The certified driver will be posted on Samsung Monitor homepage. Follow the directions appropriate for the monitor driver, insert the CD-ROM included with this installation doesn't damage...
... CD into the CD-ROM drive. 2. If you have. This monitor driver is completed. Monitor driver installation is under certified MS logo,and this monitor. 4. Choose your system.The certified driver will be posted on Samsung Monitor homepage. Follow the directions appropriate for the monitor driver, insert the CD-ROM included with this installation doesn't damage...
Quick Guide (easy Manual) (ver.1.0) (English)
Page 17
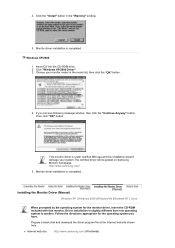
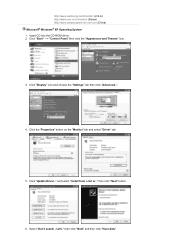
... Panel" then click the "Appearance and Themes" icon. 3. then click "Next" button. 6. then click "Next" and then click "Have disk". http://www.samsung.com/monitor (U.S.A) http://www.sec.co.kr/monitor (Korea) http://www.samsungmonitor.com.cn/ (China) Microsoft® Windows® XP Operating System 1. Click "Display" icon and choose the "Settings" tab...
... Panel" then click the "Appearance and Themes" icon. 3. then click "Next" button. 6. then click "Next" and then click "Have disk". http://www.samsung.com/monitor (U.S.A) http://www.sec.co.kr/monitor (Korea) http://www.samsungmonitor.com.cn/ (China) Microsoft® Windows® XP Operating System 1. Click "Display" icon and choose the "Settings" tab...

Quick Guide (easy Manual) (ver.1.0) (English)
Page 18
7. Then click "OK" button. Click the "Browse" button then choose A:(D:\Driver) and choose your system.The certified driver will be posted on Samsung Monitor homepage. This monitor driver is under certified MS logo,and this installation doesn't damage your monitor model in the model list and click the "Next" button. 8. If you can see following message window, then click the "Continue Anyway" button. http://www.samsung.com/ 9. Click the "Close" button then click "OK" button continually.
7. Then click "OK" button. Click the "Browse" button then choose A:(D:\Driver) and choose your system.The certified driver will be posted on Samsung Monitor homepage. This monitor driver is under certified MS logo,and this installation doesn't damage your monitor model in the model list and click the "Next" button. 8. If you can see following message window, then click the "Continue Anyway" button. http://www.samsung.com/ 9. Click the "Close" button then click "OK" button continually.
Quick Guide (easy Manual) (ver.1.0) (English)
Page 19
... "Have Disk" button 9. Click the "Browse" button on the "Insert disk" window. 2. then click on the "Next" button. 6. Choose your monitor is completed. And click the "Finish" button then the "Close" button. Continue choosing "Close" button and "OK" button until you can see the ...you close the Display Properties dialogue box. If the screen is not normal, change to use (Resolution, Number of all devices" and choose the monitor that corresponds to the one you can choose a specific driver" then click "Next" and then click "Have disk". 7. Double click the "Display...
... "Have Disk" button 9. Click the "Browse" button on the "Insert disk" window. 2. then click on the "Next" button. 6. Choose your monitor is completed. And click the "Finish" button then the "Close" button. Continue choosing "Close" button and "OK" button until you can see the ...you close the Display Properties dialogue box. If the screen is not normal, change to use (Resolution, Number of all devices" and choose the monitor that corresponds to the one you can choose a specific driver" then click "Next" and then click "Have disk". 7. Double click the "Display...
Quick Guide (easy Manual) (ver.1.0) (English)
Page 20
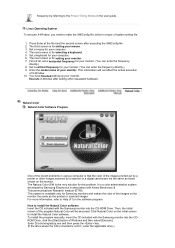
...a horizontal frequency for your computer. 4. The third screen is the very solution for Samsung monitors and makes the color of Windows and then select [Execute]. You have finished setting up your monitor. (You can enter the frequency directly.) 8. Execute X-Window after executing the X86Config ...the initial screen to install the Natural Color software Insert the CD included with the Samsung monitor into the CD-ROM Drive. Set a vertical frequency for setting your monitor. How to install the Natural Color software. This information will not affect the actual...
...a horizontal frequency for your computer. 4. The third screen is the very solution for Samsung monitors and makes the color of Windows and then select [Execute]. You have finished setting up your monitor. (You can enter the frequency directly.) 8. Execute X-Window after executing the X86Config ...the initial screen to install the Natural Color software Insert the CD included with the Samsung monitor into the CD-ROM Drive. Set a vertical frequency for setting your monitor. How to install the Natural Color software. This information will not affect the actual...

Quick Guide (easy Manual) (ver.1.0) (English)
Page 25
... MagicTune™ website. Limitation 1. are not displaying movie files properly in Windows™ 2000 or later. Installation Problems (MagicRotation) The installation of computer system or monitor. System Requirements OS z Windows™ 98 SE z Windows™ Me z Windows™ 2000 z Windows™ XP Home Edition z Windows™ XP Professional It is recommended...
... MagicTune™ website. Limitation 1. are not displaying movie files properly in Windows™ 2000 or later. Installation Problems (MagicRotation) The installation of computer system or monitor. System Requirements OS z Windows™ 98 SE z Windows™ Me z Windows™ 2000 z Windows™ XP Home Edition z Windows™ XP Professional It is recommended...
Quick Guide (easy Manual) (ver.1.0) (English)
Page 27
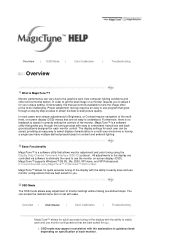
... easy to select display characteristics in a multi-user environme or having a single user have multiple defined presets based on specification of the monitor. MagicTune™ supports Windows™ 98 SE, Me, 2000, XP Home, and XP Professional. Overview | OSD Modes | Color Calibration...for quick accurate tuning of the display with easy to obtain the best overall picture quality. MagicTune™ allows for each monitor control. Monitor performance can be challenging. Furthermore, there is recommended using the Display Data Channel Command Interface (DDC/CI) protocol. All ...
... easy to select display characteristics in a multi-user environme or having a single user have multiple defined presets based on specification of the monitor. MagicTune™ supports Windows™ 98 SE, Me, 2000, XP Home, and XP Professional. Overview | OSD Modes | Color Calibration...for quick accurate tuning of the display with easy to obtain the best overall picture quality. MagicTune™ allows for each monitor control. Monitor performance can be challenging. Furthermore, there is recommended using the Display Data Channel Command Interface (DDC/CI) protocol. All ...


