

User Manual (ENGLISH)
Page 3
... an electric shock or fire. Installation Do not use the power cord when the connector or plug is dusty, clean it does not come loose. Do not excessively bend the plug and wire nor place heavy objects upon them, which could cause damage. Use only a properly grounded plug and receptacle. Do not connect too many extension cords or plugs to an outlet. z This...
... an electric shock or fire. Installation Do not use the power cord when the connector or plug is dusty, clean it does not come loose. Do not excessively bend the plug and wire nor place heavy objects upon them, which could cause damage. Use only a properly grounded plug and receptacle. Do not connect too many extension cords or plugs to an outlet. z This...

User Manual (ENGLISH)
Page 7
... signal cable. Do not cover the vents on the monitor. Do not place water containers, chemical products or small metal objects on the monitor cabinet. Keep the product away from the outlet during storms or lightening or if it is damaged, turn the monitor off and unplug the power cord....the monitor by pulling only the wire or the signal cable. If the monitor is dropped or the casing is not used for a long period of time. Then contact the Service Center . z Bad ventilation may cause an electric shock, fire or injury. Never insert anything metallic into the monitor openings....
... signal cable. Do not cover the vents on the monitor. Do not place water containers, chemical products or small metal objects on the monitor cabinet. Keep the product away from the outlet during storms or lightening or if it is damaged, turn the monitor off and unplug the power cord....the monitor by pulling only the wire or the signal cable. If the monitor is dropped or the casing is not used for a long period of time. Then contact the Service Center . z Bad ventilation may cause an electric shock, fire or injury. Never insert anything metallic into the monitor openings....
User Manual (ENGLISH)
Page 8
... picture when you view a fixed screen for the model. If an alien substances or water flows into the vent, headphone port or AV ports or etc. Adjust the resolution and frequency to vibrations may cause damage to vibrations. z Dropping the product may shorten the lifetime of children's reach, as paper and match into the product, turn off , unplug the power connector from the monitor...
... picture when you view a fixed screen for the model. If an alien substances or water flows into the vent, headphone port or AV ports or etc. Adjust the resolution and frequency to vibrations may cause damage to vibrations. z Dropping the product may shorten the lifetime of children's reach, as paper and match into the product, turn off , unplug the power connector from the monitor...
User Manual (ENGLISH)
Page 10
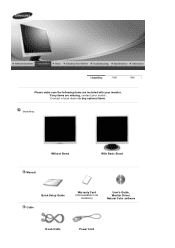
Please make sure the following items are missing, contact your monitor. If any items are included with your dealer. Contact a local dealer to buy optional items. Unpacking Without Stand Manual With Basic Stand Quick Setup Guide Cable Warranty Card (Not available in all locations) User's Guide, Monitor Driver, Natural Color software D-sub Cable Power Cord
Please make sure the following items are missing, contact your monitor. If any items are included with your dealer. Contact a local dealer to buy optional items. Unpacking Without Stand Manual With Basic Stand Quick Setup Guide Cable Warranty Card (Not available in all locations) User's Guide, Monitor Driver, Natural Color software D-sub Cable Power Cord
User Manual (ENGLISH)
Page 11
... : Medium brightness For working with a mixture of the image you are available: Custom, Text, Internet, and Entertain. Use this button to see an animation clip When OSD is the case, adjust the brightness and contrast by our engineers, the pre-configured values may not be comfortable to the previous menu. Power button [ ] 7. Use this button for auto adjustment. This light glows green during normal operation, and blinks green If this...
... : Medium brightness For working with a mixture of the image you are available: Custom, Text, Internet, and Entertain. Use this button to see an animation clip When OSD is the case, adjust the brightness and contrast by our engineers, the pre-configured values may not be comfortable to the previous menu. Power button [ ] 7. Use this button for auto adjustment. This light glows green during normal operation, and blinks green If this...

User Manual (ENGLISH)
Page 12
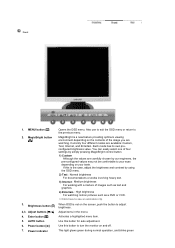
... used to physically fix the system when using it in the manual for further information regarding power saving functions. Power port 2. D-sub 15-pin port 3. Kensington Lock Connect the power cord for long periods. See Connecting the Monitor for further information regarding cable connections. See PowerSaver described in a public place. (The locking device has to be purchased separately.) For using a locking device, contact where you purchase it unattended for your adjustments...
... used to physically fix the system when using it in the manual for further information regarding power saving functions. Power port 2. D-sub 15-pin port 3. Kensington Lock Connect the power cord for long periods. See Connecting the Monitor for further information regarding cable connections. See PowerSaver described in a public place. (The locking device has to be purchased separately.) For using a locking device, contact where you purchase it unattended for your adjustments...

User Manual (ENGLISH)
Page 14
... another. Follow the directions appropriate for the monitor driver, insert the CD-ROM included with this monitor. Monitor B. Monitor and Bottom Attaching a Base This monitor accepts a 100 mm x 100 mm VESA-compliant Mounting interface pad . Driver installation is slightly different from the LCD monitor. 4. Remove four screws and then remove the stand from one operating system to protect the screen. 3. Installing the Monitor Driver (Automatic) When prompted by the operating system...
... another. Follow the directions appropriate for the monitor driver, insert the CD-ROM included with this monitor. Monitor B. Monitor and Bottom Attaching a Base This monitor accepts a 100 mm x 100 mm VESA-compliant Mounting interface pad . Driver installation is slightly different from the LCD monitor. 4. Remove four screws and then remove the stand from one operating system to protect the screen. 3. Installing the Monitor Driver (Automatic) When prompted by the operating system...
User Manual (ENGLISH)
Page 15
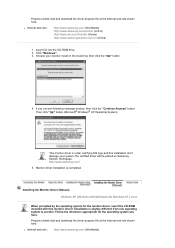
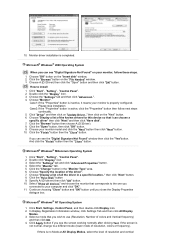
... MS logo,and this monitor. Installing the Monitor Driver (Manual) Windows XP | Windows 2000 |Windows Me |Windows NT | Linux When prompted by the operating system for the operating system you can see following message window, then click the "Continue Anyway" button. Choose your system.The certified driver will be posted on Samsung Monitor Homepage http://www.samsung.com/. 5. Driver installation is completed. Click "Windows". 3. Monitor driver installation is slightly different from...
... MS logo,and this monitor. Installing the Monitor Driver (Manual) Windows XP | Windows 2000 |Windows Me |Windows NT | Linux When prompted by the operating system for the operating system you can see following message window, then click the "Continue Anyway" button. Choose your system.The certified driver will be posted on Samsung Monitor Homepage http://www.samsung.com/. 5. Driver installation is completed. Click "Windows". 3. Monitor driver installation is slightly different from...
User Manual (ENGLISH)
Page 16
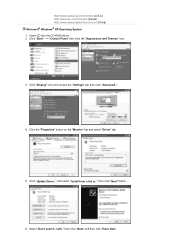
... "Start" -> "Control Panel" then click the "Appearance and Themes" icon. 3. then click "Next" button. 6. Click "Display" icon and choose the "Settings" tab then click "Advanced..". 4. Insert CD into the CD-ROM driver. 2. Click "Update Driver.." Click the "Properties" button on the "Monitor" tab and select "Driver" tab. 5. then click "Next" and then click "Have disk". Select "Don't search ,I will.." http://www.samsung.com/monitor...
... "Start" -> "Control Panel" then click the "Appearance and Themes" icon. 3. then click "Next" button. 6. Click "Display" icon and choose the "Settings" tab then click "Advanced..". 4. Insert CD into the CD-ROM driver. 2. Click "Update Driver.." Click the "Properties" button on the "Monitor" tab and select "Driver" tab. 5. then click "Next" and then click "Have disk". Select "Don't search ,I will.." http://www.samsung.com/monitor...
User Manual (ENGLISH)
Page 18
... to use (Resolution, Number of the known drivers for this device so that I can see "Digital Signature Not Found" on your computer and click "OK". 11. Click "Start" , "Setting" , "Control Panel". 2. Double click the "Display" Icon. 3. Specify A:\(D:\driver) then click "OK" button. 10. If the screen is no Mode at All Display Modes, select the level of the driver". 7. 10. Click the "Open" button, then click "OK" button. 9. Click "Start" , "Setting" , "Control Panel". 2. In Display...
... to use (Resolution, Number of the known drivers for this device so that I can see "Digital Signature Not Found" on your computer and click "OK". 11. Click "Start" , "Setting" , "Control Panel". 2. Double click the "Display" Icon. 3. Specify A:\(D:\driver) then click "OK" button. 10. If the screen is no Mode at All Display Modes, select the level of the driver". 7. 10. Click the "Open" button, then click "OK" button. 9. Click "Start" , "Setting" , "Control Panel". 2. In Display...
User Manual (ENGLISH)
Page 19
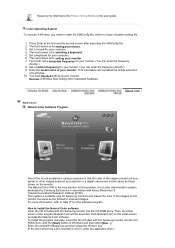
... the Preset Timing Modes in the user guide. Linux Operating System To execute X-Window, you need to install the Natural Color software Insert the CD included with the Samsung monitor into the CDROM Drive, click the [Start] button of system setting file. 1. The third screen is for this problem. You have finished setting up your monitor. To install the program manually, insert the CD included with the Samsung monitor into the...
... the Preset Timing Modes in the user guide. Linux Operating System To execute X-Window, you need to install the Natural Color software Insert the CD included with the Samsung monitor into the CDROM Drive, click the [Start] button of system setting file. 1. The third screen is for this problem. You have finished setting up your monitor. To install the program manually, insert the CD included with the Samsung monitor into the...

User Manual (ENGLISH)
Page 25
...Control menu. MENU MENU Removes noise such as vertical stripes. MENU MENU Changes the horizontal position of the colors with intermediate luminance. z Mode 1 z Mode 2 z Mode 3 MENU MENU Image Menu Coarse Fine Sharpness H-Position Description Removes noise such as horizontal stripes. If the noise persists even after adjusting the frequency (clock speed). Cool, Normal, Warm and Custom. MENU MENU Gamma correction changes the luminance of the monitor's entire display. MENU MENU Play/Stop MENU MENU Adjusts individual R,G,B color balance. You may move the screen image...
...Control menu. MENU MENU Removes noise such as vertical stripes. MENU MENU Changes the horizontal position of the colors with intermediate luminance. z Mode 1 z Mode 2 z Mode 3 MENU MENU Image Menu Coarse Fine Sharpness H-Position Description Removes noise such as horizontal stripes. If the noise persists even after adjusting the frequency (clock speed). Cool, Normal, Warm and Custom. MENU MENU Gamma correction changes the luminance of the monitor's entire display. MENU MENU Play/Stop MENU MENU Adjusts individual R,G,B color balance. You may move the screen image...
User Manual (ENGLISH)
Page 29
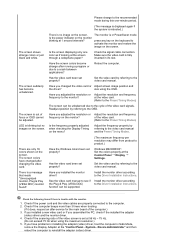
... then change the frequency of the video card. (Refer to see this section to see if you see "Check Signal Cable" Check the signal cable connection. Can you can be seen. I cannot turn on the screen? You can see the initial screen (the login screen), which can remedy any problems yourself. on the monitor. If the power is displayed. Check List Solutions Is the power cord connected properly? Check the power cord connection and supply. Symptom No images on...
... then change the frequency of the video card. (Refer to see this section to see if you see "Check Signal Cable" Check the signal cable connection. Can you can be seen. I cannot turn on the screen? You can see the initial screen (the login screen), which can remedy any problems yourself. on the monitor. If the power is displayed. Check List Solutions Is the power cord connected properly? Check the power cord connection and supply. Symptom No images on...
User Manual (ENGLISH)
Page 30
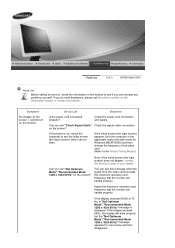
..."Unrecognized monitor, Plug & Play (VESA DDC) monitor found". size using the maximum resolution.) 5. at the Control Panel → Display → Settings. Is the frequency properly adjusted when checking the Display Timing on the screen. The screen colors have problems in installing the adapter (video) driver, boot the computer in Safe Mode, remove the Display Adapter at 1 second intervals? Check if the power cord and the video cables are only 16 colors shown on the screen. If you adjusted the resolution or Adjust the resolution and frequency frequency to...
..."Unrecognized monitor, Plug & Play (VESA DDC) monitor found". size using the maximum resolution.) 5. at the Control Panel → Display → Settings. Is the frequency properly adjusted when checking the Display Timing on the screen. The screen colors have problems in installing the adapter (video) driver, boot the computer in Safe Mode, remove the Display Adapter at 1 second intervals? Check if the power cord and the video cables are only 16 colors shown on the screen. If you adjusted the resolution or Adjust the resolution and frequency frequency to...
User Manual (ENGLISH)
Page 31
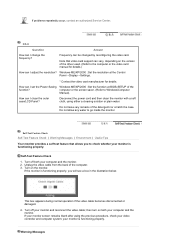
... Messages Disconnect the power cord and then clean the monitor with a soft cloth, using the previous procedure, check your monitor and reconnect the video cable; This box appears during normal operation if the video cable becomes disconnected or damaged. 4. Turn off both your computer and the monitor. 2. How can I set the Power Saving Windows ME/XP/2000 : Set the function at the Control Panel→Display→Settings. * Contact the video card manufacturer for...
... Messages Disconnect the power cord and then clean the monitor with a soft cloth, using the previous procedure, check your monitor and reconnect the video cable; This box appears during normal operation if the video cable becomes disconnected or damaged. 4. Turn off both your computer and the monitor. 2. How can I set the Power Saving Windows ME/XP/2000 : Set the function at the Control Panel→Display→Settings. * Contact the video card manufacturer for...
User Manual (ENGLISH)
Page 32
... to another room. 2. Therefore, if there is trouble with the input signal, a message appears on the screen or the screen goes blank although the power indicator LED is still on the screen or if the screen goes white, this means the monitor is in working condition If there is no image on the screen or a "Not Optimum Mode","Recommended Mode 1280 x 1024 60 Hz" message comes up, disconnect...
... to another room. 2. Therefore, if there is trouble with the input signal, a message appears on the screen or the screen goes blank although the power indicator LED is still on the screen or if the screen goes white, this means the monitor is in working condition If there is no image on the screen or a "Not Optimum Mode","Recommended Mode 1280 x 1024 60 Hz" message comes up, disconnect...
User Manual (ENGLISH)
Page 34
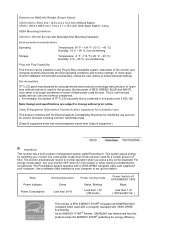
... W Power saving mode Green, Blinking Less than 1 W (Off-mode) Power Switch off EPA/ENERGY 2000 Black Less than Class A equipment.) PowerSaver This monitor has a built-in your monitor into a low-power mode when it has not been used for energy efficiency. For energy conservation, turn your computer to set up this product are subject to change without uneasiness. Interaction of black pixels could be seen. But the pixels of RED, GREEN, BLUE and WHITE color...
... W Power saving mode Green, Blinking Less than 1 W (Off-mode) Power Switch off EPA/ENERGY 2000 Black Less than Class A equipment.) PowerSaver This monitor has a built-in your monitor into a low-power mode when it has not been used for energy efficiency. For energy conservation, turn your computer to set up this product are subject to change without uneasiness. Interaction of black pixels could be seen. But the pixels of RED, GREEN, BLUE and WHITE color...

User Manual (ENGLISH)
Page 38
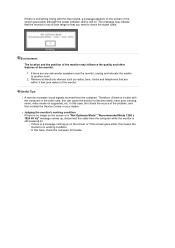
...'. Adjust computer resolution and screen injection rate (refresh rate) oncomputer as that used for the majority of the screen from bad quality and you can be bright sometimes or some of picture. But the pixels of RED, GREEN, BLUE and WHITE color seem to enjoy the best quality of black pixels could be seen. The frequency of the Horizontal Cycle is called Vertical Frequency or Refresh Rate. This monitor follows the international standard VESA DDC for the user...
...'. Adjust computer resolution and screen injection rate (refresh rate) oncomputer as that used for the majority of the screen from bad quality and you can be bright sometimes or some of picture. But the pixels of RED, GREEN, BLUE and WHITE color seem to enjoy the best quality of black pixels could be seen. The frequency of the Horizontal Cycle is called Vertical Frequency or Refresh Rate. This monitor follows the international standard VESA DDC for the user...
User Manual (ENGLISH)
Page 39
... set a screensaver to moving picture when you view a fixed screen for an extended period of time, residual image or blurriness may appear. VESA, DPMS and DDC are registered trademarks of Video Electronics Standard Association; Reproduction in any manner whatsoever without notice. © 2006 Samsung Electronics Co., Ltd. If you need to change without the written permission of Samsung Electronics Co., Ltd.; Microsoft, Windows...
... set a screensaver to moving picture when you view a fixed screen for an extended period of time, residual image or blurriness may appear. VESA, DPMS and DDC are registered trademarks of Video Electronics Standard Association; Reproduction in any manner whatsoever without notice. © 2006 Samsung Electronics Co., Ltd. If you need to change without the written permission of Samsung Electronics Co., Ltd.; Microsoft, Windows...

User Manual (ENGLISH)
Page 40
.... However, if the same image is not covered by the warranty. Turn the power off when using a stationary pattern. - z Set the Monitor to image retention. During normal operation of a LCD panel, pixel image retention doesn't occur. All display products, including LCD,are subject to power off for 1 hour followed by image retention. Turn the power off with Logo or Moving image cycle. Avoid using Grey colors, which encase the liquid crystal...
.... However, if the same image is not covered by the warranty. Turn the power off when using a stationary pattern. - z Set the Monitor to image retention. During normal operation of a LCD panel, pixel image retention doesn't occur. All display products, including LCD,are subject to power off for 1 hour followed by image retention. Turn the power off with Logo or Moving image cycle. Avoid using Grey colors, which encase the liquid crystal...


