User Manual
Page 11
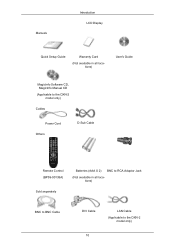
Manuals Introduction LCD Display Quick Setup Guide Warranty Card (Not available in all locations) User's Guide MagicInfo Software CD, MagicInfo Manual CD (Applicable to the DXN-2 model only) Cables Power Cord Others D-Sub Cable Remote Control (BP59-00138A) Sold separately Batteries (AAA X 2) BNC to RCA Adaptor Jack (Not available in all locations) BNC to BNC Cable DVI Cable 10 LAN Cable (Applicable to the DXN-2 model only)
Manuals Introduction LCD Display Quick Setup Guide Warranty Card (Not available in all locations) User's Guide MagicInfo Software CD, MagicInfo Manual CD (Applicable to the DXN-2 model only) Cables Power Cord Others D-Sub Cable Remote Control (BP59-00138A) Sold separately Batteries (AAA X 2) BNC to RCA Adaptor Jack (Not available in all locations) BNC to BNC Cable DVI Cable 10 LAN Cable (Applicable to the DXN-2 model only)

User Manual
Page 13
...Shows PowerSaver mode by blinking green Note See PowerSaver described in the manual for long periods. Remote Control Sensor Aim the remote control towards this button for turning the LCD Display on the LCD Display. Brightness Sensor (Optional) Automatically detects the surrounding brightness it accordingly.... needed or when leaving it unattended for further information regarding power saving functions. The LCD Display 's configuration at the back may vary slightly depending on the LCD Display model. 12 Introduction Rear Push the PIP button to Connecting Cables under Setup. Note...
...Shows PowerSaver mode by blinking green Note See PowerSaver described in the manual for long periods. Remote Control Sensor Aim the remote control towards this button for turning the LCD Display on the LCD Display. Brightness Sensor (Optional) Automatically detects the surrounding brightness it accordingly.... needed or when leaving it unattended for further information regarding power saving functions. The LCD Display 's configuration at the back may vary slightly depending on the LCD Display model. 12 Introduction Rear Push the PIP button to Connecting Cables under Setup. Note...

User Manual
Page 18
... screen. Opens the on the remote control while watching TV. Up-Down Left-Right buttons 10. This function does not work for this LCD Display. MUTE 16. MTSYou can be operated depending on the broadcasting type by using the DUAL button on -screen menu and exits from one ...Pauses (mutes) the audio output temporarily. FM Stereo Audio Type Mono Stereo SAP MTS/S_Mode Mono Mono ↔ Stereo Mono ↔ SAP Default Manual Change Mono DUAL- VOL + is used to return to another horizontally, vertically or adjusts selected menu values. The audio comes back on the lower ...
... screen. Opens the on the remote control while watching TV. Up-Down Left-Right buttons 10. This function does not work for this LCD Display. MUTE 16. MTSYou can be operated depending on the broadcasting type by using the DUAL button on -screen menu and exits from one ...Pauses (mutes) the audio output temporarily. FM Stereo Audio Type Mono Stereo SAP MTS/S_Mode Mono Mono ↔ Stereo Mono ↔ SAP Default Manual Change Mono DUAL- VOL + is used to return to another horizontally, vertically or adjusts selected menu values. The audio comes back on the lower ...
User Manual
Page 32
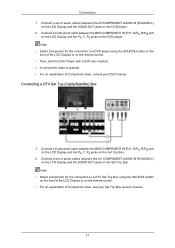
...to a DTV Set Top Box using the SOURCE button on the front of Component video, see your DVD manual. Connect a Component cable between the AV COMPONENT AUDIO IN [R-AUDIO-L] on the LCD Display and the AUDIO OUT jacks on the DVD player. Connect a set of audio cables between the BNC/... to a DVD player using the SOURCE button on the front of Component video, consult your Set Top Box owner's manual. 31 Connect a Component cable between the AV/COMPONENT AUDIO IN [R-AUDIO-L] on the LCD Display and the AUDIO OUT jacks on the remote control. • For an explanation of the...
...to a DTV Set Top Box using the SOURCE button on the front of Component video, see your DVD manual. Connect a Component cable between the AV COMPONENT AUDIO IN [R-AUDIO-L] on the LCD Display and the AUDIO OUT jacks on the DVD player. Connect a set of audio cables between the BNC/... to a DVD player using the SOURCE button on the front of Component video, consult your Set Top Box owner's manual. 31 Connect a Component cable between the AV/COMPONENT AUDIO IN [R-AUDIO-L] on the LCD Display and the AUDIO OUT jacks on the remote control. • For an explanation of the...
User Manual
Page 36
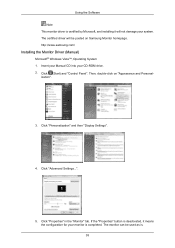
...certified driver will not damage your CD-ROM drive. 2. Then, double-click on Samsung Monitor homepage. Click "Properties" in the "Monitor" tab. Click (Start) and "Control Panel". Click "Advanced Settings...". 5. Using the Software Note This monitor driver is certified by...used as is. 35 Click "Personalization" and then "Display Settings". 4. ization". 3. Insert your Manual CD into your system. The monitor can be posted on "Appearance and Personal- http://www.samsung.com/ Installing the Monitor Driver (Manual) Microsoft® Windows Vista™, Operating System 1.
...certified driver will not damage your CD-ROM drive. 2. Then, double-click on Samsung Monitor homepage. Click "Properties" in the "Monitor" tab. Click (Start) and "Control Panel". Click "Advanced Settings...". 5. Using the Software Note This monitor driver is certified by...used as is. 35 Click "Personalization" and then "Display Settings". 4. ization". 3. Insert your Manual CD into your system. The monitor can be posted on "Appearance and Personal- http://www.samsung.com/ Installing the Monitor Driver (Manual) Microsoft® Windows Vista™, Operating System 1.

User Manual
Page 62
...Lamp Control - Maintenance Scroll 1. Allows you to display the Maintenance screen. The Manual Lamp Control automatically turns off if you adjust using the Manual Lamp Control. Click on MagicInfo model. Allows the Maintenance Control function for the displays whose power status is ON. The Input source of... adjust using the Auto Lamp Control. 3) Manual Lamp Control - The Input source of MagicInfo works only on the "Maintenance" icon in the Main Icon column to adjust the backlight of the selected display regardless of the selected display at a specified time. An "Info Grid...
...Lamp Control - Maintenance Scroll 1. Allows you to display the Maintenance screen. The Manual Lamp Control automatically turns off if you adjust using the Manual Lamp Control. Click on MagicInfo model. Allows the Maintenance Control function for the displays whose power status is ON. The Input source of... adjust using the Auto Lamp Control. 3) Manual Lamp Control - The Input source of MagicInfo works only on the "Maintenance" icon in the Main Icon column to adjust the backlight of the selected display regardless of the selected display at a specified time. An "Info Grid...

User Manual
Page 112
A: Check if the power is securely connected. A: Windows ME/2000: Set the resolution at the Control Panel → Display → Screen Saver. Do not leave any water enter the LCD Display. Note that some of the driver used. (Refer to play the video? Q & A Q: How can be changed... BIOS-SETUP of the computer. (Refer to the Windows / Computer Manual). Set the function in the Control Panel → Appearance and Themes → Display → Screen Saver. A: Disconnect the power cord and then clean the LCD Display with a soft cloth, using either a cleaning solution or plain water...
A: Check if the power is securely connected. A: Windows ME/2000: Set the resolution at the Control Panel → Display → Screen Saver. Do not leave any water enter the LCD Display. Note that some of the driver used. (Refer to play the video? Q & A Q: How can be changed... BIOS-SETUP of the computer. (Refer to the Windows / Computer Manual). Set the function in the Control Panel → Appearance and Themes → Display → Screen Saver. A: Disconnect the power cord and then clean the LCD Display with a soft cloth, using either a cleaning solution or plain water...

User Manual
Page 116
Use the software utility installed on . Display Mode IBM, 640 x 350 IBM, 640 x 480 IBM, 720 x 400 MAC, 640 x 480 MAC....363 56.476 60.023 67.500 47.776 60.000 Vertical Frequency (Hz) 70.086 59.940 70.087 66.667 74.551 75.062 72.809 75.000 56.250 60.317 ...your computer. Specifications operates with a VESA DPM compliant video card installed in your computer to the video card manual and adjusts the screen as follows. Power saving Power off (Power-switch) On Blinking Off 680 watts Less... same as a Network monitor) State Power Indicator Power Con- 700DXN-2 sumption Normal Opera-
Use the software utility installed on . Display Mode IBM, 640 x 350 IBM, 640 x 480 IBM, 720 x 400 MAC, 640 x 480 MAC....363 56.476 60.023 67.500 47.776 60.000 Vertical Frequency (Hz) 70.086 59.940 70.087 66.667 74.551 75.062 72.809 75.000 56.250 60.317 ...your computer. Specifications operates with a VESA DPM compliant video card installed in your computer to the video card manual and adjusts the screen as follows. Power saving Power off (Power-switch) On Blinking Off 680 watts Less... same as a Network monitor) State Power Indicator Power Con- 700DXN-2 sumption Normal Opera-

User Manual
Page 127
... herein or for incidental or consequential damages in this product - All rights reserved. Samsung is subject to human health or the environment. Environmental Protection Agency (EPA). Appendix Correct disposal of Samsung Electronics Co., Ltd.; For information on the battery, manual or packaging indicates that the battery contains mercury, cadmium or lead above the...
... herein or for incidental or consequential damages in this product - All rights reserved. Samsung is subject to human health or the environment. Environmental Protection Agency (EPA). Appendix Correct disposal of Samsung Electronics Co., Ltd.; For information on the battery, manual or packaging indicates that the battery contains mercury, cadmium or lead above the...

