
User Manual
Page 6
...input and output terminals, etc). • If water or foreign material enters the product, disconnect the power cord and contact a Service Center. • Otherwise, this may result in an explosion or fire. Do not lift or move the monitor by a table...using a fixed screen for a long time, an afterimage or stain may occur. • If you are not using headphones or earphones, do not sit too close to the product. 5 Do not use a moving screen saver. Safety Instructions Do not try to move the product back and forwards or right and left while only holding the power cord or signal cables...
...input and output terminals, etc). • If water or foreign material enters the product, disconnect the power cord and contact a Service Center. • Otherwise, this may result in an explosion or fire. Do not lift or move the monitor by a table...using a fixed screen for a long time, an afterimage or stain may occur. • If you are not using headphones or earphones, do not sit too close to the product. 5 Do not use a moving screen saver. Safety Instructions Do not try to move the product back and forwards or right and left while only holding the power cord or signal cables...
User Manual
Page 11
Manuals Introduction LCD Display Quick Setup Guide Warranty Card (Not available in all locations) User's Guide MagicInfo Software CD, MagicInfo Manual CD (Applicable to the DXN-2 model only) Cables Power Cord Others D-Sub Cable Remote Control (BP59-00138A) Sold separately Batteries (AAA X 2) BNC to RCA Adaptor Jack (Not available in all locations) BNC to BNC Cable DVI Cable 10 LAN Cable (Applicable to the DXN-2 model only)
Manuals Introduction LCD Display Quick Setup Guide Warranty Card (Not available in all locations) User's Guide MagicInfo Software CD, MagicInfo Manual CD (Applicable to the DXN-2 model only) Cables Power Cord Others D-Sub Cable Remote Control (BP59-00138A) Sold separately Batteries (AAA X 2) BNC to RCA Adaptor Jack (Not available in all locations) BNC to BNC Cable DVI Cable 10 LAN Cable (Applicable to the DXN-2 model only)

User Manual
Page 12
... menu values. Sold separately Introduction Wall Mount KIT Your LCD Display Front RGB to BNC Cable MENU button [MENU] Opens the on the screen, press the button to adjust volume. Selects the input source that an external device is not on -screen menu and exits from PC mode to another horizontally or adjusts selected menu values. Also use to exit the OSD menu or return to . [PC] → [DVI] → [AV] → [Component] → [HDMI...
... menu values. Sold separately Introduction Wall Mount KIT Your LCD Display Front RGB to BNC Cable MENU button [MENU] Opens the on the screen, press the button to adjust volume. Selects the input source that an external device is not on -screen menu and exits from PC mode to another horizontally or adjusts selected menu values. Also use to exit the OSD menu or return to . [PC] → [DVI] → [AV] → [Component] → [HDMI...

User Manual
Page 13
... / HDMI • DVI / AV : PC / BNC • Component : PC • HDMI : PC / BNC Power button [ ] Use this spot on and off. Note This function is not needed or when leaving it accordingly. Introduction Rear Push the PIP button to Connecting Cables under Setup. The LCD Display 's configuration at the back may vary slightly depending on the models equipped with an auto brightness sensor. For energy conservation, turn the PIP screen On...
... / HDMI • DVI / AV : PC / BNC • Component : PC • HDMI : PC / BNC Power button [ ] Use this spot on and off. Note This function is not needed or when leaving it accordingly. Introduction Rear Push the PIP button to Connecting Cables under Setup. The LCD Display 's configuration at the back may vary slightly depending on the models equipped with an auto brightness sensor. For energy conservation, turn the PIP screen On...
User Manual
Page 28
... your LCD Display to the LCD Display. Connect the power cord for your computer can be connected to the power port on the back of the LCD Display. Turn on the rear side of the monitor to BNC cable. For detailed information on connecting AV input devices, refer to the Video and [R-AUDIO-L] LCD Display. 27 Connect the Video and [R-AUDIO-L] port of the DVD, VCR or DTV Set-Top Box to the contents under Adjusting Your LCD Display. • The LCD Display 's configuration...
... your LCD Display to the LCD Display. Connect the power cord for your computer can be connected to the power port on the back of the LCD Display. Turn on the rear side of the monitor to BNC cable. For detailed information on connecting AV input devices, refer to the Video and [R-AUDIO-L] LCD Display. 27 Connect the Video and [R-AUDIO-L] port of the DVD, VCR or DTV Set-Top Box to the contents under Adjusting Your LCD Display. • The LCD Display 's configuration...
User Manual
Page 32
... Set Top Box using the SOURCE button on the front of the LCD Display or on the Set Top Box. Connect a set of audio cables between the AV COMPONENT AUDIO IN [R-AUDIO-L] on the LCD Display and the AUDIO OUT jacks on the remote control. • Then, start the DVD Player with a DVD disc inserted. • A component cable is optional. • For an explanation of Component video, see your DVD manual. Connect a Component cable between the BNC/COMPONENT IN [R/Y, G/PB, B/PR] port on the LCD Display and...
... Set Top Box using the SOURCE button on the front of the LCD Display or on the Set Top Box. Connect a set of audio cables between the AV COMPONENT AUDIO IN [R-AUDIO-L] on the LCD Display and the AUDIO OUT jacks on the remote control. • Then, start the DVD Player with a DVD disc inserted. • A component cable is optional. • For an explanation of Component video, see your DVD manual. Connect a Component cable between the BNC/COMPONENT IN [R/Y, G/PB, B/PR] port on the LCD Display and...
User Manual
Page 35
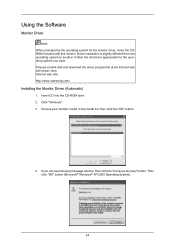
... Operating System). 34 Internet web site : http://www.samsung.com/ Installing the Monitor Driver (Automatic) 1. Insert CD into the CD-ROM drive. 2. Driver installation is slightly different from one operating system to another. Follow the directions appropriate for the monitor driver, insert the CDROM included with this monitor. Choose your monitor model in the model list, then click the "OK" button. 4. Using the Software Monitor Driver Note When prompted by the operating...
... Operating System). 34 Internet web site : http://www.samsung.com/ Installing the Monitor Driver (Automatic) 1. Insert CD into the CD-ROM drive. 2. Driver installation is slightly different from one operating system to another. Follow the directions appropriate for the monitor driver, insert the CDROM included with this monitor. Choose your monitor model in the model list, then click the "OK" button. 4. Using the Software Monitor Driver Note When prompted by the operating...
User Manual
Page 36
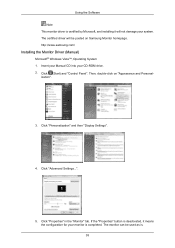
... "Display Settings". 4. Click "Advanced Settings...". 5. Click "Properties" in the "Monitor" tab. If the "Properties" button is completed. ization". 3. The monitor can be posted on "Appearance and Personal- Insert your Manual CD into your monitor is deactivated, it will be used as is certified by Microsoft, and installing it means the configuration for your CD-ROM drive. 2. http://www.samsung.com/ Installing the Monitor Driver (Manual...
... "Display Settings". 4. Click "Advanced Settings...". 5. Click "Properties" in the "Monitor" tab. If the "Properties" button is completed. ization". 3. The monitor can be posted on "Appearance and Personal- Insert your Manual CD into your monitor is deactivated, it will be used as is certified by Microsoft, and installing it means the configuration for your CD-ROM drive. 2. http://www.samsung.com/ Installing the Monitor Driver (Manual...
User Manual
Page 39
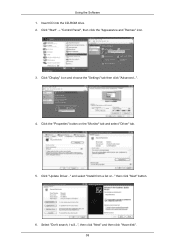
Click "Display" icon and choose the "Settings" tab then click "Advanced...". 4. and select "Install from a list or..." Using the Software 1. Select "Don't search, I will...", then click "Next" and then click "Have disk". 38 Insert CD into the CD-ROM drive. 2. Click "Update Driver..." Click "Start" → "Control Panel", then click the "Appearance and Themes" icon. 3. then click "Next" button. 6. Click the "Properties" button on the "Monitor" tab and select "Driver" tab. 5.
Click "Display" icon and choose the "Settings" tab then click "Advanced...". 4. and select "Install from a list or..." Using the Software 1. Select "Don't search, I will...", then click "Next" and then click "Have disk". 38 Insert CD into the CD-ROM drive. 2. Click "Update Driver..." Click "Start" → "Control Panel", then click the "Appearance and Themes" icon. 3. then click "Next" button. 6. Click the "Properties" button on the "Monitor" tab and select "Driver" tab. 5.
User Manual
Page 41
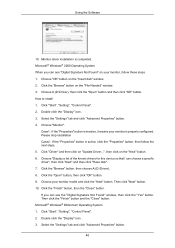
... means your monitor model and click the "Next" button. Click the "Browse" button, then choose A:(D:\Driver). 8. Click "Start", "Setting", "Control Panel". 2. Double click the "Display" icon. 3. Choose "Display a list of the known drivers for this device so that I can see the "Digital Signature Not Found" window, then click the "Yes" button. Choose your monitor is completed. How to install 1. Using the Software 10. If you can choose a specific driver", then...
... means your monitor model and click the "Next" button. Click the "Browse" button, then choose A:(D:\Driver). 8. Click "Start", "Setting", "Control Panel". 2. Double click the "Display" icon. 3. Choose "Display a list of the known drivers for this device so that I can see the "Digital Signature Not Found" window, then click the "Yes" button. Choose your monitor is completed. How to install 1. Using the Software 10. If you can choose a specific driver", then...
User Manual
Page 42
... of system setting file. 1. Click "Apply" button if you need to a different mode (lower mode of your computer and click "OK". 11. The next screen is no Mode at the first and the second screen after clicking "Test". nected to the one you close the Display Properties dialogue box. Click the "Change" button in a specific location...", then click "Next" button. 8. Select a mode that corresponds to your monitor. Using the Software 4.
... of system setting file. 1. Click "Apply" button if you need to a different mode (lower mode of your computer and click "OK". 11. The next screen is no Mode at the first and the second screen after clicking "Test". nected to the one you close the Display Properties dialogue box. Click the "Change" button in a specific location...", then click "Next" button. 8. Select a mode that corresponds to your monitor. Using the Software 4.

User Manual
Page 43
... "Start" menu and then double-click "Add/Delete a program". Select "Setting/Control Panel" on specification of the license agreement" to start the program. When the Installation Shield Wizard window appears, click "Next". 4. When the installation is not displayed, proceed with the installation using the "Add or Remove Programs" option of use. 5. Insert the installation CD into the CD-ROM drive. 2. The "Installation Status" window appears. 7. Installation Problems The installation of...
... "Start" menu and then double-click "Add/Delete a program". Select "Setting/Control Panel" on specification of the license agreement" to start the program. When the Installation Shield Wizard window appears, click "Next". 4. When the installation is not displayed, proceed with the installation using the "Add or Remove Programs" option of use. 5. Insert the installation CD into the CD-ROM drive. 2. The "Installation Status" window appears. 7. Installation Problems The installation of...

User Manual
Page 58
.... Adjusts the Brightness Sensor for the selected display. 9) Brightness Sensor - Click Settings of the selected function is displayed. - Adjusts the Color Temp for the selected display. 10) Dynamic Contrast - Color Temp is only enabled if the Color Tone is displayed. Adjusts the Color Tone for the displays whose power status is ON and if no selection is made, the factory default is displayed in this screen will automatically change the mode to Settings Control. Changing...
.... Adjusts the Brightness Sensor for the selected display. 9) Brightness Sensor - Click Settings of the selected function is displayed. - Adjusts the Color Temp for the selected display. 10) Dynamic Contrast - Color Temp is only enabled if the Color Tone is displayed. Adjusts the Color Tone for the displays whose power status is ON and if no selection is made, the factory default is displayed in this screen will automatically change the mode to Settings Control. Changing...

User Manual
Page 65
... to the Com1 port) - The dialogue box appears repeatedly. - Check to see if the display power is ON. (You can change the input source of TV works only on the Power Control Info Grid - Apply current time to control is showing. - Rerun the program and turn off the remote Function, disconnect the RS-232C cable, or exit the program in MagicInfo. Settings Value Display In Multiple Display Mode When there are...
... to the Com1 port) - The dialogue box appears repeatedly. - Check to see if the display power is ON. (You can change the input source of TV works only on the Power Control Info Grid - Apply current time to control is showing. - Rerun the program and turn off the remote Function, disconnect the RS-232C cable, or exit the program in MagicInfo. Settings Value Display In Multiple Display Mode When there are...

User Manual
Page 70
... accordance with the input signal. • The Picture menu changes depending on the external input mode. • When connecting a PC to the HDMI or DVI terminal, set Edit Name to an external source. • For PC and DVI, this is deactivated if the cable is disconnected. However, since 640x480, 720P (1280x720), and 1080p (1920x1080) are common signals for AV and PC, make your input source selection easier...
... accordance with the input signal. • The Picture menu changes depending on the external input mode. • When connecting a PC to the HDMI or DVI terminal, set Edit Name to an external source. • For PC and DVI, this is deactivated if the cable is disconnected. However, since 640x480, 720P (1280x720), and 1080p (1920x1080) are common signals for AV and PC, make your input source selection easier...
User Manual
Page 108
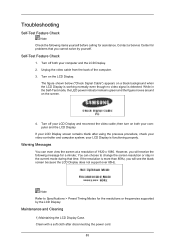
... by the LCD Display. your LCD Display and reconnect the video cable; Turn on the screen. 4. then turn on both your video controller and computer system; However, you will receive the following items yourself before calling for assistance. If the resolution is functioning properly. Contact a Service Center for problems that time. Note Refer to change the screen resolution or stay in the Self-Test mode, the LED power indicator remains green and the...
... by the LCD Display. your LCD Display and reconnect the video cable; Turn on the screen. 4. then turn on both your video controller and computer system; However, you will receive the following items yourself before calling for assistance. If the resolution is functioning properly. Contact a Service Center for problems that time. Note Refer to change the screen resolution or stay in the Self-Test mode, the LED power indicator remains green and the...

User Manual
Page 109
... using the maximum resolution.) 5. Check if the scanning ratio of the video screen is set to between 50 Hz ~ 85 Hz. (Do not exceed 60Hz when using these substances. Problems related to the Installation (PC Mode) Note Problems related to the computer. 2. Symptoms and Recommended Actions Note A LCD Display recreates visual signals received from the computer. Check if the power cord and the video cables are listed. If you installed a new video...
... using the maximum resolution.) 5. Check if the scanning ratio of the video screen is set to between 50 Hz ~ 85 Hz. (Do not exceed 60Hz when using these substances. Problems related to the Installation (PC Mode) Note Problems related to the computer. 2. Symptoms and Recommended Actions Note A LCD Display recreates visual signals received from the computer. Check if the power cord and the video cables are listed. If you installed a new video...
User Manual
Page 115
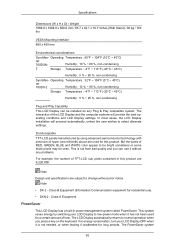
... user wishes to select alternate settings. Class B Equipment (Information Communication equipment for residential use it is not from bad quality and you press a key on any problems. For example, the number of time. For energy conservation, turn your LCD Display to normal operation when you can be seen. Specifications Dimensions (W x H x D) / Weight 1668.0 x 1094.0 x 500.0 mm / 65.7 x 43.1 x 19.7 inches (With Stand) / 83 kg / 183 lbs VESA Mounting...
... user wishes to select alternate settings. Class B Equipment (Information Communication equipment for residential use it is not from bad quality and you press a key on any problems. For example, the number of time. For energy conservation, turn your LCD Display to normal operation when you can be seen. Specifications Dimensions (W x H x D) / Weight 1668.0 x 1094.0 x 500.0 mm / 65.7 x 43.1 x 19.7 inches (With Stand) / 83 kg / 183 lbs VESA Mounting...
User Manual
Page 120
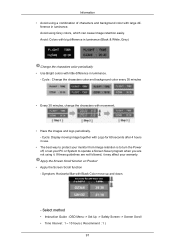
... difference in use. • The best way to protect your monitor from Image retention is to turn the Power off, or set your PC or System to operate a Screen Saver program when you are not followed, it . Cycle: Display moving image together with Logo for 60 seconds after 4 hours in luminance. - Select method • Instruction Guide : OSD Menu -> Set Up -> Safety Screen -> Screen Scroll • Time Interval...
... difference in use. • The best way to protect your monitor from Image retention is to turn the Power off, or set your PC or System to operate a Screen Saver program when you are not followed, it . Cycle: Display moving image together with Logo for 60 seconds after 4 hours in luminance. - Select method • Instruction Guide : OSD Menu -> Set Up -> Safety Screen -> Screen Scroll • Time Interval...
User Manual
Page 121
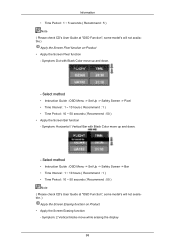
... Bar with Black Color move while erasing the display 98 Symptom: Dot with Black Color move up and down . - Symptom: 2 Vertical blocks move up and down . - Select method • Instruction Guide : OSD Menu -> Set Up -> Safety Screen -> Bar • Time Interval : 1 ~ 10 hours ( Recommend : 1 ) • Time Period : 10 ~ 50 seconds ( Recommend : 50 ) Note ( Please check CD's User Guide at "OSD Function", some model's will not...
... Bar with Black Color move while erasing the display 98 Symptom: Dot with Black Color move up and down . - Symptom: 2 Vertical blocks move up and down . - Select method • Instruction Guide : OSD Menu -> Set Up -> Safety Screen -> Bar • Time Interval : 1 ~ 10 hours ( Recommend : 1 ) • Time Period : 10 ~ 50 seconds ( Recommend : 50 ) Note ( Please check CD's User Guide at "OSD Function", some model's will not...


