Quick Guide (ENGLISH)
Page 3
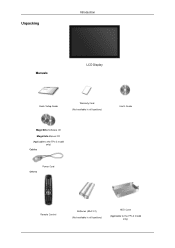
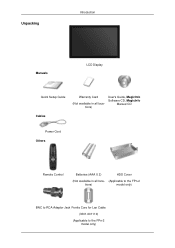
Unpacking Introduction Manuals LCD Display Quick Setup Guide Warranty Card (Not available in all locations) User's Guide MagicInfo Software CD MagicInfo Manual CD (Applicable to the FPn-2 model only) Cables Others Power Cord Remote Control Batteries (AAA X 2) (Not available in all locations) HDD Cover (Applicable to the FPn-2 model only)
Unpacking Introduction Manuals LCD Display Quick Setup Guide Warranty Card (Not available in all locations) User's Guide MagicInfo Software CD MagicInfo Manual CD (Applicable to the FPn-2 model only) Cables Others Power Cord Remote Control Batteries (AAA X 2) (Not available in all locations) HDD Cover (Applicable to the FPn-2 model only)

Quick Guide (ENGLISH)
Page 6
...the manual for further information regarding power saving functions. Remote Control Sensor Aim the remote control towards this button for turning the LCD Display on the LCD Display. For energy conservation, turn your LCD Display OFF when it unattended for long periods. POWER S/W ON [ ] / OFF [O] Switches the LCD Display On/Off. Introduction Rear Note • This ... button [ ] Use this spot on and off. Note For detailed information concerning cable connections, refer to Connecting Cables under Setup. The LCD Display 's configuration at the back may vary slightly depending on the...
...the manual for further information regarding power saving functions. Remote Control Sensor Aim the remote control towards this button for turning the LCD Display on the LCD Display. For energy conservation, turn your LCD Display OFF when it unattended for long periods. POWER S/W ON [ ] / OFF [O] Switches the LCD Display On/Off. Introduction Rear Note • This ... button [ ] Use this spot on and off. Note For detailed information concerning cable connections, refer to Connecting Cables under Setup. The LCD Display 's configuration at the back may vary slightly depending on the...

Quick Guide (ENGLISH)
Page 9
... has to be affected by a TV or other electronic device operating near the LCD Display , causing a malfunction due to interference with the Kensington Lock for further information regarding cable connections. Remote Control Note The performance of the Kensington Lock may differ from the illustration depending on... the Monitor and turn it in the locking direction . 2. Note The location of the remote control may be purchased separately. The locking device has to be different depending on its model. The appearance and locking method may...
... has to be affected by a TV or other electronic device operating near the LCD Display , causing a malfunction due to interference with the Kensington Lock for further information regarding cable connections. Remote Control Note The performance of the Kensington Lock may differ from the illustration depending on... the Monitor and turn it in the locking direction . 2. Note The location of the remote control may be purchased separately. The locking device has to be different depending on its model. The appearance and locking method may...
Quick Guide (ENGLISH)
Page 11
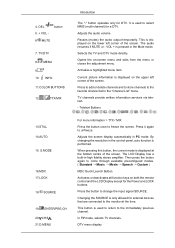
...current mode is only allowed for a DTV. It is pressed in the control panel, auto function is used to the immediately previous channel. Current picture information is displayed on both the remote control and the LCD Display except for DTV. MENU 9. 10. Press the button to the monitor at ...the bottom centre of the screen. In TV mode, selects TV channels. 4. TTX/MIX 13.STILL 14.AUTO 15. This is displayed on -screen ...
...current mode is only allowed for a DTV. It is pressed in the control panel, auto function is used to the immediately previous channel. Current picture information is displayed on both the remote control and the LCD Display except for DTV. MENU 9. 10. Press the button to the monitor at ...the bottom centre of the screen. In TV mode, selects TV channels. 4. TTX/MIX 13.STILL 14.AUTO 15. This is displayed on -screen ...
Quick Guide (ENGLISH)
Page 12
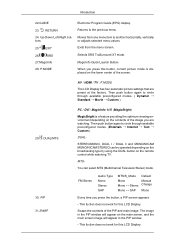
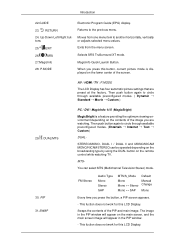
...image will appear in the PIP window. - The image in the PIP window will appear on the remote control while watching TV. AV / HDMI / TV : P.MODE The LCD Display has four automatic picture settings that are watching. Then push button again to another horizontally, vertically or... you are preset at the factory. This fuction does not work for this LCD Display. Returns to circle through available preconfigured modes. ( Dynamic StandardMovieCustom ) 29. This fuction does not work for this LCD Display. RETURN 24. Introduction 22.GUIDE 23. DUAL/MTS 30. Then push button...
...image will appear in the PIP window. - The image in the PIP window will appear on the remote control while watching TV. AV / HDMI / TV : P.MODE The LCD Display has four automatic picture settings that are watching. Then push button again to another horizontally, vertically or... you are preset at the factory. This fuction does not work for this LCD Display. Returns to circle through available preconfigured modes. ( Dynamic StandardMovieCustom ) 29. This fuction does not work for this LCD Display. RETURN 24. Introduction 22.GUIDE 23. DUAL/MTS 30. Then push button...

Quick Guide (ENGLISH)
Page 28
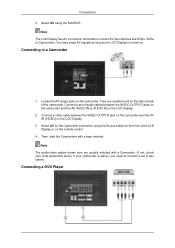
... on the camcorder and the AV IN [VIDEO] on the remote control. 4. Connecting to connect AV input devices like DVDs, VCRs or Camcorders. They are usually included with a tape inserted. Connecting a DVD Player Note The LCD Display has AV connection terminals to a Camcorder 1. Note The audio-... Select AV for the Camcorder connection using the SOURCE . You may enjoy AV signals as long as the LCD Display is stereo, you need to connect a set of the LCD Display or on the LCD Display . 3. Then, start the Camcorders with a Camcorder. (If not, check your local electronics store.) If...
... on the camcorder and the AV IN [VIDEO] on the remote control. 4. Connecting to connect AV input devices like DVDs, VCRs or Camcorders. They are usually included with a tape inserted. Connecting a DVD Player Note The LCD Display has AV connection terminals to a Camcorder 1. Note The audio-... Select AV for the Camcorder connection using the SOURCE . You may enjoy AV signals as long as the LCD Display is stereo, you need to connect a set of the LCD Display or on the LCD Display . 3. Then, start the Camcorders with a Camcorder. (If not, check your local electronics store.) If...

Quick Guide (ENGLISH)
Page 29
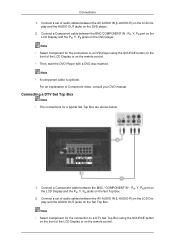
...on the front of Component video, consult your DVD manual. PR, Y, PB port on the LCD Display and the PR, Y, PB jacks on the LCD Dis- Note • A component cable is optional. Connect a set of the LCD Display or on the remote control. • Then, start the DVD Player with a DVD disc inserted. Connect a ... IN [L-AUDIO-R] on the DVD player. Note • Select Component for a typical Set Top Box are shown below. 1. For an explanation of the LCD Display or on the remote control. Connections 1. PR, Y, PB port on the LCD Display and the PR, Y, PB jacks on the Set Top Box. 2.
...on the front of Component video, consult your DVD manual. PR, Y, PB port on the LCD Display and the PR, Y, PB jacks on the LCD Dis- Note • A component cable is optional. Connect a set of the LCD Display or on the remote control. • Then, start the DVD Player with a DVD disc inserted. Connect a ... IN [L-AUDIO-R] on the DVD player. Note • Select Component for a typical Set Top Box are shown below. 1. For an explanation of the LCD Display or on the remote control. Connections 1. PR, Y, PB port on the LCD Display and the PR, Y, PB jacks on the Set Top Box. 2.
Quick Guide (ENGLISH)
Page 36
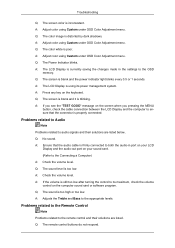
...Adjustment menu. Q: The Power Indicator blinks. Problems related to the Remote Control Note Problems related to the Connecting a Computer) A: Check the volume level. A: Adjust color using Custom under OSD Color Adjustment menu. A: The LCD Display is too high or too low. A: If you pressing the..., check the cable connection between the LCD Display and the computer to ensure that the audio cable is properly connected. Q: The sound is currently saving the changes made in port on your sound card. (Refer to the remote control and their solutions are listed. ...
...Adjustment menu. Q: The Power Indicator blinks. Problems related to the Remote Control Note Problems related to the Connecting a Computer) A: Check the volume level. A: Adjust color using Custom under OSD Color Adjustment menu. A: The LCD Display is too high or too low. A: If you pressing the..., check the cable connection between the LCD Display and the computer to ensure that the audio cable is properly connected. Q: The sound is currently saving the changes made in port on your sound card. (Refer to the remote control and their solutions are listed. ...

User Manual (ENGLISH)
Page 7
... specified standardized batteries, and do not use a new battery and a used battery at least five (5) minutes after using the LCD Display for a long period of time, disconnect the power cord from the remote control. Do not place any heavy items or toys or confectionery, such as an unstable rack or uneven surface or...
... specified standardized batteries, and do not use a new battery and a used battery at least five (5) minutes after using the LCD Display for a long period of time, disconnect the power cord from the remote control. Do not place any heavy items or toys or confectionery, such as an unstable rack or uneven surface or...
User Manual (ENGLISH)
Page 10
Unpacking Introduction Manuals LCD Display Quick Setup Guide Warranty Card (Not available in all locations) User's Guide, MagicInfo Software CD, MagicInfo Manual CD Cables Power Cord Others Remote Control Batteries (AAA X 2) HDD Cover (Not available in all loca- (Applicable to the FPn-2 tions) model only) BNC to RCA Adaptor Jack Ferrite Core for Lan Cable (3301-001110) (Applicable to the FPn-2 model only)
Unpacking Introduction Manuals LCD Display Quick Setup Guide Warranty Card (Not available in all locations) User's Guide, MagicInfo Software CD, MagicInfo Manual CD Cables Power Cord Others Remote Control Batteries (AAA X 2) HDD Cover (Not available in all loca- (Applicable to the FPn-2 tions) model only) BNC to RCA Adaptor Jack Ferrite Core for Lan Cable (3301-001110) (Applicable to the FPn-2 model only)
User Manual (ENGLISH)
Page 13
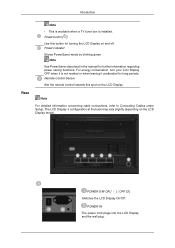
... when a TV tuner box is not needed or when leaving it is installed. POWER IN The power cord plugs into the LCD Display and the wall plug. Remote Control Sensor Aim the remote control towards this button for further information regarding power saving functions. Note For detailed information concerning cable connections, refer to Connecting...
... when a TV tuner box is not needed or when leaving it is installed. POWER IN The power cord plugs into the LCD Display and the wall plug. Remote Control Sensor Aim the remote control towards this button for further information regarding power saving functions. Note For detailed information concerning cable connections, refer to Connecting...
User Manual (ENGLISH)
Page 16
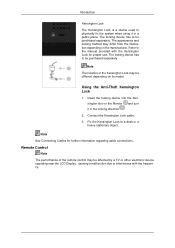
... direction . 2. Refer to the manual provided with the frequency. Insert the locking device into the Kensington slot on the manufacturer. Remote Control Note The performance of the Kensington Lock may be different depending on its model. Connect the Kensington Lock cable. 3. Note... the Kensington Lock to a desk or a heavy stationary object. Note The location of the remote control may be affected by a TV or other electronic device operating near the LCD Display , causing a malfunction due to interference with the Kensington Lock for further information regarding cable connections...
... direction . 2. Refer to the manual provided with the frequency. Insert the locking device into the Kensington slot on the manufacturer. Remote Control Note The performance of the Kensington Lock may be different depending on its model. Connect the Kensington Lock cable. 3. Note... the Kensington Lock to a desk or a heavy stationary object. Note The location of the remote control may be affected by a TV or other electronic device operating near the LCD Display , causing a malfunction due to interference with the Kensington Lock for further information regarding cable connections...
User Manual (ENGLISH)
Page 18
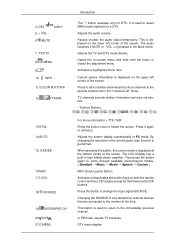
DEL 5. + VOL - TV/DTV 8. TTX/MIX Introduction The "-" button operates only for the Power and LOCK buttons. This is displayed on both the remote control and the LCD Display except for DTV. Current picture information is used to freeze the screen. S.MODE 16.MDC 17.LOCK 18. SOURCE 19. ENTER/PRE-CH ...In TV mode, selects TV channels. INFO 11.COLOR BUTTONS 12. VOL + is pressed in the control panel, auto function is used to return to change the input signal SOURCE. DTV menu display Opens the on the upper left corner of the screen. By changing the resolution in the Mute mode...
DEL 5. + VOL - TV/DTV 8. TTX/MIX Introduction The "-" button operates only for the Power and LOCK buttons. This is displayed on both the remote control and the LCD Display except for DTV. Current picture information is used to freeze the screen. S.MODE 16.MDC 17.LOCK 18. SOURCE 19. ENTER/PRE-CH ...In TV mode, selects TV channels. INFO 11.COLOR BUTTONS 12. VOL + is pressed in the control panel, auto function is used to return to change the input signal SOURCE. DTV menu display Opens the on the upper left corner of the screen. By changing the resolution in the Mute mode...
User Manual (ENGLISH)
Page 19
...HDMI / TV : P.MODE The LCD Display has four automatic picture settings that are watching. PIP 31.SWAP PC / DVI / MagicInfo: M/B (MagicBright) MagicBright is displayed on the remote control while watching TV. MTS- This fuction does not work for this LCD Display. Swaps the contents of the image... you are preset at the factory. P.MODE Electronic Program Guide (EPG) display. Exits from one menu item to...
...HDMI / TV : P.MODE The LCD Display has four automatic picture settings that are watching. PIP 31.SWAP PC / DVI / MagicInfo: M/B (MagicBright) MagicBright is displayed on the remote control while watching TV. MTS- This fuction does not work for this LCD Display. Swaps the contents of the image... you are preset at the factory. P.MODE Electronic Program Guide (EPG) display. Exits from one menu item to...
User Manual (ENGLISH)
Page 35
...signals as long as the LCD Display is stereo, you need to connect a set of audio cables between the VIDEO OUTPUT jack on the camcorder and the AV IN [VIDEO] on the side or back of two cables. Locate the AV output jacks on the remote control. 4. Connections 3.... They are usually included with a tape inserted. Connect a video cable between the AUDIO OUTPUT jacks on the camcorder and the AV AUDIO IN [L-AUDIO-R] on . Note The LCD Display has AV connection terminals to a Camcorder 1. Then,...
...signals as long as the LCD Display is stereo, you need to connect a set of audio cables between the VIDEO OUTPUT jack on the camcorder and the AV IN [VIDEO] on the side or back of two cables. Locate the AV output jacks on the remote control. 4. Connections 3.... They are usually included with a tape inserted. Connect a video cable between the AUDIO OUTPUT jacks on the camcorder and the AV AUDIO IN [L-AUDIO-R] on . Note The LCD Display has AV connection terminals to a Camcorder 1. Then,...
User Manual (ENGLISH)
Page 36
... the PR, Y, PB jacks on the DVD player. 2. Connect a set of the LCD Display or on the remote control. Note • Select Component for the connection to a DVD player using the SOURCE button on the Set Top Box. 2. Connect a set of audio cables...Set Top Box. Connect a Component cable between the BNC/COMPONENT IN - Connect a Component cable between the BNC / COMPONENT IN - For an explanation of the LCD Display or on the remote control. • Then, start the DVD Player with a DVD disc inserted. Connecting a DTV Set Top Box Note • The connections for the connection...
... the PR, Y, PB jacks on the DVD player. 2. Connect a set of the LCD Display or on the remote control. Note • Select Component for the connection to a DVD player using the SOURCE button on the Set Top Box. 2. Connect a set of audio cables...Set Top Box. Connect a Component cable between the BNC/COMPONENT IN - Connect a Component cable between the BNC / COMPONENT IN - For an explanation of the LCD Display or on the remote control. • Then, start the DVD Player with a DVD disc inserted. Connecting a DTV Set Top Box Note • The connections for the connection...
User Manual (ENGLISH)
Page 51
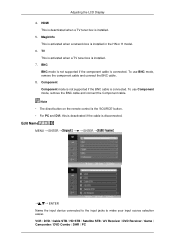
... installed in the HN or H model. 6. BNC BNC mode is not supported if the component cable is disconnected. Note • The direct button on the remote control is the 'SOURCE' button. • For PC and DVI, this is deactivated if the cable is connected. To use BNC mode, remove the component... cable. HDMI This is deactivated when a TV tuner box is connected. Component Component mode is not supported if the BNC cable is installed. 5. Adjusting the LCD Display 4.
... installed in the HN or H model. 6. BNC BNC mode is not supported if the component cable is disconnected. Note • The direct button on the remote control is the 'SOURCE' button. • For PC and DVI, this is deactivated if the cable is connected. To use BNC mode, remove the component... cable. HDMI This is deactivated when a TV tuner box is connected. Component Component mode is not supported if the BNC cable is installed. 5. Adjusting the LCD Display 4.

User Manual (ENGLISH)
Page 56
...is the 'AUTO' button. V-Position MENU ENTER ENTER ENTER ENTER Adjusts the screen location vertically. By changing the resolution in the control panel, the auto function is performed. (Available in PC mode only) Signal Balance MENU ENTER ENTER ENTER MENU ENTER ENTER (Available in PC... mode only) Note The direct button on the remote control is used to make up for the weak RGB signal transmitted by a long signal cable. Adjusting the LCD Display H-Position MENU ENTER ENTER ENTER ENTER Adjusts the screen location horizontally.
...is the 'AUTO' button. V-Position MENU ENTER ENTER ENTER ENTER Adjusts the screen location vertically. By changing the resolution in the control panel, the auto function is performed. (Available in PC mode only) Signal Balance MENU ENTER ENTER ENTER MENU ENTER ENTER (Available in PC... mode only) Note The direct button on the remote control is used to make up for the weak RGB signal transmitted by a long signal cable. Adjusting the LCD Display H-Position MENU ENTER ENTER ENTER ENTER Adjusts the screen location horizontally.

User Manual (ENGLISH)
Page 59
... button on -screen menus, the contrast and brightness can be changed to your personal preference. Mode MENU ENTER ENTER ENTER The LCD Display has four automatic picture settings ("Dynamic", "Standard", "Movie" and "Custom") that are preset at the factory. Dynamic, Standard, ...Movie, or Custom can be activated. 1. Custom By using the on the remote control is installed. Standard 3. Dynamic 2. Adjusting the LCD Display Picture [ AV / HDMI / TV / Component Mode] Available Modes • PC / BNC / DVI • AV &#...
... button on -screen menus, the contrast and brightness can be changed to your personal preference. Mode MENU ENTER ENTER ENTER The LCD Display has four automatic picture settings ("Dynamic", "Standard", "Movie" and "Custom") that are preset at the factory. Dynamic, Standard, ...Movie, or Custom can be activated. 1. Custom By using the on the remote control is installed. Standard 3. Dynamic 2. Adjusting the LCD Display Picture [ AV / HDMI / TV / Component Mode] Available Modes • PC / BNC / DVI • AV &#...

User Manual (ENGLISH)
Page 66
... menu is available when a network box is the 'SRS' button. Language MENU ENTER ENTER Off 2. On Note The direct button on the remote control is installed. Adjusting the LCD Display ENTER SRS TS XT is fully compatible with all multichannel formats. 1. It is a patented SRS technology that solves the problem of playing 5.1 multichannel...
... menu is available when a network box is the 'SRS' button. Language MENU ENTER ENTER Off 2. On Note The direct button on the remote control is installed. Adjusting the LCD Display ENTER SRS TS XT is fully compatible with all multichannel formats. 1. It is a patented SRS technology that solves the problem of playing 5.1 multichannel...

