User Manual (user Manual) (ver.1.0) (English)
Page 5
z Always use the mounting device specified in a shortened component life and degraded performance. z This may result in the internal temperature of the TFT-LCD screen, wipe with a slightly moistened, soft ... the wall (more than 10 cm / 4 inches) for ventilation purposes. The installation of children's reach. When installing the product, make sure to do so may damage the TFT-LCD surface....done by unqualified personnel may cause damage, electric shock or fire. Clean When cleaning the LCD Display case or the surface of the product, resulting in the owner's manual. z Poor ...
z Always use the mounting device specified in a shortened component life and degraded performance. z This may result in the internal temperature of the TFT-LCD screen, wipe with a slightly moistened, soft ... the wall (more than 10 cm / 4 inches) for ventilation purposes. The installation of children's reach. When installing the product, make sure to do so may damage the TFT-LCD surface....done by unqualified personnel may cause damage, electric shock or fire. Clean When cleaning the LCD Display case or the surface of the product, resulting in the owner's manual. z Poor ...

User Manual (user Manual) (ver.1.0) (English)
Page 12
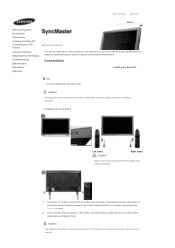
Remote Control Batteries (AAA X 2) (Not available in all locations) Cover-Hole BNC to RCA Adaptor Jack Semi Stand USB Holder & Screw (1EA) Sold separately Screw: 4 EA Wall Mount KIT Speaker Set BNC Cable LAN Cable Front DVI Cable Your LCD Display 1) MENU Opens the on-screen menu and exits from the menu or closes the adjustment menu.
Remote Control Batteries (AAA X 2) (Not available in all locations) Cover-Hole BNC to RCA Adaptor Jack Semi Stand USB Holder & Screw (1EA) Sold separately Screw: 4 EA Wall Mount KIT Speaker Set BNC Cable LAN Cable Front DVI Cable Your LCD Display 1) MENU Opens the on-screen menu and exits from the menu or closes the adjustment menu.

User Manual (user Manual) (ver.1.0) (English)
Page 23
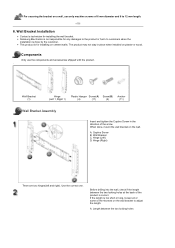
...for installing on cement walls. When done, mount the wall bracket on the wall. For securing the bracket on a wall, use the components and accessories shipped with the product. ` Wall Bracket (1) Hinge (Left 1, Right 1) Plastic Hanger Screw(A) Screw(B) Anchor (4) (11) (4) (11) Wall Bracket Assembly Insert and... holes at the back of the arrow. Wall Bracket C. Wall Bracket Installation z Contact a technician for any damages to the product or harm to 12 mm length. 6. z Samsung Electronics is not responsible for installing the wall bracket. The product may not stay in the...
...for installing on cement walls. When done, mount the wall bracket on the wall. For securing the bracket on a wall, use the components and accessories shipped with the product. ` Wall Bracket (1) Hinge (Left 1, Right 1) Plastic Hanger Screw(A) Screw(B) Anchor (4) (11) (4) (11) Wall Bracket Assembly Insert and... holes at the back of the arrow. Wall Bracket C. Wall Bracket Installation z Contact a technician for any damages to the product or harm to 12 mm length. 6. z Samsung Electronics is not responsible for installing the wall bracket. The product may not stay in the...

User Manual (user Manual) (ver.1.0) (English)
Page 24
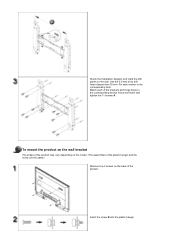
Fix each of the brackets and hinge holes to drill holes deeper than 35 mm. Insert the screw B into the plastic hanger. Use the 5.0 mm bit to the corresponding anchor holes and insert and tighten the 11 screws A. To mount the product on the wall bracket The shape of the product may vary depending on the model. (The assemblies of the plastic hanger and the screw are the same) Remove the 4 screws on the wall. Check the installation diagram and mark the drill points on the back of the product. Match each anchor in the corresponding hole.
Fix each of the brackets and hinge holes to drill holes deeper than 35 mm. Insert the screw B into the plastic hanger. Use the 5.0 mm bit to the corresponding anchor holes and insert and tighten the 11 screws A. To mount the product on the wall bracket The shape of the product may vary depending on the model. (The assemblies of the plastic hanger and the screw are the same) Remove the 4 screws on the wall. Check the installation diagram and mark the drill points on the back of the product. Match each anchor in the corresponding hole.
User Manual (user Manual) (ver.1.0) (English)
Page 25
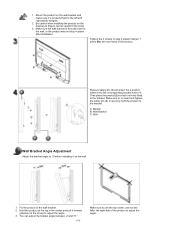
... not the leftor the right side of the arrow) to adjust the angle. 3. Mount the product on the wall bracket and make sure it on the bracket as fingers can adjust the bracket angle between -2°and 15 °. Wall Wall Bracket Angle Adjustment Adjust the bracket angle to the bracket. Remove safety pin... product to -2°before installing it is securely fixed to the left and right plastic hangers. 2. Fix the product to the bracket. Make sure the wall bracket is properly fixed to the wall, or the product may not stay in the center and pull it is firmly fixed to the...
... not the leftor the right side of the arrow) to adjust the angle. 3. Mount the product on the wall bracket and make sure it on the bracket as fingers can adjust the bracket angle between -2°and 15 °. Wall Wall Bracket Angle Adjustment Adjust the bracket angle to the bracket. Remove safety pin... product to -2°before installing it is securely fixed to the left and right plastic hangers. 2. Fix the product to the bracket. Make sure the wall bracket is properly fixed to the wall, or the product may not stay in the center and pull it is firmly fixed to the...
User Manual (user Manual) (ver.1.0) (English)
Page 30
.... A. Hinge (Right) There are two hinges(left and right). Captive Screw B. A. When done, mount the wall bracket on the wall bracket to customers when the installation is for installing the wall bracket. Wall Bracket Installation z Contact a technician for installing on cement walls. z Samsung Electronics is not responsible for any damages to the product or harm to adjust...
.... A. Hinge (Right) There are two hinges(left and right). Captive Screw B. A. When done, mount the wall bracket on the wall bracket to customers when the installation is for installing the wall bracket. Wall Bracket Installation z Contact a technician for installing on cement walls. z Samsung Electronics is not responsible for any damages to the product or harm to adjust...
User Manual (user Manual) (ver.1.0) (English)
Page 31
Match each anchor in the corresponding hole. Insert the screw B into the plastic hanger. Check the installation diagram and mark the drill points on the back of the brackets and hinge holes to drill holes deeper than 35 mm. Use the 5.0 mm bit to the corresponding anchor holes and insert and tighten the 11 screws A. Fix each of the product. To mount the product on the wall bracket The shape of the product may vary depending on the model. (The assemblies of the plastic hanger and the screw are the same) Remove the 4 screws on the wall.
Match each anchor in the corresponding hole. Insert the screw B into the plastic hanger. Check the installation diagram and mark the drill points on the back of the brackets and hinge holes to drill holes deeper than 35 mm. Use the 5.0 mm bit to the corresponding anchor holes and insert and tighten the 11 screws A. Fix each of the product. To mount the product on the wall bracket The shape of the product may vary depending on the model. (The assemblies of the plastic hanger and the screw are the same) Remove the 4 screws on the wall.

User Manual (user Manual) (ver.1.0) (English)
Page 32
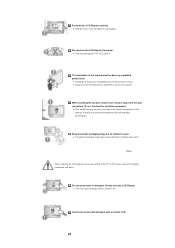
Mount the product on the wall bracket and make sure it is properly fixed to adjust the angle. 3. Then place the product(2) so that it is firmly fixed to the bracket. Hold the product at the top in the holes. 3. Be careful when installing the product on the wall. 1. Wall Wall ...sure to re-insert and tighten the safety pin (3) to securely hold the product to the rear holes of the product to the wall bracket. 2. 1. Make sure the wall bracket is securely fixed to the wall, or the product may not stay in step 2 (plastic hanger + screw B)to the bracket. Monitor...
Mount the product on the wall bracket and make sure it is properly fixed to adjust the angle. 3. Then place the product(2) so that it is firmly fixed to the bracket. Hold the product at the top in the holes. 3. Be careful when installing the product on the wall. 1. Wall Wall ...sure to re-insert and tighten the safety pin (3) to securely hold the product to the rear holes of the product to the wall bracket. 2. 1. Make sure the wall bracket is securely fixed to the wall, or the product may not stay in step 2 (plastic hanger + screw B)to the bracket. Monitor...
User Manual (user Manual) (ver.1.0) (English)
Page 33
... Model Safety Instructions Introduction Connections Installing the Stand KIT Connecting the LCD Display Using the Software Adjusting the LCD Display Troubleshooting Specifications Information Appendix The color and appearance of the product may differ for each product model. If you install a wall mount kit for your product, a Cover Hole is inserted. Caution Samsung Electronics will not be used.
... Model Safety Instructions Introduction Connections Installing the Stand KIT Connecting the LCD Display Using the Software Adjusting the LCD Display Troubleshooting Specifications Information Appendix The color and appearance of the product may differ for each product model. If you install a wall mount kit for your product, a Cover Hole is inserted. Caution Samsung Electronics will not be used.


